
Looking for that perfect chocolate cake that’s moist, rich, and foolproof? Stop scrolling through endless recipes. This Simple Chocolate Cake delivers bakery-quality results every single time.
I’ve tested dozens of chocolate cake recipes over the years. This one beats them all for flavor, texture, and pure chocolatey goodness without complicated steps.
Prep Time: 15 minutes
Baking Time: 30-35 minutes
Total Time: 50 minutes (plus cooling)
Servings: 12 slices
Why This Recipe Works
Here’s the deal with Easy Moist Chocolate Cake Recipe—simplicity wins. You don’t need fancy ingredients or professional techniques to make incredible cake.
This recipe uses hot coffee to intensify the chocolate flavor. Sounds weird, but it works like magic.
The texture comes out perfectly moist every single time. No dry, crumbly disasters here. Just tender, rich chocolate cake that melts in your mouth.
Ingredients You’ll Need
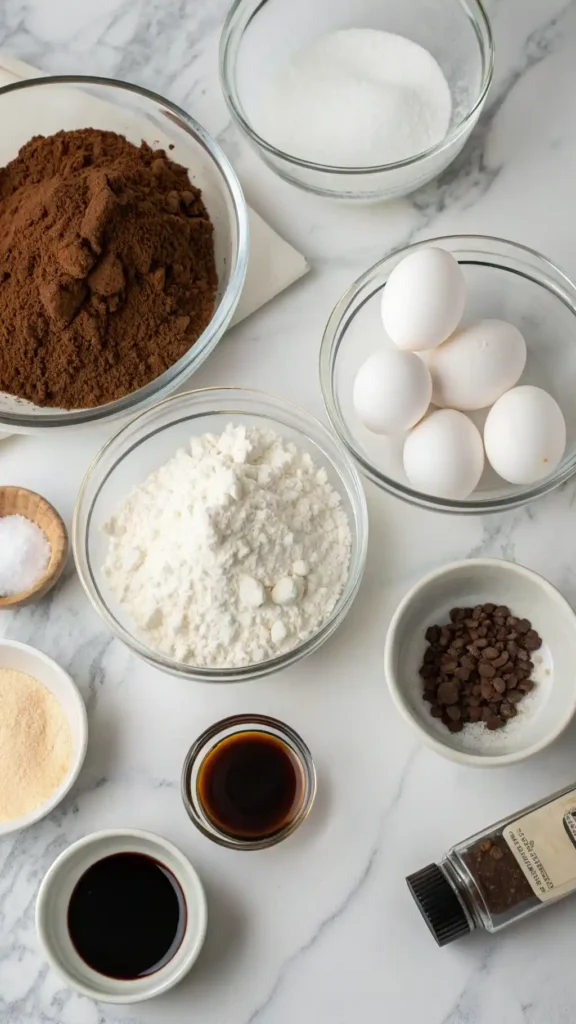
For the Cake
These Homemade Chocolate Cake Ingredients are pantry staples. Nothing exotic or hard to find here.
- 2 cups all-purpose flour
- 2 cups granulated sugar
- 3/4 cup unsweetened cocoa powder
- 2 teaspoons baking soda
- 1 teaspoon baking powder
- 1 teaspoon salt
- 2 large eggs
- 1 cup buttermilk
- 1 cup hot coffee (or hot water)
- 1/2 cup vegetable oil
- 2 teaspoons vanilla extract
For the Frosting
This Chocolate Cream Cake frosting is silky, rich, and pipeable. Perfect for decorating or just slathering on thick.
- 1 cup unsalted butter, softened
- 3 and 1/2 cups powdered sugar
- 3/4 cup unsweetened cocoa powder
- 1/2 cup heavy cream
- 2 teaspoons vanilla extract
- 1/4 teaspoon salt
Equipment Needed
You need standard baking equipment for this Basic Chocolate Cake Recipe. Nothing specialized required.
- Two 9-inch round cake pans
- Parchment paper
- Mixing bowls
- Electric mixer (hand or stand)
- Whisk
- Measuring cups and spoons
- Cooling racks
Making the Cake
Preparing Your Pans
Preheat your oven to 350°F (175°C). Get this going first—you want the oven ready.
Grease your cake pans thoroughly with butter or cooking spray. Don’t skip corners or edges.
Line the bottoms with parchment paper circles. This guarantees easy cake release every time.
Dust the greased pans lightly with cocoa powder instead of flour. Keeps your cake looking professional.
Mixing Dry Ingredients
Sift flour, sugar, cocoa powder, baking soda, baking powder, and salt into a large bowl. Sifting prevents lumps and aerates everything.
Whisk the dry ingredients together thoroughly. You want even distribution of leavening agents.
This step seems boring but it’s crucial. Uneven mixing means uneven rising and texture issues.
Make sure your cocoa powder isn’t clumpy. Old cocoa can get lumpy and ruin the batter smoothness.
Combining Wet Ingredients
Crack eggs into a separate bowl. Add buttermilk, hot coffee, oil, and vanilla extract.
Whisk everything together until fully combined. The mixture will look thin and a bit strange—that’s normal.
The hot coffee blooms the cocoa powder, intensifying chocolate flavor. This secret ingredient makes all the difference.
Don’t have buttermilk? Mix 1 cup milk with 1 tablespoon vinegar. Let it sit 5 minutes—instant buttermilk.
Bringing It Together
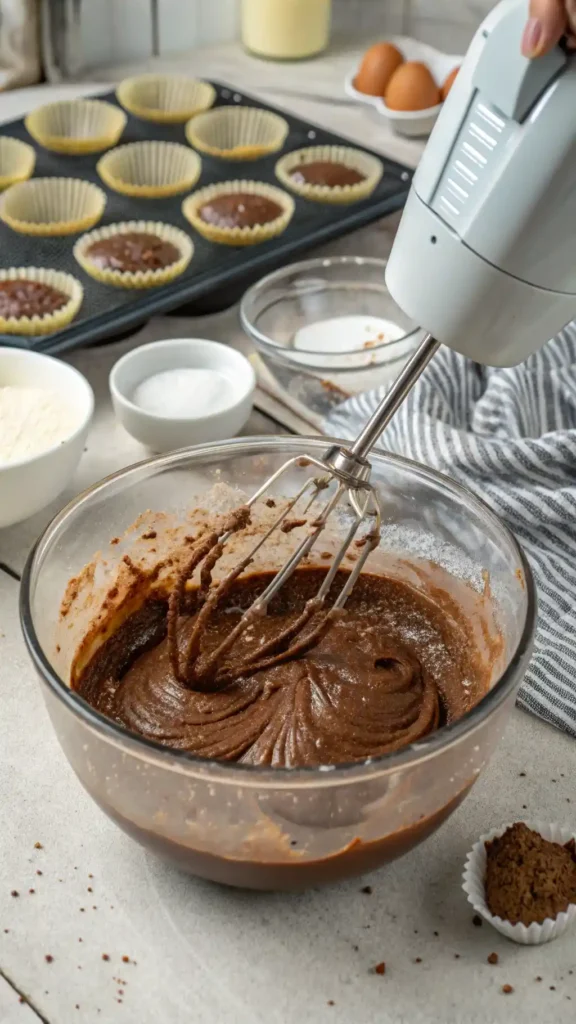
Pour wet ingredients into the dry mixture. Mix on low speed for about 30 seconds.
Scrape down the bowl sides with a spatula. Make sure you catch all the flour hiding at the bottom.
Increase speed to medium and beat for 2 minutes. The batter will be very thin—don’t panic.
This thin consistency creates that incredibly moist texture everyone loves. Thick batter equals dry cake.
Baking Process
Divide batter evenly between prepared pans. Use a kitchen scale if you want perfect layers.
Tap pans gently on the counter. This releases air bubbles that could create holes.
Bake for 30-35 minutes. Don’t open the oven door before 25 minutes—you’ll deflate the cakes.
Test with a toothpick inserted in the center. It should come out with just a few moist crumbs.
The cakes will pull slightly away from pan sides when done. The tops should spring back when lightly touched.
Cooling Properly
Let cakes cool in pans for 10 minutes. Removing them too early causes them to fall apart.
Run a knife around the edges to loosen. Invert onto cooling racks gently.
Peel off parchment paper while still warm. It removes more easily than when cold.
Cool completely before frosting. Warm cake melts frosting and creates a sliding, messy disaster.
This cooling process takes patience. I usually bake cakes the night before and frost the next day.
Making the Frosting
Preparing the Butter
Your butter must be properly softened. It should dent easily when pressed but not be greasy.
Beat butter alone for 2-3 minutes until light and fluffy. This creates a smooth frosting base.
Scrape down the bowl frequently. Unbeaten butter chunks ruin frosting texture.
Room temperature butter is key. Cold butter won’t cream properly, warm butter makes greasy frosting.
Adding Dry Ingredients
Sift powdered sugar and cocoa powder together. This prevents lumps in your frosting.
Add half the sugar-cocoa mixture to the butter. Mix on low speed until incorporated.
Add remaining sugar-cocoa mixture. Keep speed low to avoid a powdered sugar cloud in your kitchen.
Beat until the mixture looks crumbly and dry. Don’t worry—we’re fixing that next.
Creating Silky Texture
Add heavy cream, vanilla, and salt. Start mixing on low speed.
Increase to medium-high and beat for 3-4 minutes. The frosting transforms into smooth, fluffy perfection.
If it’s too thick, add cream one tablespoon at a time. Too thin? Add more powdered sugar.
Taste it. Adjust sweetness or chocolate intensity to your preference. This is your frosting.
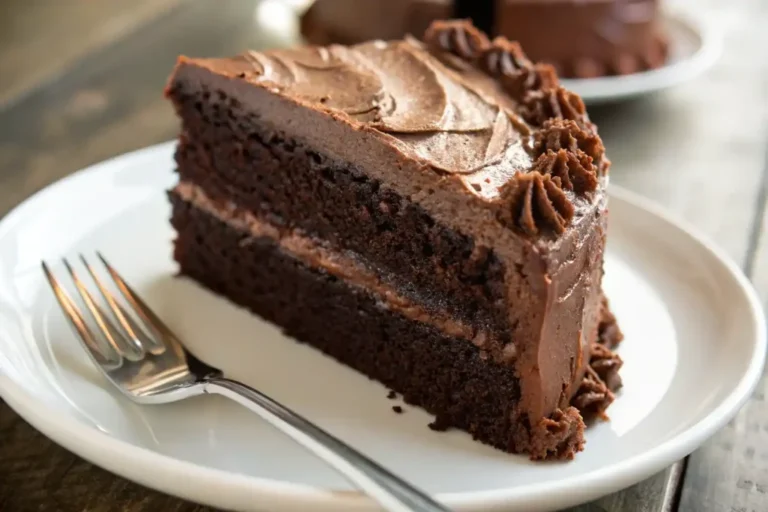
Assembling Your Cake
Leveling the Layers
Use a serrated knife to level any domed tops. Flat layers stack better and look professional.
Place the first layer on your serving plate. Put strips of parchment under the edges to catch drips.
This keeps your serving plate clean during frosting. Pull the strips out when finished.
Frosting Between Layers
Spread about 1 cup of frosting on the first layer. Use an offset spatula for even distribution.
Don’t go all the way to the edges. The weight of the top layer spreads it out.
Place the second layer on top, cut side down. Press gently to secure.
Check that it’s level. Adjust now before adding more frosting.
Crumb Coating
Apply a thin layer of frosting over the entire cake. This traps crumbs.
Don’t worry about it looking perfect. You’re creating a base for the final coat.
Refrigerate for 15-20 minutes. This sets the crumb coat and makes final frosting easier.
This step separates amateur cakes from professional-looking ones. Don’t skip it.
Final Frosting
Apply remaining frosting generously. Use long, smooth strokes with your spatula.
Work from top to bottom, smoothing as you go. Take your time here.
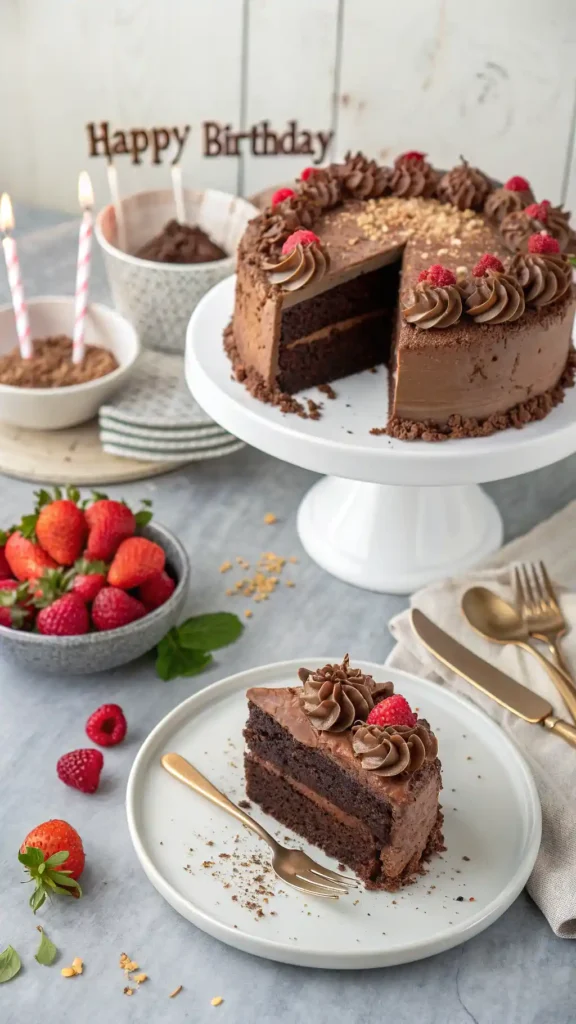
Create swirls, smooth surfaces, or textured designs. This Chocolate Cake Decoration is up to you.
For a Chocolate Cake Aesthetic look, try the naked cake style. Leave some cake visible through minimal frosting.
Decoration Ideas
Simple Elegance
Chocolate shavings on top create instant elegance. Use a vegetable peeler on a chocolate bar.
Fresh berries add color and cut through richness. Strawberries or raspberries work beautifully.
A dusting of powdered sugar or cocoa looks sophisticated. Use a small sieve for even coverage.
Birthday Cake Style
Make this a Chocolate Cake Birthday centerpiece with colorful sprinkles. Press them into the frosting sides.
Add candles in your favorite arrangement. Simple or elaborate—your choice.
Pipe “Happy Birthday” with contrasting frosting. Even messy piping looks charming on homemade cakes.
Advanced Techniques
Try ganache drips for that trendy bakery look. Heat cream, pour over chopped chocolate, and drizzle.
Pipe frosting rosettes or borders. A simple star tip creates impressive results.
Study Chocolate Truffle Cake Designs for inspiration. Recreate Unique Chocolate Cake Design elements you love.
Storage Tips
Room Temperature
Cover cake with a dome or wrap loosely. It stays moist at room temperature for 2-3 days.
Don’t refrigerate unless your kitchen is very warm. Cold temperatures dry out cake.
Bring refrigerated cake to room temperature before serving. The flavor and texture improve dramatically.
Freezer Storage
This freezes beautifully for up to 3 months. Wrap unfrosted layers individually in plastic wrap.
Freeze frosted cake uncovered first, then wrap. This prevents frosting damage.
Thaw in the refrigerator overnight. Remove wrapping to prevent condensation sogginess.
Variations Worth Trying
Chocolate Brownie Cake
Add 1 cup chocolate chips to the batter. Creates fudgy pockets throughout.
Reduce baking time by 5 minutes. You want it slightly underdone for brownie-like texture.
This version satisfies intense chocolate cravings. Dense, rich, and totally indulgent.
Coffee Chocolate Cake
Increase coffee to 1 and 1/2 cups. Reduces buttermilk to 1/2 cup.
The coffee flavor becomes more prominent. Coffee lovers go crazy for this version.
Top with espresso buttercream for double coffee intensity. IMO, this beats any coffee shop cake.
Lighter Version
Replace oil with unsweetened applesauce. Cuts calories while maintaining moisture.
Use low-fat buttermilk. Minimal flavor difference with reduced fat.
This How To Make Easy Chocolate Cake At Home lighter still tastes incredible. You won’t feel deprived.
Troubleshooting Common Issues
Cake Sinks in Middle
Oven temperature was too high. Use an oven thermometer to verify accuracy.
You opened the door too early. Wait at least 25 minutes before peeking.
Batter was overmixed. Mix just until ingredients combine, no longer.
Dry Texture
Cake was overbaked. Check a few minutes before the recommended time.
Measurements were off. Baking requires precision—use proper measuring techniques.
Not enough liquid ingredients. Double-check your measurements next time.
Frosting Won’t Spread
Butter was too cold. Let it soften properly before starting.
Not enough liquid. Add cream one tablespoon at a time until spreadable.
Beat it longer. Sometimes frosting just needs more mixing time.
Budget-Friendly Tips
This Simple Homemade Chocolate Cake costs about $8 to make. That’s less than $1 per slice.
Buy cocoa powder in bulk. It’s way cheaper per ounce than small containers.
Make your own buttermilk. Saves money and a trip to the store.
Skip fancy decorations for everyday cakes. Save those for special occasions.
Making It Special
For Celebrations
This How To Make A Homemade Chocolate Cake works perfectly for any Chocolate Cake Ideas celebration. Birthdays, anniversaries, or just Tuesday.
Add food coloring to white frosting for themed parties. Rainbow layers inside surprise everyone.
Insert surprise candies or treats between layers. Kids especially love this.
Gift Giving
Bake in smaller pans for individual cakes. Perfect personalized gifts.
Package slices in clear boxes with ribbon. Homemade gifts beat store-bought every time.
Include the recipe card. People will definitely ask for it.
Why This Recipe Beats Others
How To Make Chocolate Cake Fast becomes easy with this recipe. Simple steps, no complicated techniques required.
The coffee trick intensifies chocolate flavor without adding coffee taste. Genius chemistry at work.
Buttermilk creates tender crumb and subtle tang. Balances the sweetness perfectly.
This recipe is forgiving. Small variations in measurements won’t ruin it.
FAQ Section
Can I make this without coffee?
Yes, substitute hot water for coffee. The cake will still be delicious, just slightly less intense in chocolate flavor. Coffee doesn’t add coffee taste—it enhances cocoa.
How do I make this in a 9×13 pan?
Use the same batter in a greased 9×13 pan. Bake for 35-40 minutes. Perfect for sheet cakes and easier assembly without layer stacking.
Can I use natural cocoa instead of Dutch-process?
Either works, but Dutch-process creates richer color and milder flavor. Natural cocoa is more acidic and tangy. Both produce good results in this recipe.
Why is my frosting grainy?
The powdered sugar wasn’t sifted, or the butter was too cold. Sift your sugar and ensure proper butter temperature. Beat longer to dissolve any remaining crystals.
Can I make cupcakes instead?
Absolutely. Fill cupcake liners 2/3 full and bake for 18-22 minutes. This recipe makes about 24 cupcakes. Perfect for parties and portion control.
Final Thoughts
There you have it—everything you need to make incredible Chocolate Cake Desserts that’ll become your signature recipe. This proves you don’t need complicated techniques for amazing results.
The combination of simple ingredients and foolproof method creates bakery-quality cake at home. Every slice delivers rich, moist chocolate perfection.
So preheat that oven and get baking. Your kitchen is about to smell incredible, and everyone will be begging for your secret recipe.
Easy Moist Chocolate Cake
Ingredients
Method
- Preheat your oven to 350°F (175°C). Grease your cake pans thoroughly with butter or cooking spray and line the bottoms with parchment paper.
- Dust the greased pans lightly with cocoa powder.
- Sift together the flour, sugar, cocoa powder, baking soda, baking powder, and salt in a large bowl.
- In a separate bowl, whisk together the eggs, buttermilk, hot coffee, oil, and vanilla until fully combined.
- Pour the wet ingredients into the dry mixture and mix on low speed for 30 seconds, then scrape down the bowl and increase speed to medium for 2 minutes.
- Divide the batter evenly between the prepared pans and bake for 30-35 minutes, testing with a toothpick.
- Let the cakes cool in the pans for 10 minutes before inverting onto cooling racks.
- Beat softened butter until light and fluffy, then gradually add sifted powdered sugar and cocoa powder.
- Add heavy cream, vanilla, and salt, and beat until smooth and fluffy.
- Level any domed tops of the cakes, place the first layer on a serving plate, and spread frosting between layers.
- Apply a thin crumb coat of frosting over the entire cake, refrigerate for 15-20 minutes, then apply the final coat of frosting.


