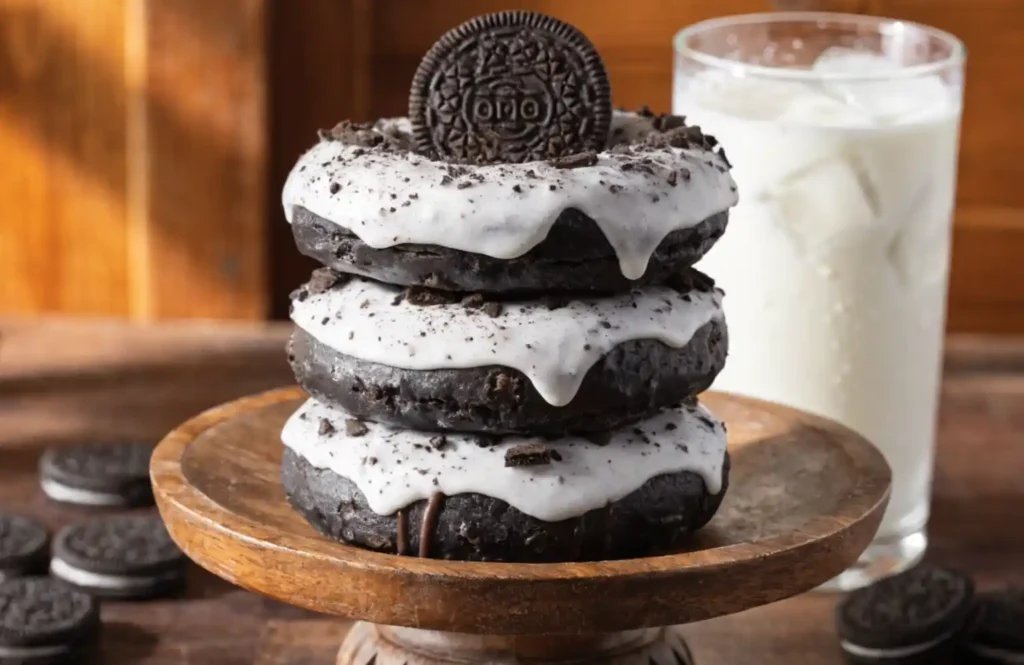
Two iconic treats combined into one mind-blowing creation—that’s what Oreo donuts are all about. I stumbled upon this recipe during a late-night baking experiment, and honestly, my life hasn’t been the same since.
Prep Time: 15 minutes
Cook Time: 12 minutes
Total Time: 27 minutes
Servings: 12 donuts
These homemade Oreo donuts recipe creations deliver bakery-quality results without leaving your kitchen. Ready to blow some minds? Let’s make magic happen.
Why Oreo Donuts Are Game-Changers
Have you ever thought about why certain flavor combinations just work? Oreos and donuts together create this perfect balance of chocolatey goodness and fluffy texture. It’s not rocket science—it’s better.
I’ve tried countless Oreo dessert recipes over the years. Some were meh. Others were decent. But these Oreo donuts? They’re consistently amazing every single time I make them.
The beauty lies in their simplicity. You don’t need professional baking skills or fancy equipment. Just basic ingredients and a donut pan. That accessibility makes them perfect for anyone.
Plus, they’re incredibly versatile. Bake them plain or get creative with toppings. Serve them for breakfast, dessert, or whenever you want. No judgment here on donut timing.
Essential Ingredients
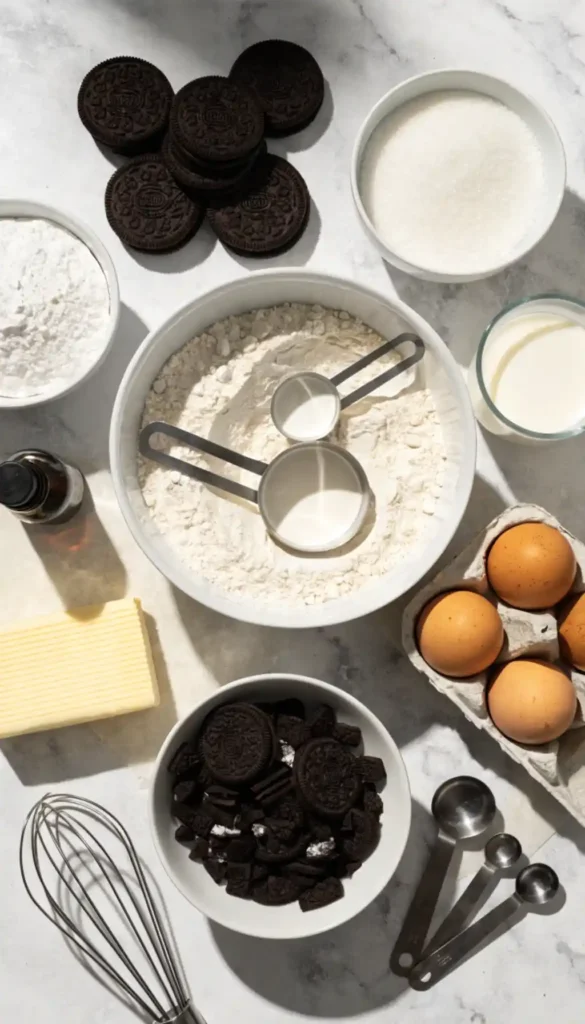
Let’s break down what you need for this best donut recipe. Nothing complicated or impossible to find. Just solid ingredients that create something spectacular when combined.
For the Donuts:
- 1 1/2 cups all-purpose flour
- 1/2 cup granulated sugar
- 1 1/2 teaspoons baking powder
- 1/4 teaspoon salt
- 1/2 cup whole milk
- 2 large eggs
- 3 tablespoons melted butter
- 1 teaspoon vanilla extract
- 10 Oreo cookies, crushed (keep some chunks)
For the Glaze:
- 2 cups powdered sugar
- 1/4 cup whole milk
- 2 tablespoons melted butter
- 1/2 teaspoon vanilla extract
- 6 Oreo cookies, finely crushed
Now For Topping:
- 8 Oreo cookies, cut in half
- Extra crushed Oreos for sprinkling
Simple stuff, right? The crushed Oreos add texture and flavor throughout. That’s the secret weapon in this homemade donuts recipe easy approach.
Equipment You’ll Need
Before starting, gather your tools. Having everything ready makes the process smooth. I learned this after running around my kitchen like a maniac too many times.
Essential Tools:
- 12-cup donut pan (non-negotiable for this recipe)
- Mixing bowls (2-3 different sizes)
- Whisk and spatula
- Measuring cups and spoons
- Piping bag or ziplock bag
- Cooling rack
The donut pan is crucial here. Regular muffin tins won’t give you that classic donut shape. Trust me, the shape matters for the full experience.
Preparing Your Pan
Pan preparation prevents disaster. Grease your donut pan thoroughly with butter or cooking spray. Get into all those crevices and corners carefully.
I prefer butter for greasing because it adds subtle flavor. Cooking spray works fine too if that’s what you have. Either way, don’t skip this step.
Some people dust the greased pan with flour. I find this unnecessary if you’ve greased well. But it doesn’t hurt if you’re worried about sticking issues.
Preheat your oven to 375°F while you mix the batter. Starting with a properly heated oven ensures even baking. Cold ovens create texture problems nobody wants.
Making the Batter
Mix your dry ingredients first. Combine flour, sugar, baking powder, and salt in a large bowl. Whisk them together thoroughly to eliminate any lumps.
In a separate bowl, whisk together milk, eggs, melted butter, and vanilla extract. Make sure the butter isn’t too hot—it’ll cook the eggs. Room temperature is perfect.
Pour wet ingredients into dry ingredients. Stir gently until just combined. Don’t overmix here. Overmixing creates tough, dense donuts. We want fluffy, tender results.
Fold in your crushed Oreos last. Use a spatula to distribute them evenly throughout the batter. Leave some visible chunks—they create pockets of chocolatey goodness.
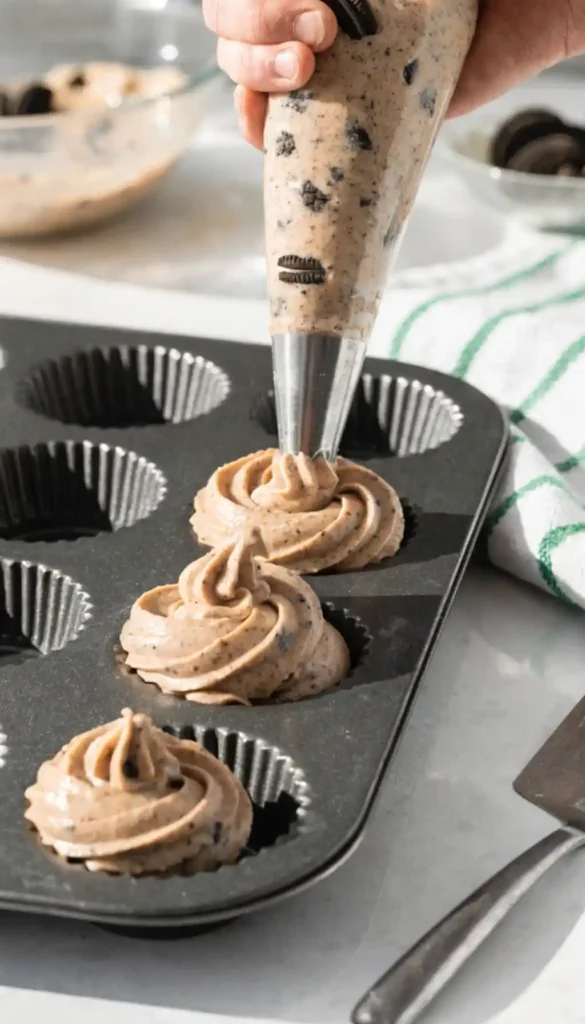
Filling the Pan
Transfer batter to a piping bag or large ziplock bag. Cut the corner off if using a ziplock. This method gives you control and reduces mess significantly.
Pipe batter into each donut cavity, filling them about two-thirds full. Don’t overfill or they’ll lose their shape during baking. Less is more here, honestly.
The batter should settle evenly in each cavity. Tap the pan gently on the counter to remove air bubbles. This ensures smooth tops without weird holes or gaps.
Work carefully when piping. Messy edges mean messy-looking finished donuts. Take your time getting clean lines around each cavity. It’s worth the extra effort.
Baking to Perfection
Slide your pan into the preheated oven. Set a timer for 10 minutes initially. Ovens vary, so checking early prevents disasters from happening.
These cake donuts recipe versions typically need 10-12 minutes total. They’re done when a toothpick inserted comes out clean. The tops should spring back when touched lightly.
Watch them closely during the last few minutes. The line between perfect and overbaked is thin. Overbaked donuts turn dry and crumbly. Nobody wants that texture situation.
Remove from oven when done and let cool in the pan for 5 minutes. This setting period helps them firm up slightly. They’ll break if removed too early.
Removing from Pan
After 5 minutes, carefully turn the pan over onto a cooling rack. The donuts should release easily if you greased properly. Gentle tapping helps stubborn ones.
If a donut sticks, run a butter knife around the edges carefully. Don’t force it or you’ll break the donut. Patience saves broken hearts and broken donuts.
Let them cool completely on the rack before glazing. Warm donuts make the glaze melt and slide off. We want that glaze to set beautifully on top.
This cooling time feels endless when they smell so good. Use it to make your glaze. Perfect timing means everything comes together efficiently.
Making the Glaze
Whisk together powdered sugar, milk, melted butter, and vanilla in a medium bowl. Start with less milk—you can always add more. Too thin is harder to fix.
The consistency should be thick but pourable. It should coat the back of a spoon without immediately dripping off. That’s the sweet spot for perfect coverage.
Stir in finely crushed Oreos last. Mix them in thoroughly so they’re evenly distributed. These cookie bits add texture and visual interest to the glaze.
Taste your glaze and adjust sweetness if needed. Sometimes I add a pinch of salt to balance the sweetness. Small tweaks make big differences in flavor.
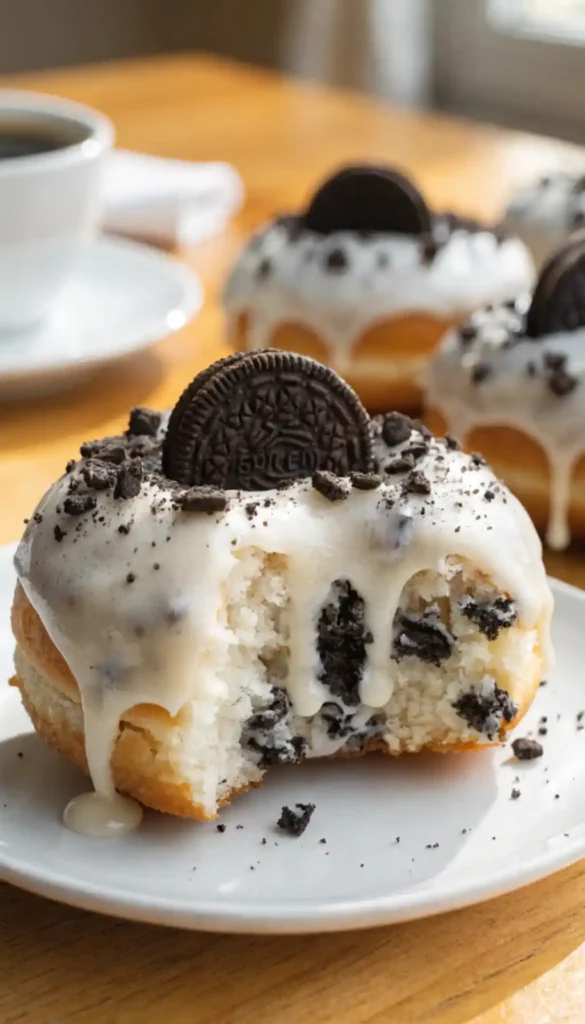
Glazing Your Donuts
Dip the top of each cooled donut into the glaze. Let excess drip back into the bowl before turning it right-side up. This prevents puddles forming underneath.
Place glazed donuts back on the cooling rack. Work quickly before the glaze sets. Once it starts setting, dipping becomes messier and less smooth.
The glaze should create a smooth, even coating across the top. Any bare spots? Just dip that section again quickly. Perfection takes practice, so don’t stress.
Place an Oreo half on top while the glaze is still wet. Press it gently so it adheres. The glaze acts like edible glue holding everything together.
Adding Final Touches
Sprinkle extra crushed Oreos over the wet glaze. This adds texture and makes them look professionally decorated. It also signals “hey, these are Oreo donuts” visually.
You can drizzle melted chocolate over them for extra decadence. Or keep them simple with just the glaze and cookie half. Both versions taste incredible, IMO.
Let glazed donuts sit for 15 minutes until the glaze sets completely. Touching them too soon creates smudges. I know waiting is hard—resist the temptation.
Once set, these donuts aesthetic treats are ready to devour. They look bakery-perfect and taste even better. Get ready for serious compliments from everyone who tries them.
Storage Tips
Store these homemade Oreos recipe by tasty creations in an airtight container at room temperature. They stay fresh for 2-3 days, though they rarely last that long.
The glaze might soften slightly over time. That’s normal and doesn’t affect taste. If anything, softer glaze adds extra moistness to the donut itself.
Don’t refrigerate these donuts. Cold temperatures make them dense and dry. Room temperature keeps them at peak texture and flavor consistently.
Freeze unglazed donuts for up to 2 months. Thaw completely before glazing. This lets you prep ahead for parties or special occasions easily.
Variations to Try
Master the basic recipe first, then experiment. I’ve tried countless variations of these Oreo baking recipes. Some combinations work better than others naturally.
Double Chocolate Version
Use chocolate cake mix as your base instead of flour mixture. Add crushed Oreos to chocolate batter. Top with chocolate glaze and Oreo pieces. Chocolate overload in the best way.
This creates an ultra-rich chocolate donut recipe that serious chocolate lovers adore. It’s intense but balanced by the Oreo’s sweetness perfectly.
Mint Oreo Donuts
Use mint Oreos instead of regular ones. Add a drop of peppermint extract to the batter. Green food coloring in the glaze makes them festive looking.
Perfect for holidays or whenever you’re craving that chocolate-mint combination. These disappear fast at Christmas gatherings every single time.
Strawberry Oreo Version
Golden Oreos with strawberry filling create a fruity twist. Use strawberry extract in both batter and glaze. Top with freeze-dried strawberries and Oreo pieces.
This lighter, fruitier version appeals to people who find regular Oreos too intense. The flavor balance surprises everyone who tries it.
Baked vs. Fried Donuts
These baked doughnut recipes offer advantages over fried versions. Less mess, less oil, and honestly, less stress overall. Baking is just easier for home cooks.
Baked donuts have a cake-like texture rather than yeasty. Some people prefer this denser crumb. Others miss that traditional donut texture. Personal preference rules here.
You skip the whole oil temperature monitoring nightmare. No splattered oil or potential burns. Just set the oven and let it work its magic safely.
Baked versions are slightly healthier too. If that matters to you. Less oil means fewer calories while maintaining incredible flavor throughout.
Common Mistakes to Avoid
I’ve made every donut mistake possible. Learn from my failures and save yourself frustration. These tips ensure your Oreo food hacks turn out perfect.
Don’t overfill the pan cavities. Overfilled batter creates weird shapes without holes in the middle. Two-thirds full is the magic number here.
Avoid undermixing or overmixing batter. Undermixed batter has flour pockets. Overmixed batter creates tough, chewy donuts. Mix just until ingredients combine evenly.
Never skip the cooling time before glazing. I’ve ruined batches by rushing this step. Hot donuts make glaze slide off completely. Patience is essential.
Using stale Oreos affects texture and flavor. Fresh cookies crush better and taste more intense. Check expiration dates before starting your baking adventure.
Serving Suggestions
Serve these sugar donuts recipe versions for breakfast, dessert, or snack time. They work for literally any occasion. No rules apply to donut consumption timing.
Pair them with coffee or cold milk. The beverage cuts through the sweetness beautifully. Hot chocolate works great too, especially during winter months.
Stack them on a pretty platter for parties. They look impressive and disappear quickly. Everyone loves individual-sized desserts they can grab easily.
Warm them slightly in the microwave for 10 seconds. This melts the glaze slightly and makes them extra indulgent. A small touch that elevates the experience.
Making Mini Versions
Want mini donuts ideas? Use a mini donut pan instead. Reduce baking time to 6-8 minutes for smaller sizes. Everything else stays the same.
Mini versions are perfect for parties or portion control. People can try multiple flavors without committing to full-sized donuts. Kids especially love the smaller size.
You’ll get about 24 mini donuts from this recipe. Adjust glaze quantities accordingly—you’ll need less for smaller surfaces. The ratio stays proportional.
Mini donuts also make cute gifts when packaged in clear bags. Tie them with ribbon and suddenly you’re a gourmet gift-giver. Impressive and delicious.
Cost Breakdown
Let’s talk budget because baking should be affordable. This entire batch costs roughly $8-10 to make. That’s less than $1 per donut maximum.
Bakery Oreo donuts cost $3-5 each typically. You’re saving massive amounts making them yourself. Plus, yours are fresher and taste better anyway.
Most ingredients are pantry staples you probably have. The Oreos represent the main special purchase. Buy them on sale to save even more money.
One recipe makes 12 donuts—enough for a family or small gathering. Double the batch for larger crowds. The savings multiply with quantity production.
Why This Recipe Works
This Oreo doughnuts recipe succeeds because of balanced moisture and flavor. The crushed cookies throughout ensure every bite delivers that signature Oreo taste consistently.
The glaze isn’t overly sweet or cloying. It complements rather than overwhelms the donut itself. That balance keeps people reaching for seconds without feeling sick.
Baking method produces consistent results every time. Unlike fried donuts that require precise oil temperature, oven baking removes variables. More predictable equals more successful.
The recipe scales easily for different quantities. Half it for fewer donuts or double for parties. The ratios maintain properly regardless of batch size.
Final Thoughts
You now know how to make Oreo donuts that rival any bakery version. It’s simpler than you imagined, right? No professional skills required here whatsoever.
These treats have become my go-to for impressing guests. They look fancy but take minimal effort. That’s the best kind of recipe, FYI.
Stop overthinking it and just start baking. Your kitchen will smell incredible. Your taste buds will thank you eternally. Everyone wins in this scenario.
Remember, even imperfect donuts taste amazing when they involve Oreos. Don’t stress about making them Instagram-perfect. Just make them, eat them, and enjoy the process completely.
Frequently Asked Questions
Can I make these without a donut pan?
Technically yes, but they won’t be donuts—they’ll be muffins. Use a muffin tin and reduce baking time by 2-3 minutes. They’ll taste identical but lack the classic donut shape and hole.
How do I prevent my donuts from sticking to the pan?
Grease thoroughly with butter or cooking spray, getting into every corner. Some bakers also dust with flour after greasing. Let donuts cool 5 minutes before removing—patience prevents breakage.
Can I use a different cookie instead of Oreos?
Absolutely! Try Nutter Butters, Chips Ahoy, or any sandwich cookie. Adjust the glaze flavor to match. The technique stays the same regardless of cookie choice used.
Why are my donuts dense instead of fluffy?
Overmixing the batter is the usual culprit. Mix only until ingredients combine—lumps are okay. Also check that your baking powder is fresh. Expired leavening agents don’t work properly.
Can I make the batter ahead of time?
Not recommended. Baking powder activates when wet, so batter loses its rising power if sitting too long. Mix and bake immediately for best texture. You can prep dry ingredients ahead though.

Oreo Donuts
Ingredients
Method
- Preheat your oven to 375°F (190°C). Grease your donut pan thoroughly with butter or cooking spray.
- In a large bowl, whisk together the flour, sugar, baking powder, and salt.
- In a separate bowl, whisk together the milk, eggs, melted butter, and vanilla extract.
- Pour the wet ingredients into the dry ingredients and stir gently until just combined. Don't overmix.
- Fold in the crushed Oreos, leaving some chunks visible.
- Transfer the batter into a piping bag or a ziplock bag with the corner cut off.
- Pipe the batter into the donut pan, filling each cavity about two-thirds full.
- Bake in the preheated oven for 10-12 minutes, or until a toothpick comes out clean.
- Let the donuts cool in the pan for 5 minutes before moving them to a cooling rack.
- In a medium bowl, whisk together the powdered sugar, milk, melted butter, and vanilla extract until thick but pourable.
- Stir in the finely crushed Oreos.
- Once the donuts are cool, dip the top of each donut into the glaze and let the excess drip off.
- Add a half Oreo on top of each glazed donut and sprinkle with extra crushed Oreos.