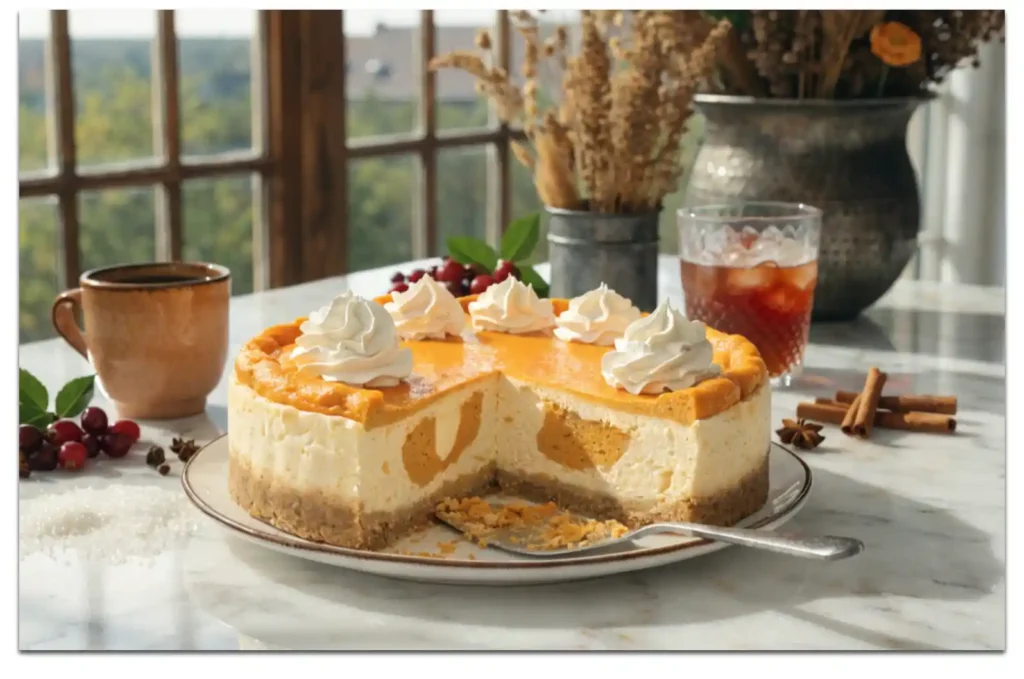
Why choose between pumpkin pie and cheesecake when you can have both? This pumpkin pie cheesecake recipe combines two beloved desserts into one spectacular creation. I made it for Thanksgiving once and people literally fought over the last slice.
Prep Time: 30 minutes
Bake Time: 1 hour
Chill Time: 4 hours
Total Time: 5 hours 30 minutes
Servings: 12 slices
This best pumpkin cheesecake recipe delivers creamy, spiced perfection that’ll make you the dessert hero of every fall gathering. Ready to create magic?
Why This Combination Works
Have you ever thought about why certain flavor pairings just make sense? Pumpkin pie and cheesecake share similar spice profiles. They complement each other instead of competing. It’s dessert harmony at its finest.
I’ve tested countless fall cheesecake recipes over the years. Some were too pumpkin-forward. Others tasted like plain cheesecake with orange food coloring. This version balances both flavors perfectly every single time.
The graham cracker crust provides that familiar pie base. Creamy cheesecake layer adds richness. Spiced pumpkin topping brings seasonal warmth. Together they create something greater than the sum of their parts.
Plus, this impresses people way more than regular cheesecake. They see that gorgeous swirled top and assume you’re a baking genius. Little do they know it’s actually pretty straightforward, honestly.
Essential Ingredients
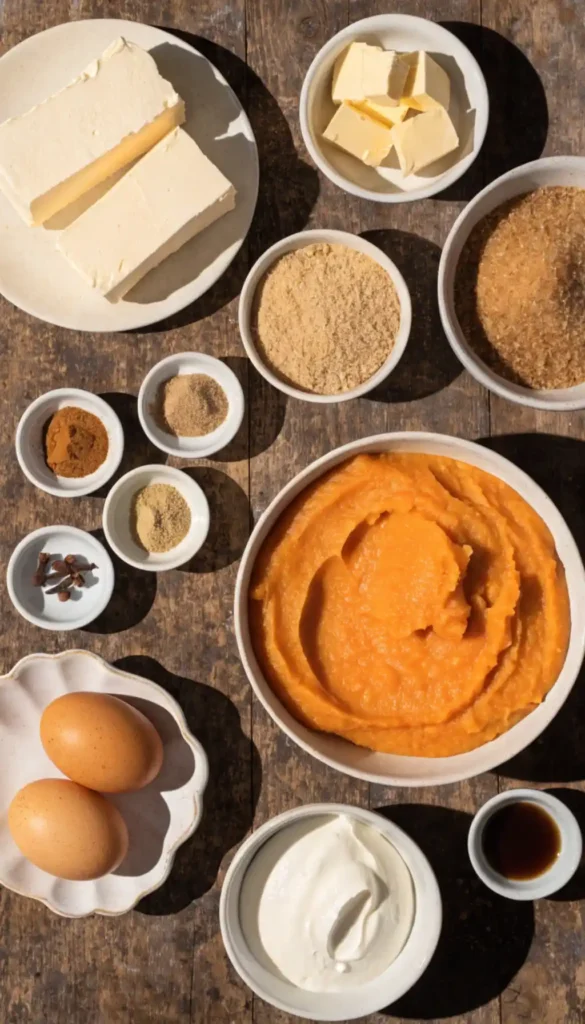
Let’s break down what you need for this easy pumpkin pie cheesecake. Nothing too exotic or impossible to find. Just quality ingredients that create spectacular results when combined properly.
For the Crust:
- 2 cups graham cracker crumbs
- 1/2 cup unsalted butter, melted
- 1/4 cup granulated sugar
- 1/4 teaspoon salt
For the Cheesecake Layer:
- 24 ounces cream cheese, softened
- 3/4 cup granulated sugar
- 3 large eggs
- 1 teaspoon vanilla extract
- 1/4 cup sour cream
Now For the Pumpkin Layer:
- 1 (15-ounce) can pumpkin puree
- 1/2 cup brown sugar
- 2 large eggs
- 1 teaspoon ground cinnamon
- 1/2 teaspoon ground ginger
- 1/4 teaspoon ground nutmeg
- 1/4 teaspoon ground cloves
- 1/8 teaspoon salt
Room temperature ingredients matter tremendously here. Cold cream cheese creates lumps. Room temp ingredients blend smoothly and create silky texture. Plan ahead and leave them out for an hour.
Equipment You’ll Need
Before starting, gather your tools. Having everything ready makes the process smooth and stress-free. I learned this after making unnecessary messes too many times before.
Essential Tools:
- 9-inch springform pan
- Electric mixer or stand mixer
- Mixing bowls (3 different sizes)
- Rubber spatula
- Measuring cups and spoons
- Aluminum foil
- Toothpick or knife for swirling
The springform pan is non-negotiable here. Regular pans make removal impossible without destroying your masterpiece. Invest in one if you don’t have it already. Totally worth it.
Preparing the Crust
Preheat your oven to 325°F while you prep. Starting with a properly heated oven ensures even baking. Cold ovens create texture problems nobody wants to deal with later.
Mix graham cracker crumbs, melted butter, sugar, and salt in a bowl. Stir until mixture resembles wet sand. Every crumb should be coated with butter evenly throughout.
Press mixture firmly into the bottom of your springform pan. Use the bottom of a measuring cup to pack it down. Firm crusts don’t crumble when slicing. Loose crusts fall apart messily.
Bake the crust for 10 minutes. This sets it and prevents sogginess later. Let it cool while you make the fillings. Timing everything correctly makes assembly smooth and easy.
Making the Cheesecake Layer
Beat softened cream cheese in your mixer until completely smooth. No lumps allowed here. They won’t disappear during baking—they’ll haunt your finished product forever, basically.
Add sugar and beat until light and fluffy, about 2-3 minutes. Scrape down the bowl sides frequently. Hidden pockets of unmixed cream cheese ruin texture. Stay thorough here.
Add eggs one at a time, mixing just until incorporated after each. Don’t overmix once eggs are in. Overmixing creates cracks during baking. Nobody wants cracked cheesecake surfaces.
Stir in vanilla extract and sour cream. The sour cream adds tanginess and helps prevent cracking. It’s a secret weapon many bakers don’t know about. Game-changer ingredient right there.
Creating the Pumpkin Layer
Combine pumpkin puree, brown sugar, and eggs in a separate bowl. Whisk thoroughly until completely smooth. No lumps or streaks should remain in the mixture.
Add all your spices—cinnamon, ginger, nutmeg, cloves, and salt. These create that signature pumpkin pie flavor. Don’t skip any of them. Each contributes essential flavor complexity.
Mix until spices are evenly distributed throughout. Taste a tiny bit if you want. You can adjust spice levels now but not after baking. Make it perfect upfront.
This pumpkin and cream cheese recipes combination creates incredible depth. The spices complement cream cheese’s tanginess beautifully. Together they taste like fall wrapped in a hug.
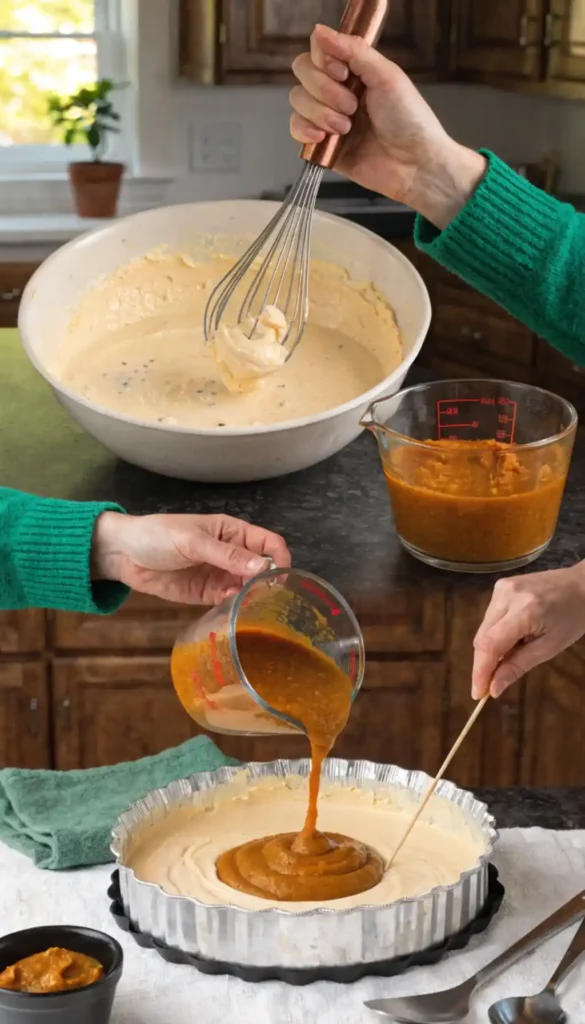
Layering Your Cheesecake
Pour cheesecake batter over your cooled crust. Spread it evenly to the edges using a spatula. Smooth the top completely flat. Level surface matters for appearance later.
Gently pour pumpkin mixture over the cheesecake layer. Start from the center and work outward. Pour slowly to prevent the layers from mixing too much initially.
The pumpkin layer should cover the cheesecake almost completely. A few small spots of white showing is fine. Perfect coverage isn’t necessary for this traditional pumpkin pie cheesecake style.
Drop spoonfuls of reserved cheesecake batter (save about 1/4 cup) randomly on top. These white dollops create the swirl pattern. Placement doesn’t need to be perfect or symmetrical.
Creating the Swirl Pattern
Use a toothpick or knife to swirl the two layers together. Drag it through the layers in figure-eight patterns. Work gently—you’re creating marbling, not fully mixing them.
Don’t overdo the swirling. Too much creates muddy brown instead of pretty contrast. Five or six swirls usually creates the perfect pattern. Less is more here.
The swirl should look organic and natural. Instagram-perfect isn’t necessary. Rustic charm works beautifully for this homemade pumpkin pie cheesecake aesthetic. Embrace imperfection confidently.
Step back and admire your work before baking. This is your last chance to adjust the swirl. Once it goes in the oven, the pattern is locked in forever.
Baking Perfectly
Wrap the outside of your springform pan tightly with aluminum foil. This prevents water from leaking in during the water bath. Water inside ruins everything. Prevent it proactively.
Place wrapped pan in a larger roasting pan. Pour hot water into the roasting pan until it reaches halfway up the cheesecake pan’s sides. This water bath prevents cracking.
Bake for 60-70 minutes. The center should still jiggle slightly when you shake the pan. It’ll firm up during cooling. Overbaked cheesecake turns grainy and dry. Nobody wants that.
Turn off the oven but leave the cheesecake inside with the door cracked. Let it cool gradually for one hour. Sudden temperature changes cause cracks. Gradual cooling prevents them.
Cooling and Chilling
Remove cheesecake from the water bath carefully. Take off the foil and let it cool completely on a wire rack. This takes about 2 hours at room temperature minimum.
Once cooled to room temperature, cover the top loosely with plastic wrap. Refrigerate for at least 4 hours, preferably overnight. Proper chilling is absolutely crucial for texture and slicing.
The cheesecake continues setting in the fridge. Cutting too early creates messy, soft slices. Patience delivers clean, beautiful slices that hold their shape perfectly on plates.
Overnight chilling also allows flavors to meld together beautifully. Next-day cheesecake always tastes better than same-day. Plan ahead and make it the day before serving events.
Removing from Pan
Run a thin knife around the edge of the cheesecake before opening the springform. This prevents sticking and tearing. Work slowly and carefully around the entire perimeter thoroughly.
Unlatch and remove the springform ring gently. If it resists, run the knife around again. Don’t force it or you’ll damage the sides. Gentle persistence wins here.
Slide a large spatula under the crust to loosen it from the pan bottom. Transfer carefully to your serving plate. This step terrifies people but it’s easier than it looks.
Alternatively, leave the cheesecake on the pan bottom and place it directly on your serving platter. Nobody judges this shortcut. We’ve all done it, honestly.
Slicing Cleanly
Use a sharp knife dipped in hot water for cutting. Wipe the knife clean between each slice. This prevents dragging filling and creates professional-looking clean edges every time.
Cut slowly and deliberately. Rushing creates messy, broken slices. Each slice should showcase those beautiful swirled layers. Presentation matters for impressive desserts like this one.
A proper slice should hold its shape when plated. The layers should be distinct and visible. If slices fall apart, the cheesecake needed more chilling time. Remember that for next time.
Serve slices chilled or at cool room temperature. Some people prefer it straight from the fridge. Others like it slightly softened. Both ways taste incredible, so personal preference rules.
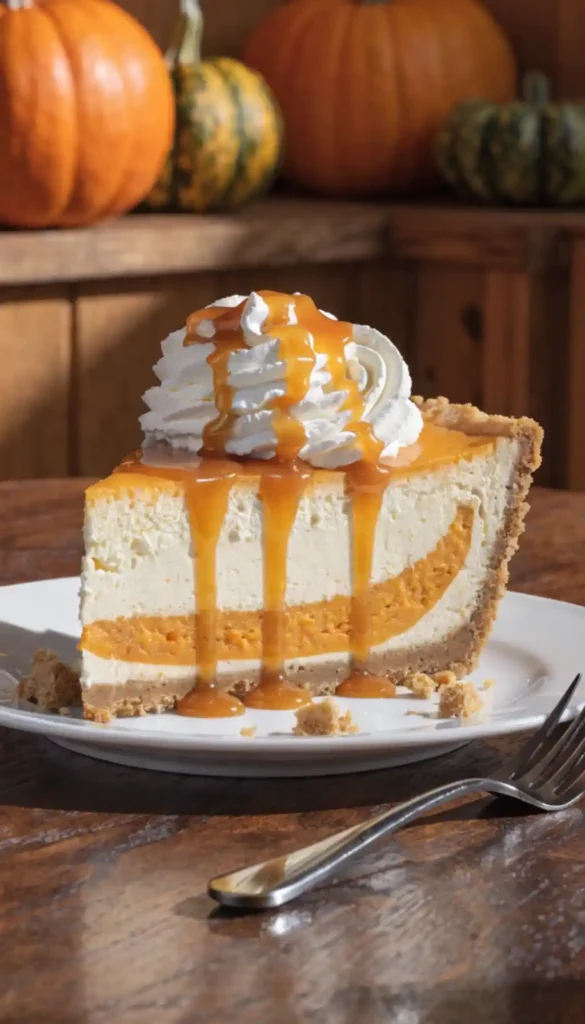
Topping Options
Whipped cream is the classic choice. Make fresh whipped cream with heavy cream, powdered sugar, and vanilla. It’s simple and enhances without overpowering the cheesecake itself.
Caramel drizzle adds sweet, buttery richness. Buy it or make it homemade. Both options work beautifully. The caramel’s color contrasts gorgeously against the cheesecake too.
Candied pecans provide crunchy texture contrast. Toast pecans with butter and brown sugar. Chop roughly and sprinkle over individual slices. Texture variation elevates the eating experience significantly.
Keep toppings simple, IMO. The cheesecake is the star here. Toppings should complement, not compete. Less is definitely more when it comes to garnishing this beauty.
Storage Tips
Store leftover cheesecake covered in the refrigerator. It keeps fresh for 5-6 days easily. The flavor actually improves over the first few days as everything melds together.
Cover with plastic wrap or transfer to an airtight container. Exposed cheesecake absorbs fridge odors. Nobody wants onion-flavored dessert. Protect it properly for best results.
Freeze individual slices wrapped tightly in plastic wrap, then aluminum foil. They keep for 2-3 months frozen. Thaw overnight in the fridge before serving. Perfect for having dessert ready anytime.
Don’t freeze the whole cheesecake unless absolutely necessary. Texture changes slightly after freezing and thawing. Individual slices freeze better than whole cakes for some reason.
Variations to Try
Master the basic recipe first, then experiment freely. I’ve tried countless variations of these best pumpkin desserts. Some combinations work brilliantly. Others taught me valuable lessons about restraint.
No Bake Version
Want to make no bake pumpkin cheesecake? Skip baking entirely. Use a no-bake cheesecake base with gelatin. Layer with spiced pumpkin filling mixed with whipped cream. Chill until set.
This version works great for hot climates or when you don’t want to heat up your kitchen. It’s lighter and airier than baked versions. Different but equally delicious, honestly.
Gingersnap Crust
Replace graham crackers with gingersnap cookies. The spicy cookies complement pumpkin flavors incredibly well. Crush them finely and proceed with the recipe exactly the same way.
This variation adds extra spice and complexity. It’s perfect for people who love bold, assertive flavors. The ginger really shines through without overwhelming anything else.
Chocolate Swirl Addition
Melt chocolate and swirl it alongside the pumpkin layer. Use a toothpick to create a triple-swirl effect. Chocolate, pumpkin, and cheesecake together create mind-blowing flavor complexity.
This turns the dessert into something truly unique. Not traditional at all but absolutely incredible. Perfect for people who want to push boundaries creatively with their baking.
Common Mistakes to Avoid
Don’t use pumpkin pie filling instead of pure pumpkin puree. Pie filling already contains sugar and spices. It’ll make your cheesecake too sweet and weirdly spiced. Read labels carefully always.
Avoid opening the oven door during baking. Temperature fluctuations cause cracks. Trust the process and leave it alone. Curiosity literally kills cheesecakes in this case, basically.
Never skip the water bath. Some recipes claim you don’t need it. Those recipes are lying to you. Water bath prevents cracks and creates silky texture. Always use it.
Don’t cut the cheesecake warm or even room temperature. It must be thoroughly chilled first. Warm cheesecake is soup. Cold cheesecake slices beautifully. Temperature matters tremendously here.
Cost Breakdown
Homemade cheesecake costs roughly $12-15 to make. That’s about $1.25 per slice for 12 servings. Bakery cheesecakes cost $6-8 per slice typically. You’re saving massive amounts here.
Cream cheese represents the biggest expense. Buy it on sale and stock up. It freezes well for months. Strategic shopping cuts costs significantly without sacrificing quality at all.
This beats buying separate pumpkin pie and cheesecake for gatherings. One dessert feeds more people while impressing them equally. Efficiency and deliciousness combined perfectly together.
Making it yourself also means controlling quality. You know exactly what’s in it. No mystery ingredients or excessive preservatives. Just real, wholesome ingredients creating something spectacular.
Perfect Occasions
Thanksgiving is the obvious choice for this spiced pumpkin cheesecake recipe. It satisfies both pie lovers and cheesecake fans. Everyone gets what they want in one dessert. Genius solution, right?
Fall dinner parties benefit from this showstopper. It screams autumn without being too on-the-nose. The presentation impresses while the flavor delivers on that visual promise completely.
Make it for holiday potlucks and watch it disappear first. People go crazy for it every single time. I’ve never brought home leftovers. Ever. That should tell you something.
Even casual fall gatherings deserve this treat. Movie nights, game days, or just because you want amazing dessert. Any excuse works for making this incredible creation.
Why This Recipe Works
This cheesecake pumpkin pie recipe succeeds through careful balance and proper technique. Neither flavor overpowers the other. They dance together harmoniously in every single bite taken.
The layers create textural variety. Crunchy crust, creamy cheesecake, silky pumpkin. Your mouth experiences different sensations throughout. That complexity keeps things interesting until the last bite.
Traditional techniques combined with accessible ingredients make this achievable. No special skills required. Just attention to detail and patience. Anyone can make this successfully with practice.
The recipe scales perfectly and maintains ratios beautifully. Double it for crowds or make individual minis. The proportions work regardless of size adjustments made throughout.
Final Thoughts
You now know how to make incredible pumpkin pie cheesecake. It’s easier than you imagined, right? No pastry chef certification required for these spectacular results whatsoever.
This recipe has become my fall signature dessert. I make it repeatedly every autumn. People request it specifically by name. That’s the highest compliment any home baker can receive.
Stop choosing between pumpkin pie and cheesecake. Make this hybrid and have the best of both worlds. Your taste buds will thank you eternally. So will everyone else.
Remember, even imperfect cheesecake tastes amazing. Don’t stress about minor cracks or swirl patterns. Just make it, serve it, and accept the compliments graciously. You’ve earned them, FYI.
Frequently Asked Questions
Can I use fresh pumpkin instead of canned?
Yes, but it requires extra work. Roast and puree fresh pumpkin, then drain excess moisture through cheesecloth. Canned puree is more consistent and convenient. I honestly recommend sticking with canned for best results.
Why did my cheesecake crack?
Common causes include overmixing after adding eggs, baking at too high temperature, skipping the water bath, or cooling too quickly. Follow the gradual cooling method and use a water bath to prevent cracks.
Can I make this ahead of time?
Absolutely! Make it 1-2 days ahead. It actually tastes better after chilling overnight. The flavors meld beautifully and slicing becomes easier. Perfect for stress-free entertaining and holiday planning.
How do I know when it’s done baking?
The edges should be set but the center should still jiggle slightly when you shake the pan gently. It firms up during cooling. Use an instant-read thermometer—it should read 150°F in the center.
Can I substitute low-fat cream cheese?
You can, but texture suffers significantly. Low-fat versions contain more water and less fat. This creates grainy texture and affects flavor. Full-fat cream cheese is worth the extra calories for proper cheesecake texture.

Pumpkin Pie Cheesecake
Ingredients
Method
- Preheat your oven to 325°F while you prep.
- Mix graham cracker crumbs, melted butter, sugar, and salt in a bowl. Stir until mixture resembles wet sand.
- Press mixture firmly into the bottom of your springform pan.
- Bake the crust for 10 minutes and let it cool while you prepare the fillings.
- Beat softened cream cheese in your mixer until completely smooth.
- Add sugar and beat until light and fluffy, about 2-3 minutes.
- Add eggs one at a time, mixing just until incorporated after each.
- Stir in vanilla extract and sour cream.
- Combine pumpkin puree, brown sugar, and eggs in a separate bowl. Whisk until smooth.
- Add spices and mix until evenly distributed.
- Pour cheesecake batter over your cooled crust and smooth the top.
- Gently pour pumpkin mixture over the cheesecake layer.
- Drop spoonfuls of reserved cheesecake batter randomly on top to create a swirl pattern.
- Use a toothpick or knife to swirl the layers together gently.
- Wrap the outside of your springform pan tightly with aluminum foil.
- Place the wrapped pan in a larger roasting pan and pour hot water into the roasting pan.
- Bake for 60-70 minutes until the center jiggles slightly.
- Turn off the oven and leave the cheesecake inside with the door cracked for one hour.
- Remove cheesecake from the water bath and cool completely on a wire rack.
- Once cooled, refrigerate for at least 4 hours before serving.
- Run a thin knife around the edge before unlatching the springform.
- Gently remove the springform ring and slide a large spatula under the crust to loosen it.
- Serve slices chilled or at cool room temperature with whipped cream or caramel drizzle.


