
Prep Time: 15 minutes | Cook Time: 15 minutes | Total Time: 30 minutes | Servings: 12 pizza bombs
Let’s Talk About These Little Pockets of Joy
You know that moment when you bite into something and literally forget everything else? That’s what Cheesy Pizza Bombs do to people. No drama, no exaggeration — just pure, gooey, cheesy magic wrapped in golden dough.
I made these for a game night last month and they were gone in under ten minutes. Twelve bombs. Gone. My friends looked at me like I’d just solved world hunger. Honestly, it wasn’t that hard.
Whether you’re throwing a party, feeding hungry kids, or just want a snack that slaps — these are it. Let’s get into it.
What Exactly Are Cheesy Pizza Bombs?
Think of a pizza bomb as everything you love about pizza — the cheese, the sauce, the toppings — stuffed into a little dough pocket and baked until golden. No fork needed. No plates, either, if you’re being honest.Cheesy Pizza Bombs
They’re handheld, portable, and completely addictive. IMO, they beat a regular slice because every bite has the perfect filling-to-dough ratio. That’s a scientific fact. (Okay, maybe not scientific. But still.)
You can fill them with whatever you like. Classic mozzarella and pepperoni, veggies, or go full meat-lover mode. The Cheesy Pizza Bombs formula is flexible and forgiving — perfect for beginners.Cheesy Pizza Bombs
Ingredients You’ll Need
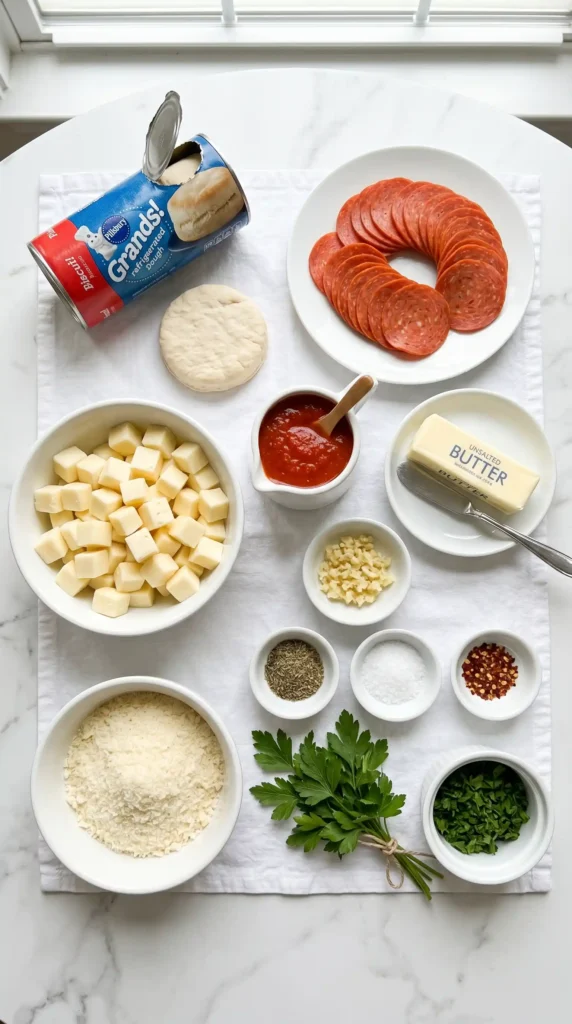
Here’s the full list. Nothing fancy, nothing you’d need a specialty store for. Just solid, simple ingredients that work together beautifully.
For the Dough
- 1 can (13.8 oz) refrigerated pizza dough — or homemade if you’re feeling ambitious
- 2 tablespoons unsalted butter, melted
- 1 teaspoon garlic powder
- 1 teaspoon Italian seasoning
- 1 tablespoon fresh parsley, finely chopped
For the Filling
- 1 cup shredded mozzarella cheese (the more, the merrier)
- 1/2 cup mini pepperoni slices — or regular pepperoni torn into smaller pieces
- 1/4 cup pizza sauce — plus extra for dipping
- 1/4 teaspoon red pepper flakes (optional, but recommended)
- Salt and black pepper to taste
Optional Add-Ins
- 1/4 cup diced bell peppers
- 1/4 cup sliced black olives
- 2 tablespoons grated Parmesan cheese for topping
What Equipment Do You Need?
Nothing crazy. You likely have all of this already:
- A large baking sheet
- Parchment paper or a non-stick baking mat
- A small bowl for the butter mixture
- A sharp knife or pizza cutter
- A pastry brush (or just use a spoon)
How to Make Cheesy Pizza Bombs: Step-by-Step

Alright, here’s where the fun begins. Follow these steps and you’ll have perfectly golden, cheesy bombs ready in about 30 minutes.Cheesy Pizza Bombs
Step 1: Preheat Your Oven-Cheesy Pizza Bombs
Preheat your oven to 375 degrees Fahrenheit (190 degrees Celsius). This temperature gives you that perfect golden crust without burning the bottom. While the oven heats up, line your baking sheet with parchment paper so nothing sticks.
Don’t skip the preheating step. Cold oven equals sad, pale pizza bombs. We want golden, not ghostly.
Step 2: Prep the Dough-Cheesy Pizza Bombs
Unroll your refrigerated pizza dough onto a lightly floured surface. Stretch it out gently into a large rectangle — roughly 12 by 8 inches works well.
Using your knife or pizza cutter, cut the dough into 12 equal squares. Each square should be roughly 3 by 3 inches. They don’t have to be perfect — rustic is totally fine here.
If you’re using homemade dough, let it rest at room temperature for 10 minutes before cutting. Cold dough shrinks and fights back. Give it a moment.
Step 3: Add Your Filling-Cheesy Pizza Bombs
Place each dough square flat on your surface. Add about 1 tablespoon of shredded mozzarella right in the center. Then layer on 3 to 4 mini pepperoni slices.
Spoon about half a teaspoon of pizza sauce over the cheese. Don’t go overboard with the sauce here — too much and the dough won’t seal properly. A little goes a long way.
If you’re adding optional toppings like bell peppers or olives, add a small pinch of those now too. Keep the fillings centered so you can fold the dough easily.
Step 4: Seal the Bombs-Cheesy Pizza Bombs
This is the most satisfying part. Grab the four corners of each dough square and pull them up and together over the filling. Pinch all the seams tightly to seal.
Make sure there are no gaps or holes. If the dough tears a little, just press it back together. Cheese has a way of escaping if you give it any opportunity, and we don’t want that.
Place each sealed bomb seam-side down on your prepared baking sheet. Leave about 2 inches of space between each one so they have room to puff up beautifully.
Step 5: Make the Garlic Butter-Cheesy Pizza Bombs
In a small bowl, mix together 2 tablespoons of melted butter, 1 teaspoon of garlic powder, and 1 teaspoon of Italian seasoning. Stir it well until everything is combined.
This butter mixture is what gives the outside of your Cheesy Pizza Bombs that gorgeous, fragrant, golden finish. Don’t skip it. It’s the secret weapon.
Using a pastry brush — or just a spoon — generously coat the top and sides of each bomb with the garlic butter. Be thorough. Every surface matters.
Step 6: Add the Finishing Touches
Sprinkle a little grated Parmesan cheese over each bomb if you’re using it. It melts and creates a slightly crispy, cheesy crust on top that is absolutely worth it.
You can also add a tiny pinch of red pepper flakes on top for a bit of heat. FYI, this step is optional but adds a nice visual and flavor boost.
Step 7: Bake to Golden Perfection
Slide the baking sheet into your preheated oven and bake for 13 to 15 minutes. Keep an eye on them after the 12-minute mark.
You’re looking for a deep golden brown color on the tops. The dough should look puffed and cooked through. If they still look pale at 13 minutes, give them another 2 minutes.
Once done, pull them out and let them cool for 3 to 4 minutes before serving. They hold heat incredibly well inside — the filling will be lava-level hot. You’ve been warned.
Step 8: Serve and Enjoy
Arrange your pizza bombs on a serving plate and put a small bowl of warm pizza sauce right next to them for dipping. Watch them disappear.
Serve immediately for the best cheese-pull experience. As they cool down, the cheese firms up a little. Still delicious, but nothing beats them fresh out of the oven.
Pro Tips for Perfect Cheesy Pizza Bombs
A few things I learned the hard way so you don’t have to:
- Don’t overstuff. I know it’s tempting, but too much filling means the dough won’t seal and you’ll have cheese explosions on your baking sheet. Not as fun as it sounds.Cheesy Pizza Bombs
- Use cold dough. Refrigerated pizza dough is easier to handle. If it gets too warm and stretchy, pop it back in the fridge for 5 minutes.
- Seal tightly. Pinch and press those seams firmly. Double-check every single bomb before they go in the oven.Cheesy Pizza Bombs
- Cheese choice matters. Fresh mozzarella works but releases more moisture. Low-moisture shredded mozzarella melts more cleanly and seals better.Cheesy Pizza Bombs
- Make them ahead. You can assemble and refrigerate the unbaked bombs for up to 4 hours. Just brush with butter right before baking.Cheesy Pizza Bombs
Fun Variations to Try

Once you’ve nailed the classic version, mix things up:
- Veggie Bombs: Swap pepperoni for sauteed mushrooms, spinach, and roasted red peppers.
- BBQ Chicken Bombs: Use shredded rotisserie chicken, BBQ sauce instead of pizza sauce, and sharp cheddar.
- Four Cheese Bombs: Mix mozzarella, provolone, Parmesan, and cream cheese for a rich, indulgent filling.
- Breakfast Bombs: Fill with scrambled eggs, cooked bacon, and cheddar. Morning game-changer.
How to Store and Reheat
Storage: Let leftover pizza bombs cool completely, then store them in an airtight container in the fridge for up to 3 days.
Reheating: Pop them in a 350-degree oven for 8 to 10 minutes to bring back the crispiness. The microwave works in a pinch but softens the outside. Your call.
Freezing: Freeze unbaked, assembled bombs on a baking sheet, then transfer to a zip-lock bag. Bake directly from frozen at 375 degrees for 18 to 20 minutes.
Frequently Asked Questions
1. Can I use homemade dough instead of store-bought?
Absolutely. Homemade pizza dough works great here. Just make sure it has had time to rise properly before using it. The texture will be slightly chewier, which many people actually prefer.
2. Can I make Cheesy Pizza Bombs ahead of time?
Yes! Assemble them, place on a lined baking sheet, cover with plastic wrap, and refrigerate for up to 4 hours. Brush with garlic butter right before baking. Do not brush ahead of time as the butter can make the dough soggy.
3. What dipping sauces work best?
Classic marinara or pizza sauce is the obvious winner. But ranch dressing, garlic aioli, and even honey (for a sweet-savory combo) all work surprisingly well. Experiment and find your favorite.Cheesy Pizza Bombs
4. Can I make these gluten-free?
Yes, you can use gluten-free pizza dough. Many grocery stores carry it. The texture might be slightly different but the flavor will still be great. Just handle the dough gently as gluten-free dough tends to be a bit more fragile.Cheesy Pizza Bombs
5. How do I stop the cheese from leaking out during baking?
Two things: don’t overfill and seal the dough firmly. Make sure the seams are completely pinched shut and placed seam-side down. If you notice a small hole, just press it closed before baking.
6. What’s the best cheese to use?
Low-moisture shredded mozzarella is the go-to choice. It melts smoothly and doesn’t release too much liquid. You can blend it with provolone or fontina for extra flavor depth. Fresh mozzarella works but slice it thin and pat it dry first.
Final Thoughts
Cheesy Pizza Bombs are genuinely one of the easiest, most crowd-pleasing snacks you can make. Thirty minutes. Simple ingredients. Zero complaints.
They work as a game-day snack, a party appetizer, a quick weeknight treat, or even a fun activity to do with kids. Let them stuff and seal their own bombs — great activity, zero artistic pressure.
Give this recipe a shot this weekend. Share them with someone you like, or keep them all to yourself. I won’t judge.

Cheesy Pizza Bombs
Ingredients
Method
- Preheat your oven to 375°F (190°C). Line your baking sheet with parchment paper.
- Unroll your pizza dough onto a lightly floured surface and stretch into a rectangle (about 12 by 8 inches). Cut into 12 evenly-sized squares (approximately 3 by 3 inches).
- On each dough square, add about 1 tablespoon of mozzarella, 3-4 mini pepperoni slices, and half a teaspoon of pizza sauce in the center.
- Fold up the corners of the dough to seal the filling inside, pinching the seams tightly.
- Place each sealed bomb seam-side down on the baking sheet with 2 inches of space between them.
- Mix melted butter, garlic powder, and Italian seasoning in a small bowl. Brush this mixture over the tops and sides of each bomb.
- Sprinkle grated Parmesan on top if using. Bake in the preheated oven for 13-15 minutes until golden brown.
- Let them cool for 3-4 minutes before serving.
- Serve warm with extra pizza sauce for dipping.


