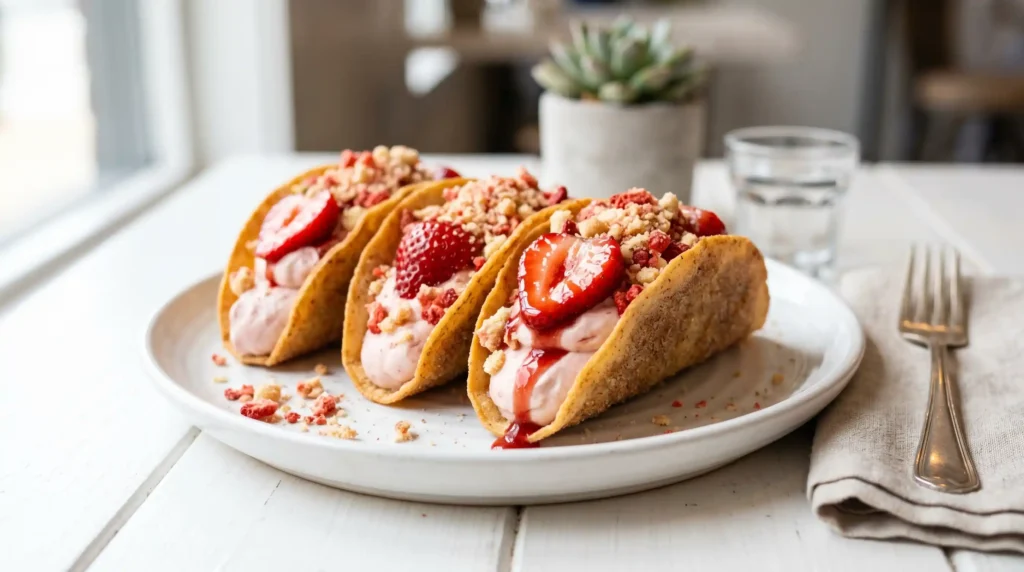
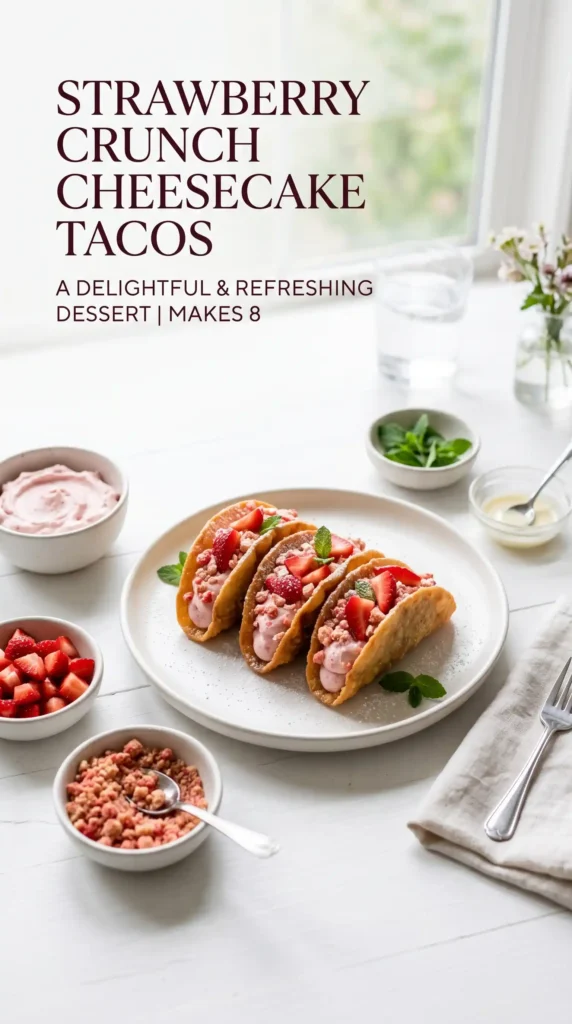
Tacos for dessert. I know — bear with me. Strawberry Crunch Cheesecake Tacos take everything you love about strawberry cheesecake — the tangy cream filling, the buttery crunch topping, the sweet fresh strawberries — and serve all of it inside a crispy cinnamon-sugar tortilla shell that you can hold in one hand. If that does not immediately sound like the best decision you have made all week, read the next paragraph.
I made these for a birthday party expecting mild enthusiasm. What I received was grown adults asking if there were more in the kitchen, a child hoarding one under the table, and two separate people requesting the recipe before they had finished eating. That is the kind of reception this dessert consistently generates. It looks extraordinary, tastes even better, and takes 65 minutes including the shell-shaping and chilling steps.
Have you ever made something that sparked actual conversation at a party? Not just compliments — genuine questions, excitement, and mild disbelief that something this good exists? Make these once and you will understand exactly what I mean.
Why Strawberry Crunch Cheesecake Tacos Are Genuinely Brilliant
The concept works because it solves the presentation problem that regular cheesecake creates at parties. Cheesecake requires a plate, a fork, careful slicing, and someone to serve it. These tacos require nothing but two hands. Each one is a completely self-contained, individually portioned dessert that travels easily, plates beautifully, and delivers every element of strawberry cheesecake in a single handheld package.
The strawberry crunch topping is the element that makes these recognisable. A mix of crushed vanilla wafers and freeze-dried strawberries creates a coating that is simultaneously fruity, buttery, and crispy — it provides a textural contrast against the smooth cream cheese mousse that keeps every bite interesting from first to last. That crunch is non-negotiable and genuinely irreplaceable.
The cinnamon sugar taco shell does something that a regular pie crust or graham cracker base cannot: it provides structural support while contributing its own warm, spiced flavour note that complements the strawberry and cream cheese without competing with either. The shell tastes like the best churro you have ever eaten, shaped into a taco. IMO, that alone justifies the recipe.
What You Need
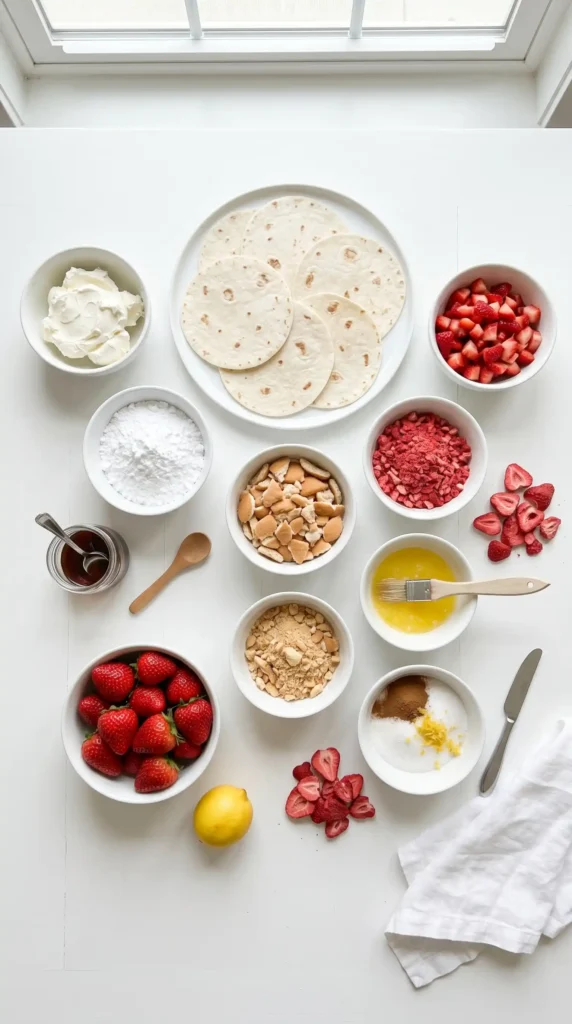
Four components: the cinnamon sugar taco shells, the cream cheese mousse filling, the fresh strawberry topping, and the strawberry crunch coating. Each one takes under ten minutes to prepare. The most time-consuming element is shaping and baking the shells — but the process is genuinely straightforward once you understand the technique.
For the Cinnamon Sugar Taco Shells
- 10–12 small flour tortillas (15–18cm / 6–7 inch diameter)
- 4 tablespoons (57g) unsalted butter, melted
- 1/4 cup (50g) granulated white sugar
- 1 teaspoon ground cinnamon
- Cooking spray for the baking rack
For the Cream Cheese Mousse
- 225g (8oz) full-fat cream cheese, softened to room temperature
- 1 cup (120g) powdered sugar, sifted
- 1 teaspoon pure vanilla extract
- 1/2 teaspoon lemon zest
- 1 cup (240ml) heavy whipping cream, cold
- Pinch of salt
Now For the Fresh Strawberry Topping
- 2 cups (300g) fresh strawberries, hulled and thinly sliced
- 2 tablespoons granulated sugar
- 1 teaspoon fresh lemon juice
- 1/2 teaspoon pure vanilla extract
Now For the Strawberry Crunch Topping
- 1 cup (about 30) vanilla wafer cookies, crushed to coarse crumbs
- 1/2 cup (15g) freeze-dried strawberries, crushed to a powder or small pieces
- 3 tablespoons (42g) unsalted butter, melted
- 1 tablespoon granulated sugar
Freeze-dried strawberries are essential for the crunch topping and should not be replaced with fresh or frozen ones. They have an intense flavor, are completely dry, and crush easily into a fine powder or small pieces. This allows them to mix evenly into the crumble without adding any moisture.
Fresh or frozen strawberries would make the crumble wet and soggy within minutes. FYI — freeze-dried strawberries are widely available in most grocery stores near the dried fruits or snack aisle and make an enormous difference to both the flavour intensity and texture of the finished crunch.
How to Make Strawberry Crunch Cheesecake Tacos Step by Step
The process runs in four parallel workstreams: shape and bake the shells, macerate the strawberries, make the mousse, and mix the crunch topping. The shells take 15 minutes in the oven. The mousse needs 30 minutes of chilling. Everything else takes under 10 minutes each. Read through the full sequence before starting and all four components will finish at the right time for smooth assembly.
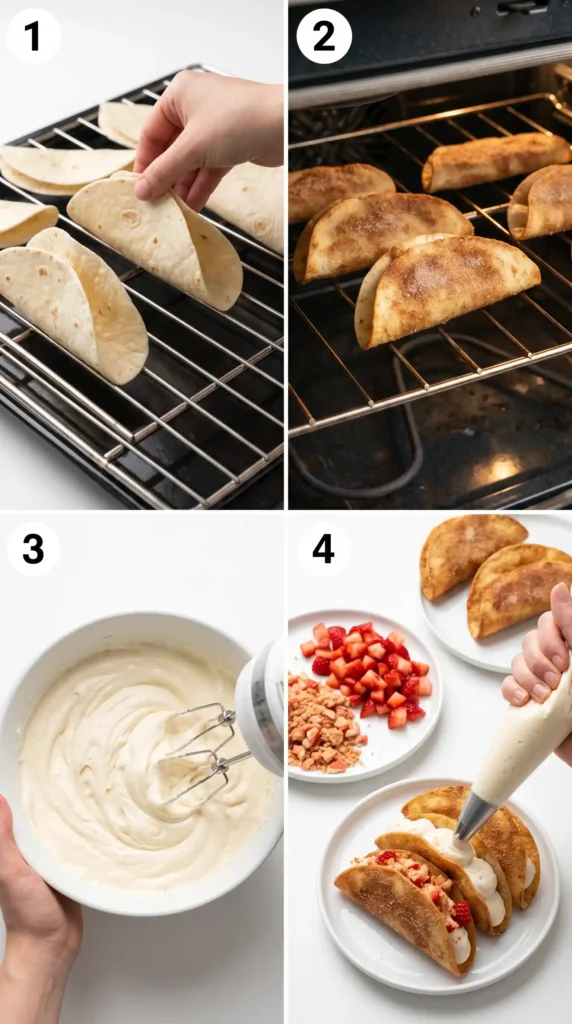
Step 1: Shape and Bake the Cinnamon Sugar Taco Shells
Preheat your oven to 190°C (375°F) and prepare a cinnamon sugar mixture by combining granulated sugar with cinnamon until evenly blended. Brush both sides of each tortilla generously with melted butter, making sure every edge is coated, then sprinkle the cinnamon sugar evenly on both sides, pressing lightly so it sticks well.
Drape each prepared tortilla over two oven rack bars or over two wooden spoons placed across a baking tray so it forms a natural taco shape while baking. Make sure the tortilla hangs in a firm curve to help it hold its structure later when filled.
Bake for 10–12 minutes until the tortillas turn golden, firm up at the edges, and smell like caramelised cinnamon sugar. They may look slightly soft when removed from the oven, but they will crisp as they cool. Let them cool completely in their taco shape for about 15 minutes before handling or filling.
If the shells flatten, it usually means the draping angle was too shallow. A stronger curve (around 60–70 degrees) helps them keep their taco shape better. You can also use a muffin tin placed on its side as an alternative method to maintain a consistent curve.
Step 2: Macerate the Strawberries
While the shells bake, prepare the strawberry topping. Place the thinly sliced fresh strawberries in a bowl and sprinkle over the granulated sugar, fresh lemon juice, and vanilla extract. Toss gently to coat every slice. Let the strawberries sit at room temperature for 20–30 minutes — the sugar draws out the natural juice from the strawberries, creating a light, glossy syrup that makes every slice look jewel-like and taste more intensely strawberry-flavoured than plain fresh fruit would.
Do not skip the macerating step. Plain unsweetened strawberries work in a pinch, but macerated strawberries look significantly more beautiful — deeply red and glossy — and taste sweeter and more developed. The syrup that forms in the bowl is also useful: a small spoonful drizzled over the assembled tacos just before serving adds visual drama and concentrated strawberry flavour without any extra effort.
Step 3: Make the Strawberry Crunch Topping
Place the vanilla wafer cookies in a zip-lock bag and use a rolling pin to crush them into rough crumbs — aim for a mixture of fine crumbs and small pieces rather than a uniform fine powder. The irregular texture gives the crunch topping more interest and a better bite. Crush the freeze-dried strawberries separately in another bag until they reduce to a fine powder with some slightly larger pieces.
Combine the crushed vanilla wafers and crushed freeze-dried strawberries in a bowl. Add the melted butter and granulated sugar and stir until every crumb is lightly coated in the butter and the mixture looks uniformly pink from the strawberry powder. Spread the mixture on a parchment-lined tray and allow it to firm up at room temperature for 10–15 minutes, or refrigerate for 5 minutes for a faster result. The butter will bind the crumbs into a slightly clumped, crumbly mixture that scoops easily and holds together on top of the mousse without scattering immediately.
Step 4: Make the Cream Cheese Mousse
Beat the room-temperature cream cheese with a hand mixer on medium speed for about 90 seconds until completely smooth and lump-free. Add the sifted powdered sugar, vanilla extract, lemon zest, and pinch of salt and beat on medium speed for another 60 seconds until fully incorporated and the mixture looks uniform. Taste it — it should be sweet, slightly tangy, vanilla-forward, and creamy. This is your cheesecake base.
In a separate cold bowl, beat the cold heavy cream with a hand mixer on medium-high speed until stiff peaks form, which takes about 2–3 minutes. Make sure the cream is very cold before you start, as warm cream takes longer to whip and does not hold its shape well. For best results, chill the bowl in the fridge for about 10 minutes before use, as this helps the cream whip faster and become more stable.
Fold the whipped cream into the cream cheese mixture in three additions using a rubber spatula. Use large, gentle, sweeping strokes from the bottom of the bowl upward — never stirring vigorously, which deflates the air bubbles you just whipped into the cream and produces a flat, dense filling rather than a light, mousse-like one. After the third addition, the mousse should look smooth, pale, and hold its shape when scooped. Transfer to a piping bag or a zip-lock bag with a corner snipped and refrigerate for 30 minutes until firm enough to pipe cleanly.
Step 5: Assemble the Tacos
Once the shells are completely cool and the mousse is well chilled, prepare all toppings before assembling. Assembly itself takes less than ten minutes. Pipe or spoon the cream cheese mousse into each cooled taco shell, spreading it evenly from one end to the other. Leave about 1 cm of the shell visible at the top edge to create a clean contrast between the mousse and the toppings.
Arrange 4–5 macerated strawberry slices on top of the mousse in each taco. Slightly overlap them with the tips pointing upward for a better visual effect. Next, add a generous tablespoon of strawberry crunch topping over and around the slices. Gently press it into the mousse so it sticks well.
Finally, drizzle a small amount of strawberry syrup over the finished Strawberry Crunch Cheesecake Tacos just before serving. This adds a glossy, bright red finish and makes the presentation more appealing.
Serve immediately or refrigerate assembled tacos for up to 1 hour before serving.Beyond 1 hour, the shells will start to soften as they absorb moisture from the mousse and lose their crunch. For the best texture contrast, serve the Strawberry Crunch Cheesecake Tacos within 60 minutes of the final assembly so the shell stays crispy and the mousse remains smooth.
Variations Worth Making
Blueberry Cheesecake Tacos
Swap the fresh strawberries for fresh blueberries macerated in the same sugar and lemon mixture. Replace the freeze-dried strawberries in the crunch topping with freeze-dried blueberries. The colour contrast between the deep purple-blue fruit and the white cream cheese mousse in the golden shell is visually stunning. Add a small drizzle of honey over the blueberries before adding the crunch for extra sweetness.
Chocolate Strawberry Version
Drizzle the inside of each cooled shell with melted dark chocolate and let it set for 5 minutes before piping in the mousse. Add 2 tablespoons of unsweetened cocoa powder to the cream cheese mousse for a chocolate cheesecake variation. The chocolate-coated shell provides a barrier that keeps the mousse from softening the shell during holding time, which also gives you slightly longer before the shells lose their crunch.
No-Bake Shell Version
If you want to skip the oven entirely, use flat waffle cones shaped into taco forms while they are still warm from the packaging, or use pre-made waffle taco shells available at specialty grocery stores. These provide the crunch without the baking step and deliver a neutral or lightly sweet flavour that pairs well with every variation of filling. The cinnamon-sugar baked tortilla version has a better flavour, but the waffle cone version works brilliantly for speed and convenience.
Make-Ahead Tips and Storage
Store each component separately for the best results. The baked shells keep in an airtight container at room temperature for up to 3 days — they stay crispy as long as they remain completely dry. The cream cheese mousse keeps covered in the fridge for up to 3 days and can be re-piped as needed. The strawberry crunch topping keeps in an airtight container at room temperature for up to 5 days.
The macerated strawberries keep refrigerated for up to 24 hours — the syrup continues to develop and deepen in flavour overnight, which actually makes them taste better on day two. Assemble all components together no more than 60 minutes before serving. This make-ahead strategy means the actual day-of preparation is under 15 minutes — which makes these genuinely practical for entertaining rather than just impressive-sounding.
Frequently Asked Questions
Can I use corn tortillas instead of flour tortillas for the shells?
Corn tortillas are less pliable than flour tortillas and crack more easily when draped over the rack bars. If you want to use corn tortillas, warm them wrapped in damp paper towels in the microwave for 45–60 seconds to make them more flexible before shaping and baking. The flavour of baked cinnamon-sugar corn tortillas is excellent — slightly nuttier and more complex than flour — but the shaping requires more care and some cracking is likely with smaller or thicker corn tortillas.
Can I make Strawberry Crunch Cheesecake Tacos without heavy cream in the mousse?
Yes, though the texture of the filling changes. Replace the whipped heavy cream with 1 cup of full-fat whipped topping, such as Cool Whip, and fold it into the beaten cream cheese in the same way as fresh whipped cream. This version is slightly less rich and sets a bit softer, but it still tastes great and holds up well in the shells. However, the homemade whipped cream version creates a noticeably lighter and more luxurious mousse, making it worth the extra few minutes if you have the time.
Where do I find freeze-dried strawberries?
Most major grocery stores stock freeze-dried strawberries near the dried fruits, trail mix, or snack aisle — look for bags labeled “freeze-dried” rather than “dried” or “dehydrated.” Trader Joe’s, Whole Foods, and most health food stores stock them reliably. Online retailers carry them in larger quantities at better prices if you plan to make this recipe regularly. In a pinch, crush freeze-dried strawberry snack packs designed for toddlers or lunchboxes — these work identically and are available almost everywhere.
How do I prevent the shells from going soft before serving?
Three strategies keep the shells crispier for longer. First, make sure the shells are completely cool and fully set before adding any filling, since warm shells absorb moisture from the mousse much faster. Next, pipe the mousse as close to serving time as possible, and keep the assembled tacos refrigerated for no more than 60 minutes before serving. Finally, keep the strawberry crunch topping separate and allow guests to add it at the table, so it stays as crisp as possible right before eating.
Can I make these gluten-free?
Yes with a few substitutions. Use certified gluten-free small flour tortillas or gluten-free corn tortillas for the shells. Replace the vanilla wafer cookies in the crunch topping with crushed gluten-free vanilla cookies, crushed gluten-free graham crackers, or even crushed gluten-free rice cakes. The cream cheese mousse and the macerated strawberries contain no gluten-containing ingredients. Confirm that your freeze-dried strawberries are certified gluten-free, as some brands process them in facilities shared with wheat products.
Final Thoughts
These Strawberry Crunch Cheesecake Tacos earn their place as the dessert that upstages everything else on the table. The crispy cinnamon shell, the light cream cheese mousse, the bright macerated strawberries, and the buttery strawberry crunch topping deliver all four elements of a great dessert — crunch, creaminess, freshness, and richness — in a single, elegant, handheld package.
Sixty-five minutes of total time, most of which runs passively. A presentation that generates genuine excitement. A flavour combination that makes people reach for a second one without thinking twice. This is genuinely the best possible use of a taco shell outside its traditional context.
Bake those shells until they snap. Chill that mousse until it pipes cleanly. Macerate those strawberries so they look like something from a dessert magazine. And never, under any circumstances, skip the crunch topping. That is non-negotiable and you will understand why the moment you eat one.

Strawberry Crunch Cheesecake Tacos
Ingredients
Method
- Preheat your oven to 190°C (375°F). Prepare a cinnamon sugar mixture by combining granulated sugar and cinnamon.
- Brush both sides of each tortilla generously with melted butter, then sprinkle the cinnamon sugar evenly.
- Drape each tortilla over two oven rack bars or spoons to form a taco shape.
- Bake for 10–12 minutes until golden. Let cool in taco shape for 15 minutes.
- Slice the strawberries and mix in a bowl with granulated sugar, lemon juice, and vanilla extract.
- Let sit for 20–30 minutes to create a syrup.
- Crush vanilla wafers and freeze-dried strawberries separately.
- Combine and add melted butter and sugar, mixing until coated.
- Let firm at room temperature for 10–15 minutes or refrigerate for 5 minutes.
- Beat cream cheese until smooth, then add powdered sugar, vanilla, lemon zest, and salt until combined.
- In a separate bowl, whip the cold heavy cream to stiff peaks.
- Fold the whipped cream into the cream cheese mixture in three additions.
- Refrigerate for 30 minutes until firm enough to pipe.
- Pipe mousse into cooled taco shells, add macerated strawberries, and top with strawberry crunch.
- Drizzle strawberry syrup over tacos before serving.


