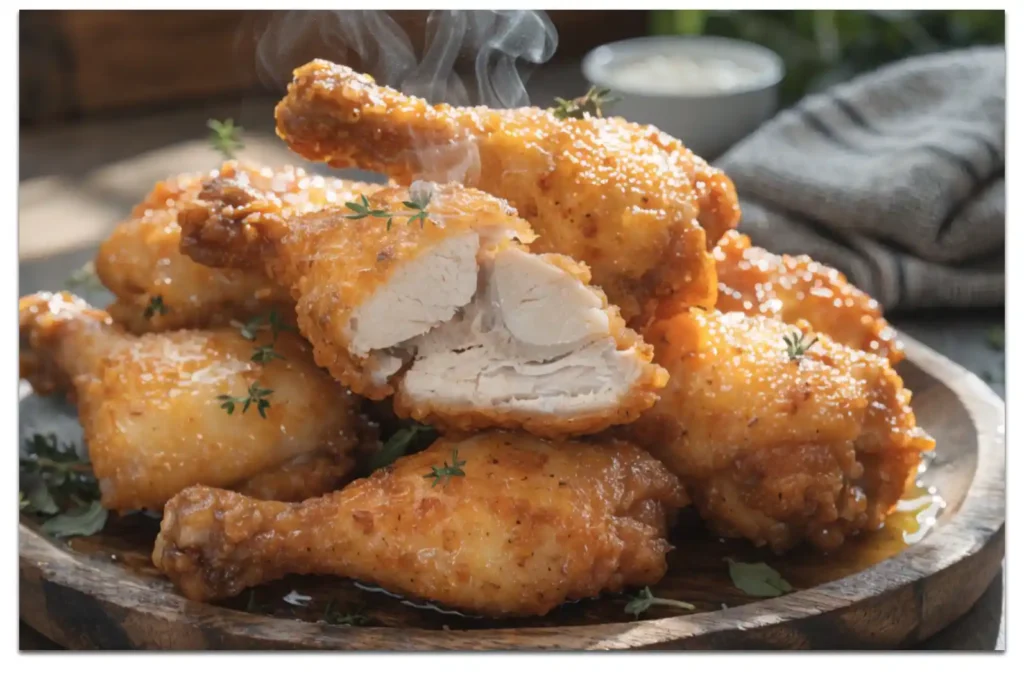
Forget everything you think you know about fried chicken. This butter fried chicken recipe changed my entire perspective on what crispy, juicy chicken should taste like. No buttermilk needed, just pure buttery magic.
Prep Time: 20 minutes
Cook Time: 25 minutes
Total Time: 45 minutes
Servings: 4-6 pieces
This crispy fried chicken recipe delivers restaurant-quality results using butter as the secret weapon. Ready to make the best fried chicken of your life? Let’s get started.
Why Butter Makes All the Difference
Have you ever wondered what makes some fried chicken taste richer than others? Butter. That’s the answer. Cooking in butter creates this incredible depth of flavor oil simply cannot match.
I’ve tried countless fried chicken variations over the years. Traditional methods using buttermilk and oil work fine. But this butter-based approach? It’s on another level entirely, honestly.
The butter creates an incredibly crispy exterior while keeping the inside moist and tender. It also adds subtle richness that complements the chicken perfectly. Once you try it, you’ll never go back.
Plus, this is a fried chicken recipe without buttermilk. No overnight soaking required. No special ingredients to track down. Just straightforward cooking that delivers outstanding results every single time.
Essential Ingredients
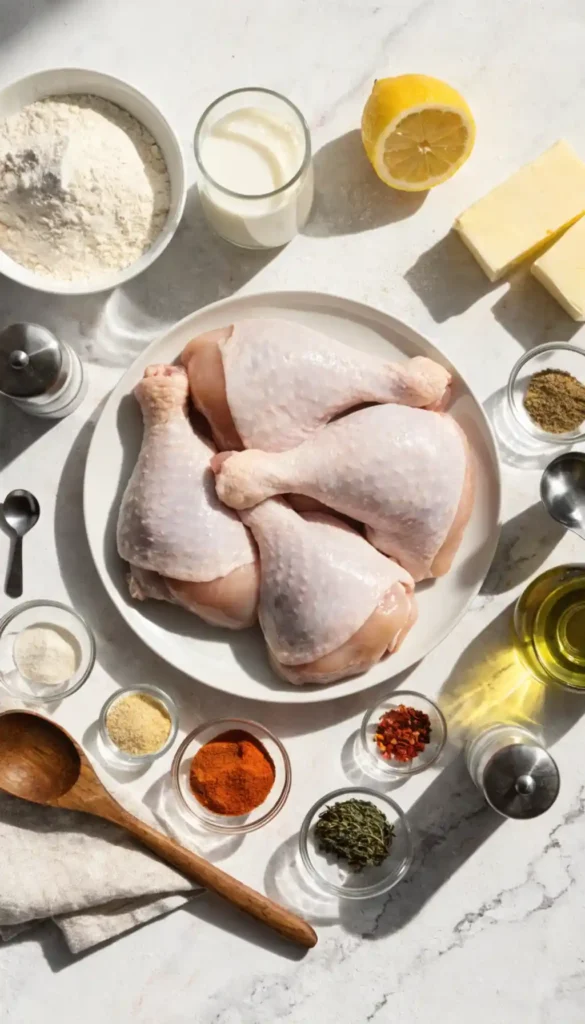
Let’s break down what you need for this simple fried chicken recipe. Nothing complicated or hard to find. Just quality basics that create something truly spectacular.
For the Chicken:
- 2 pounds chicken pieces (thighs, drumsticks, or breasts)
- 1 cup whole milk
- 1 tablespoon lemon juice
- 2 teaspoons salt
- 1 teaspoon black pepper
For the Coating:
- 2 cups all-purpose flour
- 1 tablespoon garlic powder
- 1 tablespoon onion powder
- 1 tablespoon paprika
- 2 teaspoons salt
- 1 teaspoon black pepper
- 1 teaspoon cayenne pepper (optional)
- 1/2 teaspoon dried thyme
Now For Frying:
- 1 cup unsalted butter
- 1/2 cup vegetable oil
The butter-oil combination is crucial. Butter alone burns too easily at high heat. The oil raises the smoke point while preserving that incredible butter flavor throughout.
Choosing Your Chicken
Chicken selection matters more than most people realize. Different cuts cook at different rates and have varying textures. Choose wisely based on your preferences here.
Best Cuts for Frying:
- Thighs (my personal favorite – dark meat stays juicier)
- Drumsticks (great for kids, easy to hold)
- Breasts (lean white meat, needs careful timing)
- Wings (crispy all over, perfect for snacking)
I prefer bone-in, skin-on pieces for maximum flavor and moisture. Boneless chicken cooks faster but dries out more easily. The bone conducts heat and helps meat cook evenly.
Let chicken come to room temperature for 30 minutes before cooking. Cold chicken creates temperature shock when hitting hot fat. This results in uneven cooking and greasy exterior.
Preparing the Brine
Mix milk and lemon juice in a large bowl. The acid in lemon juice creates a quick buttermilk substitute. Let it sit for 5 minutes until slightly thickened.
Add chicken pieces to the milk mixture. Make sure each piece is completely submerged. This step tenderizes while adding moisture that prevents drying during cooking.
Season the milk mixture with salt and pepper. These seasonings penetrate the meat during soaking. They create flavor from the inside out, not just surface-level taste.
Let chicken soak for at least 20 minutes. Longer is better if you have time—up to 2 hours works great. This fried chicken recipe no buttermilk method still delivers tender, flavorful results.
Making the Perfect Coating
Combine flour and all your seasonings in a large, shallow dish. Mix thoroughly until everything is evenly distributed. No clumps or uneven seasoning allowed here.
The garlic powder adds savory depth. Paprika creates beautiful color and subtle smokiness. Cayenne brings heat if you want it. These spices transform plain flour into magic.
Taste a tiny pinch of the flour mixture. Yes, really. Raw flour tastes bland, but you can gauge if the seasoning ratio feels right. Adjust before coating chicken.
This fried chicken seasoning combination works for any cut. It’s versatile and balanced. You can tweak individual spices based on personal preference without ruining anything.
The Double-Dredge Technique
Remove one piece of chicken from milk. Let excess drip off for a few seconds. Too much liquid creates gloppy coating instead of crispy crust.
Place chicken in seasoned flour. Press firmly to coat all surfaces thoroughly. Get flour into every crevice and fold of skin. Complete coverage matters tremendously.
Dip the floured chicken back into milk briefly. Just a quick dunk—don’t let it soak again. This creates the base for a second flour layer.
Return to flour mixture for final coating. Press firmly again to create a thick, textured crust. This double-dredge method creates that signature extra-crispy texture everyone loves.
Setting Up Your Frying Station
Use a large, heavy-bottomed skillet or cast iron pan. These distribute heat evenly and maintain consistent temperature. Thin pans create hot spots that burn food.
Add butter and oil to the pan. Heat over medium-high until butter completely melts and mixture reaches 350°F. Use a thermometer for accuracy if you have one.
The mixture should shimmer but not smoke. Smoking means it’s too hot and will burn. Adjust heat as needed to maintain proper temperature throughout cooking.
Place a cooling rack over a baking sheet nearby. This setup keeps fried chicken crispy by allowing air circulation. Paper towels make chicken soggy—avoid them completely.
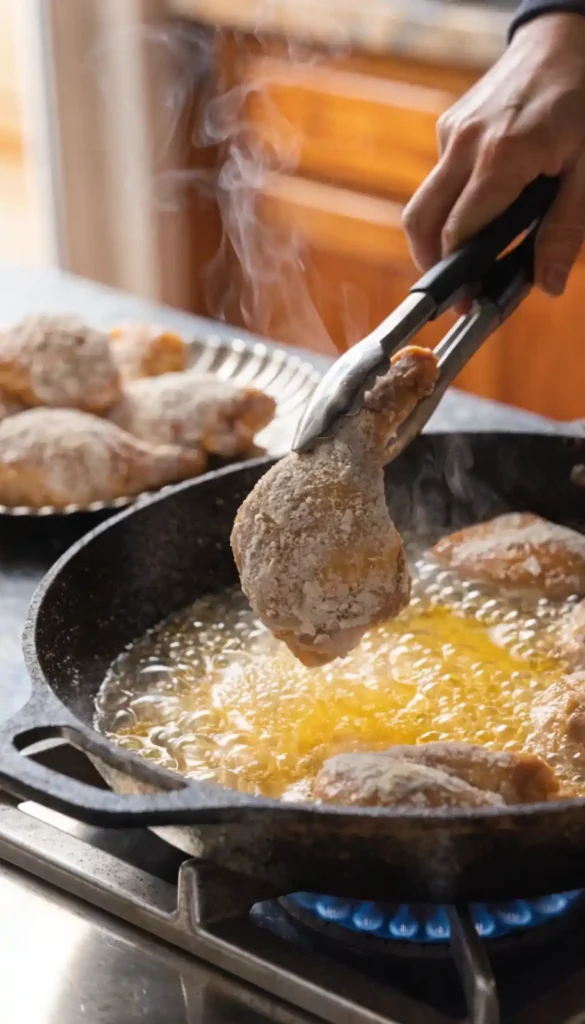
Frying to Perfection
Carefully place chicken pieces in hot butter-oil mixture. Don’t overcrowd the pan—leave space between pieces. Crowding lowers temperature and creates steaming instead of frying.
You should hear vigorous sizzling immediately. If not, the fat isn’t hot enough yet. Wait and let temperature recover before adding more chicken pieces.
Cook skin-side down first for 8-10 minutes. Don’t move the chicken constantly. Let it develop that golden-brown crust undisturbed. Patience creates perfection here.
Watch for butter browning but not burning. Lower heat slightly if it darkens too quickly. The goal is golden butter, not black, which tastes bitter and ruins everything.
Flipping and Finishing
Use tongs to flip chicken carefully. The crust should be deep golden brown and crispy. If it looks pale, give it another minute before flipping.
Cook the second side for another 8-10 minutes. Smaller pieces like wings need less time. Larger breast pieces might need 12-15 minutes per side total.
Check internal temperature with a meat thermometer. Chicken must reach 165°F at the thickest part. This ensures food safety while maintaining juiciness throughout.
The coating should be deeply golden and crispy all over. If some spots look pale, rotate the piece slightly. Even browning creates the best texture and appearance.
Resting the Chicken
Transfer finished chicken to your prepared cooling rack. Let it rest for 5 minutes before serving. This resting period is crucial—don’t skip it ever.
Resting allows juices to redistribute throughout the meat. Cut too early and those juices run out onto your plate. That’s flavor you’re losing unnecessarily, honestly.
The crust also sets and crisps up more during resting. Steam escapes, creating even crunchier texture. Hot-from-the-pan isn’t actually peak crispiness—rested is better.
Resist the urge to cover with foil during resting. Trapped steam makes coating soggy. Just let it sit uncovered on the rack. Air circulation maintains that perfect crunch.
Achieving Maximum Crispiness
Temperature control determines crispiness more than anything else. Too low and coating absorbs grease. Too high and it burns before chicken cooks through. Sweet spot is 340-360°F.
Don’t flip constantly. Each flip releases heat and disturbs crust formation. Flip once, maybe twice maximum for thicker pieces. More than that creates problems unnecessarily.
Fresh oil-butter mixture matters. Reused frying fat breaks down and affects texture. Start with fresh mixture for best results every single time you cook.
Let the first batch drain completely before frying more. Residual moisture from previous chicken lowers oil temperature. Maintain heat between batches for consistent results throughout.
Making It Extra Garlicky
Want this garlic fried chicken even more pronounced? Add crushed fresh garlic to your butter-oil mixture. Use 4-5 cloves, smashed but not minced completely.
The garlic infuses the fat with incredible flavor. It also creates amazing aroma while cooking. Your entire house will smell like a five-star restaurant instantly.
Remove garlic pieces before they burn and turn bitter. They brown faster than chicken cooks. Fish them out with a slotted spoon after 2-3 minutes.
Alternatively, increase garlic powder in the flour mixture to 2 tablespoons. This adds garlic flavor without requiring fresh cloves. Either method works beautifully for garlic lovers.
Oven-Finishing Method
For extra-large pieces, try this hybrid technique. Pan-fry until golden on both sides. Then transfer to a 375°F oven for 15-20 minutes.
This baked fried chicken recipe approach ensures thorough cooking without burning the exterior. It’s especially helpful for thick breast pieces that need longer cooking times.
Place chicken on a wire rack over a baking sheet. This allows hot air circulation on all sides. Direct pan contact makes the bottom soggy—rack prevents this.
Check internal temperature before removing from oven. Once it hits 165°F, it’s done. Let rest as usual before serving. This method never fails, guaranteed.
Variations to Try
Master the basic recipe first, then experiment. I’ve tested countless variations of these fried chicken dinner ideas. Some work brilliantly. Others? Learning experiences, let’s say.
Southern Fried Chicken Version
Add 1 cup buttermilk to your milk mixture. Include hot sauce for tang and heat. Use lard instead of oil for authentic Southern flavor profile.
This southern fried chicken recipe traditional approach creates extra-tangy, spicy results. It’s richer and more complex than the basic version. Perfect for special occasions.
Spicy Country Fried Chicken
Double the cayenne pepper in your flour mixture. Add hot sauce to the milk. Serve with spicy gravy made from pan drippings for country fried chicken perfection.
The heat hits you immediately but doesn’t overpower. It enhances rather than masks the chicken’s natural flavor. IMO, this version is dangerously addictive and habit-forming.
Herb-Crusted Version
Add fresh herbs to your flour mixture. Try rosemary, thyme, and sage—all finely chopped. These create aromatic, sophisticated flavor that impresses dinner guests every time.
Herb additions make this feel more gourmet than traditional fried chicken. It’s still crispy and delicious but with elevated complexity. Great for special dinner parties.
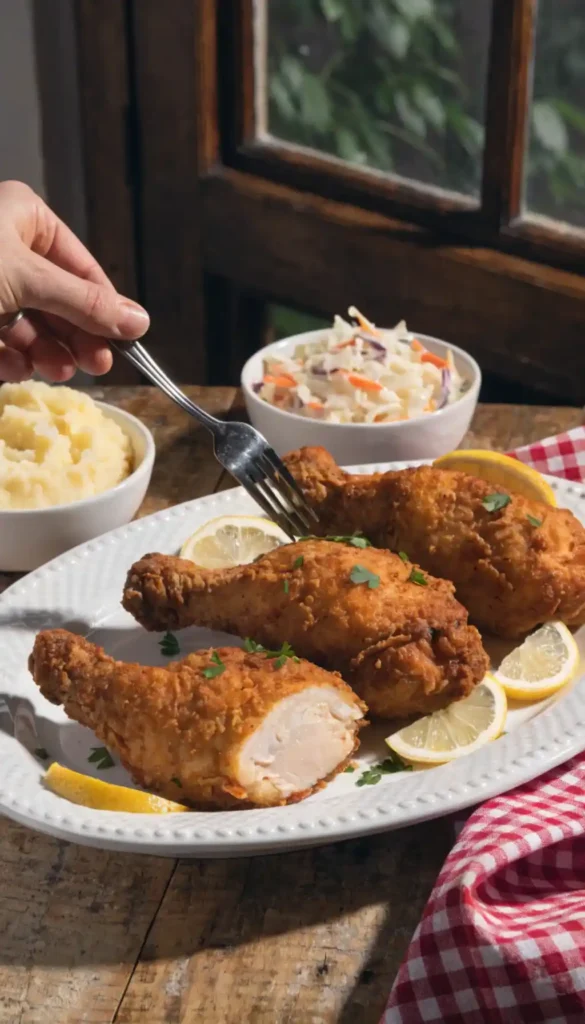
Side Dish Pairings
These fried chicken meals deserve worthy companions. I’ve found certain sides complement the rich, buttery chicken better than others without competing for attention.
Perfect Pairings:
- Creamy mashed potatoes with gravy
- Buttery corn on the cob
- Coleslaw for crunch and tang
- Mac and cheese for indulgence
- Biscuits to soak up extra butter
Balance the richness with something fresh or acidic. Pickles, coleslaw, or lemon wedges cut through fat beautifully. Your palate needs that contrast for full enjoyment.
Storage and Reheating
Store leftover chicken in an airtight container in the refrigerator. It keeps well for 3-4 days. The coating softens slightly but still tastes delicious cold.
Reheat in a 375°F oven for 15-20 minutes to restore crispiness. Microwave works for convenience but makes coating soggy. Oven reheating is worth the extra time.
Freeze cooked chicken for up to 3 months. Let it cool completely first, then wrap tightly. Thaw overnight in the fridge before reheating in the oven.
Cold fried chicken makes excellent sandwiches or salads. Don’t feel obligated to reheat. Many people prefer it cold straight from the fridge, FYI.
Common Mistakes to Avoid
Don’t use skinless chicken for frying. The skin protects meat and creates the best texture. Skinless pieces dry out and lack that satisfying crispy-fatty contrast.
Avoid moving chicken too much while cooking. Constant fiddling prevents proper browning. Let physics do its job without interference. Patience wins every single time here.
Never cover the pan while frying. This traps steam and makes coating soggy instead of crispy. Keep it uncovered throughout the entire cooking process always.
Don’t salt chicken immediately after frying. Salt draws out moisture and makes coating less crispy. Add salt after resting if needed, though the coating should have plenty.
Cost Comparison
Restaurant fried chicken costs $12-20 per person typically. This recipe feeds 4-6 people for about $15-18 total. That’s roughly $3 per serving maximum.
Chicken represents the main expense. Buy family packs on sale for better pricing. Freeze what you don’t use immediately. Stock up during promotions strategically.
The butter seems pricey but you use relatively little per batch. One stick goes far when mixed with oil. The flavor impact justifies the cost completely.
Making this easy fried chicken recipe without buttermilk saves money too. No special dairy purchases needed. Regular milk works perfectly at fraction of the cost.
Why This Recipe Works
This fried chicken without buttermilk succeeds through smart fat selection and proper technique. Butter adds richness while oil prevents burning. Together they create magic.
The double-dredge coating ensures maximum crispiness and coverage. Every bite delivers that satisfying crunch. No soggy spots or bare patches anywhere on the chicken.
Simple seasoning lets chicken flavor shine through. You’re enhancing natural taste, not covering it up. That’s the mark of truly great fried chicken recipes.
The method works consistently regardless of skill level. Follow the steps and you’ll get great results. No mysterious variables or luck required here at all.
Final Thoughts
You now know how to make incredible butter fried chicken at home. It’s simpler than you imagined, right? No overnight brining or special equipment required whatsoever.
This recipe has saved countless dinners at my house. It impresses guests while being easy enough for regular weeknights. That versatility makes it invaluable in my rotation.
Stop ordering expensive takeout and start making this. Your kitchen will smell amazing. Your family will think you’re a culinary genius. Everybody wins here.
Remember, even slightly imperfect fried chicken tastes incredible. Don’t stress about making it restaurant-perfect. Just cook it, enjoy it, and make it again soon.
Frequently Asked Questions
Can I use chicken breast instead of dark meat?
Yes, but watch cooking time carefully. Breasts dry out faster than thighs. Use a meat thermometer and remove them immediately when they hit 165°F. Consider pounding breasts to even thickness first.
Why isn’t my coating staying on the chicken?
Make sure chicken is patted dry before the first dredge. Press flour firmly into the meat. Let coated pieces rest for 5 minutes before frying—this helps coating adhere better during cooking.
Can I make this recipe without milk?
Absolutely! Use water with a tablespoon of vinegar instead. Or skip the soak entirely and just season chicken directly. The coating will still work, though the meat might be slightly less tender.
How do I prevent butter from burning?
Mix butter with oil—the oil raises the smoke point. Keep temperature around 350°F, not higher. If butter browns too quickly, reduce heat slightly. Watch it carefully throughout cooking.
Can I make fried chicken tenders using this recipe?
Yes! Use fried chicken tenderloin recipes timing instead. Tenders need only 3-4 minutes per side since they’re thinner. Everything else stays the same. Perfect for quick meals or kids.

Butter Fried Chicken Recipe: Crispy, Golden Perfection
4
servings485
kcal45
minutesThis butter fried chicken features juicy chicken coated in seasoned flour and fried in butter-oil mixture for incredible flavor and crispiness. Soak chicken in milk-lemon mixture, double-dredge in seasoned flour, then fry in butter-oil at 350°F until golden brown and internal temperature reaches 165°F. No buttermilk needed.
Ingredients
- For the Chicken:
2 pounds chicken pieces (thighs, drumsticks, or breasts)
1 cup whole milk
1 tablespoon lemon juice
2 teaspoons salt
1 teaspoon black pepper
- For the Coating:
2 cups all-purpose flour
1 tablespoon garlic powder
1 tablespoon onion powder
1 tablespoon paprika
2 teaspoons salt
1 teaspoon black pepper
1 teaspoon cayenne pepper (optional)
1/2 teaspoon dried thyme
- For Frying:
1 cup unsalted butter
1/2 cup vegetable oil
Directions
- Remove chicken from refrigerator 30 minutes before cooking
- Mix milk and lemon juice in large bowl, let sit 5 minutes
- Add chicken pieces to milk mixture with salt and pepper
- Soak chicken for at least 20 minutes
- Combine flour with all seasonings in shallow dish
- Mix thoroughly until evenly distributed
- Remove one chicken piece from milk, let excess drip off
- Press chicken into seasoned flour, coating all surfaces
- Dip floured chicken back into milk briefly
- Return to flour for second coating, pressing firmly
- Repeat with remaining chicken pieces
- Heat butter and oil in large skillet over medium-high heat
- Heat mixture to 350°F
- Place cooling rack over baking sheet nearby
- Carefully add chicken pieces to hot butter-oil mixture
- Don’t overcrowd the pan, leave space between pieces
- Cook skin-side down for 8-10 minutes undisturbed
- Flip chicken when golden brown and crispy
- Cook second side for another 8-10 minutes
- Check internal temperature reaches 165°F
- Transfer finished chicken to cooling rack
- Let rest for 5 minutes before serving
- Maintain oil temperature between batches
- Serve hot with your favorite sides