Let me guess—you’re craving something sweet, indulgent, and ridiculously easy to make? Yeah, I thought so. Chocolate Covered Oreos are about to become your go-to dessert, and honestly, you’ll wonder why you didn’t try this sooner.
These little beauties are perfect for parties, gift-giving, or just satisfying that 3 PM chocolate craving. Trust me, once you master this recipe, you’ll be the hero of every gathering.
Prep Time: 15 minutes
Total Time: 45 minutes (including setting time)
Servings: 24 cookies
Why Chocolate Covered Oreos Are Amazing
Here’s the thing about Chocolate Covered Cookies—they’re fancy without being fussy. You take something everyone already loves (hello, Oreos!) and make them even better.
The contrast between the crunchy cookie and smooth chocolate? Chef’s kiss. Plus, you can customize them endlessly with different toppings and decorations.
IMO, these beat store-bought Chocolate Covered Treats Ideas any day. You control the chocolate quality, the decorations, and best of all, you can make them exactly how you like them.
What You’ll Need
Ingredients
Let me break down what you need for this Homemade Chocolate Dipped Oreos recipe. Spoiler alert: it’s not much.
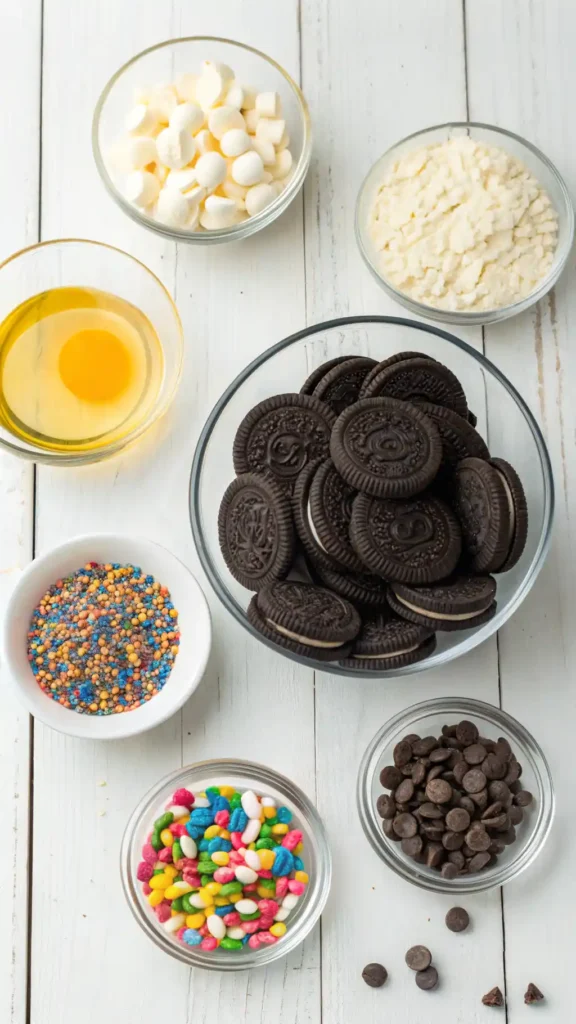
- 24 Oreo cookies (regular, Double Stuf, or any flavor you love)
- 12 ounces semi-sweet chocolate chips
- 12 ounces white chocolate chips (optional, for variety)
- 2 tablespoons coconut oil or vegetable shortening
- Sprinkles, crushed nuts, or mini chocolate chips for decoration
That’s it. Seriously. You probably have most of this in your pantry already.
Equipment
You don’t need fancy tools for these Chocolate Dipped Treats either. Just grab these basics:
- Microwave-safe bowls
- Fork or dipping tool
- Baking sheet
- Parchment paper or wax paper
- Optional: piping bag for drizzle designs
The Step-by-Step Process
Prep Your Workspace
First things first—set up your station. Line your baking sheet with parchment paper. This prevents sticking and makes cleanup a breeze.
Place your Oreos on a separate plate within easy reach. Trust me, having everything organized before you start dipping makes the whole process smoother.
Clear some space in your fridge too. You’ll need it later for those Chocolate-Dipped Oreos On Baking Sheet to set properly.
Melting the Chocolate
Now for the fun part. Pour your chocolate chips into a microwave-safe bowl. Add one tablespoon of coconut oil to the chocolate.
Why coconut oil? It helps thin the chocolate and gives you that gorgeous glossy finish. Plus, it makes dipping way easier.
Microwave in 30-second intervals, stirring between each burst. This prevents burning and ensures smooth, creamy chocolate. Usually takes about 90 seconds total.
Keep stirring until completely smooth. You want it flowing freely off your spoon. Too thick? Add a tiny bit more coconut oil.
The Dipping Technique
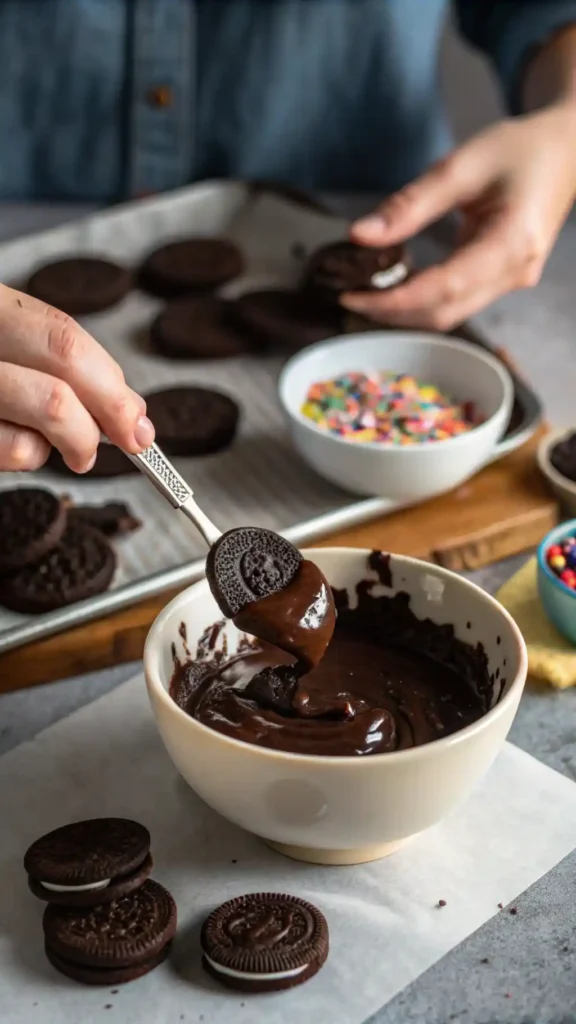
Here’s where your Dark Chocolate Dipped Oreos come to life. Drop one cookie into the melted chocolate. Use a fork to flip it over, coating both sides.
Slide the fork under the cookie and lift it out. Tap the fork gently on the bowl’s edge to remove excess chocolate.
This tapping step is crucial, folks. It prevents those thick chocolate pools around your cookies. You want a nice, even coating.
Carefully slide the cookie onto your prepared baking sheet. Use a toothpick to nudge it off the fork if needed.
Repeat this process with all your cookies. Work quickly but don’t rush—chocolate waits for no one, but it also doesn’t set instantly.
Adding Decorations
Right after dipping each cookie, add your toppings. The chocolate needs to be wet for decorations to stick properly.
Sprinkle on whatever makes your heart happy. Classic rainbow sprinkles? Go for it. Crushed candy canes during holidays? Absolutely. Sea salt for that sweet-salty combo? You’re speaking my language.
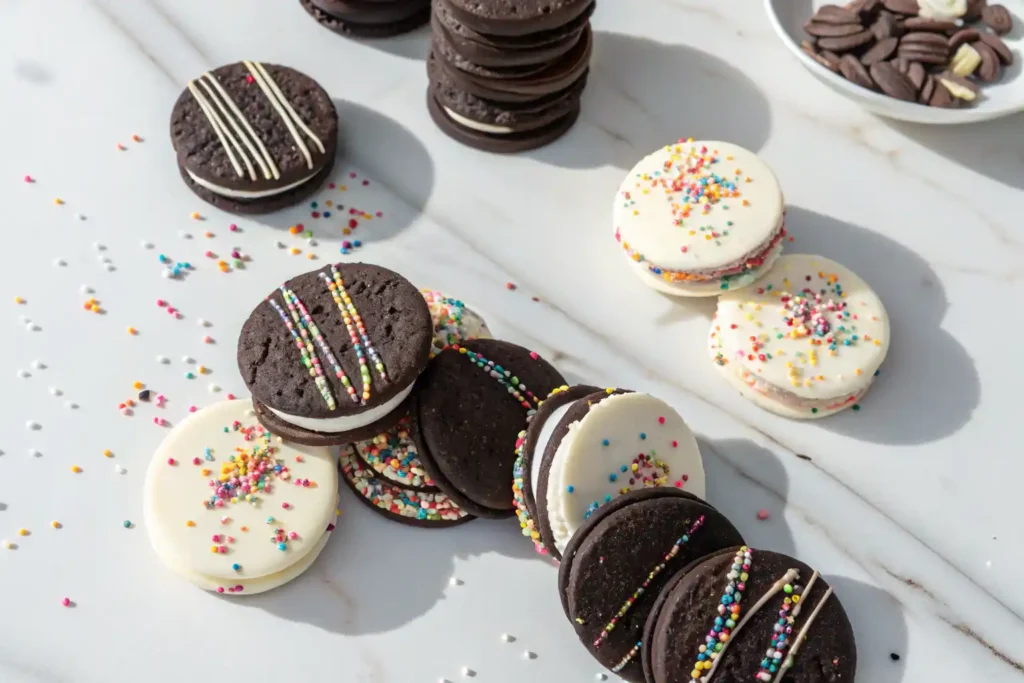
For fancier Decorated Oreos, drizzle contrasting chocolate on top. Melt white chocolate and use a piping bag or fork to create zigzag patterns.
You can also try crushing other cookies, chopped nuts, or mini chocolate chips. Get creative—there are no wrong answers here.
Setting Time
Pop your baking sheet into the refrigerator. Let those beauties chill for at least 30 minutes. This sets the chocolate perfectly.
Room temperature works too, but takes longer—about an hour. I’m impatient, so fridge it is.
Once set, the chocolate should be firm to the touch. No wet spots or sticky areas allowed.
Pro Tips for Perfect Results
Choose Quality Chocolate
Here’s something nobody tells you—chocolate quality matters. Like, really matters. Cheap chocolate chips can taste waxy and won’t set properly.
I prefer Ghirardelli or Guittard for these Chocolate Covered Desserts. The flavor difference is noticeable, and they melt like a dream.
For white chocolate, be extra picky. Some brands aren’t even real chocolate—check the ingredients. Real cocoa butter makes all the difference.
Temperature Control
Working with chocolate means respecting temperature. Too hot, and it burns. Too cool, and it seizes up.
Never let water get into your chocolate. Even a single drop causes it to clump and become unusable. Keep everything dry.
If your chocolate gets too thick while working, pop it back in the microwave for 10-15 seconds. Stir well and continue dipping.
Coating Thickness
Want to know how to nail the perfect coating? It’s all about that excess chocolate removal.
Tap, tap, tap that fork on the bowl’s edge. Seriously, don’t skip this step. It prevents elephant-foot cookies with thick chocolate puddles.
You want just enough chocolate to cover the cookie without overwhelming it. The Oreo should still be the star.
Flavor Variations to Try
Different Cookie Bases
Why stop at regular Oreos? Golden Oreos create a beautiful color contrast with dark chocolate. Mint Oreos? Even better with chocolate coating.
Try Birthday Cake Oreos for extra fun. Peanut Butter Oreos are dangerous—dangerously delicious, that is.
Each flavor creates a unique twist on this Chocolate Covered Oreos Recipe. Mix and match to find your favorite combo.
Chocolate Combinations
Double-dip for extra decadence. Coat in white chocolate first, let it set, then drizzle dark chocolate on top.
Create marbled effects by swirling white and dark chocolate together. These look super impressive but take minimal extra effort.
Milk chocolate offers a sweeter, milder flavor. Dark chocolate brings intensity. White chocolate adds creaminess. Use all three for variety.
Creative Toppings
Think beyond sprinkles, friends. Crushed pretzels add salty crunch. Toffee bits bring buttery sweetness. Freeze-dried strawberries create tangy pops.
Drizzle with caramel for Chocolate Covered Treats Ideas that rival expensive candy shops. Add edible gold dust for fancy occasions.
Seasonal toppings work great too. Candy corn for fall, crushed peppermint for winter, pastel sprinkles for spring.

Storing Your Creations
Keep these Oreos Dipped In Chocolate in an airtight container. Layer them with parchment paper between each level to prevent sticking.
They’ll stay fresh at room temperature for about a week. In the fridge, they last two weeks. Can you freeze them? Absolutely—up to three months.
Just let frozen ones thaw at room temperature before serving. The chocolate might sweat a bit, but the taste stays perfect.
Perfect Occasions for Chocolate Covered Oreos
Party Treats
These work for literally any party. Birthday? Check. Baby shower? Perfect. Wedding favor? Elegant and delicious.
Package them in clear cellophane bags tied with ribbon. Instant impressive gift that costs way less than store-bought treats.
Set up a DIY station at parties. Let guests dip and decorate their own. Kids especially love this activity.
Holiday Specials
Christmas? Use red and green sprinkles. Valentine’s Day? Pink and red with heart-shaped decorations. Halloween? Orange and black with spooky designs.
These How To Make Chocolate Covered Oreos At Home recipes adapt perfectly to any holiday theme. Change the colors, change the vibe.
Easter gets pastel sprinkles and mini chocolate eggs. Fourth of July deserves red, white, and blue. You get the idea.
Gift Giving
Stack them in a decorative tin. Boom—instant thoughtful gift. Way better than another candle, right?
Teachers, neighbors, coworkers—everyone appreciates homemade treats. Plus, you look like a domestic superstar without breaking a sweat.
Add a personalized tag with the recipe. People will ask how you made them, guaranteed.
Common Mistakes to Avoid
Chocolate Seizing
Water is chocolate’s enemy. Even humidity can cause problems. Keep all utensils bone dry.
If your chocolate does seize, don’t panic. Sometimes adding a tablespoon of warm cream and stirring vigorously saves it.
Prevention works better though. Just keep everything dry from the start.
Overheating
Burned chocolate tastes bitter and grainy. Can’t fix it—you’ll need to start over. FYI, this is why we use short microwave bursts.
Stir thoroughly between each interval. The residual heat continues melting even after you stop microwaving.
Patience pays off here. Rushing leads to ruined chocolate and wasted ingredients.
Decoration Timing
Add toppings immediately after dipping. Wait too long, and the chocolate sets. Then your sprinkles just bounce off.
Work one cookie at a time if needed. Quality beats speed every single time.
Keep your toppings nearby and ready to go. Organization prevents panic and mistakes.
Taking It to the Next Level
Cake Pops Designs Inspiration
Borrow ideas from Cake Pops Designs to elevate your Oreos. Insert a stick before dipping for Oreo pops.
These work great for kids’ parties. Easier to handle, less messy, totally Instagram-worthy.
Display them in a foam block for a stunning dessert table centerpiece.
Chocolate Covered Strawberries Ideas
Apply techniques from Chocolate Covered Strawberries Ideas here. The drizzle patterns? They work beautifully on Oreos too.
Try the same white chocolate zigzag over dark chocolate base. Classic, elegant, and crowd-pleasing.
The key difference? Oreos are way more forgiving than strawberries. No washing, no drying, no worrying about moisture.
Chocolate Covered Marshmallows Techniques
Some methods from Chocolate Covered Marshmallows apply here. Like using different chocolate types for variety.
The setting time is similar. The storage methods work identically. The presentation ideas transfer perfectly.
Basically, once you master one chocolate-dipping technique, you’ve mastered them all.
Why This Recipe Works
This How To Make Chocolate Covered Sandwich Cookies method is foolproof. You’re not baking anything, so timing isn’t critical.
The ingredients are accessible and affordable. Most grocery stores carry everything you need in one trip.
The technique requires no special skills. If you can melt chocolate and dip a cookie, you’re golden.
Plus, the results look professional. Nobody needs to know how easy they were to make 🙂
FAQ Section
How long do Chocolate Covered Oreos last?
At room temperature, they stay fresh for one week in an airtight container. Refrigerated, they last two weeks. Frozen? Up to three months without quality loss.
Can I use regular chocolate bars instead of chips?
Absolutely. Chop them finely for even melting. You might need slightly more coconut oil for proper consistency. Quality chocolate bars often taste better than chips.
Why is my chocolate too thick to dip?
Your chocolate needs more coconut oil or shortening. Add one teaspoon at a time, stirring well. Alternatively, the chocolate might be overheated—let it cool slightly.
Can I use almond bark instead of real chocolate?
Sure, almond bark melts easily and sets quickly. However, it doesn’t taste as rich as real chocolate. It’s cheaper though, so great for large batches.
Do I need to refrigerate these after making them?
Not necessarily. Refrigeration speeds up setting time. Once set, store them at room temperature in a cool, dry place. Refrigerate only in hot weather.

Chocolate Covered Oreos Recipe: Your New Favorite Treat
24
Cookies145
kcal45
minutesChocolate Covered Oreos transform ordinary cookies into extraordinary treats with minimal effort. Dip Oreos in melted chocolate, add creative toppings, and refrigerate until set. Perfect for parties, gifts, or personal indulgence, these customizable treats require just five ingredients and 45 minutes total time.
Ingredients
24 Oreo cookies
12 ounces semi-sweet chocolate chips
12 ounces white chocolate chips (optional)
2 tablespoons coconut oil or vegetable shortening
Sprinkles, nuts, or mini chocolate chips for decoration
Directions
- Line baking sheet with parchment paper
- Melt chocolate chips with coconut oil in 30-second microwave intervals
- Dip each Oreo into melted chocolate using a fork
- Tap fork on bowl edge to remove excess chocolate
- Place coated cookie on prepared baking sheet
- Add toppings immediately while chocolate is wet
- Refrigerate for 30 minutes until chocolate sets completely
- Store in airtight container at room temperature
Final Thoughts
There you have it—the ultimate guide to making Chocolate Dipped Oreos Recipe that’ll impress everyone. These Oreo Chocolate Dipped Cookies are seriously addictive.
The best part? You can customize them endlessly. Every batch can be different based on your mood or occasion.
So grab those Oreos and get dipping. Your taste buds will thank you, and so will everyone you share them with.