That rich, brown gravy that transforms fries and cheese curds into pure magic? You can absolutely make it at home. This Poutine Gravy Recipe delivers authentic Canadian flavor without boarding a plane to Montreal.
I’ve spent years perfecting this after countless disappointing attempts. Now my gravy rivals any Quebec diner. No exaggeration—it’s legitimately that good.
Prep Time: 5 minutes
Cook Time: 15 minutes
Total Time: 20 minutes
Servings: 4-6 servings (about 2 cups gravy)
Why This Gravy Matters
Here’s the thing about Homemade Poutine Gravy—it makes or breaks the dish. You can’t just pour regular beef gravy over fries.
Authentic poutine gravy has specific characteristics. Slightly sweet, peppery, with that distinctive brown color.
This Gravy Poutine Recipe creates the real deal. Not too thick, not too thin—just right for coating fries and melting cheese curds.
What Makes Poutine Gravy Different
Traditional Characteristics
Poutine gravy is thinner than regular beef gravy. It needs to seep between fries and soften cheese curds.
The flavor profile is unique. Slightly sweet from vegetables, peppery, deeply savory.
Most importantly, it stays liquid even when coating hot fries. That’s the texture goal here.
This Canadian Food staple can’t be replicated with jar gravy. Sorry, but it just doesn’t work.
Common Misconceptions
Poutine gravy isn’t just beef gravy with different seasoning. The technique differs completely.
Some people think it’s basically Potato Gravy. Wrong again—that’s for mashed potatoes.
This isn’t thick like Sunday Gravy either. Completely different consistency and purpose.
Understanding these differences prevents disappointment. Know what you’re making before starting.
Ingredients You’ll Need
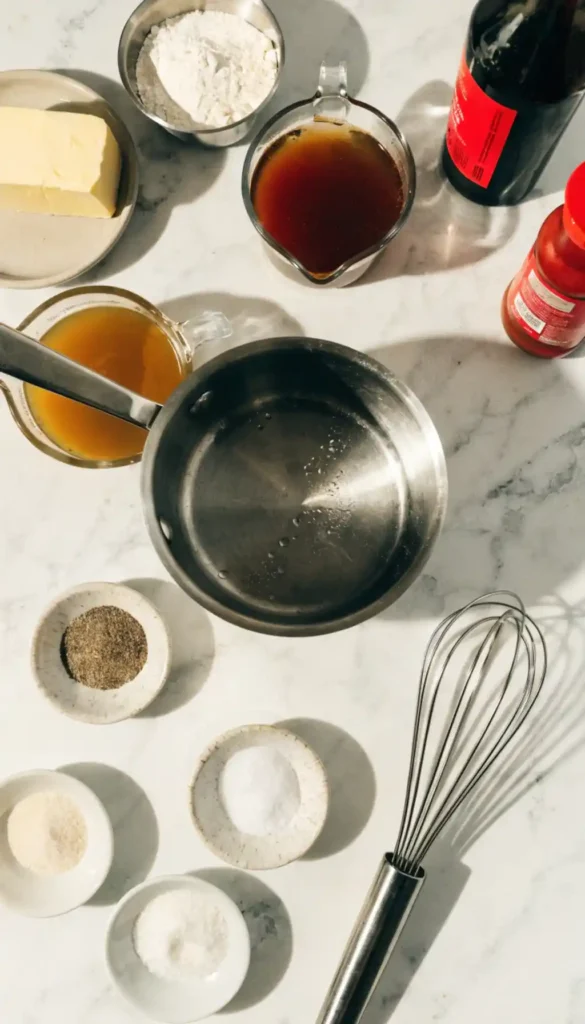
For the Gravy Base
These create authentic Homemade Poutine flavor. Simple ingredients, specific ratios.
- 3 tablespoons unsalted butter
- 1/4 cup all-purpose flour
- 2 cups beef broth (good quality)
- 1 cup chicken broth
- 1 tablespoon ketchup
- 1 tablespoon Worcestershire sauce
- 1/2 teaspoon garlic powder
- 1/2 teaspoon onion powder
- 1/4 teaspoon black pepper
- Salt to taste
Optional Enhancements
These extras elevate basic Easy Poutine Recipe gravy to extraordinary.
- 1 teaspoon cornstarch (for extra thickness)
- 1/4 teaspoon MSG (enhances umami)
- Splash of white vinegar (adds brightness)
Equipment Needed
You need minimal tools for this Poutine Easy Recipe. Basic kitchen stuff works perfectly.
- Medium saucepan
- Whisk
- Measuring cups and spoons
- Fine-mesh strainer (optional)
Making the Perfect Roux
Starting the Foundation
Melt butter in saucepan over medium heat. Don’t let it brown—just melted.
Add flour all at once. Whisk immediately to combine completely.
This creates a roux—the thickening agent for your gravy. Essential step here.
Cook the roux for 2-3 minutes, whisking constantly. You want it lightly golden.
The roux should smell toasty, not raw. This cooks out the flour taste.
IMO, rushing the roux ruins everything. Give it proper time to develop.
Achieving the Right Color
The roux color determines final gravy color. Light golden creates proper poutine shade.
Too dark and you’ll get brown gravy. Too light creates pale, unappealing gravy.
Watch it carefully. It changes color quickly once it starts.
This step separates okay gravy from authentic poutine gravy. Color matters enormously.
Adding the Liquids
The Gradual Pour
Pour beef broth slowly while whisking constantly. Start with just 1/2 cup.
Whisk vigorously to prevent lumps. The roux absorbs liquid and smooths out.
Add remaining beef broth gradually. Keep whisking the entire time.
Pour in chicken broth next. The combination creates complex flavor depth.
Never dump all liquid at once. Gradual addition prevents lumping.
Preventing Lumps
Lumps form when flour clumps before liquid reaches it. Constant whisking prevents this.
If lumps form, whisk harder. Most will dissolve with aggressive whisking.
Worst case, strain gravy through fine-mesh strainer. Not ideal but salvages it.
Temperature control helps too. Medium heat lets you whisk effectively.
Seasoning the Gravy
Adding Flavor Components
Stir in ketchup once liquids are smooth. This adds subtle sweetness and color.
Add Worcestershire sauce. This provides depth and umami complexity.
Sprinkle in garlic powder, onion powder, and black pepper. Stir well.
These seasonings create that distinctive poutine gravy flavor. Don’t skip them.
Taste before adding salt. The broths already contain sodium.
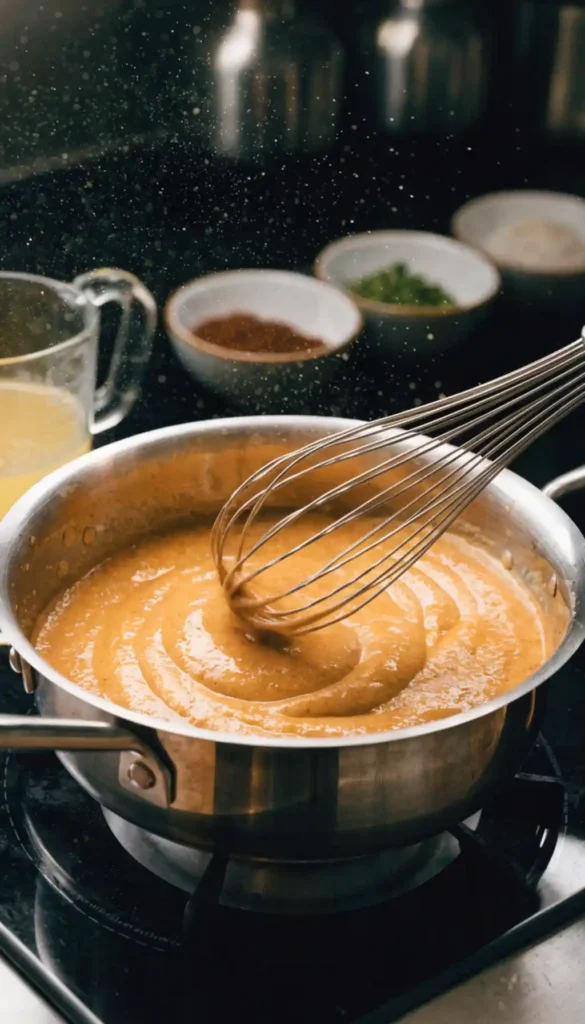
Simmering to Perfection
Bring gravy to gentle simmer. Reduce heat to medium-low.
Simmer for 5-7 minutes, stirring occasionally. The flavors meld together beautifully.
The gravy will thicken as it simmers. It should coat the back of a spoon.
Remember it thickens more as it cools. Keep it slightly thinner than desired.
Achieving Perfect Consistency
Thickness Test
Dip spoon in gravy. Run your finger across the back.
The line should hold briefly before filling in. That’s perfect consistency.
Too thick? Add more broth one tablespoon at a time. Stir well.
Too thin? Mix 1 teaspoon cornstarch with cold water. Stir into simmering gravy.
The texture should flow freely but coat fries well. Finding this balance matters.
Final Adjustments
Taste your gravy now. Need more pepper? More salt? Adjust freely.
The flavor should be savory, slightly sweet, with peppery finish.
If too bland, add splash of Worcestershire. If too salty, dilute with water.
This is your gravy. Make it taste how you want it.
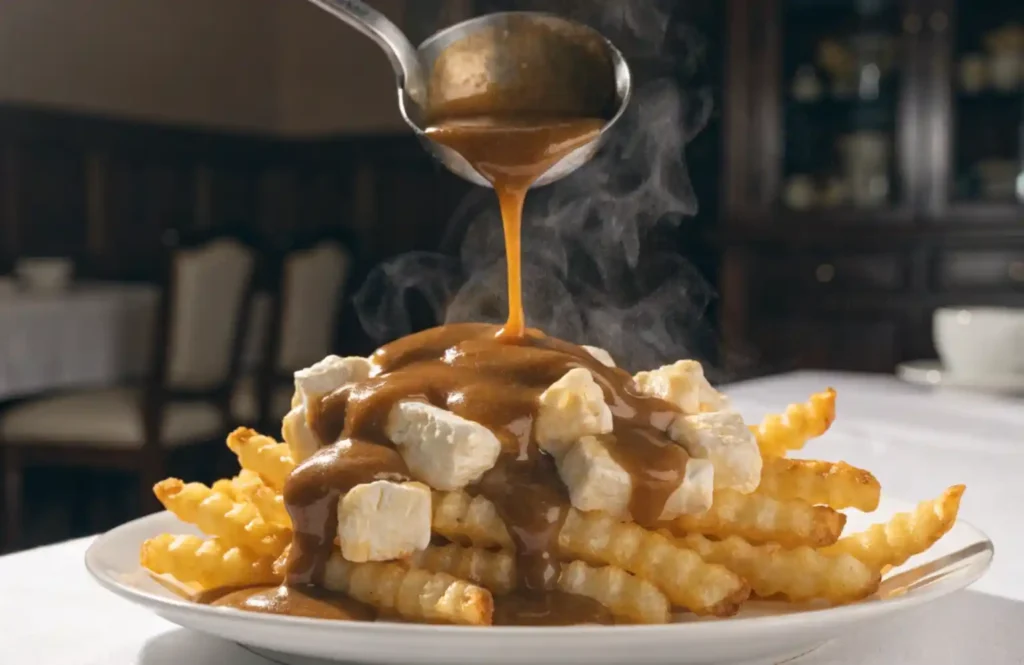
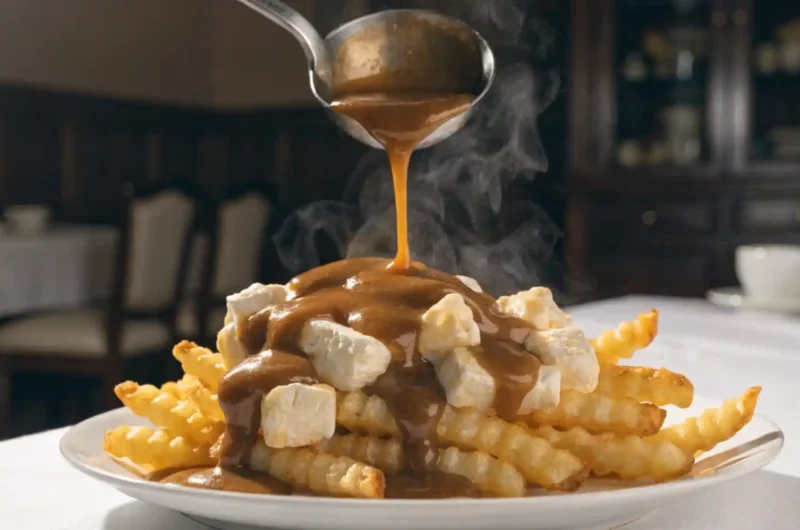
Serving Your Poutine

Classic Preparation
Start with crispy Poutine Fries. Fresh-cut or frozen both work.
Add fresh cheese curds generously. They should squeak when you bite them.
Pour hot gravy over everything immediately. The heat melts cheese curds perfectly.
Serve right away. Poutine waits for nobody—it gets soggy fast.
Creative Variations
Try Pulled Pork Poutine by adding BBQ pulled pork on top. Ridiculously good.
Bacon, green onions, and sour cream create loaded poutine. Guilty pleasure territory.
Montreal smoked meat makes incredible topping. Authentic Quebec style.
What To Eat With Poutine? Nothing—it’s a complete meal. Maybe a salad if you’re fancy.
Storage and Reheating
Refrigerator Storage
Store cooled gravy in airtight container. Keeps for up to 5 days refrigerated.
The gravy will thicken significantly when cold. Completely normal behavior.
Bring to room temperature before reheating. Prevents oil separation.
Reheating Methods
Stovetop reheating works best. Add splash of broth to thin it.
Warm over low heat, whisking constantly. Don’t let it boil hard.
Microwave works in a pinch. Heat in 30-second intervals, stirring between.
The gravy should return to original consistency. Add broth if needed.
Freezer Instructions
This freezes beautifully for up to 3 months. Perfect batch-cooking recipe.
Freeze in ice cube trays for portion control. Pop out cubes as needed.
Thaw overnight in refrigerator before reheating. Never microwave from frozen.
Common Mistakes to Avoid
Burning the Roux
Burnt roux tastes bitter. There’s no fixing this—you must start over.
Use medium heat, not high. Patience prevents burning.
Whisk constantly during roux stage. Don’t walk away even briefly.
Using Wrong Broth
All-beef broth creates too heavy flavor. The beef-chicken combo is essential.
Low-quality broth makes weak gravy. Invest in good broth here.
Water with bouillon cubes works but tastes inferior. Real broth wins.
Overseasoning
You can always add more seasoning. Can’t remove it once added.
Start conservative with salt and pepper. Taste and adjust gradually.
Remember cheese curds add saltiness. Consider this when seasoning.
Budget-Friendly Tips
This recipe costs about $3 to make. That’s roughly 50 cents per serving.
Way cheaper than restaurant poutine. You’re saving $5-8 per serving easily.
FYI, the ingredients store well. Buy once, make multiple batches.
Why Homemade Beats Store-Bought
Jarred gravy tastes artificial and too thick. It doesn’t melt cheese curds properly.
Homemade lets you control salt levels. Most commercial gravies are crazy salty.
You know exactly what goes in. No mystery ingredients or preservatives.
Fresh gravy tastes incomparably better. The difference is immediately obvious.
Adapting for Dietary Needs
Vegetarian Version
Use vegetable broth instead of beef and chicken. Add extra Worcestershire.
The flavor differs but still works. Not traditional but tasty.
Mushroom broth adds meaty depth. Better vegetarian option than plain vegetable.
Gluten-Free Option
Replace flour with cornstarch or gluten-free flour blend. Use equal amounts.
The texture changes slightly. Cornstarch creates glossier gravy.
Ensure broths are certified gluten-free. Some contain wheat.
Lower Sodium
Use low-sodium broths throughout. Reduces sodium by about 40%.
Skip added salt entirely. Let natural broth sodium carry flavor.
This version tastes less authentic but works for restrictions.
FAQ Section
Can I make this without beef broth?
You can use all chicken broth but the flavor will be lighter. For best results, use the beef-chicken combo. It creates that distinctive poutine gravy taste.
Why does my gravy have lumps?
Lumps form when you add liquid too fast or don’t whisk enough. Add broth gradually while whisking constantly. Strain if necessary to remove stubborn lumps.
How do I make it thicker?
Simmer longer to reduce liquid or add cornstarch slurry (1 teaspoon cornstarch mixed with cold water). Stir into simmering gravy and cook 1-2 minutes until thickened.
Can I use this gravy for other dishes?
Absolutely. It works great over mashed potatoes, meatloaf, or Hamburger And Gravy Recipe dishes. The peppery flavor complements many comfort foods perfectly.
What makes poutine gravy different from regular gravy?
Poutine gravy is thinner, slightly sweet, and more peppery. It stays liquid when hot to properly coat fries and melt cheese curds. Regular gravy is thicker and differently seasoned.
Poutine Gravy Recipe: The Soul of Canadian Comfort Food
4
servings80
kcal20
minutesPoutine gravy combines butter, flour, beef and chicken broth with ketchup and Worcestershire sauce for authentic Canadian flavor. Create roux with butter and flour, gradually whisk in broths, add seasonings, simmer until proper consistency. Pour hot over crispy fries and fresh cheese curds for classic poutine. Perfect savory gravy ready in 20 minutes.
Ingredients
3 tablespoons unsalted butter
1/4 cup all-purpose flour
2 cups beef broth
1 cup chicken broth
1 tablespoon ketchup
1 tablespoon Worcestershire sauce
1/2 teaspoon garlic powder
1/2 teaspoon onion powder
1/4 teaspoon black pepper
Salt to taste
Directions
- Melt butter in medium saucepan over medium heat
- Add flour all at once, whisk immediately to combine
- Cook roux 2-3 minutes, whisking constantly until lightly golden
- Pour 1/2 cup beef broth slowly while whisking vigorously
- Add remaining beef broth gradually, whisking constantly
- Pour in chicken broth, continue whisking until smooth
- Stir in ketchup and Worcestershire sauce
- Add garlic powder, onion powder, and black pepper
- Bring to gentle simmer, reduce heat to medium-low
- Simmer 5-7 minutes, stirring occasionally
- Test consistency—should coat back of spoon
- Taste and adjust salt and seasonings
- Strain through fine-mesh strainer if lumps remain
- Pour hot over fries and cheese curds immediately
Final Thoughts
There you have it—everything you need to make authentic Poutine Gravy that transforms simple fries into Canadian comfort food perfection. This recipe proves you don’t need a Quebec diner nearby.
The combination of proper technique and right seasoning creates that signature flavor. Every spoonful delivers savory, peppery goodness.
So grab those cheese curds and get cooking. Your poutine game is about to reach legendary status.