You know that classic spinach artichoke dip everyone fights over at parties? Now imagine it wrapped in buttery, flaky crescent dough. These little golden pockets are basically edible happiness.
I’m about to change your appetizer game forever.
Prep Time: 15 minutes
Cook Time: 12 minutes
Total Time: 27 minutes
Servings: 16 crescent bites
Why These Crescent Bites Win Every Time
Here’s what makes spinach artichoke crescent bites the ultimate party food. They combine everyone’s favorite dip with the convenience of handheld portions.
No double-dipping drama, no need for plates or chips. Just grab one and enjoy. The crescent dough creates this perfect buttery vessel for all that creamy goodness.
I’ve brought these to countless gatherings. They never last more than 10 minutes on the table. People literally hover around the platter waiting for them to cool.
The best part? They look impressive but take almost no effort. Your secret is safe with me. 🙂
Gathering Your Ingredients

Let’s talk about what you need to create these golden bundles of joy. The list is surprisingly short and sweet.
For the Filling:
- 1 package (8 ounces) cream cheese, softened
- ½ cup sour cream
- 1 cup frozen chopped spinach, thawed and squeezed dry
- ¾ cup canned artichoke hearts, drained and chopped
- 1 cup shredded mozzarella cheese
- ½ cup grated Parmesan cheese
- 2 cloves garlic, minced
- ½ teaspoon onion powder
- ¼ teaspoon black pepper
- ¼ teaspoon salt
For Assembly:
- 2 cans (8 ounces each) refrigerated crescent roll dough
- 1 egg, beaten (for egg wash)
- 2 tablespoons melted butter
- ½ teaspoon garlic powder
- Fresh parsley for garnish (optional)
The Secret to Perfect Spinach Prep
Let me save you from soggy crescent bites right now. The spinach must be completely dry. I’m talking squeeze-it-like-you-mean-it dry.
Thaw frozen spinach in the microwave or overnight in the fridge. Then wrap it in paper towels or a clean kitchen towel.
Squeeze hard over the sink. You’ll be shocked how much water comes out. Keep squeezing until barely any moisture remains.
Wet spinach equals soggy filling which equals disappointing bites. Nobody wants that tragedy. Take the extra minute to do this right.
Prepping the Artichoke Hearts
Drain those canned artichokes thoroughly. Pour them into a colander and let them sit for a few minutes.
Pat them dry with paper towels. Then chop them into small pieces – about ¼ inch chunks works perfectly.
You want pieces small enough to distribute evenly but large enough to taste. Artichoke chunks add texture and that distinctive tangy flavor.
Some people use marinated artichokes. IMO, that’s too much extra moisture and competing flavors. Stick with plain canned or jarred artichoke hearts.
Creating the Creamy Filling
Make sure your cream cheese is properly softened. Rock-hard cream cheese creates lumpy filling that’s impossible to spread.
In a medium bowl, mix the softened cream cheese and sour cream until smooth. Use a hand mixer or really work that spoon.
Add the squeezed-dry spinach and chopped artichokes. Fold them in gently but thoroughly. Everything should look evenly distributed.
Stir in the mozzarella, Parmesan, minced garlic, onion powder, salt, and pepper. Mix until all ingredients are completely combined.
Taste the filling now. Seriously, grab a spoon and taste it. This is quality control, not snacking. Okay, it’s both.
Adjust seasoning if needed. Want more garlic? Add it. Need more salt? Go for it. This is your filling.
Understanding Crescent Dough Basics
Refrigerated crescent dough is a busy cook’s best friend. Keep it cold until you’re ready to work with it.
Open the can carefully. That pop still startles me every single time, and I’ve done this hundreds of times.
Unroll the dough gently on a clean surface. You’ll see perforations marking individual triangles.
Don’t separate them yet. We’re doing something different here that makes these bites way easier to assemble.
Cutting Your Dough Strategically
Here’s the trick: press the perforations together to form rectangles instead of triangles. You’ll get 4 rectangles per can.
Use a pizza cutter or sharp knife to cut each rectangle into 4 smaller squares. Each can gives you 16 squares total.
Keep the dough cold while you work. If it gets too warm, it becomes sticky and hard to handle.
Work quickly and efficiently. Warm dough is your enemy here. Cold dough is cooperative and delightful.
Filling Your Crescent Squares
Place about 1 tablespoon of filling in the center of each square. Don’t overfill – that’s the rookie mistake everyone makes.
Too much filling and they burst open during baking. Nobody wants exploded crescent bites leaking all over the baking sheet. :/
Leave about ½ inch border around the edges. This space is crucial for proper sealing.
Use a small cookie scoop for consistent portions. Every bite should have the same amazing filling-to-dough ratio.
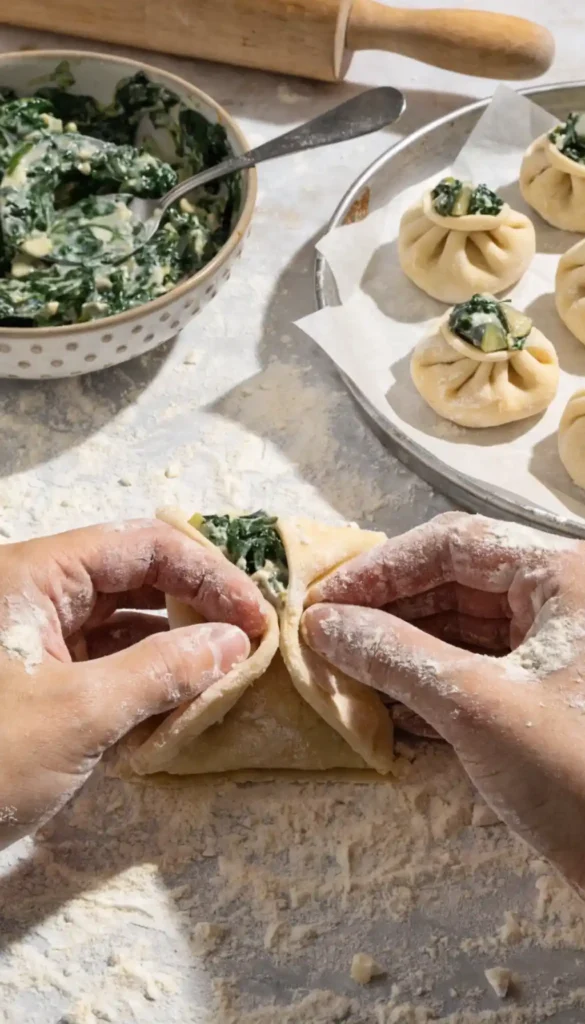
The Folding Technique That Works
Bring two opposite corners together over the filling. Pinch them closed firmly.
Now bring the other two corners up and pinch all four corners together in the center. Creates a little purse shape.
Pinch and seal all the seams where dough meets dough. Really press them together. Unsealed edges leak during baking.
Place each sealed bite seam-side up on a parchment-lined baking sheet. Space them about 2 inches apart for even air circulation.
Some people fold them into triangles. Some do half-moons. The four-corner method I described creates the most reliable seal.
Preparing for the Oven
Preheat your oven to 375°F. Don’t skip preheating – it affects how the dough rises and browns.
Brush each crescent bite with beaten egg. This creates that gorgeous golden color everyone expects.
The egg wash isn’t optional if you want professional-looking results. It’s the difference between okay and outstanding.
Mix melted butter with garlic powder. Brush this over the egg-washed bites for extra flavor and shine.
Baking to Golden Perfection
Slide your baking sheet into the preheated oven. Set a timer for 10 minutes, then start checking.
You’re looking for deep golden brown color on top and bottom. The dough should look completely cooked, not pale or doughy.
Total baking time runs 12-15 minutes depending on your oven. Every oven is slightly different, so watch them carefully.
The filling might bubble through small openings. That’s totally normal and actually looks kind of rustic and appealing.
Remove them when they’re golden and puffed. Let them cool on the baking sheet for 3-4 minutes before transferring.

Cooling and Serving Strategy
Those bites are lava-hot straight from the oven. Let them cool slightly before serving or you’ll burn everyone’s mouths.
Transfer to a serving platter after 5 minutes. They’re best served warm but not scalding hot.
Garnish with chopped fresh parsley if you’re feeling fancy. It adds color and makes them look more sophisticated.
Provide small napkins alongside. The butter makes them slightly greasy – in the best possible way.
Dipping Sauce Suggestions
These are perfect on their own, but dipping sauces take them to another level. Let me share winning combinations.
Marinara Sauce: Warm marinara for dipping creates Italian vibes. The acidity cuts through the rich, creamy filling beautifully.
Ranch Dressing: Because ranch makes everything better. This is basically a scientific fact at this point.
Garlic Aioli: Mix mayo with minced garlic and lemon juice. Fancy but takes 30 seconds to make.
Balsamic Reduction: Drizzle over the top instead of dipping. Sweet and tangy contrast with savory filling.
Make-Ahead Options for Busy Hosts
Want to prep these ahead? You’ve got several solid options that actually work.
Filling Only: Make the filling up to 2 days ahead. Store in an airtight container in the fridge. Assemble and bake when ready.
Fully Assembled: Assemble the bites completely, place on a baking sheet, and refrigerate for up to 4 hours. Bake when guests arrive.
Freezer Method: Assemble and freeze on a baking sheet. Transfer frozen bites to freezer bags. Bake from frozen, adding 3-5 minutes to cooking time.
FYI, I prefer the filling-only method. Fresh-assembled bites bake more evenly than frozen ones.
Variation Ideas Worth Trying
This base recipe adapts beautifully to different flavor profiles. Here are tested variations I love.
Add Bacon: Crumble 4 slices of cooked bacon into the filling. Because bacon makes everything better.
Sun-Dried Tomatoes: Chop ¼ cup sun-dried tomatoes and mix into filling. Adds sweet-tart punch and beautiful color.
Jalapeño Kick: Mix in 2 tablespoons diced jalapeños for heat. Spicy spinach artichoke is seriously addictive.
Crab Addition: Fold in ½ cup lump crab meat. Turns these into upscale party appetizers.
Storage and Reheating Tips
Leftover crescent bites store in an airtight container for 3 days refrigerated. They’re actually great cold too.
Reheat in a 350°F oven for 5-7 minutes. This re-crisps the outside while warming the filling.
Microwave works in a pinch but makes the dough soft instead of flaky. Oven reheating is always better.
Don’t freeze after baking. The texture gets weird and soggy. Only freeze before baking for best results.
Common Mistakes to Avoid
Let me save you from the errors I made while perfecting these bites.
Not Drying Spinach: Wet spinach creates watery filling that leaks everywhere. Squeeze it dry like your life depends on it.
Overfilling: More filling seems better but causes explosions. Stick with 1 tablespoon per bite maximum.
Skipping Egg Wash: Pale, dull bites look homemade in the wrong way. That egg wash creates professional appearance.
Baking Too Hot: High heat burns the outside before the inside cooks. Stick with 375°F for even baking.
Why Homemade Beats Store-Bought
Pre-made frozen spinach artichoke bites exist, but they’re nowhere near as good as these homemade versions.
You control the filling ratio and seasoning. Store versions skimp on filling and overdo the dough.
Fresh ingredients taste infinitely better than whatever preservatives they pack into frozen appetizers.
These cost about $8 to make 16 bites. Frozen versions charge similar prices for half the quantity and quality.
Scaling for Large Gatherings
Need to feed a crowd? This recipe doubles or triples beautifully without any adjustments.
Make multiple batches of filling in advance. Store in the fridge and assemble bites in batches as needed.
You can bake multiple sheets simultaneously. Just rotate them halfway through for even browning.
Figure 2-3 bites per person for appetizer portions. For a party of 20, make 3 batches.
Pairing with Other Appetizers
These spinach artichoke bites pair perfectly with other party foods. Let me share strategic combinations.
Serve alongside meatballs for protein variety. The flavors and textures complement each other nicely.
Add a cheese board for people who want lighter options. Provides contrast to the rich, hot bites.
Include veggie crudités with hummus. Gives health-conscious guests something to munch on.
Sweet dessert bites at the end round out the appetizer spread perfectly.
Perfect for Every Occasion
These crescent bites work for literally any event. Holiday parties? Check. Game day? Absolutely. Book club? Perfect.
They’re fancy enough for cocktail parties but casual enough for family gatherings. That versatility is rare.
Kids generally love them too. The familiar crescent dough makes them less intimidating than some appetizers.
Vegetarian guests appreciate having a substantial option that isn’t just vegetables and hummus.
Final Thoughts on Crescent Perfection
Spinach artichoke crescent bites prove that the best recipes combine familiar favorites in new ways. Nothing revolutionary here, just smart assembly.
The buttery, flaky dough wrapped around creamy, cheesy filling creates something greater than the sum of its parts. That’s recipe magic.
These make you look like a culinary genius with minimal actual effort. I’m all about maximum praise for reasonable work.
So grab those ingredients and start assembling. Your next party just found its star attraction.

Spinach Artichoke Crescent Bites: Party Appetizers That Disappear in Minutes
16
bites120
kcal27
minutesSpinach artichoke crescent bites wrap classic spinach artichoke dip filling in buttery crescent dough. Cream cheese, mozzarella, Parmesan, spinach, and artichokes create the creamy filling. Each bite is brushed with egg wash and garlic butter, then baked until golden. Perfect make-ahead party appetizers that disappear fast at any gathering.
Ingredients
8 oz cream cheese, softened
½ cup sour cream
1 cup frozen spinach, thawed and squeezed dry
¾ cup artichoke hearts, chopped
1 cup shredded mozzarella
½ cup grated Parmesan
2 cloves garlic, minced
½ tsp onion powder
¼ tsp black pepper
¼ tsp salt
2 cans (8 oz each) crescent roll dough
1 egg, beaten
2 tbsp melted butter
½ tsp garlic powder
Fresh parsley (optional)
Directions
- Preheat oven to 375°F and line baking sheet
- Thaw frozen spinach and squeeze completely dry
- Drain and chop artichoke hearts into small pieces
- Mix softened cream cheese and sour cream until smooth
- Add spinach, artichokes, mozzarella, Parmesan, garlic, seasonings
- Stir filling until evenly combined
- Unroll crescent dough and press perforations together
- Cut dough into rectangles, then cut into squares (16 per can)
- Place 1 tablespoon filling in center of each square
- Bring four corners together and pinch to seal
- Place seam-side up on prepared baking sheet
- Brush with beaten egg wash
- Mix melted butter with garlic powder
- Brush garlic butter over each bite
- Bake 12-15 minutes until golden brown
- Cool 5 minutes before serving
- Garnish with fresh parsley if desired
FAQs
Can I use fresh spinach instead of frozen? Yes! Use about 2 cups fresh spinach. Sauté it first until completely wilted, then chop and squeeze dry. Fresh spinach has more moisture, so the squeezing step is even more critical.
What if I don’t have crescent roll dough? Puff pastry works as a substitute. Cut it into squares and fill the same way. Baking time might increase slightly, and the texture will be flakier rather than layered.
Can I make these dairy-free? Use dairy-free cream cheese, sour cream, and cheese alternatives. The texture will be slightly different but still delicious. Brush with olive oil instead of butter.
Why do my bites leak during baking? Either too much filling or inadequate sealing. Use only 1 tablespoon filling per bite and really pinch those seams closed. Make sure spinach is completely dry too.
How do I keep the dough from getting sticky? Work quickly and keep everything cold. If dough gets warm and sticky, refrigerate it for 10 minutes. Dust your work surface lightly with flour if needed.