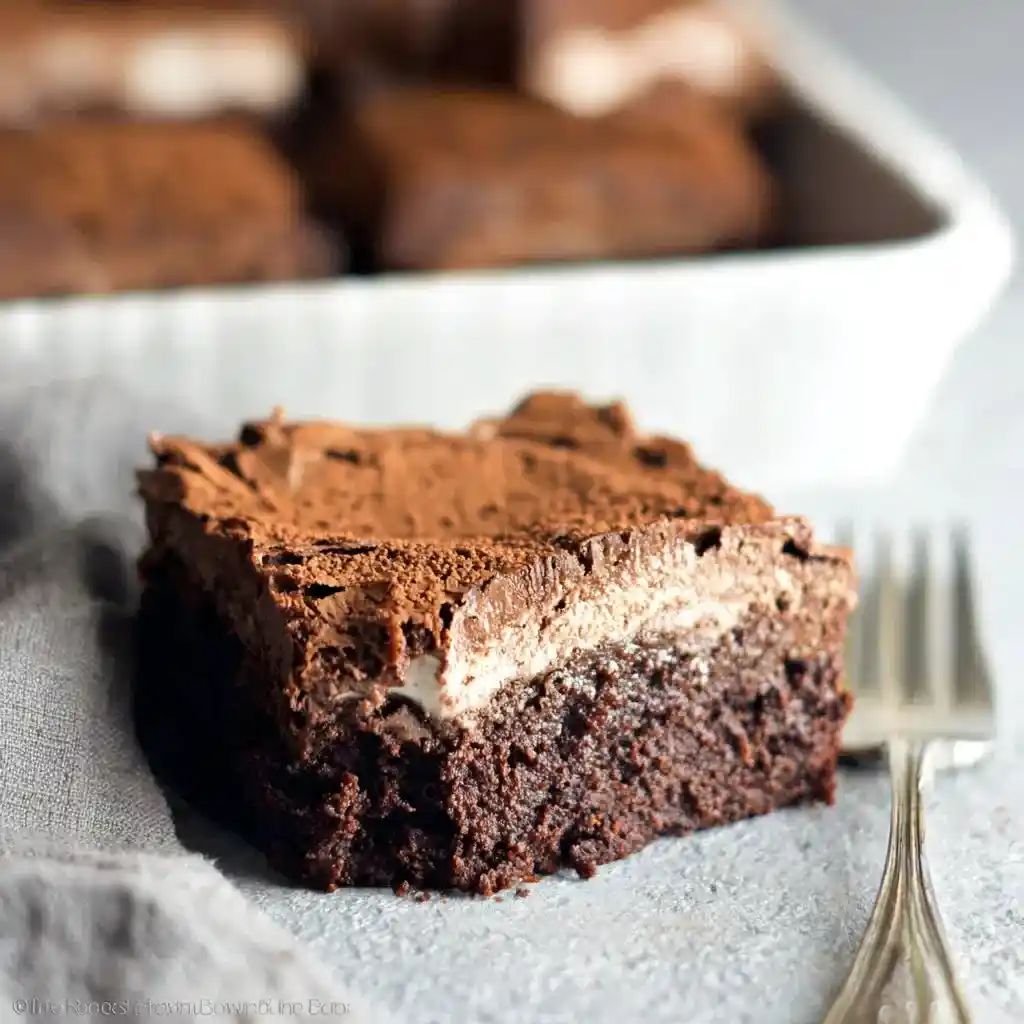
Fudgy brownie base, silky chocolate filling, fluffy topping. If that doesn’t make your mouth water a little, I don’t know what will.
I made these for a family dinner once, and they disappeared before the main course even hit the table. That’s the kind of chaos French Silk Brownies cause.
Servings: 12 squares Prep time: 25 minutes Chill time: 2 hours Total time: Roughly 3 hours (mostly hands-off)
What Makes French Silk Brownies So Different
Regular brownies stop at fudgy and chocolatey. This recipe adds a creamy, mousse-like layer on top that turns a simple treat into something bakery-worthy.
Think of it as a brownie wearing a fancy coat. IMO, that extra layer is what separates a good dessert from one people actually remember.
The contrast between dense brownie and light, airy filling does all the heavy lifting here. Have you ever had a dessert where every bite feels a little different? This is that dessert.
What You’ll Need
Let’s break this down by layer, since that keeps things simple.
For the Brownie Base
- Boxed brownie mix (unprepared)
- Egg
- Unsalted butter, melted
- Milk
For the French Silk Layer
- Cream cheese, softened
- Vanilla extract
- Powdered sugar
- Semi-sweet chocolate
- Unsalted butter, cubed
- Cool Whip
Now For the Topping
- Cool Whip
- Chocolate shavings or mini chocolate chips
Nothing here requires a trip to a specialty store. That’s honestly half the appeal.
How to Make French Silk Brownies
This recipe has layers, literally, so let’s go step by step. Take your time with each stage and the final result will feel worth it.
Step 1: Prep Your Pan and Oven
Preheat your oven to 350 degrees Fahrenheit. Grease an 11×7-inch glass baking dish with non-stick spray so the brownies release cleanly later.
Getting this step right now saves you frustration later. Nobody wants a brownie that fights back when you try to serve it.
Step 2: Mix the Brownie Batter
In a mixing bowl, combine your brownie mix, egg, melted butter, and milk. Stir until the batter looks smooth with no dry streaks left.
Don’t overthink this part. A basic brownie mix does the job just fine, and honestly, nobody at the table will know the difference.
Step 3: Bake the Brownie Layer
Spread the batter evenly into your prepared dish, making sure it reaches all the corners. Bake for 25 to 28 minutes, checking with a toothpick near the center.
Once it comes out clean, pull the brownies from the oven. Let them cool completely to room temperature before moving forward, since a warm base will melt your filling.
Step 4: Make the Cream Cheese Base
In a large bowl, beat the softened cream cheese with vanilla extract until smooth. Add the powdered sugar gradually and mix until fully combined and creamy.
Take your time here so you avoid lumps. A smooth base now means a smoother, silkier filling later.
Step 5: Melt the Chocolate
In a microwave-safe bowl, combine the semi-sweet chocolate and cubed butter. Heat in 30-second bursts, stirring between each round until fully melted and glossy.
Rushing this step with high heat risks scorching the chocolate. Slow and steady wins here, even if it feels tedious.
Step 6: Combine the Filling
Pour the melted chocolate mixture into your cream cheese base and mix until fully incorporated. The color should turn a deep, even brown with no streaks.
Gently fold in Cool Whip until the mixture looks light and fluffy. Folding, not stirring, keeps all that airy texture intact.
Step 7: Layer and Chill
Spread the French silk filling evenly over your cooled brownie base. Top with the remaining Cool Whip, smoothing it out for a clean, bakery-style finish.
Sprinkle chocolate shavings or mini chips on top if you want extra flair. Chill the whole dish for at least two hours before slicing.
Step 8: Slice and Serve
Use a sharp knife and wipe it clean between cuts for neat, tidy squares. Serve chilled, since the filling holds its shape best straight from the fridge.
Have you ever cut into a dessert and just paused to admire it for a second? This is one of those moments.
Serving Suggestions Worth Trying
These brownies pair beautifully with a handful of simple additions. A few favorites of mine include:
- A drizzle of extra chocolate sauce for a bakery-style finish
- A scoop of vanilla ice cream on the side
- A hot cup of coffee to balance the sweetness
- A glass of cold milk for a classic pairing
Serve these at a party and watch how fast the tray empties. FYI, you might want to make a double batch just to be safe.
Storing and Reheating Leftovers
Refrigerator storage keeps these fresh for up to 5 days in an airtight container. Keep them cold at all times since the cream cheese and whipped topping layers don’t do well at room temperature.
Freezer storage works great for individual slices, lasting up to 2 months when wrapped tightly. Thaw overnight in the refrigerator before serving so the texture stays smooth.
Store away from strong-smelling foods in your fridge. Chocolate desserts pick up odors more easily than you’d expect :/
Fun Variations to Try
Once you’ve made the base recipe, feel free to get creative. A few standout variations worth trying:
- Oreo version with crushed cookies layered between the brownie and filling
- Mint chocolate version with peppermint extract and crushed mint candies
- Mocha version with instant espresso powder mixed into the filling
- Salted caramel version drizzled between the layers and on top
Why stick with one flavor combo when there are so many worth exploring? Pick whichever sounds good to you this week.
Frequently Asked Questions
Can I use homemade brownie batter instead of a boxed mix? Yes, homemade batter works perfectly here. Just make sure it bakes up fudgy rather than cakey for the best texture contrast.
Do these brownies need to stay refrigerated? Yes, absolutely. The cream cheese and whipped topping layers require cold storage to stay food-safe and hold their texture.
Can I make these ahead of time? Yes, and honestly, they taste even better after chilling overnight. The flavors settle and the layers firm up nicely.
Can I freeze French Silk Brownies? Yes, wrap slices tightly and freeze for up to 2 months. Thaw them in the fridge overnight before serving.
What’s the best chocolate to use for the filling? Semi-sweet chocolate gives the best balance of sweetness and richness. Dark chocolate works too if you want a more intense flavor.
Final Thoughts
French Silk Brownies bring together everything a good dessert should have: dense chocolate flavor, a creamy silky layer, and a light finish on top. They look impressive, but the process stays simple enough for a weeknight bake.
Make a batch this weekend and see how long they actually last on the counter. My guess? Not very long at all
French Silk Brownies
Ingredients
Method
- Preheat your oven to 350 degrees Fahrenheit. Grease an 11×7-inch glass baking dish with non-stick spray.
- In a mixing bowl, combine brownie mix, egg, melted butter, and milk. Stir until the batter is smooth with no dry streaks.
- Spread the batter evenly into your prepared dish and bake for 25 to 28 minutes, checking with a toothpick near the center.
- Let the brownies cool completely to room temperature.
- In a large bowl, beat softened cream cheese with vanilla extract until smooth. Gradually add powdered sugar and mix until creamy.
- In a microwave-safe bowl, melt semi-sweet chocolate and cubed butter together in 30-second bursts, stirring in between until glossy.
- Add melted chocolate mixture to cream cheese base and mix until fully incorporated. Fold in Cool Whip gently.
- Spread the French silk filling evenly over the cooled brownie base. Top with remaining Cool Whip and smooth out.
- Sprinkle with chocolate shavings or mini chips, if desired. Chill for at least two hours before slicing.
- Slice using a sharp knife and serve chilled for best texture.
Notes
French Silk Brownies
Ingredients
Method
- Preheat your oven to 350 degrees Fahrenheit. Grease an 11×7-inch glass baking dish with non-stick spray.
- In a mixing bowl, combine brownie mix, egg, melted butter, and milk. Stir until the batter is smooth with no dry streaks.
- Spread the batter evenly into your prepared dish and bake for 25 to 28 minutes, checking with a toothpick near the center.
- Let the brownies cool completely to room temperature.
- In a large bowl, beat softened cream cheese with vanilla extract until smooth. Gradually add powdered sugar and mix until creamy.
- In a microwave-safe bowl, melt semi-sweet chocolate and cubed butter together in 30-second bursts, stirring in between until glossy.
- Add melted chocolate mixture to cream cheese base and mix until fully incorporated. Fold in Cool Whip gently.
- Spread the French silk filling evenly over the cooled brownie base. Top with remaining Cool Whip and smooth out.
- Sprinkle with chocolate shavings or mini chips, if desired. Chill for at least two hours before slicing.
- Slice using a sharp knife and serve chilled for best texture.




