Servings: 12 cups | Prep Time: 20 minutes | Chill Time: 45 minutes | Total Time: ~1 hour 5 minutes
Peanut butter and raspberry together? That combination hits differently. I made these peanut butter raspberry cups on a whim one afternoon, fully expecting them to be just okay. They were gone by evening. Every single one. Let’s make sure the same thing happens at your place.
Why Peanut Butter Raspberry Cups Work So Well
The magic here is contrast. You get rich, salty peanut butter meeting bright, slightly tart raspberry. Then add a chocolate shell around it all, and you’ve got something that tastes way more sophisticated than the effort it requires.
These cups hit three flavor notes at once — sweet, salty, and tangy. That’s the kind of balance that keeps people reaching back into the tin. Don’t say I didn’t warn you.
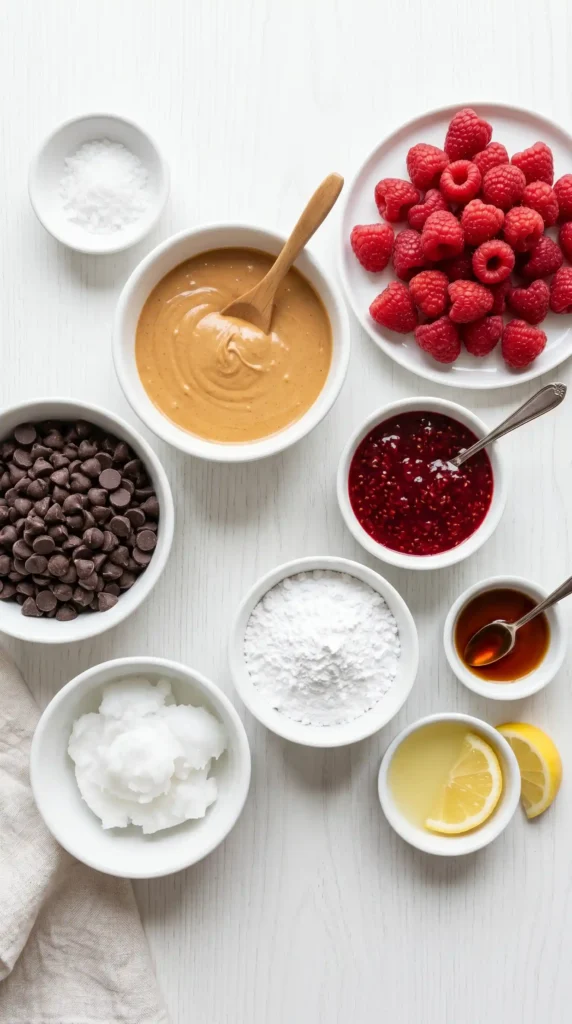
Ingredients You’ll Need
Get everything ready before you start. This recipe moves quickly and you don’t want to be digging around for cornstarch while your chocolate sets.
For the Chocolate Shell:
- 2 cups semi-sweet chocolate chips (about 340g)
- 2 tablespoons coconut oil (helps the chocolate set smoothly)
For the Peanut Butter Filling:
- 1 cup creamy peanut butter (natural or regular, your call)
- 3 tablespoons powdered sugar
- 1/2 teaspoon vanilla extract
- 1/4 teaspoon salt (skip if your peanut butter is already salted)
For the Raspberry Layer:
- 1/2 cup fresh raspberries (about 60g) OR 3 tablespoons raspberry jam
- 1 teaspoon lemon juice (only if using fresh raspberries)
- 1 teaspoon sugar (only if using fresh raspberries)
Optional Topping:
- Flaky sea salt
- Crushed freeze-dried raspberries
How to Make Peanut Butter Raspberry Cups Step by Step
No oven, no stress. This recipe is mostly about layering and patience while things chill. Follow each step and you’ll nail it.
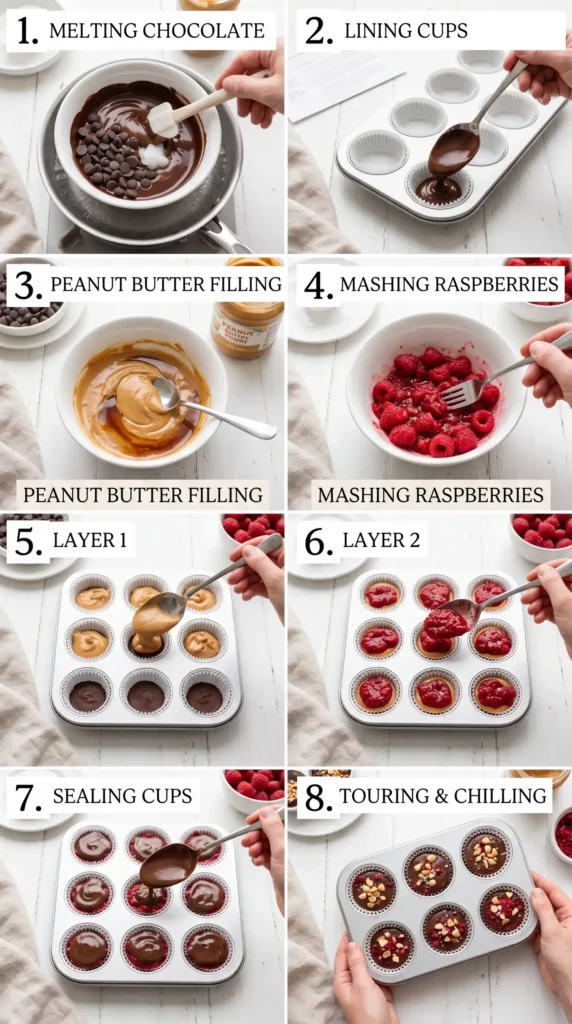
Step 1: Prepare Your Muffin Tin
Grab a standard 12-cup muffin tin. Line every cup with a paper cupcake liner. This is non-negotiable — without liners, the cups will stick and fall apart when you try to remove them.
Press each liner down firmly so it sits flat against the bottom of the cup. Set the lined tin in the freezer for about 5 minutes to get it cold. A cold tin helps the first chocolate layer set faster and more evenly.
Step 2: Melt the Chocolate
Add 2 cups of semi-sweet chocolate chips and 2 tablespoons of coconut oil to a heatproof bowl. You can melt this two ways — in the microwave or over a double boiler.
For the microwave method, heat in 30-second intervals, stirring well after each one. Usually takes 2 to 3 rounds. For the double boiler method, set the bowl over a saucepan of gently simmering water and stir until fully melted. Don’t let any water touch the chocolate or it will seize up and turn grainy. That’s a painful lesson I learned the hard way :/
Once melted, stir until completely smooth and glossy. The coconut oil gives it a silky texture that sets up firm without turning chalky.
Step 3: Add the Bottom Chocolate Layer
Pull the cold muffin tin out of the freezer. Spoon about 1 tablespoon of melted chocolate into each liner. Use the back of the spoon to spread it slightly up the sides of each liner — just about 1/4 inch up.
You’re creating a little chocolate cup that will hold the filling. Don’t make this layer too thin or the cup will crack when you pop it out. A solid base makes everything more stable and satisfying to bite into.
Place the tin back in the freezer for 8 to 10 minutes until the chocolate layer is fully set and hard to the touch.
Step 4: Make the Peanut Butter Filling
While the base sets, make your filling. Add 1 cup of creamy peanut butter to a bowl. Stir in 3 tablespoons of powdered sugar, 1/2 teaspoon of vanilla extract, and 1/4 teaspoon of salt.
Mix everything together firmly until smooth and well combined. The powdered sugar sweetens the filling without making it gritty, and the salt balances the sweetness perfectly. FYI, natural peanut butter works great here, but make sure you stir it well first — separated peanut butter gives you a greasy filling.
The texture should be thick and scoopable, almost like a soft dough. If it feels too runny, add another tablespoon of powdered sugar and stir again.
Step 5: Prepare the Raspberry Layer
If you’re using fresh raspberries, add 1/2 cup of raspberries to a small bowl. Add 1 teaspoon of lemon juice and 1 teaspoon of sugar. Mash everything together with a fork until you get a chunky, jammy mixture. Don’t blend it completely smooth — a little texture is part of the charm.
If you’re using raspberry jam, simply measure out 3 tablespoons and stir it briefly to loosen it up. Jam is the easier route and honestly produces a more consistent result. Fresh raspberries give a brighter, more intense flavor but require a little more prep.
Either version works beautifully. I’ve made it both ways and loved both equally — though IMO the fresh raspberry version wins on flavor by a small margin.
Step 6: Layer the Peanut Butter Filling
Pull the muffin tin out of the freezer once the chocolate base is fully set. Scoop about 1 heaped tablespoon of the peanut butter mixture and roll it gently into a rough ball between your palms. Press it flat into a disc shape and set it into the center of the chocolate cup.
Press it down gently and smooth the edges slightly. You want it to sit centered in the cup with a small gap around the edges so the top chocolate layer can seal around it. Repeat for all 12 cups. Work quickly — warm hands can soften the chocolate base if you linger.
Step 7: Add the Raspberry Layer
Spoon a small amount of the raspberry mixture — about 1 teaspoon — directly on top of the peanut butter disc in each cup. Spread it gently with the back of the teaspoon to cover most of the peanut butter surface.
Don’t go overboard with the amount. Too much raspberry makes the top layer of chocolate harder to seal and can make the cups leak. One teaspoon per cup is the sweet spot. The raspberry layer should be visible but contained, sitting like a little jewel on top of the peanut butter.
Step 8: Seal with the Top Chocolate Layer
Reheat the remaining melted chocolate briefly if it has thickened — a quick 20-second blast in the microwave and a stir should do it. Spoon about 1 tablespoon of chocolate over the raspberry layer in each cup.
Use the back of the spoon to spread it gently to the edges, fully covering the filling. Make sure the chocolate reaches the liner edges so the cup seals completely. Tap the tin gently on the counter a few times to level the chocolate and remove any air bubbles.
Step 9: Add Toppings and Chill
While the top chocolate is still wet, sprinkle a pinch of flaky sea salt over each cup. If you have crushed freeze-dried raspberries, add a pinch of those too. Both toppings are optional but they add a professional finish and boost the flavor.
Place the tin in the refrigerator for 30 to 45 minutes until the chocolate tops are fully set and firm. Resist the urge to check them every five minutes. They need undisturbed chill time to set properly.
Step 10: Remove and Serve
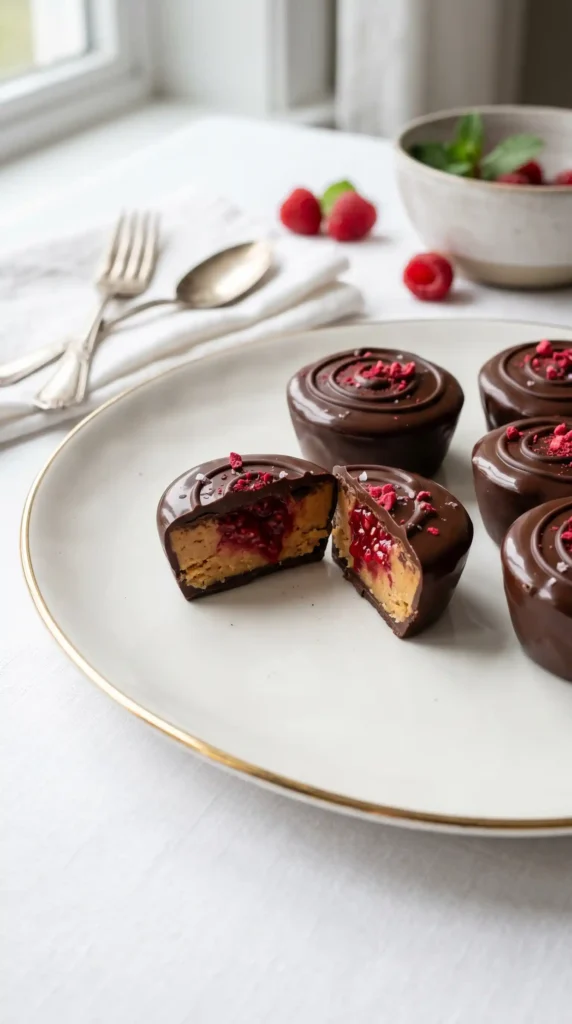
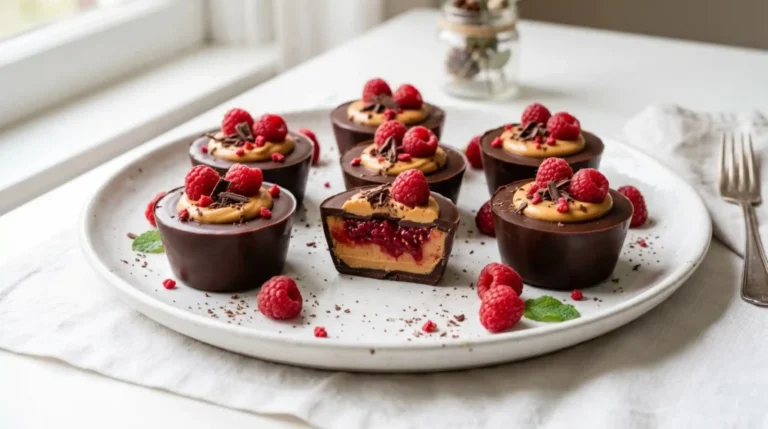
Once fully set, lift each cup out of the tin by gently pulling up on the paper liner. Peel the liner away carefully. The cups should hold their shape perfectly with clean edges and a solid chocolate shell.
Arrange them on a plate and serve immediately, or store them for later. Either way, enjoy the very satisfying crunch of that chocolate shell giving way to the soft peanut butter and bright raspberry inside.
Tips for Perfect Peanut Butter Raspberry Cups
- Chill between every layer. Skipping this step causes the layers to bleed into each other.
- Use good quality chocolate. Cheap chips can taste waxy. Semi-sweet or dark chocolate works best.
- Don’t overfill the cups. Keep each layer thin enough that the chocolate can seal everything in.
- Work with cold hands. If your hands are warm, chill them under cold water before handling the peanut butter filling.
- Store in the fridge. These cups soften quickly at room temperature, especially in warm weather.
Variations Worth Trying
The base recipe is solid, but here are a few directions you can take it:
- Dark chocolate version: Swap semi-sweet chips for 70% dark chocolate. The bitterness plays beautifully against the sweet peanut butter.
- Almond butter swap: Replace peanut butter with almond butter for a milder, slightly sweeter filling.
- White chocolate shell: Use white chocolate instead of dark for a completely different look and flavor profile.
- Strawberry version: Replace the raspberry layer with strawberry jam for a more classic vibe.
- Crunchy peanut butter: Use crunchy peanut butter instead of creamy for added texture in every bite.
FAQs About Peanut Butter Raspberry Cups
Q1: Can I use frozen raspberries instead of fresh ones? Yes. Thaw them first and drain any excess liquid before mashing. Frozen raspberries tend to release more water than fresh, so draining well is important. Otherwise the raspberry layer becomes too wet and the chocolate won’t seal cleanly over it.
Q2: How long do peanut butter raspberry cups last? Store them in an airtight container in the refrigerator for up to 7 days. For longer storage, freeze them in a single layer first, then transfer to a freezer bag. They keep well frozen for up to 2 months and taste great straight from the freezer.
Q3: Can I make these vegan? Yes, easily. Use dairy-free chocolate chips and make sure your peanut butter contains no milk solids. Coconut oil is already plant-based. Double-check the powdered sugar brand — some use bone char in processing, so look for certified vegan options if that matters to you.
Q4: Why did my chocolate turn grainy when melting? This is called seizing, and it happens when even a tiny drop of water contacts melted chocolate. Make sure your bowl, spoon, and everything touching the chocolate is completely dry. Also avoid overheating — keep the microwave intervals short and stir between each one.
Q5: Can I make mini versions using a mini muffin tin? Absolutely. Use a mini muffin tin with mini liners and scale down each layer to about half a teaspoon. They look adorable and work perfectly as bite-sized treats for parties. Chill times stay roughly the same since the chocolate thickness is similar.
Conclusion
Peanut butter raspberry cups deliver serious flavor with surprisingly little effort. You get a crisp chocolate shell, a rich and salty peanut butter center, and a bright pop of raspberry in every bite. Three layers, one incredible result.
Make a batch this weekend. Share them with people you like, hoard them from people you don’t, and accept that everyone will ask you for the recipe. That’s just how this goes.
Peanut Butter Raspberry Cups
Ingredients
Method
- Prepare a standard 12-cup muffin tin by lining each cup with a paper cupcake liner.
- Place the lined tin in the freezer for about 5 minutes.
- Melt 2 cups of semi-sweet chocolate chips with 2 tablespoons of coconut oil in a heatproof bowl using either the microwave or a double boiler.
- Stir until completely smooth and glossy.
- Spoon 1 tablespoon of melted chocolate into each liner, spreading it slightly up the sides.
- Freeze for 8 to 10 minutes until set.
- In a bowl, mix 1 cup of creamy peanut butter with 3 tablespoons of powdered sugar, 1/2 teaspoon of vanilla extract, and 1/4 teaspoon of salt until smooth and well combined.
- If using fresh raspberries, mash 1/2 cup with 1 teaspoon of lemon juice and 1 teaspoon of sugar until chunky.
- If using jam, simply measure out 3 tablespoons.
- Scoop a heaped tablespoon of peanut butter filling into each chocolate cup.
- Top with 1 teaspoon of raspberry mixture.
- Reheat any remaining melted chocolate if necessary, then spoon 1 tablespoon over the raspberry layer in each cup.
- Tap the tin to remove air bubbles.
- Sprinkle each cup with optional toppings and chill in the refrigerator for 30 to 45 minutes until set.
- Once set, remove from the tin and enjoy.