Servings: 10 slices Prep Time: 20 minutes Cook Time: 60 minutes Total Time: 1 hour 20 minutes
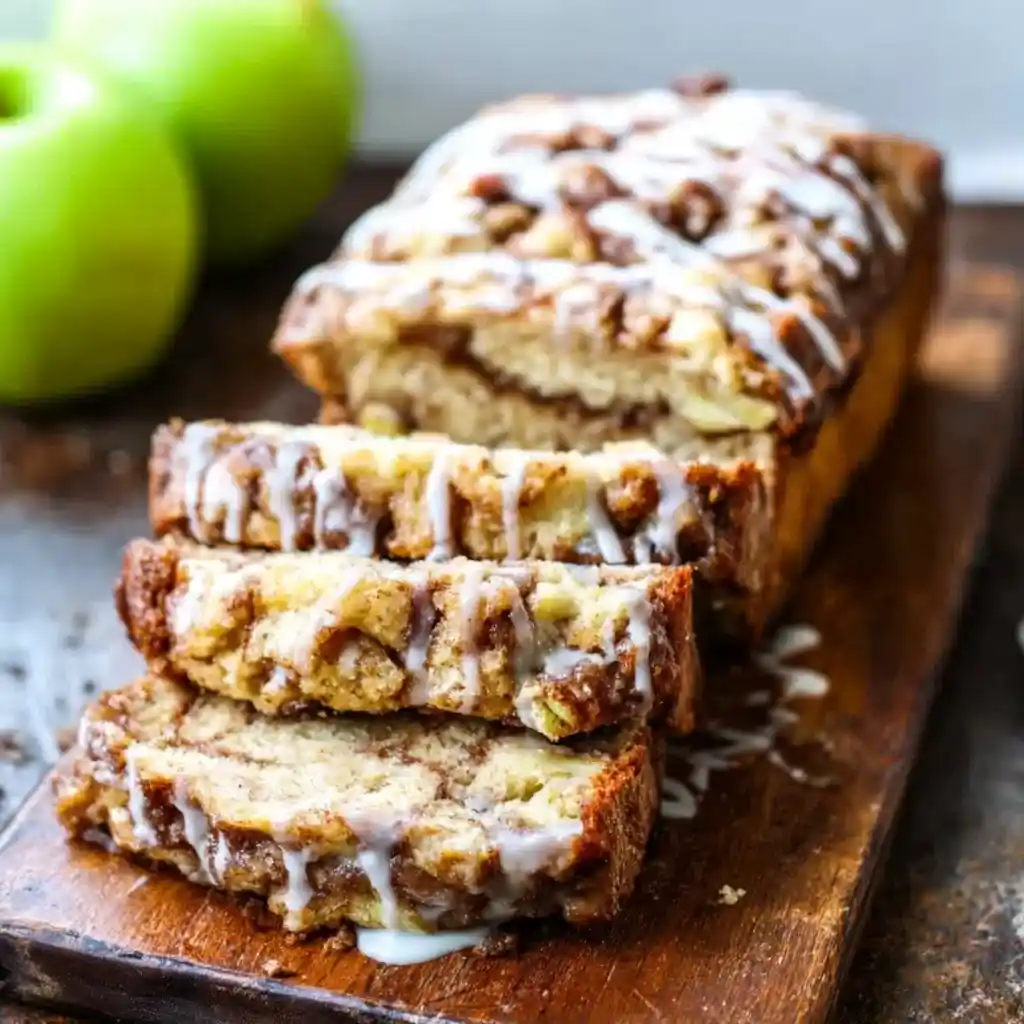
Craving apple fritter flavor without deep-frying anything? Apple Fritter Bread delivers exactly that, and I’ve been baking this loaf on repeat since discovering it’s basically a fritter you can slice with a knife.
I used to only get that cinnamon-apple donut flavor from bakery runs, until I realized a quick bread could capture the same magic. Now this loaf shows up in my kitchen every fall without fail.
This recipe layers buttery bread batter with cinnamon-sugar apples, then finishes with a sweet glaze on top. Ever had a dessert that tastes like it required way more effort than it actually did? This is exactly that kind of recipe.
Why Apple Fritter Bread Works So Well
Apple fritters are amazing, but frying dough at home is honestly kind of a hassle, right? Baking the same flavors into a loaf gives you all that cinnamon-apple goodness without any hot oil involved.
Layering the batter and apple filling in stages matters more than you’d think. IMO, that swirling technique is exactly what creates those beautiful pockets of apple and cinnamon running through every slice.
The glaze on top adds a final touch of sweetness that ties the whole loaf together. Have you ever bitten into a quick bread that felt genuinely bakery-quality? This one absolutely delivers that experience.
What You’ll Need for Apple Fritter Bread
This recipe has four components. Here’s everything broken down clearly.
Brown Sugar Cinnamon Swirl
- ⅓ cup brown sugar
- 1 teaspoon cinnamon
Apple Bread Batter
- ½ cup butter, softened
- ⅔ cup granulated sugar
- 2 eggs, room temperature
- 1 ½ teaspoons vanilla extract
- 1 ½ cups all-purpose flour
- 1 ¾ teaspoons baking powder
- ½ cup milk or almond milk, room temperature
Apple Filling
- 2 large apples, peeled and chopped small, Granny Smith recommended
- 2 tablespoons granulated sugar
- 1 teaspoon cinnamon
Old-Fashioned Cream Glaze
- ½ cup powdered sugar
- 1 to 3 tablespoons milk or cream
Four simple components, and none of them require anything you can’t find at a regular grocery store.
How to Make Apple Fritter Bread
Step 1: Preheat the Oven and Prep Your Pan
Set your oven to 350°F and let it fully preheat before you start assembling anything. Grease a 9×5-inch loaf pan thoroughly, or line it with parchment paper for even easier removal later.
That parchment paper trick saves you from wrestling a stuck loaf out of the pan. FYI, leaving a little overhang on the sides makes lifting the finished bread out almost effortless.
Step 2: Make the Cinnamon Sugar Swirl
In a small bowl, mix the brown sugar and cinnamon together thoroughly. Set this mixture aside, you’ll be layering it into the bread a little later.
This small step takes seconds but matters a lot for flavor. That cinnamon-brown sugar blend is what creates those signature sweet swirls running through each slice.
Step 3: Whisk the Dry Ingredients
In another bowl, whisk together the flour and baking powder. Mixing these separately first ensures the baking powder distributes evenly throughout the batter instead of clumping in random spots.
Skipping this step can leave you with uneven rising in certain parts of the loaf. A quick whisk now prevents that frustrating outcome later.
Step 4: Cream the Butter and Sugar
In a large bowl, beat the softened butter and granulated sugar together until the mixture turns light and creamy. This usually takes a few minutes with an electric mixer, so don’t rush through it.
Properly creamed butter and sugar is what gives this bread its soft, cake-like texture. Skipping ahead too early leaves you with a denser, less tender loaf.
Step 5: Add the Eggs and Vanilla
Add the eggs one at a time, mixing thoroughly after each addition before adding the next. This gradual approach helps the eggs incorporate smoothly instead of curdling the batter.
Stir in the vanilla extract once both eggs are fully mixed in. Have you ever added vanilla too early and felt like the flavor got lost in the mix? Adding it here keeps that flavor bright and noticeable.
Step 6: Combine Wet and Dry Ingredients
Gradually mix the flour mixture into the butter mixture, alternating with the milk as you go. Add everything in a few batches rather than all at once, this keeps the batter smooth instead of lumpy.
Keep mixing just until everything comes together into a smooth, thick batter. Overmixing at this stage can toughen the bread, so stop as soon as the flour disappears into the mixture.
Step 7: Prepare the Apple Filling
In a separate bowl, toss your chopped apples with the granulated sugar and cinnamon. Make sure every piece gets coated evenly, this ensures consistent flavor throughout the layers.
Granny Smith apples work particularly well here since they hold their shape during baking. IMO, that firm texture is exactly what keeps the filling from turning to mush inside the loaf.
Step 8: Layer the Batter and Filling
Pour half of the batter into your prepared loaf pan and spread it out evenly. Add half of the apple mixture on top, followed by half of the brown sugar cinnamon swirl.
Pour the remaining batter over that layer and spread it gently. Top with the rest of the apple mixture and the remaining cinnamon sugar swirl, creating a second layer of flavor throughout the loaf.
Step 9: Swirl and Bake
Use a knife to gently swirl the layers together, dragging it through the batter in a few zigzag motions. Don’t overdo it, you want visible pockets of apple and cinnamon, not a completely blended mixture.
Bake for about 55 to 60 minutes, or until a toothpick inserted into the center comes out clean. Keep an eye on the top toward the end, tenting it with foil if it browns too quickly before the inside finishes baking.
Step 10: Cool and Glaze
Let the bread cool in the pan for about 15 minutes before transferring it to a wire rack. This brief resting period helps the loaf firm up enough to handle without falling apart.
While it cools completely, mix the powdered sugar with milk or cream to make the glaze. Drizzle it generously over the cooled loaf right before slicing, letting it drip down the sides for that classic bakery look.
Tips for the Best Results
- Use Granny Smith apples for the best texture and balanced sweetness.
- Don’t overmix the batter, this keeps the bread tender instead of dense.
- Swirl gently, aim for visible pockets rather than fully blended layers.
- Cool before glazing to prevent the glaze from melting off entirely.
Storage and Reheating Tips
Store leftover bread in an airtight container at room temperature for up to two days. Refrigerate for slightly longer storage, up to five days, to keep it fresher for longer.
Reheat individual slices in the microwave for about 15 seconds, or warm them lightly in the oven. Either method brings back that soft, just-baked texture in seconds.
This bread also freezes beautifully. Wrap the loaf tightly in plastic wrap and foil, then freeze for up to three months. Thaw overnight in the refrigerator before serving.
Fun Variations to Try
Ready to switch things up? These twists are worth trying:
- Caramel version: Add caramel sauce between the layers and drizzle extra over the glaze.
- Nutty upgrade: Mix chopped walnuts or pecans into the apple mixture for crunch.
- Cream cheese twist: Add a layer of sweetened cream cheese between the batter layers.
- Spiced version: Add nutmeg and cloves to the batter for deeper fall flavor.
- Chocolate chip variation: Fold in half a cup of chocolate chips for a sweeter dessert bread.
Frequently Asked Questions
What apples work best for this bread? Granny Smith apples are ideal since they hold their shape and balance out the sweetness nicely.
Can I use other types of apples? Yes, Honeycrisp, Fuji, or Gala apples all work well as substitutes in this recipe.
Can I make this bread ahead of time? Absolutely, it actually tastes even better the next day once the flavors have had time to develop.
Can I freeze Apple Fritter Bread? Yes, wrap it tightly and freeze for up to three months without any issue.
Why did my bread sink in the middle? This usually happens when the bread is underbaked or the oven temperature runs a bit low.
Can I make this recipe dairy-free? Yes, simply use plant-based butter and almond milk in place of the dairy versions.
Final Thoughts
Apple Fritter Bread captures everything great about the classic donut in a soft, sliceable loaf. Buttery, cinnamon-swirled, and finished with a sweet glaze, it’s the kind of bread that disappears fast at any breakfast or brunch table.
Bake a loaf this weekend and watch how quickly it gets requested again 🙂 Just maybe make two, because one loaf rarely survives past the first day in my house
Apple Fritter Bread
Ingredients
Method
- Preheat the oven to 350°F and grease a 9×5-inch loaf pan or line it with parchment paper.
- In a small bowl, mix together the brown sugar and cinnamon for the swirl.
- In another bowl, whisk together the flour and baking powder.
- In a large bowl, beat together the softened butter and granulated sugar until light and creamy.
- Add eggs one at a time and mix thoroughly, then stir in vanilla.
- Gradually mix the dry ingredients into the wet, alternating with milk until just combined.
- In a separate bowl, toss the chopped apples with granulated sugar and cinnamon.
- Pour half of the batter into the prepared loaf pan and spread evenly. Add half of the apple mixture and half of the brown sugar-cinnamon swirl.
- Pour the remaining batter over, followed by the rest of the apple mixture and the remaining swirl.
- Use a knife to gently swirl the layers together. Bake for 55 to 60 minutes, or until a toothpick inserted comes out clean.
- Let the bread cool in the pan for about 15 minutes before transferring to a wire rack.
- While cooling, mix powdered sugar with milk or cream to make the glaze and drizzle it over the cooled loaf.




