
Prep: 15 min Bake: 30–35 min Total: ~50 min Servings: 8–10 slices Difficulty: Easy
What happens when a pumpkin pie and a giant soft-baked cookie decide to collaborate? You get a Pumpkin Cookie Pie — and honestly, it is the kind of recipe that makes you wonder why you ever made them separately in the first place. One pan. One incredible outcome. Maximum autumn energy.
I first made this on a whim when I had leftover pumpkin puree from another recipe and a serious craving for something warm and sweet. The result was so unexpectedly good that I made it again the very next weekend. Then the weekend after that. My family now considers it a non-negotiable part of fall.
Have you ever wanted a dessert that feels nostalgic and new at exactly the same time? This is that dessert. Let us walk through it step by step.
Why Pumpkin Cookie Pie Wins Every Time
Most pumpkin desserts make you choose between a crispy shell and a custardy filling. This recipe removes that dilemma entirely. The cookie base bakes up thick and chewy, holding firm enough to slice cleanly but soft enough to melt slightly under the warm pumpkin layer above it. Both textures exist in every slice simultaneously.
The spice profile does a lot of heavy lifting here too. The cookie base uses brown sugar and warm spices that complement the pumpkin filling rather than competing with it. Everything tastes like one cohesive dessert rather than two things awkwardly stacked on top of each other. That harmony is what makes people reach for a second slice before finishing the first.
IMO, this also makes a vastly more interesting Thanksgiving dessert than standard pumpkin pie. It travels well, slices cleanly, looks dramatic on a table, and tastes better warm — which is rare for a pie. That combination of practicality and flavour is genuinely hard to beat.
What You Need to Make It
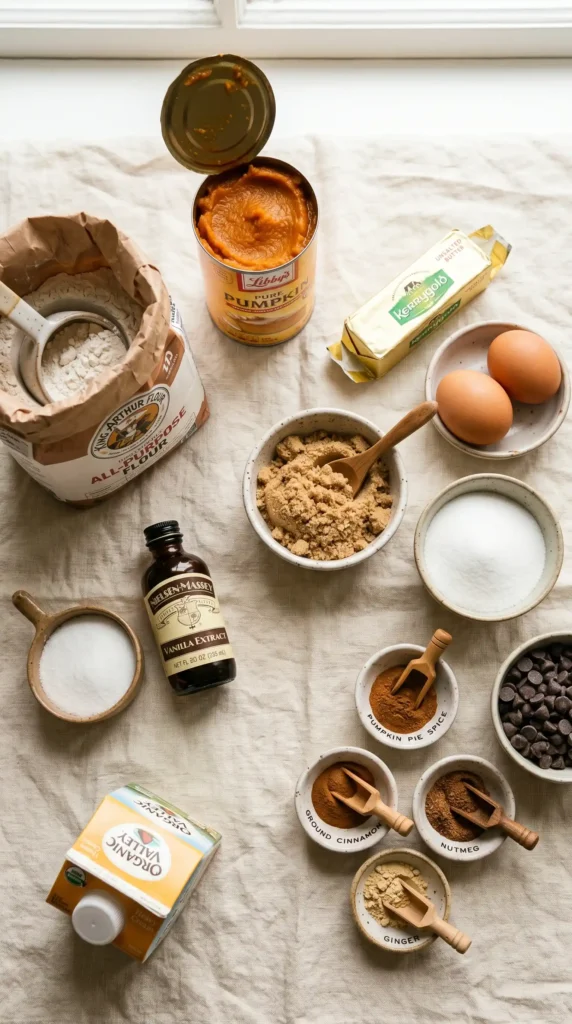
Two layers, two short ingredient lists. Everything here comes from a standard grocery store. Use pure pumpkin puree — not pumpkin pie filling, which already contains sugar and spices that will throw off the balance of this recipe completely.
For the Cookie Base
- 1/2 cup (113g) unsalted butter, melted and slightly cooled
- 3/4 cup (150g) packed light brown sugar
- 1/4 cup (50g) granulated white sugar
- 1 large egg, room temperature
- 1 egg yolk, room temperature
- 2 teaspoons pure vanilla extract
- 1 and 1/2 cups (190g) all-purpose flour
- 1 teaspoon cornstarch
- 1/2 teaspoon baking soda
- 1/2 teaspoon ground cinnamon
- 1/4 teaspoon ground nutmeg
- 1/2 teaspoon salt
- 3/4 cup (130g) semi-sweet chocolate chips (optional but highly recommended)
For the Pumpkin Filling
- 1 cup (240g) pure pumpkin puree (not pumpkin pie filling)
- 1/3 cup (65g) granulated white sugar
- 1 large egg
- 1/4 cup (60ml) heavy cream
- 1 teaspoon pumpkin pie spice
- 1/2 teaspoon ground cinnamon
- 1/4 teaspoon ground ginger
- 1/4 teaspoon pure vanilla extract
- Pinch of salt
To Serve
- Whipped cream or vanilla ice cream
- A light dusting of cinnamon or pumpkin pie spice
- Caramel drizzle (optional)
Pumpkin Puree vs. Pumpkin Pie FillingThis distinction matters more than it might seem. Pure pumpkin puree contains only cooked, pureed pumpkin — nothing else. Pumpkin pie filling contains added sugar, spices, and thickeners already blended in. Using filling instead of puree makes the pumpkin layer too sweet and completely throws off the spice balance in this recipe. Always check the label.
How to Make Pumpkin Cookie Pie Step by Step
The process runs in three stages: make the cookie dough, make the pumpkin filling, layer and bake. Neither component requires special equipment. A hand mixer makes the cookie dough faster, but a sturdy bowl and a wooden spoon do the job perfectly well. This recipe is genuinely forgiving and beginner-friendly throughout.
Step 1: Preheat and Prepare Your Pan
Preheat your oven to 175°C (350°F) and allow it to reach full temperature before the pan goes in. Grease a 9-inch (23cm) cast iron skillet, a 9-inch round cake pan, or a deep 9-inch pie dish generously with butter or cooking spray. Make sure you coat the sides as well as the base — the cookie dough will press up slightly against the sides as it bakes and you want it to release cleanly.
If you use a cast iron skillet, it will give you the crispiest, most caramelised base and edges. A standard cake pan gives a softer, more even bake. A pie dish gives you the most traditional presentation. All three work well — choose based on what you have available and the texture you prefer. FYI, the skillet version looks the most dramatic when you bring it to the table.
Step 2: Make the Pumpkin Filling First
Start with the pumpkin filling rather than the cookie dough, so it has time to sit while you prepare the base. In a medium bowl, whisk together the pumpkin puree, granulated sugar, egg, heavy cream, pumpkin pie spice, cinnamon, ginger, vanilla extract, and pinch of salt. Whisk for a full minute until the mixture looks completely smooth, slightly glossy, and uniform in colour with no streaks of egg white visible.
Taste the filling and check the spice level. It should taste warmly spiced — prominent cinnamon and ginger notes, with the earthiness of pumpkin coming through clearly. If it tastes flat, add an extra pinch of pumpkin pie spice. Set the bowl aside and move to the cookie dough. The filling should rest at room temperature while you prep the base.
Step 3: Make the Cookie Dough
In a large mixing bowl, whisk together the melted butter, packed brown sugar, and granulated sugar until the mixture looks smooth and slightly lighter in colour — about 60 seconds of vigorous whisking by hand or 30 seconds with a hand mixer. The brown sugar is essential here. It provides the deep, molasses-forward flavour that contrasts beautifully with the pumpkin layer above it.
Add the whole egg, the extra egg yolk, and the vanilla extract to the butter-sugar mixture. Whisk again for another 30–45 seconds until everything is fully combined and the mixture looks slightly thick and glossy. The extra yolk — without its white — adds richness and chew to the cookie base without making it cakey or airy. It is a small addition that makes a noticeable difference in the finished texture.
Now add the flour, cornstarch, baking soda, cinnamon, nutmeg, and salt to the wet mixture. Switch to a rubber spatula or wooden spoon and fold the dry ingredients in, mixing just until no dry flour streaks remain. Do not overmix. The moment the flour disappears, stop mixing. Overmixing develops gluten and turns your chewy cookie base into something dense and tough. If you are adding chocolate chips, fold them in with the last few strokes.
Why Cornstarch in Cookie Dough?Cornstarch interrupts gluten development in the flour, which keeps the cookie base soft and tender rather than crisp and snappy. It is the difference between a cookie that stays chewy for days versus one that hardens overnight. One teaspoon does a remarkable amount of work for such a small quantity.
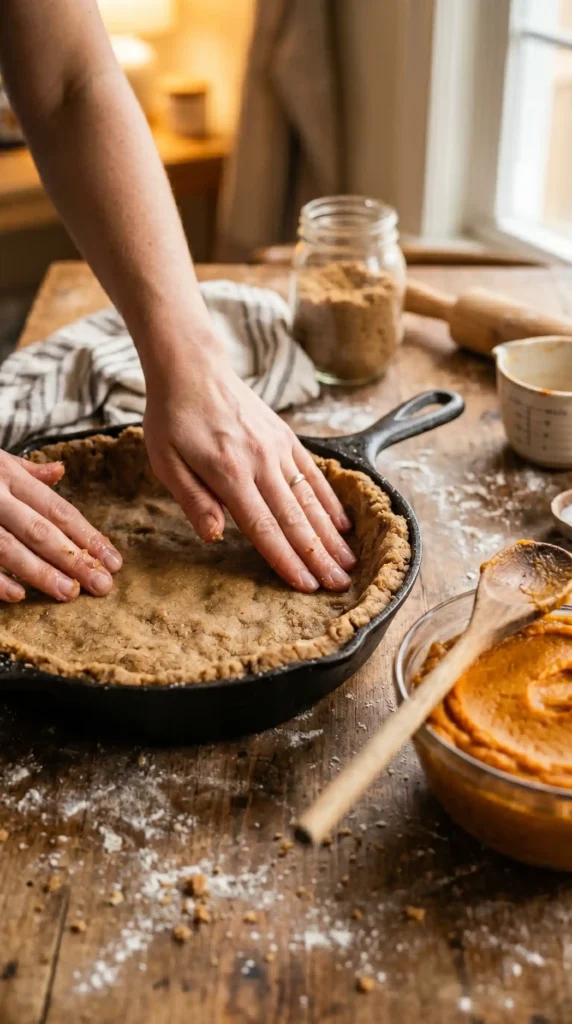
Step 4: Layer the Dough Into the Pan
Transfer the cookie dough into your prepared pan. Using clean, lightly dampened hands or the back of a large spoon, press the dough into an even layer across the entire base of the pan. Work it toward the edges and press it gently up the sides about 1–2cm to create a very shallow rim. This rim serves as a natural barrier that keeps the pumpkin filling contained in the centre as it bakes.
Take your time pressing the dough flat and even. An uneven base means parts of the cookie will be thicker and underbaked while thinner areas become over-crisped. Aim for a consistent thickness of roughly 1.5–2cm across the entire base. If the dough sticks to your hands while pressing, lightly dampen them with cold water — this prevents sticking without adding excess flour to the surface.
Step 5: Add the Pumpkin Filling
Pour the pumpkin filling gently and evenly over the pressed cookie dough base. Use a spoon or small spatula to spread it all the way to the edges of the cookie rim you created, leaving a thin border of cookie dough visible around the perimeter. The filling should settle into an even, smooth layer that covers the centre of the dough completely without spilling over the rim edges.
If you want to add a visual finishing touch, drop a few chocolate chips or a light sprinkle of brown sugar over the pumpkin layer before it goes into the oven. The chips will sink slightly and the brown sugar will caramelise into a thin, glossy top layer. Neither is necessary, but both look genuinely impressive for very little extra effort. 🙂
Step 6: Bake to Perfection
Slide the pan into your fully preheated oven on the centre rack. Bake for 30–35 minutes. The edges of the cookie base should look golden-brown and set, pulling very slightly away from the sides of the pan. The pumpkin filling centre should look mostly set — it will still have a very slight jiggle in the very middle when you gently shake the pan, similar to a properly baked cheesecake. That slight jiggle is correct and desirable.
Do not overbake waiting for the centre to look completely firm. The residual heat from the pan will continue cooking the pumpkin filling for several minutes after it leaves the oven, and a fully set pumpkin layer at the moment of baking means an overcooked, rubbery layer by the time it reaches the table. Pull it when the edges are firm and the centre has just a gentle wobble left.
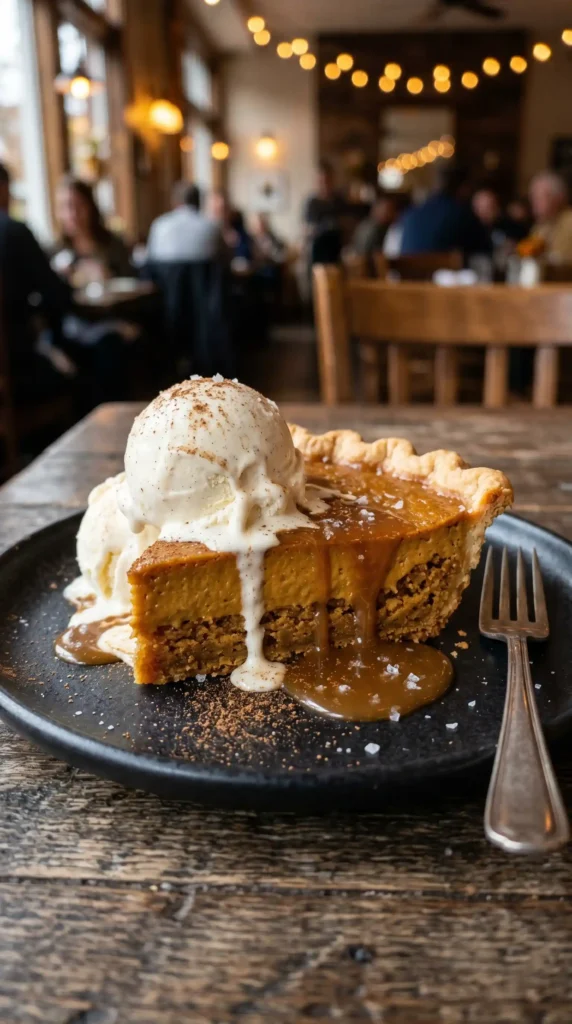
Step 7: Cool, Slice and Serve
Remove the pan from the oven and place it on a wire rack. Allow the Pumpkin Cookie Pie to cool for at least 20 minutes before slicing — this allows the pumpkin filling to finish setting up properly and gives the cookie base time to firm enough to support clean slices. Cutting into it immediately out of the oven means everything slides and pools. Those 20 minutes of patience pay off directly in the quality of the slice.
Serve warm with a generous spoonful of whipped cream or a scoop of good vanilla ice cream on top. A drizzle of salted caramel sauce over the whole thing elevates the presentation significantly and adds a third flavour note that brings the pumpkin and cookie elements into even sharper relief. A light dusting of cinnamon or pumpkin pie spice over the whipped cream finishes the whole thing beautifully.
Variations Worth Exploring
Pecan Streusel Topping
Mix 3 tablespoons of butter, 3 tablespoons of brown sugar, 1/4 cup of flour, and 1/3 cup of roughly chopped pecans together with your fingers until crumbly. Scatter this streusel over the pumpkin filling before it goes into the oven. It bakes into a crunchy, nutty top layer that adds a wonderful textural contrast to the soft filling and chewy base underneath.
White Chocolate Chip Base
Swap the semi-sweet chocolate chips in the cookie base for white chocolate chips. White chocolate is sweeter and more buttery than dark, and it pairs unexpectedly well with the warm pumpkin spices in the filling. The contrast between the sweet white chocolate and the earthy pumpkin creates a more complex, layered flavour profile that works particularly well for people who find standard pumpkin pie slightly one-note.
No-Bake Chilled Version
Press the raw cookie dough into a tart pan as the base, then top with a no-bake pumpkin cheesecake filling made by beating pumpkin puree with cream cheese, whipped cream, sugar, and spices until thick and mousse-like. Refrigerate for 4 hours until fully set. This version skips the oven entirely and works brilliantly as a make-ahead dessert for gatherings.
Storing and Reheating
Cover any leftover Pumpkin Cookie Pie loosely with cling film or foil and store it at room temperature for up to 2 days, or refrigerate for up to 5 days. The pumpkin filling keeps best refrigerated since it contains egg and cream. Reheat individual slices in a 160°C (325°F) oven for 8–10 minutes, or microwave for 30–40 seconds until the centre is warm again.
The pie also freezes well. Slice it into individual portions, wrap each one tightly in cling film and then foil, and freeze for up to 2 months. Thaw overnight in the fridge and reheat as described above. The cookie base retains its texture surprisingly well after freezing, which makes this a genuinely useful make-ahead dessert for the holiday season.
Frequently Asked Questions
Can I make Pumpkin Cookie Pie ahead of time?
Yes, and it actually tastes better the next day once the layers have had time to settle and meld together. Bake it the day before your event, let it cool completely at room temperature, then cover and refrigerate overnight. Bring it back to room temperature for 30 minutes before serving, or warm individual slices in a low oven for 8–10 minutes. The cookie base stays chewy and the pumpkin filling stays smooth.
How do I know when the Pumpkin Cookie Pie is fully baked?
Look for three signs together: the cookie edges are golden-brown and pulling slightly from the sides of the pan, the pumpkin filling has set around the outer two thirds of the pan, and the very centre still shows a gentle wobble when you shake the pan lightly. If all three are present, remove it from the oven. The centre will finish cooking from residual heat as the pie cools on the wire rack.
Can I use canned pumpkin pie filling instead of pumpkin puree?
Using pumpkin pie filling is not recommended for this recipe. Pie filling contains pre-added sugars, spices, and thickeners in amounts designed for a traditional single-filling pie. Adding them to this recipe throws off the sugar balance and makes the filling too sweet and over-spiced. Pure pumpkin puree gives you control over the exact spice and sweetness levels that make this recipe work correctly. Always check the label before opening the can.
Can I make this recipe gluten-free?
Yes. Substitute the all-purpose flour in the cookie base with a certified gluten-free 1:1 baking flour blend that contains xanthan gum. The rest of the recipe stays unchanged. The texture of the cookie base will be very slightly denser than the original but the flavour remains excellent. Confirm that your baking soda and any chocolate chips you use are also certified gluten-free, as cross-contamination during manufacturing is a real concern with these ingredients.
What can I substitute for heavy cream in the pumpkin filling?
Full-fat coconut cream makes the best dairy-free substitute — it provides similar richness and fat content without affecting the spice flavours at all. Evaporated milk is another solid option and produces a slightly lighter, less rich filling. Regular whole milk works in a pinch but produces a thinner, less custard-like filling that may need an extra 3–4 minutes of baking time to set properly. Avoid low-fat milk, which produces a filling that struggles to set.
Final Thoughts
This Pumpkin Cookie Pie delivers exactly what the name promises — the comforting warmth of a spiced pumpkin filling sitting on top of a thick, chewy, golden cookie base. It takes 50 minutes from start to finish, uses one pan, and consistently produces results that make people pause mid-bite to ask for the recipe.
It works as a Thanksgiving showstopper, a weekend family dessert, or an autumn treat on a Tuesday night when you want something warm and seasonal without spending the whole evening baking. Few recipes earn that level of versatility this reliably.
Preheat your oven, grab that can of pumpkin puree, and make this today. And if anyone at the table asks whether you worked particularly hard on it — the correct answer is “oh, it was nothing.” We will keep the 50-minute truth between us.

Pumpkin Cookie Pie
Ingredients
Method
- Preheat your oven to 175°C (350°F) and grease a 9-inch (23cm) cast iron skillet, a 9-inch round cake pan, or a deep 9-inch pie dish generously with butter or cooking spray.
- In a medium bowl, whisk together the pumpkin filling ingredients: pumpkin puree, granulated sugar, egg, heavy cream, pumpkin pie spice, ground cinnamon, ground ginger, vanilla extract, and a pinch of salt.
- In a large mixing bowl, whisk together the melted butter, packed brown sugar, and granulated sugar until smooth.
- Add the whole egg, extra egg yolk, and vanilla extract to the butter-sugar mixture, whisking until fully combined.
- Add flour, cornstarch, baking soda, cinnamon, nutmeg, and salt. Fold in the dry ingredients until just combined. If using, fold in chocolate chips.
- Transfer the cookie dough to the prepared pan and press into an even layer up the sides slightly.
- Pour the pumpkin filling evenly over the cookie dough base, being careful not to spill over the sides.
- Bake in the preheated oven for 30–35 minutes until the edges look golden-brown and the center has a slight jiggle.
- Allow the Pumpkin Cookie Pie to cool for at least 20 minutes before slicing to ensure clean slices.
- Serve warm topped with whipped cream or vanilla ice cream, and optionally drizzled with caramel.


