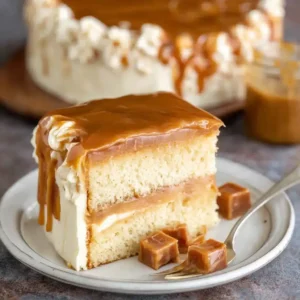
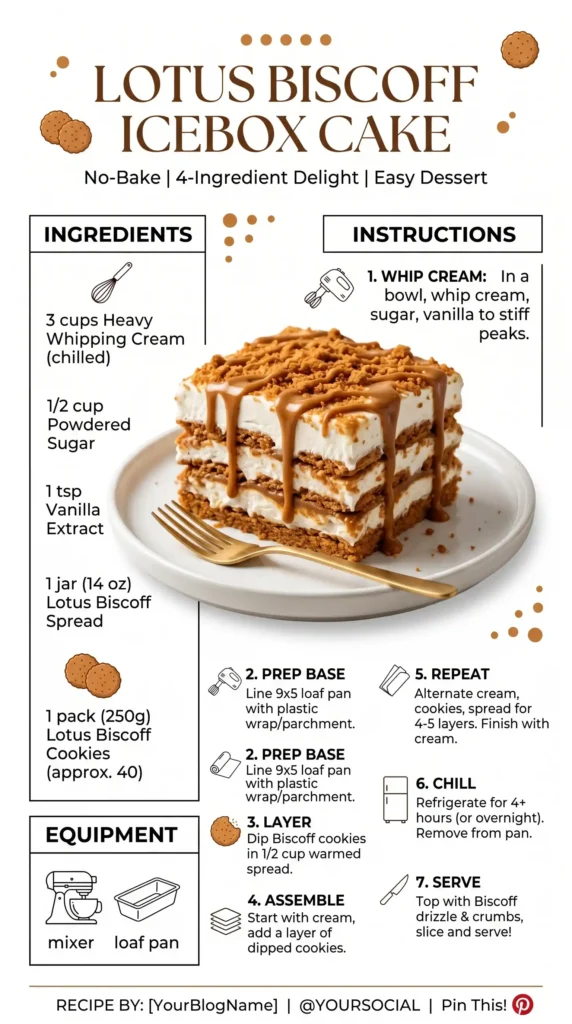
Lotus Biscoff cookies are already one of the greatest things to happen to a coffee break. But apparently someone decided that was not enough and put them in a no-bake icebox cake, and the result is something that makes people refuse to believe you did not bake it. Lotus Biscoff Icebox Cake takes twenty minutes of active work, requires no oven, no special equipment, and produces a sliceable, layered, deeply spiced, outrageously good dessert that serves twelve people.
I made this for the first time when I needed a dessert for a gathering and had approximately thirty minutes available. I was expecting adequate results. The complete silence at the table when people tasted it — followed by the immediate request for the recipe — told me I had accidentally made something genuinely special. I have made it many times since. It is never adequate. It is always extraordinary.
Have you ever made a no-bake dessert that people refused to believe required no baking? This is that dessert. Let us make it properly.
What Is an Icebox Cake and Why Does It Work So Well?
An icebox cake is a no-bake dessert built from layers of crisp cookies and cream that chills in the refrigerator overnight. During chilling, the cookies absorb moisture from the surrounding cream and soften completely — transforming from crisp, snapping biscuits into a texture that is almost indistinguishable from sponge cake layers. The chilling process does what baking would normally do, but without heat.
The technique works because cookies made with fat, sugar, and flour absorb the dairy fat and moisture in whipped cream as they chill. The fat migrates from the cream into the cookie and the moisture softens the starch, producing a dense, cake-like layer that holds its shape when sliced. The result looks and eats like a layered baked cake — but nobody spent any time near an oven.
Biscoff cookies are particularly brilliant for this technique because their spiced, caramelised flavour intensifies as they soften. A plain digestive biscuit softens into a neutral, slightly sweet layer. A Biscoff cookie softens into a deeply spiced, complex layer that tastes of caramel, cinnamon, and ginger simultaneously. That flavour concentration is what elevates Biscoff icebox cake above every other version. IMO, Biscoff cookies are the only choice for this recipe and I say that with complete conviction.
What You Need-Lotus Biscoff Icebox Cake
Five components. Everything available at most grocery stores. The Biscoff spread is the element that ties the whipped cream to the cookie flavour — use it in the cream filling as well as for the topping drizzle. Both smooth and crunchy Biscoff spread work beautifully in this recipe, though smooth produces a more even distribution through the cream and a cleaner flavour in every layer.
For the Biscoff Cream Filling
- 2 cups (480ml) heavy whipping cream, cold
- 225g (8oz) full-fat cream cheese, softened to room temperature
- 1/2 cup (120g) smooth Biscoff spread (Lotus brand is the original — do not substitute)
- 1 cup (120g) powdered sugar, sifted
- 1 teaspoon pure vanilla extract
- Pinch of salt
For the Cookie Layers
- 2 standard packs (approximately 35–40 whole) Lotus Biscoff cookies — enough for 4 complete layers in a standard 9×5-inch loaf tin or 3 layers in a 9×13 dish
Now For the Biscoff Topping
- 1/2 cup (120g) smooth Biscoff spread, gently warmed until pourable
- 6–8 Biscoff cookies, roughly crushed, for the top surface
- Optional: a few whole Biscoff cookies arranged decoratively along the top
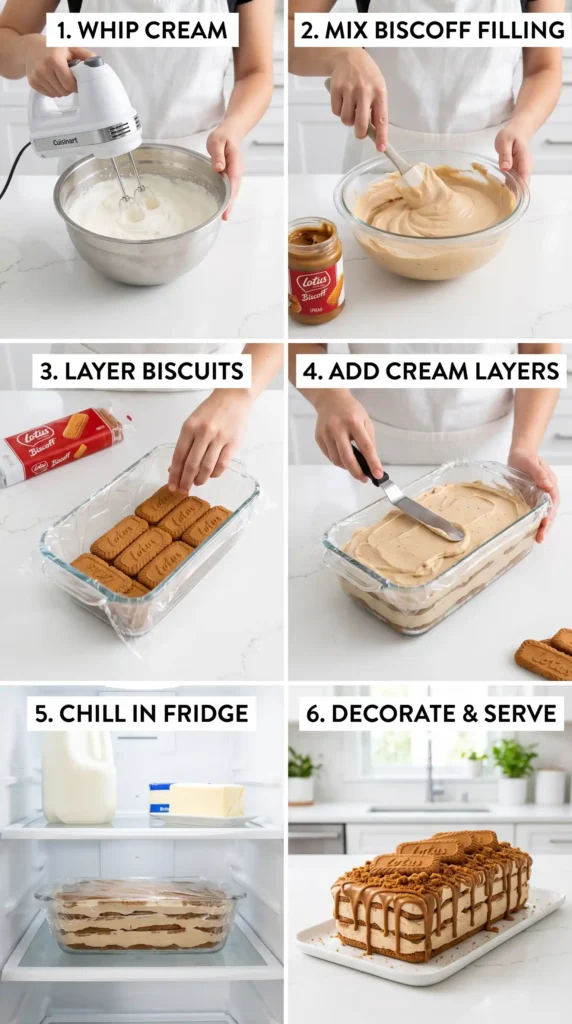
Cold Cream and a Cold Bowl Are Non-NegotiableHeavy cream whips to stable, stiff peaks dramatically faster and more reliably when both the cream and the bowl are very cold. Keep the cream in the fridge until the exact moment you pour it into the bowl. Place the mixing bowl and beaters in the freezer for 10 minutes before whipping. Warm cream produces a softer, less stable whipped cream that may not hold its structure between the cookie layers during the long chilling time. FYI — this preparation takes ten minutes and makes a significant difference to the finished cake.
How to Make Lotus Biscoff Icebox Cake Step by Step
Four stages: make the Biscoff cream filling, layer the cookies and cream, chill overnight, then top and serve. The assembly takes about 20 minutes. The refrigerator handles everything else. The most important decisions are in the cream filling — getting the texture right — and in the layering, where even distribution produces clean, beautiful slices. Let us walk through each step in detail.
Step 1: Prepare Your Tin or Dish
Choose your vessel. A standard 9×5-inch (23x13cm) loaf tin produces a tall, elegant cake that slices into thick, impressive portions. A 9×13-inch (23x33cm) baking dish produces a wider, flatter cake that serves more people and is easier to assemble. Both work equally well for the recipe — the loaf tin looks more dramatic as a cake when sliced; the larger dish works better for buffets and gatherings.
Line the base and sides of the tin or dish with cling film, leaving significant overhang on all sides — at least 8–10cm of overhang. This overhang is what allows you to lift the finished cake cleanly out of the tin after chilling. A cake stuck to the sides of an unlined tin requires serving directly from the tin, which is significantly less visually impressive than lifting it out onto a serving board. Take the extra 60 seconds for the cling film.
Step 2: Make the Biscoff Cream Filling
Beat the softened cream cheese in a large bowl with a hand mixer on medium speed for about 60 seconds until smooth and lump-free. Add the Biscoff spread, sifted powdered sugar, vanilla extract, and pinch of salt. Beat on medium speed for another 60 seconds until fully incorporated and the mixture looks uniform and smooth throughout. This Biscoff-cream cheese base is the flavour foundation — it should taste intensely spiced and slightly tangy from the cream cheese.
In a separate cold bowl, whip the cold heavy cream with clean beaters on medium-high speed until it forms stiff peaks — about 2–3 minutes. The cream should hold a firm, defined peak when the beaters are lifted. Do not under-whip, which produces a loose cream that will not hold the cookie layers in place, and do not over-whip, which produces a grainy, buttery texture rather than smooth, cloudlike whipped cream.
Add the whipped cream to the Biscoff cream cheese mixture in three additions, folding gently with a rubber spatula after each addition. Use large, slow strokes from the bottom of the bowl upward — the goal is to combine the two mixtures without deflating the air bubbles you just whipped into the cream. The finished filling should look pale caramel-coloured, thick, and hold its shape when scooped. If it looks at all liquid or pourable, the cream was not whipped to stiff peaks and needs additional gentle folding to firm up.
Step 3: Layer the Cake
Spread a thin layer of the Biscoff cream filling across the very base of the lined tin — about 1/4 inch thick. This base layer prevents the first cookie layer from sticking to the cling film and provides a foundation for the first set of cookies. Working quickly and deliberately, lay a single layer of whole Biscoff cookies across the cream base, fitting them as closely together as possible and breaking cookies where needed to fill gaps at the edges. A complete, unbroken cookie layer produces the most even texture in the finished slice.
Spread a generous, even layer of the Biscoff cream filling over the first cookie layer — roughly one quarter of the total filling for a four-layer cake. Use an offset spatula or the back of a spoon to spread it evenly from corner to corner and edge to edge, covering every visible cookie. Do not press down hard — you want to spread rather than compress. The cream layer should be about as thick as the cookie layer below it.
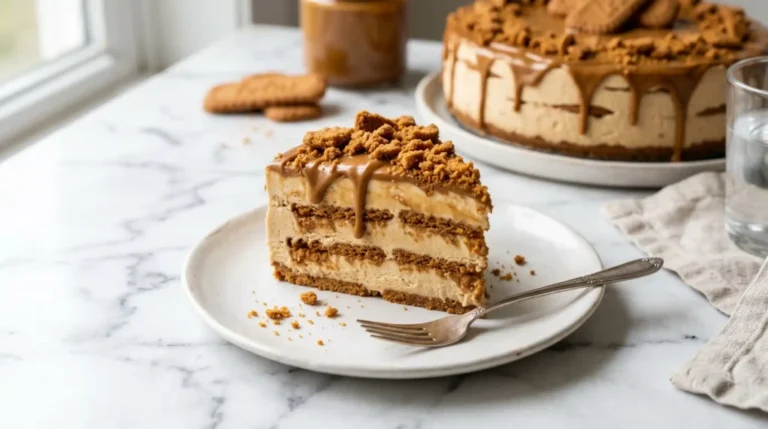
Continue building layers in this sequence — cookies, cream, cookies, cream — until you have used all the cream filling and cookies. The top layer should be cream, not cookies, which provides a smooth surface for the topping and the most visually striking presentation when lifted out and inverted or left upright. Smooth the final cream layer as evenly as possible with the spatula. Cover the surface with cling film pressed directly against the cream to prevent a skin forming.
Step 4: Chill Overnight
Refrigerate the assembled Lotus Biscoff Icebox Cake for a minimum of 6 hours — overnight chilling consistently produces the best result. During chilling, the cookies absorb moisture from the surrounding cream and transform from crisp, snapping biscuits into soft, dense, cake-like layers that hold their shape perfectly when sliced. At 6 hours the cookies are mostly softened. At overnight they have fully transformed and the entire cake has set to a firm, clean-slicing consistency.
Resist the urge to check on it during chilling by pressing the top or moving the cling film. Disrupting the cake during the setting process can prevent the layers from bonding properly and may cause the cream to shift. Leave it completely undisturbed in the coldest part of your refrigerator and trust the process. The patience required is genuinely the hardest part of this recipe.
Step 5: Top, Unmould, and Serve
When ready to serve, gently warm the Biscoff spread in a small saucepan over very low heat or in the microwave in 15-second intervals, stirring between each, until it becomes fluid and pourable. Do not overheat — you want pourable consistency, not hot liquid that will melt the cream below it. Remove the chilled cake from the refrigerator and lift it out of the tin using the cling film overhangs. Place it on a serving board or plate.
Pour the warmed Biscoff spread slowly over the top surface of the cake, encouraging it toward the edges and allowing it to drip naturally down the sides in thin, golden streams. Work quickly before the spread begins to set against the cold surface. Immediately scatter the roughly crushed Biscoff cookies across the wet Biscoff topping — they will stick as the spread cools. Arrange any whole cookies decoratively across the top. Allow the topping to set for 5 minutes before slicing and serving.
Slicing an Icebox Cake Cleanly — The Warm Knife TechniqueRun a sharp knife under hot water and wipe dry before every cut. The warm blade glides through the cold cream and softened cookie layers without dragging or tearing. A cold knife compresses and tears the layers rather than cutting cleanly through them, producing jagged, uneven slices that look messy regardless of how carefully the cake was assembled. Warm knife, slow pressure, and patience between each cut produces perfectly even, beautiful slices.
Variations Worth Making
Chocolate Biscoff Icebox Cake
Add 2 tablespoons of high-quality cocoa powder to the cream cheese mixture alongside the Biscoff spread. The chocolate and Biscoff combination creates an extraordinarily complex filling — caramel, spice, and dark chocolate simultaneously. Top the finished cake with a mixture of warm Biscoff spread and melted dark chocolate swirled together, and finish with both crushed Biscoff cookies and dark chocolate shavings. This version works especially well for dinner party presentation.
Coffee Biscoff Icebox Cake
Add 2 teaspoons of instant espresso powder dissolved in a tablespoon of warm water to the cream cheese mixture. The coffee deepens and amplifies the caramelised Biscoff flavour in a way that makes the filling taste significantly more complex — almost like a tiramisu had a child with a Biscoff cookie. Use espresso-dipped Biscoff cookies instead of dry cookies for an even more intensely flavoured cookie layer.
Mini Individual Biscoff Icebox Cakes
Build the same recipe in six to eight individual ramekins or glass jars for single-serving portions. Layer cookies and cream in the same sequence as the large cake, chill for the same time, and top with a small spoonful of warmed Biscoff spread and a crushed cookie crumble. These individual portions work perfectly for dinner parties, gifting, and any gathering where serving a full cake is impractical. They are also considerably easier to transport than a full-sized icebox cake.
Storage Tips-Lotus Biscoff Icebox Cake
Store Lotus Biscoff Icebox Cake covered in the refrigerator for up to 3 days. The texture actually continues to improve over the first 24 hours after making — the Biscoff flavour deepens further into the cream and the layers firm more completely as additional chilling time passes. Keep it covered tightly with cling film or in an airtight container to prevent it from absorbing other fridge odours, which the dairy cream can do easily if left uncovered.
This cake does not freeze well — the whipped cream filling changes texture significantly during freezing and thawing, losing its lightness and becoming slightly grainy and watery rather than smooth and cloud-like. Make it fresh and enjoy it within 3 days for the best possible result. The excellent news is that it requires only 20 minutes of preparation, which makes making it fresh for any occasion completely practical.
Frequently Asked Questions
Can I use Cool Whip instead of whipping the heavy cream myself?
Yes. Use one standard 8oz (225g) container of Cool Whip or equivalent whipped topping in place of the whipped heavy cream. The result is slightly less rich and has a less pure dairy flavour than fresh whipped cream, but it is significantly faster and produces a stable filling that holds well throughout the chilling time. Fold the Cool Whip into the Biscoff cream cheese mixture gently using the same technique as for fresh whipped cream — three additions with light folding strokes.
What can I use if I cannot find Lotus Biscoff cookies?
Biscoff cookies are now widely available in most major grocery stores globally, often in the cookie or international food aisle. If you genuinely cannot access them, speculoos cookies — the Belgian spiced shortbread that Biscoff is based on — are essentially the same product under a different name and are often available at specialty food stores and online retailers. No other cookie produces the same spiced, caramelised result — substituting plain digestive biscuits or graham crackers fundamentally changes the flavour profile of the finished cake.
Can I make this cake without cream cheese in the filling?
Yes. Omit the cream cheese and increase the heavy cream to 2 and 1/2 cups. Whip the cream to stiff peaks, then gently fold in the Biscoff spread, powdered sugar, and vanilla until just combined. The cream-only version has a lighter, less tangy, slightly less stable filling — it is more delicate and may not hold as clean a slice. The cream cheese version produces a firmer, more sliceable result that holds the layers together more reliably over the 6–8 hour chilling time.
Do I need to dip the cookies in anything before layering?
No — unlike classic tiramisu or some other icebox cakes, Biscoff cookies require no dipping or soaking before layering. They contain enough fat and sugar to absorb the moisture from the surrounding cream filling on their own during the chilling time. Dipping them in liquid would cause them to become too soft too quickly, resulting in a mushy rather than cake-like texture. Place them dry directly onto the cream layers and allow the natural chilling and absorption process to work as designed.
Can I assemble the icebox cake in a glass dish instead of a loaf tin?
Yes — a 9×13-inch glass or ceramic baking dish works very well. The wider format produces a flatter cake with more layers visible in each slice from the side, which looks beautiful in a trifle-style presentation. You do not need to unmould from a glass dish — simply serve directly from the dish by scooping squares with a large spoon or spatula. This format is significantly easier for large gatherings since it requires no unmoulding and allows more casual serving.
Final Thoughts
This Lotus Biscoff Icebox Cake earns its reputation as the no-bake dessert that nobody believes is actually no-bake. The deeply spiced cookie layers, the Biscoff-spiked whipped cream filling, the warm caramel-coloured drizzle, and the crushed cookie topping combine into something that looks sophisticated, tastes extraordinary, and required twenty minutes of your time plus the patience to wait overnight. That is genuinely the best dessert deal available.
It works for dinner parties, for family celebrations, for gifting, for any occasion where you want something visually impressive that will generate genuine reactions. It stores for three days, improves with time, and consistently produces the kind of stunned appreciation that makes baking feel worthwhile — even when technically no baking happened.
Line that tin. Make that cream cold. Layer with intention. And then leave it alone overnight. The refrigerator will do the rest, and what comes out in the morning will honestly make you proud even though you were asleep for most of its creation.
Lotus Biscoff Icebox Cake
Ingredients
Method
- Line a standard 9×5-inch loaf tin or 9×13-inch baking dish with cling film, leaving overhang.
- In a large bowl, beat the softened cream cheese until smooth. Add Biscoff spread, powdered sugar, vanilla, and a pinch of salt. Mix until uniform.
- In a separate cold bowl, whip the cold heavy cream until stiff peaks form. Gently fold it into the Biscoff mixture in three additions.
- Spread a thin layer of Biscoff cream filling in the base of the lined tin.
- Place a single layer of whole Biscoff cookies on top of the cream filling.
- Spread more Biscoff cream filling over the cookie layer. Continue layering cookies and cream until all are used, finishing with a cream layer on top.
- Cover the top with cling film and refrigerate for at least 6 hours or overnight.
- Warm the Biscoff spread until pourable. Remove the cake using the cling film overhang.
- Pour the warmed Biscoff spread over the top of the cake. Sprinkle crushed Biscoff cookies on top and decorate with whole cookies if desired.
- Allow the topping to set for 5 minutes before slicing and serving.