
Prep Time: 20 minutes | Bake Time: 30 minutes | Total Time: 50 minutes + cooling | Servings: 12 slices
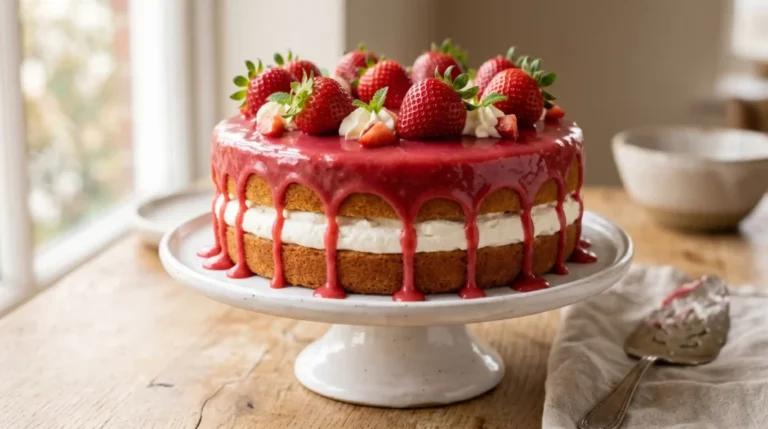
There are cakes you make because you need dessert, and then there are cakes you make because you want people to stop mid-conversation and stare. Strawberry Glaze Cake falls firmly in the second category. A light, fluffy vanilla cake base, fresh strawberry filling, and a glossy pink glaze that drips down the sides like something out of a bakery window.
I made this for my sister’s birthday last spring and she actually photographed it before cutting it. High praise.
What Is Strawberry Glaze Cake?
It’s a tender vanilla or white cake layered with fresh strawberry filling and finished with a smooth, shiny strawberry glaze that sets beautifully on top. The glaze isn’t just for looks — it delivers a concentrated burst of real strawberry flavor in every single bite. No artificial strawberry extract needed here. Real fruit does all the heavy lifting.
The combination of soft cake, jammy strawberry filling, and that gleaming glaze makes this dessert look significantly more complicated than it actually is. And honestly? That gap between effort and result is exactly what makes it worth making.
Ingredients You’ll Need
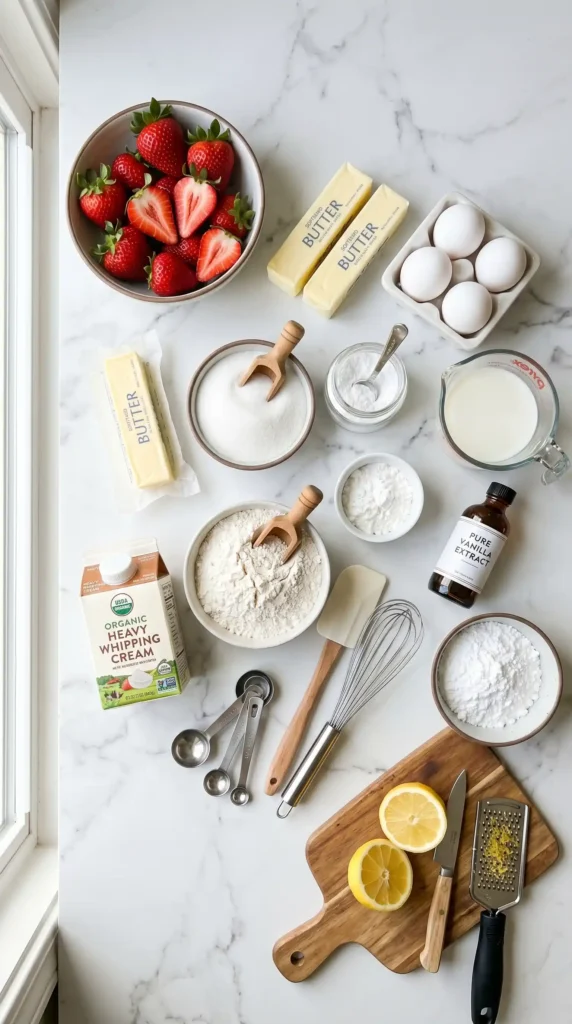
Broken down by component so nothing gets missed.
For the Vanilla Cake Layers
- 2 and 1/2 cups all-purpose flour
- 2 cups granulated sugar
- 1 cup unsalted butter, softened
- 4 large eggs, room temperature
- 1 cup whole milk, room temperature
- 1 tablespoon pure vanilla extract
- 1 tablespoon baking powder
- 1/2 teaspoon salt
For the Strawberry Filling
- 2 cups fresh strawberries, hulled and diced
- 1/3 cup granulated sugar
- 1 tablespoon lemon juice
- 1 tablespoon cornstarch
- 2 tablespoons cold water
For the Strawberry Glaze
- 1 cup fresh strawberries, hulled and roughly chopped
- 2 cups powdered sugar, sifted
- 1 tablespoon lemon juice
- 1 to 2 tablespoons heavy cream (adjust for consistency)
- Pinch of salt
For the Whipped Cream Frosting (Optional but Recommended)
- 2 cups heavy whipping cream, cold
- 1/4 cup powdered sugar
- 1 teaspoon vanilla extract
IMO, the whipped cream frosting between the layers makes this cake genuinely exceptional. It keeps things light rather than heavy and rich, which lets the strawberry glaze stay the star of the show.
Equipment You’ll Need
You need two 9-inch round cake pans, parchment paper, a hand or stand mixer, a medium saucepan for the filling, a fine mesh strainer for the glaze, a wire cooling rack, and an offset spatula for frosting. Nothing unusual — just standard baking equipment.
A fine mesh strainer for the glaze is worth mentioning specifically. Straining out the strawberry seeds and pulp gives you a perfectly smooth, glossy glaze rather than a chunky, uneven one. That smooth finish is what makes the Strawberry Glaze Cake look genuinely professional.
How to Make Strawberry Glaze Cake
Step 1: Prepare Your Pans and Preheat
Preheat your oven to 350°F (175°C). Grease both 9-inch round cake pans with butter, then line the bottoms with circles of parchment paper. Grease the parchment too. This double-preparation ensures the cake layers release cleanly and completely after baking — no torn layers, no stuck edges.
Set the pans aside while you make the batter. Having everything ready before you start mixing prevents the batter from sitting and losing leavening power while you scramble to prep the pans.
Step 2: Make the Strawberry Filling First
Start the filling before the batter because it needs time to cool completely before you assemble the cake. Combine the diced fresh strawberries, granulated sugar, and lemon juice in a medium saucepan over medium heat. Stir everything together and cook for about 5 minutes until the strawberries soften and release their juices.
In a small bowl, whisk the cornstarch and cold water together until smooth — this is your thickening slurry. Pour it into the simmering strawberry mixture and stir constantly. The mixture will thicken noticeably within 60 to 90 seconds of adding the slurry. Keep stirring to prevent it from sticking to the bottom.
Once thick and glossy, remove the filling from the heat and transfer it to a bowl. Press a piece of plastic wrap directly onto the surface of the filling to prevent a skin from forming. Set it in the refrigerator to cool completely — at least 30 minutes. Cold filling stays in place between cake layers instead of sliding and squeezing out under the weight of the top layer.
Step 3: Make the Vanilla Cake Batter
In a large bowl, beat the softened butter and granulated sugar together using a hand or stand mixer on medium-high speed for 3 to 4 minutes until the mixture turns pale, fluffy, and significantly increased in volume. This creaming step builds the structure that gives the cake its light, tender crumb. Don’t rush it — under-creamed butter and sugar produces a dense, flat cake.
Add the eggs one at a time, beating well after each addition on medium speed. Scrape down the sides of the bowl with a rubber spatula after every couple of eggs to keep everything evenly mixed. Add the vanilla extract with the last egg and beat until combined.
In a separate bowl, whisk together the flour, baking powder, and salt. With the mixer on low speed, add the flour mixture to the butter mixture in three additions, alternating with the whole milk. Start and end with flour — flour, milk, flour, milk, flour. This alternating method keeps the batter smooth and prevents it from curdling or separating.
Stop mixing the moment the last addition of flour disappears into the batter. A few gentle folds with the spatula to catch any flour at the bottom of the bowl and you’re done. Overmixed batter develops too much gluten and gives you a rubbery, tough cake instead of the soft, pillowy texture you want.
Step 4: Bake the Cake Layers
Divide the batter evenly between your two prepared cake pans. Use a kitchen scale if you want perfectly equal layers — each pan should hold roughly the same weight of batter. Smooth the tops with your offset spatula and tap each pan gently on the counter twice to settle the batter and release any large air pockets.
Bake both pans on the center rack at 350°F for 28 to 32 minutes. Check at the 28-minute mark by inserting a toothpick into the center — it should come out clean or with just a few dry crumbs. The edges should pull slightly away from the pan sides and the tops should spring back when pressed lightly.
Remove both pans from the oven and let them cool in the pans for 15 minutes before running a knife around the edges and inverting them onto a wire cooling rack. Peel off the parchment paper and let the layers cool completely to room temperature before any assembly begins. Rushing this step melts your frosting and turns your beautiful cake into a warm, sliding mess. :/
Step 5: Make the Strawberry Glaze
Add the chopped fresh strawberries to a blender or food processor and blend until completely smooth — about 30 seconds. Pour the puree through a fine mesh strainer into a bowl, pressing with a spoon to extract as much liquid as possible. Discard the seeds and pulp remaining in the strainer.
You should have roughly 1/3 to 1/2 cup of smooth strawberry liquid. Add the sifted powdered sugar, lemon juice, and pinch of salt. Whisk vigorously until completely smooth and combined. Add the heavy cream one tablespoon at a time until the glaze reaches a consistency that pours slowly but still flows — think honey consistency, not water.
The glaze should coat the back of a spoon and hold its shape for a moment before slowly dripping off. Too thick and it won’t pour smoothly over the cake. Too thin and it runs straight off without coating anything. Adjust with a small amount of cream or powdered sugar until it feels right.
Step 6: Make the Whipped Cream Frosting
Make sure your heavy whipping cream is very cold — warm cream won’t whip properly. Pour it into a chilled mixing bowl and beat on medium-high speed until it starts to thicken. Add the powdered sugar and vanilla extract and continue beating until stiff peaks form — the frosting holds its shape when you lift the beater but isn’t grainy or overbeaten.
Watch it carefully in the final stages. Whipped cream goes from perfect stiff peaks to overbeaten and grainy in about 20 seconds of over-mixing. Stop the moment the peaks hold their shape firmly.
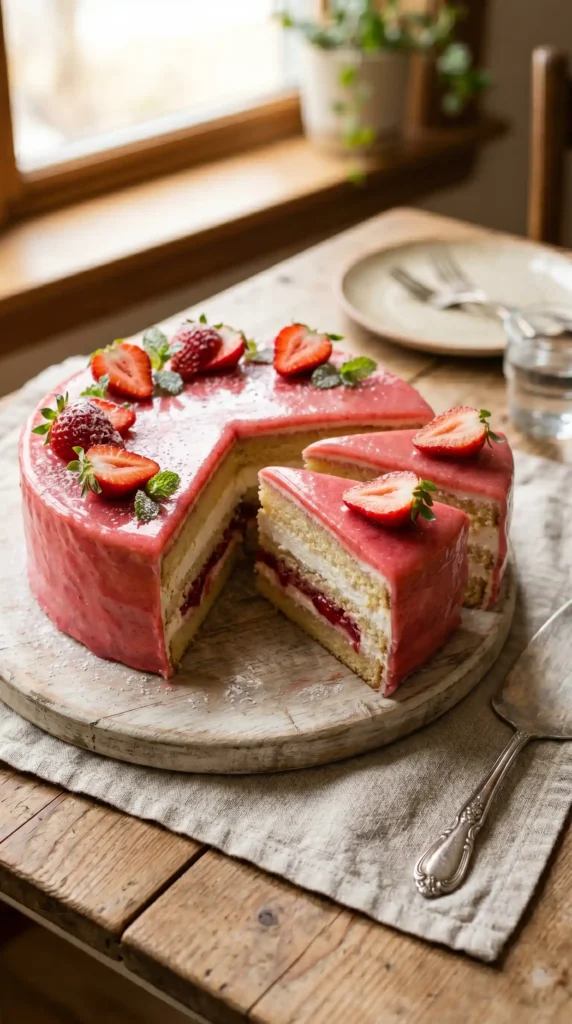
Step 7: Assemble the Strawberry Glaze Cake
Place the first cooled cake layer on your serving plate or cake board. Spread a generous layer of whipped cream frosting across the top, leaving a half-inch border around the edge. Spoon the cooled strawberry filling over the frosting layer and spread it gently to the border — the frosting border prevents the filling from squeezing out the sides when you add the top layer.
Place the second cake layer on top, pressing down gently and evenly. Apply a thin crumb coat of whipped cream frosting around the entire outside of the cake and refrigerate for 20 minutes to set. This crumb coat seals in any loose crumbs so the final finish looks clean.
After chilling, apply a final smooth layer of whipped cream frosting across the top and sides. Return to the refrigerator for another 15 minutes before glazing.
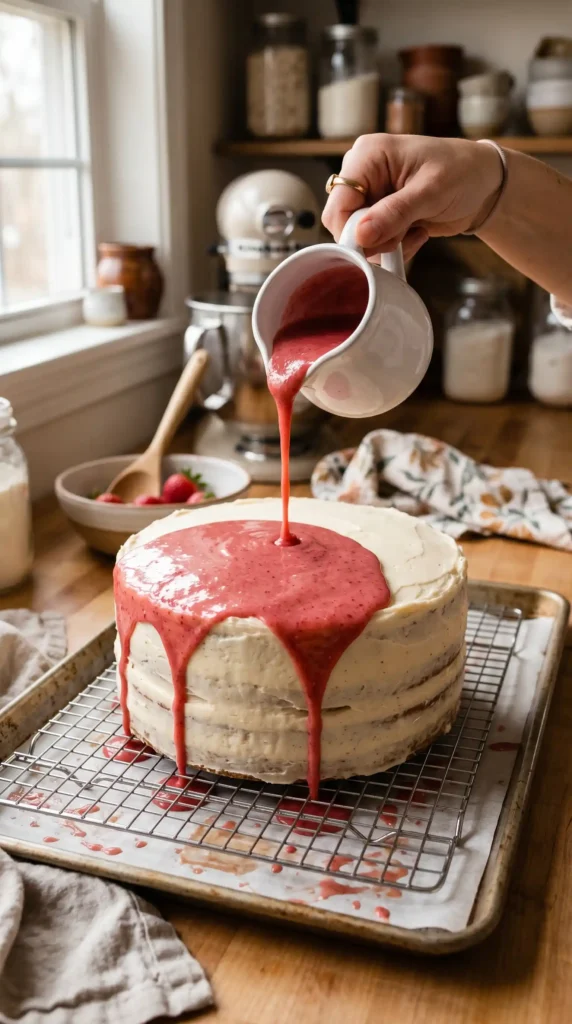
Step 8: Pour the Glaze and Finish
Remove the cake from the refrigerator and set it on a wire rack with a baking sheet underneath to catch drips. Pour the strawberry glaze slowly and steadily from the center of the cake top, letting it spread naturally toward the edges and drip down the sides in organic, flowing ribbons.
Work quickly but calmly — the glaze sets as it hits the cold cake. Don’t try to redirect drips once they fall. Let the glaze do what it wants and the result looks completely natural and stunning. Decorate the top with fresh whole strawberries immediately while the glaze is still slightly tacky so they adhere in place.
Refrigerate the finished Strawberry Glaze Cake for at least 30 minutes before slicing to let the glaze set fully and the layers firm up for clean cutting.
Tips for Best Results
- Room temperature ingredients in the batter make a smoother, better-emulsified mixture.
- Cool everything completely before assembly — warm cake plus frosting equals disaster.
- Strain the glaze. Seeds and pulp ruin the smooth, glossy finish that makes this cake beautiful.
- Cold cake before glazing. The cold surface helps the glaze set faster and adhere better.
- Sharp knife plus warm water gives you clean, defined slices. Wipe the blade between every cut.
What to Serve Alongside
- Fresh sliced strawberries and mint for a simple garnish plate
- A scoop of vanilla bean ice cream for an indulgent dessert pairing
- Sparkling rosé or strawberry lemonade for a spring or summer gathering
- Whipped cream on the side for anyone who wants extra
How to Store
Store the assembled Strawberry Glaze Cake covered in the refrigerator for up to 4 days. The glaze stays glossy for the first two days and slightly absorbs into the frosting after that — it still tastes excellent but loses some visual shine. FYI, individual slices wrapped in plastic wrap freeze well for up to 6 weeks. Thaw overnight in the refrigerator before serving.
Frequently Asked Questions
Can I use frozen strawberries for the filling and glaze?
Yes, both work well with frozen strawberries. Thaw them completely and drain excess liquid before using in the filling. For the glaze, blend them from frozen and strain — you may need slightly less cream since frozen berries release more water than fresh.
Can I make Strawberry Glaze Cake a day ahead?
Absolutely — it’s actually better the next day. The layers settle, the filling sets more firmly, and the flavors meld together. Make and assemble the cake the day before, refrigerate overnight, and add fresh strawberry garnishes just before serving.
Why did my glaze turn out too runny?
Either the strawberry puree had too much water content or the powdered sugar ratio was off. Fix a runny glaze by whisking in more sifted powdered sugar a tablespoon at a time until it thickens. Also make sure the cake is cold before glazing — warm surfaces cause even properly thick glaze to run.
Can I use a box cake mix instead of making the cake from scratch?
Yes. A white or vanilla box cake mix baked in two 9-inch rounds works perfectly as the base. The homemade strawberry filling and glaze are what make this cake special — those components stay the same regardless of the cake base you use.
How do I get clean slices without the glaze cracking?
Let the cake sit at room temperature for 10 minutes before cutting to slightly soften the set glaze. Use a sharp chef’s knife dipped in warm water and wiped dry between every single cut. Slow, steady pressure rather than a sawing motion keeps the glaze and layers intact through each slice.
Final Thoughts
Strawberry Glaze Cake delivers the full package — a light vanilla base, real strawberry filling, airy whipped cream frosting, and a stunning glossy glaze that makes everyone reach for their phone before their fork. It takes about 50 minutes of active work, looks completely bakery-worthy, and tastes even better than it looks.
Make the filling ahead, cool everything properly, and nail that glaze consistency. Do those three things and this cake works perfectly every single time. Now go find your best strawberries.
Strawberry Glaze Cake
Ingredients
Method
- Preheat your oven to 350°F (175°C). Grease both 9-inch round cake pans with butter and line the bottoms with parchment paper.
- Prepare the strawberry filling first as it needs to cool before assembly.
- Combine diced strawberries, granulated sugar, and lemon juice in a saucepan over medium heat. Cook for about 5 minutes until strawberries soften.
- Mix cornstarch and cold water until smooth, then add to the strawberry mixture and stir until thickened. Remove from heat and cool in the refrigerator.
- In a large bowl, cream together butter and sugar on medium-high speed until pale and fluffy.
- Add eggs one at a time, beating well after each addition, along with vanilla extract with the last egg.
- In another bowl, mix flour, baking powder, and salt. Gradually add to the butter mixture, alternating with whole milk. Stop mixing when just combined.
- Divide the batter between the prepared pans and bake for 28-32 minutes. Check doneness with a toothpick.
- Cool in the pans for 15 minutes before transferring to a cooling rack.
- Blend chopped strawberries until smooth and strain into a bowl to remove seeds.
- Mix in sifted powdered sugar, lemon juice, and salt until smooth. Adjust with heavy cream for desired consistency.
- Whip cold heavy cream until it starts thickening, then add powdered sugar and vanilla extract until stiff peaks form.
- Place the first cake layer on a serving plate, spread whipped cream frosting, then spoon strawberry filling on top.
- Add the second cake layer on top, apply a thin crumb coat of frosting, and chill for 20 minutes.
- Apply a final layer of whipped cream frosting before glazing.
- Pour the glaze over the chilled cake and allow it to set. Decorate with fresh strawberries.
- Refrigerate for at least 30 minutes before slicing.


