
If you have ever eaten elote — Mexican street corn on a cob slathered in crema, cotija cheese, chilli powder, and lime — then you already understand why this dip exists. Mexican Street Corn Dip takes every element of that iconic street food and turns it into something you can scoop endlessly with a tortilla chip. It is, objectively, one of the greatest dips ever created.
I brought this to a backyard barbecue expecting it to be one of several good options on the appetizer table. It was the first thing empty. Before the burgers came off the grill. Before the guacamole. People scraped the bowl with their chips and then asked me why I did not make more. I have made more at every gathering since.
Have you ever needed one dip that works for absolutely every occasion — game day, cookouts, potlucks, Tuesday evenings? This is the dip. Let us make it properly.
What Is Elote and Why Does It Make Such a Perfect Dip?
Elote is grilled or roasted Mexican street corn — a whole corn cob coated in a mixture of mayonnaise or crema, crumbled cotija cheese, chilli powder, lime juice, and fresh herbs. It is sold from street carts throughout Mexico and has become one of the most beloved street foods globally. The flavour combination is bold, tangy, slightly spicy, and deeply satisfying.
The dip version captures all of those flavours in a format that serves a crowd rather than one person. By charring the corn kernels in a skillet rather than on a grill, you get that essential caramelised, smoky note. Mixing the kernels with mayo, sour cream, lime, and spices recreates the crema coating. Cotija and fresh toppings finish the picture perfectly.
IMO, this is also one of the smartest conversions of a single-serving food into a group dish ever devised. Everything that makes elote spectacular translates directly and loses nothing in the transition to dip form. If anything, it gains accessibility — chips are easier to eat than a corn cob at a party.
Everything You Need
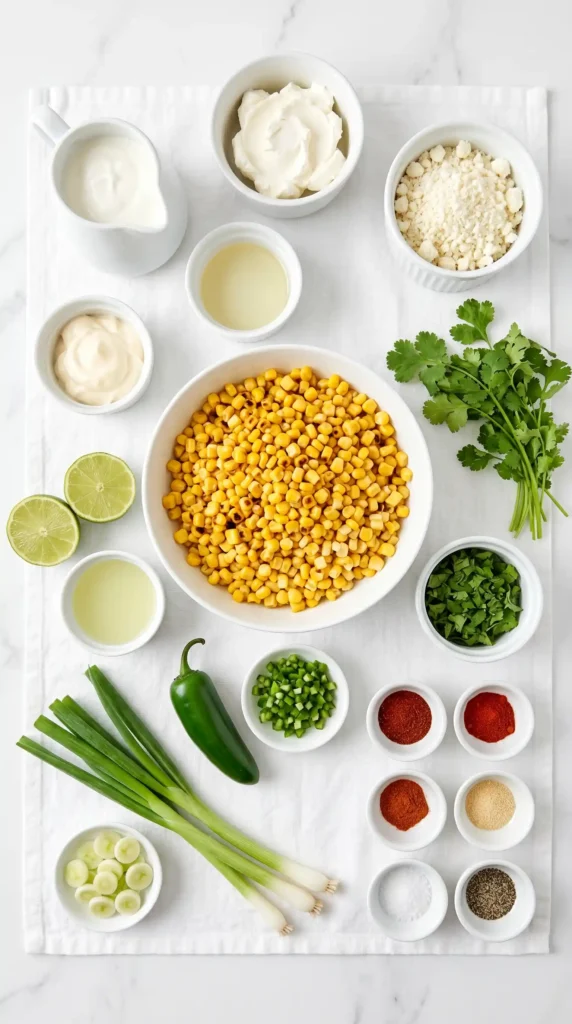
Simple, accessible ingredients. Cotija cheese is the one item that may require a trip to a Mexican grocery store or a well-stocked supermarket — it is a crumbly, salty, dry Mexican cheese that is worth finding. In a pinch, feta cheese works as a substitute with a slightly milder result, but cotija is worth seeking out for the genuine flavour.
For the Corn Base
- 4 cups (about 600g) corn kernels — fresh from 4 large cobs, or frozen kernels fully thawed and patted dry, or drained canned corn patted very dry
- 1 tablespoon neutral oil or butter (for charring)
- 1/2 teaspoon salt for seasoning during cooking
For the Creamy Dip Base
- 1/2 cup (115g) good quality mayonnaise
- 1/2 cup (120g) sour cream or Mexican crema
- 225g (8oz) full-fat cream cheese, softened to room temperature
- Juice of 2 limes (about 3–4 tablespoons)
- 1 teaspoon lime zest
- 1 teaspoon chilli powder
- 1/2 teaspoon smoked paprika
- 1/2 teaspoon garlic powder
- 1/4 teaspoon cayenne pepper (adjust to heat preference)
- 1/2 teaspoon salt
- 1/4 teaspoon black pepper
Now For the Toppings and Mix-Ins
- 3/4 cup (85g) cotija cheese, crumbled — divided (half into dip, half on top)
- 1 jalapeño, finely diced — seeds removed for mild, seeds kept for hot
- 3 tablespoons fresh cilantro leaves, roughly chopped
- 3 spring onions, thinly sliced
- Extra chilli powder and smoked paprika for dusting the top
- Extra lime wedges for serving
Now For Serving
- Tortilla chips — thick restaurant-style hold up better to scooping than thin chips
- Optional: sliced raw vegetables (cucumber rounds, bell pepper strips, celery), pita chips, or toasted bread
Fresh vs. Frozen vs. Canned CornFresh corn from the cob produces the best flavour and the most satisfying char — the natural sugars caramelise beautifully in the hot skillet. Frozen corn (fully thawed and patted very dry before charring) produces a genuinely excellent result and is the most practical year-round option. Canned corn works but must be drained and dried extremely thoroughly since residual moisture prevents charring and leads to steaming instead. FYI — never char wet corn. It steams, not sears.
How to Make Mexican Street Corn Dip Step by Step
This recipe runs in three stages: char the corn, build the creamy base, then combine and finish. You can serve it warm — which is the version most people prefer — or at room temperature. A brief broil at the end, if you want the top bubbling and slightly golden, adds a dramatic visual that earns genuine gasps from anyone who sees it come out of the oven.
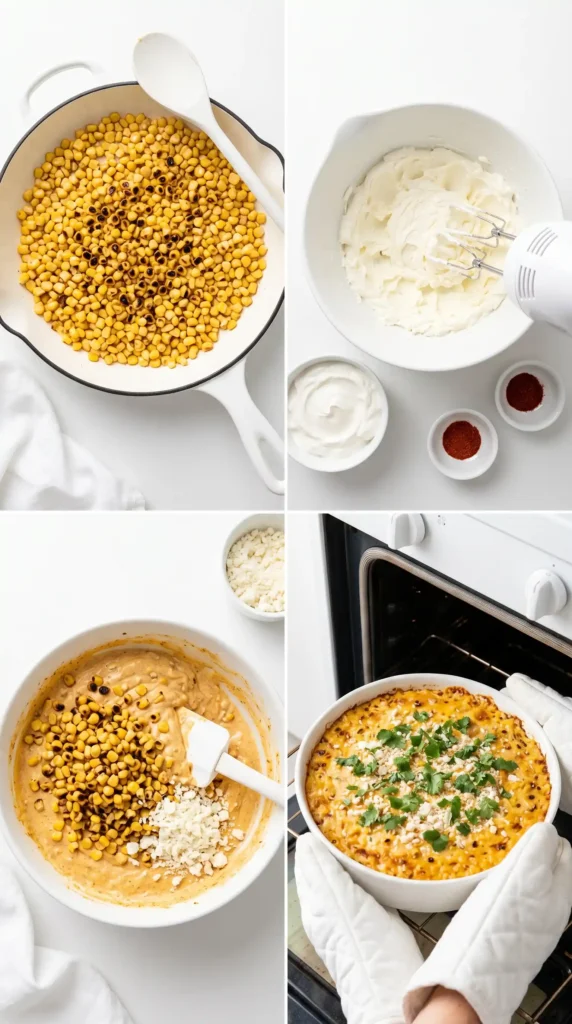
Step 1: Char the Corn
Heat a large cast iron skillet or heavy stainless steel pan over high heat until it is genuinely hot — a drop of water should evaporate instantly on contact. Add the neutral oil or butter and swirl to coat the base. Add the corn kernels in a single layer. Do not stir for the first 2–3 minutes. This is the critical step — undisturbed corn in direct contact with a screaming hot pan develops deep, slightly smoky char marks that create the elote flavour profile.
After 2–3 minutes, stir the corn once and allow the other side to char for another 2 minutes. The kernels should look visibly browned and slightly caramelised in spots — not uniformly golden, but with distinct dark spots across roughly a third of the corn surface. Season with the 1/2 teaspoon of salt halfway through cooking. Remove from heat and allow the corn to cool for 5 minutes before adding it to the creamy base.
If your skillet is not large enough to spread the corn in a single layer, cook it in two batches. Overcrowding the pan causes the corn to steam in its own moisture rather than charring — you get pale, soft kernels instead of the bold, caramelised ones that make this dip distinctive. Two batches take an extra 5 minutes and produce a dramatically better result. Always choose the better result. :/
Step 2: Make the Creamy Dip Base
While the corn cools, build the creamy base in a large mixing bowl. Beat the softened cream cheese with a hand mixer or a sturdy spoon for about 60 seconds until it looks completely smooth with no lumps. Cold cream cheese will not blend evenly with the other ingredients and leaves visible chunks in the finished dip — room temperature cream cheese blends in seconds and produces a silky, uniform base.
Add the mayonnaise and sour cream (or Mexican crema) to the beaten cream cheese and stir until fully combined. Add the lime juice, lime zest, chilli powder, smoked paprika, garlic powder, cayenne, salt, and black pepper. Stir everything together until the spices are evenly distributed throughout the base and the mixture looks uniformly pale orange-gold from the chilli powder. Taste it. It should taste tangy, creamy, and boldly spiced. Adjust lime for more brightness or cayenne for more heat.
Step 3: Combine the Corn and Base
Add the cooled charred corn kernels to the creamy base. Fold them in thoroughly using a rubber spatula until every kernel is coated in the spiced cream mixture. Add half the crumbled cotija cheese — the portion that goes into the dip itself rather than on top — and fold it in gently. Add the diced jalapeño and two thirds of the spring onion slices and fold again until evenly distributed.
Taste the combined dip at this stage and make any final adjustments. Add more lime juice if the flavor tastes flat, increase the cayenne for extra heat, and adjust the salt if the overall taste feels muted.The dip should taste bold and assertive even before the toppings go on — it will be scooped with chips which are already salty, so the dip itself needs enough seasoning to hold its own rather than tasting diluted against the chip.
Step 4: Choose Your Serving Style
Transfer the completed Mexican Street Corn Dip to a serving bowl for room-temperature serving, or to an oven-safe dish for warm or broiled serving. For the warm version — which is the most popular and the most impressive — spoon the dip into a skillet or shallow baking dish and bake at 190°C (375°F) for 12–15 minutes until the edges are bubbling and the centre is heated through. The dip does not need to brown on top at this stage — that comes in the final step if you want the broiled version.
For the broiled top — and this visual is worth doing for any gathering where you want an impression — switch the oven to the broil setting after baking. Broil for 2–3 minutes, watching closely, until the top develops golden-brown bubbling spots and the edges look slightly caramelised. Remove immediately and add the toppings while the surface is still hot so the cotija softens slightly against the warm dip.
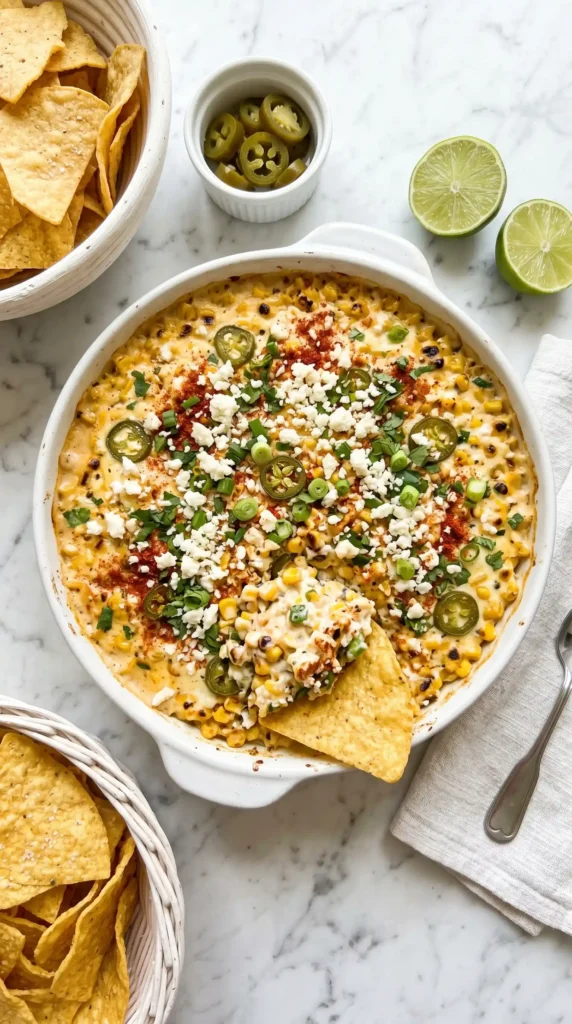
Step 5: Add the Toppings and Serve
Scatter the remaining crumbled cotija cheese generously over the entire surface of the dip. Add the remaining spring onion slices and the fresh cilantro across the top. Dust a light, even layer of chilli powder and smoked paprika over the surface — this recreates the visual dusting you see on elote and signals to anyone looking at the dish exactly what they are about to taste. Add a few thin jalapeño rounds on top if you want visible heat indication.
Place lime wedges around the edge of the serving bowl or dish so guests can add extra lime directly to their scoops. Arrange tortilla chips around and beside the bowl. Serve immediately while warm. The dip tastes excellent at room temperature too, but the warm version — with the slightly bubbling edges and the softened cotija on top — creates the kind of presentation that makes people stop their conversations and reach for a chip before they have even said hello.
Make It Spicier or Milder in SecondsFor a milder dip, remove all seeds and membranes from the jalapeño and reduce the cayenne to a pinch. For a genuinely hot version, keep the jalapeño seeds and double the cayenne to 1/2 teaspoon. Add a tablespoon of hot sauce directly into the creamy base for a consistent heat that runs through every bite. The base recipe lands at medium — noticeable heat with a comfortable finish.
Variations Worth Making
Bacon Mexican Street Corn Dip
Cook 6 strips of bacon until crispy, chop into small pieces, and fold half into the dip with the corn. Scatter the remaining bacon over the top alongside the cotija. The smoky, salty bacon amplifies the charred corn flavour significantly and adds a meaty richness that makes this version feel more substantial as a snack. This is the variation that disappears fastest at every gathering where both versions appear on the table.
Black Bean and Corn Street Dip
Add one drained and rinsed can of black beans (400g) to the dip at the same time as the charred corn. The black beans add protein, texture, and an earthiness that balances the tangy, spicy cream base. This version works as a more filling dip or even a side dish alongside grilled chicken or fish tacos. Top with diced avocado in addition to the standard toppings.
Cold Street Corn Dip
Skip the cream cheese for the cold version and use 1 cup of sour cream or Mexican crema and 1/2 cup of mayonnaise as the entire base. The cold version is lighter, brighter, and more refreshing — excellent for summer outdoor gatherings where a warm dip does not suit the weather or the occasion. Chill for at least 30 minutes before serving so the flavours meld fully. Add the toppings immediately before serving.
Storage and Make-Ahead Tips
Store leftover Mexican Street Corn Dip covered in the fridge for up to 4 days. The flavours actually deepen overnight as the lime and spices permeate the corn and cream base — many people prefer the day-two version. Reheat in the oven at 175°C (350°F) for 10–12 minutes or in a skillet over medium-low heat, stirring gently until warmed through. Add fresh toppings after reheating.
The dip base — without the corn toppings — can be made up to 2 days in advance and refrigerated. Char the corn fresh on the day of serving for the best flavour and fold it in shortly before your guests arrive. This split make-ahead approach gives you most of the prep work done in advance while keeping the corn as fresh and boldly flavoured as possible.
Frequently Asked Questions
What can I substitute for cotija cheese?
Feta cheese is the closest widely available substitute — it has a similar crumbly texture and salty flavour profile, though it is slightly milder and tangier than cotija. Queso fresco works well too and stays truer to the Mexican flavour profile. Parmesan crumbled finely also works in a pinch — it is sharper and drier but delivers a similar salty, granular texture over the top of the dip. Avoid soft cheeses like cream cheese or brie, which do not crumble and completely change the texture.
Can I make Mexican Street Corn Dip ahead of time?
Yes, this is one of the best make-ahead party dips available. Make the full dip up to 24 hours in advance, store it covered in the fridge, and bake it fresh when needed. Add all fresh toppings — cilantro, spring onion, extra cotija, the chilli powder dusting — only after baking and immediately before serving. Pre-topped dip stored in the fridge loses the bright visual contrast that makes the dish so appealing when it first arrives at the table.
Can I make this dip without cream cheese?
Yes — the cold version in the variations section above uses only sour cream and mayonnaise as the base, which produces a lighter, more fluid dip. For the warm version without cream cheese, increase the sour cream to 3/4 cup and the mayonnaise to 3/4 cup to compensate for the missing volume. The finished dip will be thinner and less rich than the cream cheese version but still tastes excellent and works well for anyone who wants a lighter result.
Is this dip gluten-free?
The dip itself contains no gluten-containing ingredients — corn, dairy, lime, spices, and fresh vegetables are all naturally gluten-free. Confirm that your mayonnaise brand does not contain any added thickeners with gluten, and check that your chilli powder and smoked paprika are certified gluten-free if you are cooking for someone with coeliac disease. Serve with certified gluten-free tortilla chips or fresh vegetable dippers to keep the entire serving gluten-free.
How do I get the best char on my corn without a grill?
A cast iron skillet over high heat produces the best indoor char — its heavy base retains and distributes heat evenly, creating the sustained high surface temperature needed for genuine caramelisation. Make sure the pan is completely preheated before the corn goes in, the corn is as dry as possible before hitting the pan, and you resist stirring for the first 2–3 minutes. A broiler also works — spread corn on a foil-lined tray and broil for 5–8 minutes, stirring once, until charred in spots.
Final Thoughts
This Mexican Street Corn Dip earns its place as the permanent go-to party appetizer for a very specific reason: it consistently surprises people. Everyone recognises the elote flavour profile when they taste it, but almost nobody expects it in dip form, and that moment of recognition and delight is what makes it memorable rather than just good.
Twenty-five minutes. One skillet. One mixing bowl. The boldest, most crowd-pleasing dip you have made. That is a return on time investment that almost nothing else in cooking can match.
Now char that corn on high heat and do not touch it for three minutes. The char is where everything starts. Everything else is just beautiful company.

Mexican Street Corn Dip
Ingredients
Method
- Char the corn by heating a cast iron skillet over high heat until hot.
- Add oil or butter, swirl to coat, and arrange corn kernels in a single layer.
- Do not stir for the first 2-3 minutes to develop char marks.
- After 2-3 minutes, stir and let the other side char for another 2 minutes.
- Season with salt halfway through cooking. Cool for 5 minutes after charring.
- In a large bowl, beat softened cream cheese until smooth.
- Add mayonnaise and sour cream, stirring until combined.
- Mix in lime juice, lime zest, and spices. Adjust seasoning to taste.
- Fold charred corn into the creamy base until coated.
- Add half of the crumbled cotija, diced jalapeño, and some spring onion. Fold gently.
- Taste and adjust seasoning if necessary.
- Transfer dip to an oven-safe dish. Bake at 190°C (375°F) for 12-15 minutes.
- For a broiled top, switch to broil for 2-3 minutes until golden brown.
- Sprinkle remaining cotija, spring onions, and cilantro on top.
- Dust with additional chili powder and smoked paprika.
- Place lime wedges around the dish and serve with tortilla chips.


