
Servings: 24 bites | Prep Time: 30 minutes | Chill Time: 2 hours | Total Time: ~2.5 hours | No-Bake
The Bite-Sized Dessert That Disappears in Seconds
Some desserts look amazing in photos but taste forgettable in real life. Strawberry Crunch Cheesecake Bites are not that. These little things deliver on every promise — a creamy cheesecake center, a buttery graham cracker base, and a strawberry crunch coating that is completely irresistible.
I brought a tray of these to a potluck once, fully expecting leftovers. I had none. Someone actually asked if I had more hiding in my bag. I did not, and I have regretted it every single time since.
The best news? This is a no-bake recipe. No oven required. You just need a mixer, a fridge, and a little patience while everything chills. If you can stir and scoop, you can absolutely make these.
What Makes Strawberry Crunch Cheesecake Bites So Good
The magic here is texture contrast. You get the dense, smooth creaminess of the cheesecake filling against the sandy, crunchy strawberry coating. Every single bite gives you multiple textures at once, and that combination is what keeps people reaching for another one.
The strawberry crunch coating — made from crushed golden sandwich cookies and strawberry gelatin powder — creates this nostalgic flavor that reminds you of strawberry shortcake ice cream bars. IMO, that alone is worth making this recipe for.
Have you ever served something at a party that people literally gathered around? That is what happens with these. They look adorable, they taste incredible, and they are easy to pick up and eat without plates or forks. Total crowd-pleaser.
Everything You Need for Strawberry Crunch Cheesecake Bites
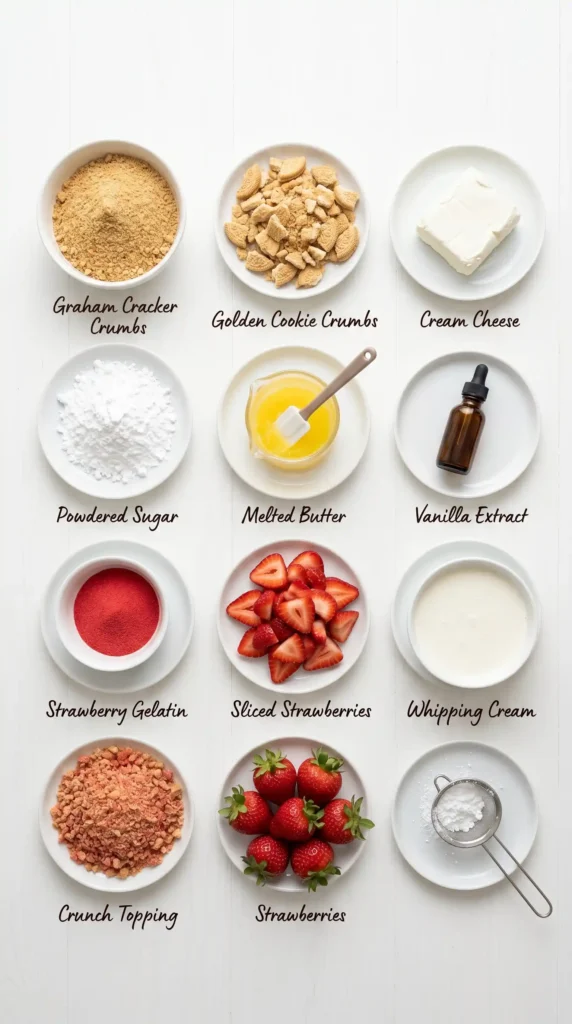
For the Cheesecake Filling
- 16 ounces (450g) full-fat cream cheese, softened to room temperature
- 1/2 cup (60g) powdered sugar, sifted
- 1 teaspoon pure vanilla extract
- 1/4 cup (60ml) heavy whipping cream, cold
For the Graham Cracker Base
- 1 cup (100g) graham cracker crumbs (about 8 full crackers)
- 3 tablespoons (42g) unsalted butter, melted
- 1 tablespoon granulated sugar
For the Strawberry Crunch Coating
- 20 golden sandwich cookies (like Golden Oreos), crushed into coarse crumbs
- 3 tablespoons (25g) strawberry-flavored gelatin powder (like Jell-O)
- 3 tablespoons (42g) unsalted butter, melted
Optional Garnishes
- Fresh strawberry halves or slices
- White chocolate drizzle
- Extra strawberry crunch sprinkled on top
How to Make Strawberry Crunch Cheesecake Bites Step by Step
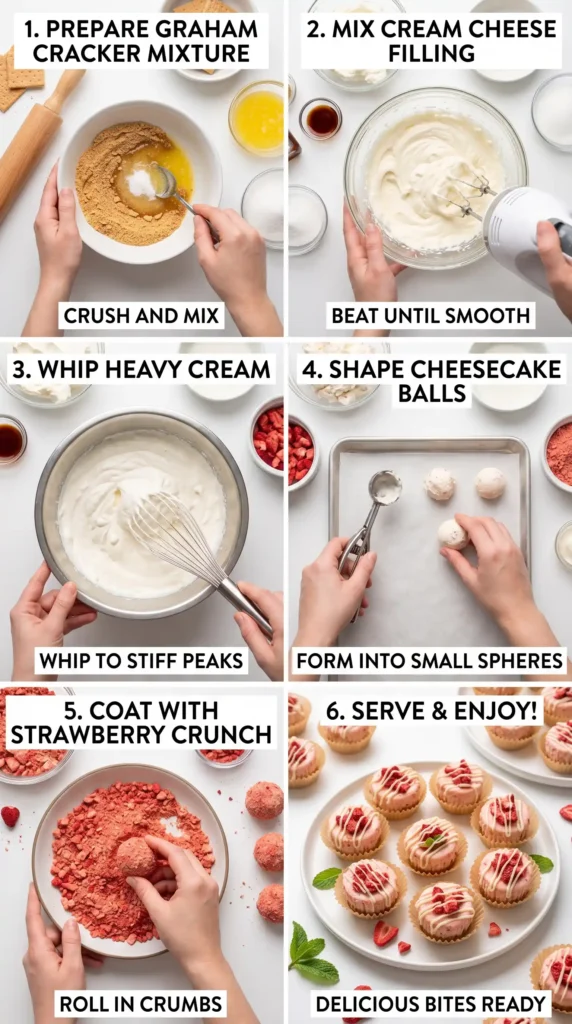
Step 1: Make the Graham Cracker Base Layer
Start by making the base so it has time to firm up while you prepare everything else. Crush your graham crackers into fine crumbs using a food processor or by sealing them in a zip-lock bag and rolling over them with a rolling pin.
Transfer the crumbs to a bowl and add the melted butter and sugar. Stir everything together until the crumbs look like wet sand and hold their shape when you press a small amount between your fingers.
Line a small baking sheet or flat tray with parchment paper. Press the graham cracker mixture into a thin, even layer about half an inch thick. The exact shape does not matter because you will cut or scoop from it later.
Place the tray in the fridge while you make the cheesecake filling. You want the base layer to firm up slightly so it is easier to work with. About 15 minutes in the fridge is enough at this stage.
Step 2: Make the Strawberry Crunch Coating
This coating is the signature element of the whole recipe and it takes about 5 minutes to put together. Start by placing your golden sandwich cookies in a food processor. Pulse them until you get coarse crumbs. You want some texture here, not a fine powder.
Transfer the cookie crumbs to a mixing bowl. Add the strawberry gelatin powder and stir well to combine. The gelatin powder adds that unmistakable strawberry flavor and gives the coating its bright pink color. Do not substitute this with fresh strawberries here — the dry powder is what makes the coating stick and stay crunchy.
Pour the melted butter over the crumb mixture and stir until everything clumps together loosely. The coating should look like moist, crumbly sand with a pink tint. Spread it out on a flat plate or shallow dish and set it aside. You will use this to roll the finished bites.
Step 3: Make the Cheesecake Filling
This is the most important step, so take your time and make sure your cream cheese is fully softened before you start. Cold cream cheese creates a lumpy, uneven filling that will not scoop cleanly. Let it sit at room temperature for at least 30 minutes before you begin.
Place the softened cream cheese in a large mixing bowl. Beat it with a hand mixer on medium speed for about 2 minutes until it is completely smooth and fluffy. Scrape down the sides of the bowl a couple of times to make sure everything gets incorporated evenly.
Add the sifted powdered sugar and vanilla extract. Beat on low speed first to avoid a sugar explosion, then increase to medium and beat for another 90 seconds. The mixture should look smooth, thick, and creamy at this point.
In a separate cold bowl, whip the heavy cream on high speed until it holds stiff peaks. This usually takes about 2 to 3 minutes with a hand mixer. Stiff peaks mean the cream holds its shape when you lift the beaters without flopping over.
Fold the whipped cream gently into the cream cheese mixture using a rubber spatula. Use slow, sweeping motions from the bottom of the bowl upward. Do not stir aggressively. Gentle folding keeps the whipped cream light and airy, which gives your cheesecake filling a smooth, mousse-like texture.
Once fully combined, the filling should look thick, creamy, and hold its shape when you scoop it. If it feels too soft, cover the bowl and refrigerate it for 20 minutes before scooping. Chilling it slightly makes the bites much easier to shape.
Step 4: Assemble the Cheesecake Bites
Take your graham cracker base out of the fridge. Use a small round cookie cutter or the rim of a shot glass to cut out small discs from the base layer. Aim for about 1-inch rounds, enough to give each bite a firm, structured bottom.
Now scoop the cheesecake filling. A small cookie scoop or a tablespoon works perfectly here. Scoop a portion of filling and place it directly onto a graham cracker disc. Use clean hands to gently press and shape the filling into a smooth ball around the base. It does not need to be perfect — a rough round shape works fine.
Once you have shaped a bite, roll it immediately in the strawberry crunch coating. Press the coating gently into the sides and top so it adheres well. Give each bite a gentle squeeze to help the crumbs stick without flattening the shape.
Place each finished bite on a parchment-lined tray as you go. Work in batches if needed. If the filling starts to soften and become hard to shape, pop the bowl back in the fridge for 10 minutes and continue. FYI, working with cold filling makes this whole process significantly easier and less messy.
Step 5: Chill and Serve
Once all your bites are assembled and coated, refrigerate the entire tray for at least 2 hours. This chilling time is not optional. The filling needs to set firm so the bites hold their shape when picked up.
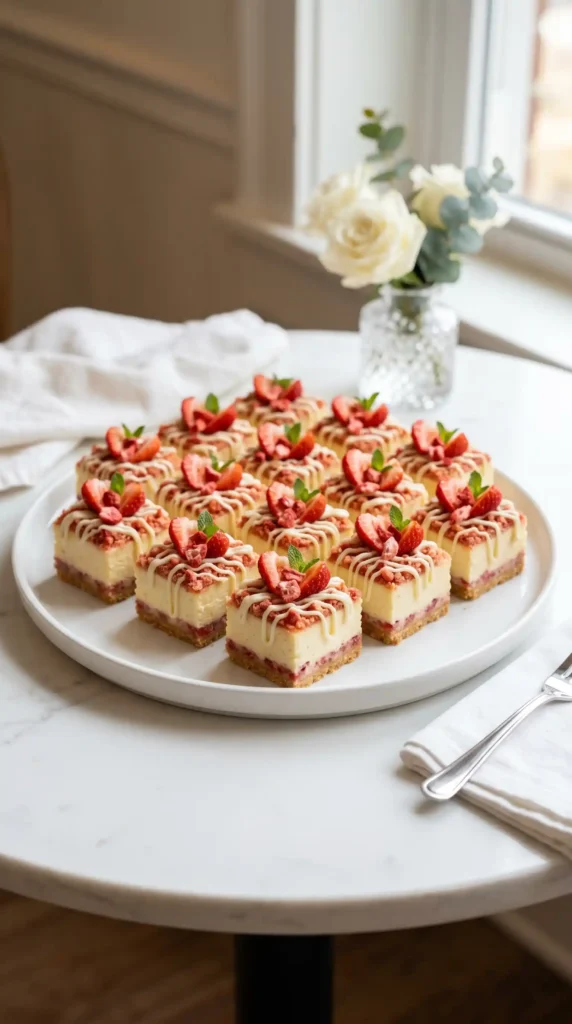
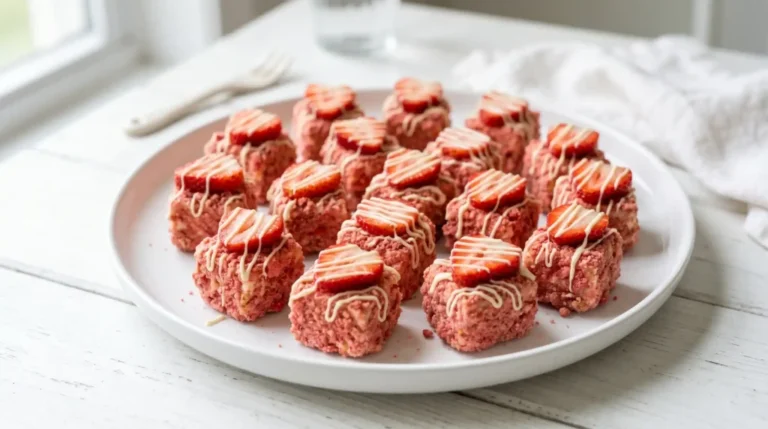
After chilling, add any optional garnishes. A small strawberry half pressed into the top looks gorgeous and signals the flavor immediately. A thin drizzle of melted white chocolate adds a touch of elegance if you want to dress them up further.
Serve them cold, straight from the fridge. The contrast between the cold, creamy center and the crunchy coating is at its best when the bites are properly chilled. Arrange them on a platter and watch how quickly they vanish.
Tips for Perfect Strawberry Crunch Cheesecake Bites
- Always use full-fat cream cheese. Low-fat versions produce a looser filling that does not hold its shape.
- Work quickly when rolling the bites. The warmth of your hands softens the filling fast.
- Make the crunch coating a day ahead and store it in an airtight container to save time.
- Use a small cookie scoop for consistent sizing so all bites chill and set evenly.
- If bites lose their shape after rolling, reshape them gently after chilling for 30 minutes.
How to Store Strawberry Crunch Cheesecake Bites
Store finished bites in a single layer in an airtight container in the refrigerator for up to 5 days. Stacking them can damage the coating and flatten their shape, so keep them in one layer or use parchment between layers.
You can also freeze these bites for up to 6 weeks. Place them on a tray to freeze solid first, then transfer to a freezer bag. Thaw in the fridge overnight before serving. The texture stays remarkably good after freezing.
Frequently Asked Questions
Can I make Strawberry Crunch Cheesecake Bites ahead of time?
Yes, these are actually better when made a day ahead. The filling firms up beautifully overnight and the flavors develop further. You can make the components separately up to 2 days ahead and assemble the day before serving. Just keep them refrigerated until needed.
What can I use instead of golden sandwich cookies in the crunch coating?
Vanilla wafers, shortbread cookies, or even plain digestive biscuits work as substitutes. The key is using a neutral-flavored, crunchy cookie so the strawberry gelatin flavor comes through clearly. Avoid chocolate-flavored cookies as they overpower the strawberry taste.
Why is my cheesecake filling too soft to shape?
This usually means the cream cheese was too warm or the whipped cream was not beaten to stiff peaks. Pop the filling in the fridge for 20 to 30 minutes. If it is still too soft, whip an extra 2 tablespoons of heavy cream to stiff peaks and fold it in gently.
Can I make these without the graham cracker base?
You can. The base adds structural support and a buttery crunch, but if you skip it, the filling balls will still hold their shape after chilling. Simply scoop the filling directly, shape into balls, roll in the coating, and chill. They work perfectly well either way.
Do Strawberry Crunch Cheesecake Bites need to be refrigerated at all times?
Yes. Because the filling contains cream cheese and heavy cream, these bites need to stay cold. Do not leave them out at room temperature for more than 2 hours. For parties, serve them on a chilled platter or keep the tray on a bed of ice.
Final Thoughts
Strawberry Crunch Cheesecake Bites check every box you want from a party dessert. They look impressive, taste incredible, require no baking, and disappear from the plate faster than you can refill it. Every single time I make these, I wish I had made a double batch.
The combination of creamy cheesecake filling, buttery graham cracker base, and that nostalgic strawberry crunch coating is genuinely hard to beat. These bites feel indulgent without being heavy, and that balance makes them work for almost any occasion.
So grab some cream cheese and golden cookies, clear a shelf in your fridge, and get making. Once you share these with people you love, they will ask for the recipe immediately. Consider that your warning
Strawberry Crunch Cheesecake Bites
Ingredients
Method
- Make the Graham Cracker Base Layer: Crush graham crackers into fine crumbs and mix with melted butter and sugar. Press into a lined tray and refrigerate for 15 minutes.
- Make the Strawberry Crunch Coating: Crush golden sandwich cookies and mix with strawberry gelatin powder. Add melted butter and combine until crumbly.
- Make the Cheesecake Filling: Beat softened cream cheese until smooth, then add powdered sugar, and vanilla extract. Fold in whipped cream gently until combined.
- Assemble the Cheesecake Bites: Cut out discs from the graham cracker base. Scoop cheesecake filling onto each disc, shape into balls, and roll in strawberry crunch coating.
- Chill and Serve: Refrigerate for at least 2 hours. Optionally garnish before serving.


