
Prep Time: 15 minutes | Cook Time: 25-30 minutes | Servings: 24 cups (serves 6-8 people)
Picture this: a party tray of crispy, golden tater tots molded into little cups and stuffed to the brim with melted cheese, bacon, and sour cream. Yeah, that is exactly what Loaded Tater Tot Cups are. And once you make them, you will never look at plain tater tots the same way again.
I first made these for a Super Bowl party three years ago. I expected them to sit quietly next to the other snacks. Instead, they vanished in about eight minutes flat. Someone actually asked if I had ordered them from a restaurant. I had not — but I definitely smiled and let the moment linger.
These little cups work for game nights, potlucks, kids’ parties, or honestly just a Wednesday when you want something really satisfying. They look impressive, they taste incredible, and the method is way simpler than you think. Let me walk you through everything.
Why Loaded Tater Tot Cups Are the Ultimate Party Snack
Have you ever tried to serve tater tots at a party and ended up with a lukewarm pile that nobody touches after the first ten minutes? That is the old way. Loaded Tater Tot Cups solve this problem completely because each cup is its own self-contained, portion-perfect snack.
The cup shape means every single bite gets crispy edges, melty cheese, and all the toppings together in one go. No flimsy paper plate. No dipping sauce drama. IMO, this is the most efficient snack delivery system ever invented.
They also reheat beautifully if you have leftovers. Not that you will. But just in case, a quick five minutes in the air fryer brings them right back to crispy perfection. Convenience and flavour working together — can you really ask for more from a snack?
What You Need to Make Loaded Tater Tot Cups
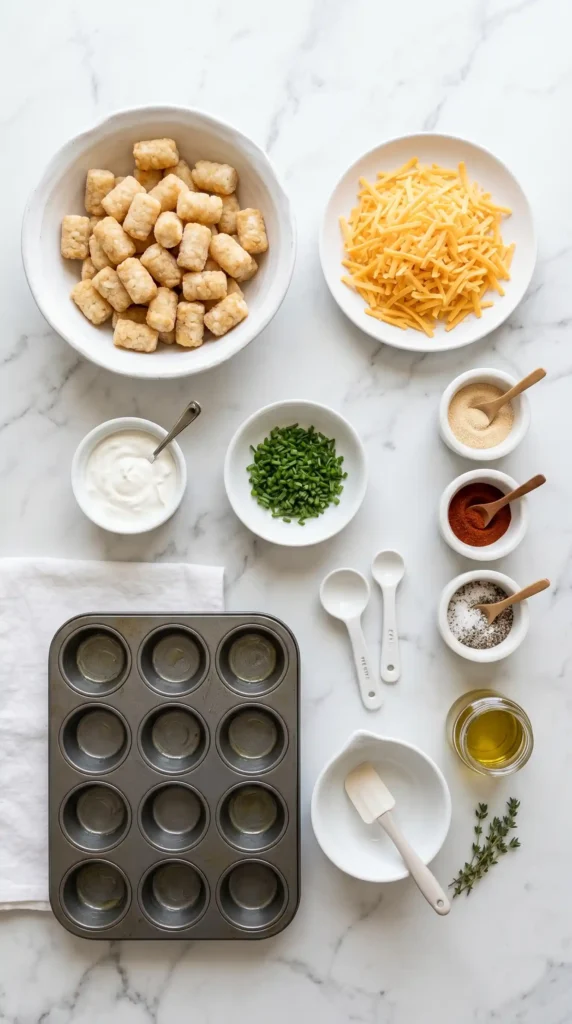
The ingredient list is short and everything on it earns its place. Nothing fancy, nothing you need to hunt down at a specialty store.
For the Tater Tot Cups
- 900g (32 oz) frozen tater tots
- 1 tablespoon olive oil or cooking spray
- 1/2 teaspoon garlic powder
For the Loaded Filling
- 200g (about 7 oz) shredded cheddar cheese
- 150g (about 5 oz) cooked bacon, crumbled (roughly 8 strips)
- 120g (1/2 cup) sour cream
- 3 tablespoons finely chopped chives or spring onions
- 1/2 teaspoon smoked paprika
- Salt and black pepper to taste
- Optional: pickled jalapeno slices for heat
How to Make Loaded Tater Tot Cups Step by Step
Here is where the magic actually happens. The process is straightforward, but the little details in each step make a genuine difference to the final result. Follow this and you will land perfect, crispy Loaded Tater Tot Cups every single time.
Step 1: Thaw the Tater Tots Slightly
Take your 900g of frozen tater tots out of the freezer and let them sit at room temperature for about 10-15 minutes. You do not want them fully thawed — just pliable enough to press and mold without crumbling apart. Fully frozen tots will crack when you try to shape them.
While the tots are thawing slightly, preheat your oven to 220C (425F). This high temperature is important — it creates that beautifully crispy exterior that makes these cups so satisfying to bite into. A low oven gives you sad, soft cups and nobody wants that.
Step 2: Grease Your Muffin Tin Well
Grab a standard 12-cup muffin tin — you will need two of them or work in batches for 24 cups. Generously spray every cup with cooking spray or brush with a little olive oil. Get the sides and the base of each cup. Do not be shy here.
Skipping this step or doing it half-heartedly is how you end up spending ten minutes trying to pry cups out of the tin and ending up with broken, messy pieces. Proper greasing means your cups pop out cleanly and look as good as they taste.
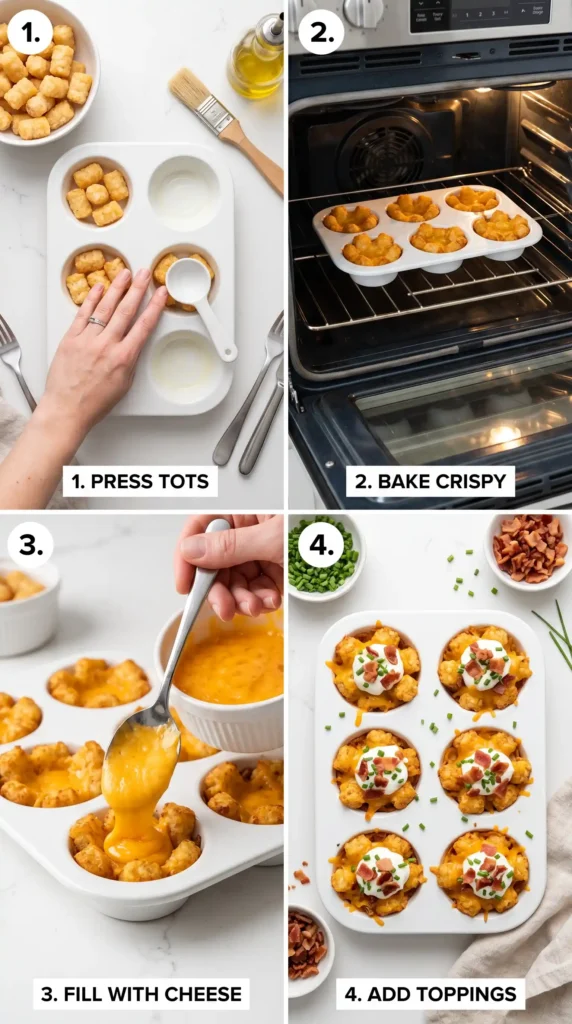
Step 3: Press the Tots into Cup Shapes
Place 3-4 slightly thawed tater tots into each muffin cup. Using your fingers or the back of a small spoon, press them firmly down and up the sides to form a cup shape. The goal is an even layer of tot around the base and walls with a hollow in the middle for the filling.
Work quickly because the tots start to warm up fast from your hands. If they get too soft and sticky, pop the muffin tin in the freezer for 5 minutes to firm them back up before continuing. A firm, well-shaped cup holds together much better during baking.
Sprinkle a tiny pinch of garlic powder and a whisper of salt over the shaped tots before they go into the oven. This seasons the cup itself, not just the filling, and makes a noticeable difference to the overall flavour of the finished Loaded Tater Tot Cups.
Step 4: Bake Until Crispy and Golden
Place the muffin tin in the preheated oven and bake for 15-18 minutes. You are looking for the tops of the cups to turn a deep golden brown. The edges should look visibly crispy and the tots should have puffed up slightly around the rim.
At the 15-minute mark, check on them. Every oven runs a little differently — some run hot, some run cool. If they look pale and soft, give them another 3-5 minutes. You want actual crunch here, not just a light colour change.
Once they hit that golden, crispy stage, take them out and use a small spoon or your fingers to gently press the centre back down if it has puffed up. This re-creates the cup hollow you need for the fillings. Do this while they are still hot — it only takes about 10 seconds per cup.
Step 5: Add the Cheese and Return to the Oven
Now comes the fun part. Fill each cup with a generous pinch of shredded cheddar cheese — roughly one tablespoon per cup. Do not pack it too tightly; you want it to melt down into the cup nicely rather than sitting on top like a little cheese hat.
Return the muffin tin to the oven for another 5-7 minutes until the cheese has fully melted and started to bubble around the edges. Bubbling cheese is your green light. Barely melted cheese is not the same experience and the cups will feel incomplete.
Pull them out and let them sit for exactly 2 minutes before you try to remove them from the tin. This brief rest allows the cheese to firm up just enough to help hold the cup shape together. Rush this step and the cups may fall apart when you lift them out.
Step 6: Load Them Up and Serve
Carefully remove each cup from the tin using a small offset spatula or butter knife to loosen the edges. Place them on a serving tray. Now add your toppings: a small dollop of sour cream, a good pinch of crumbled bacon, a few chive pieces, and a light dusting of smoked paprika.
If you want heat, lay a single pickled jalapeno slice right on top of the sour cream. The acidic tang of the jalapeno cuts through the richness perfectly. Serve immediately while the cups are still warm and the cheese is still gooey. These are not a make-and-wait situation.
Tips for Perfect Loaded Tater Tot Cups Every Time
A few key habits separate a good result from a great one. Here is what I always keep in mind:
- Always grease the tin generously — this single step determines whether your cups come out clean or come out in pieces.
- Use freshly shredded cheddar rather than pre-shredded. Pre-shredded bags contain anti-caking agents that make the cheese melt less smoothly.
- Cook your bacon until genuinely crispy — chewy bacon in these cups feels wrong. Crispy bacon crumbles stay in place and add a proper textural contrast.
- Work in batches if you only have one muffin tin — the second batch always turns out just as good.
- Add the sour cream right before serving, not in advance — it keeps the cups from getting soggy and the dollop looks much better freshly applied.
Tasty Variations to Switch Things Up
The classic Loaded Tater Tot Cups version is hard to beat, but once you nail the base technique, you can take these in all sorts of directions. Here are a few combinations worth trying:
- BBQ Pulled Pork Cups: Swap the bacon for slow-cooked pulled pork and use smoked gouda instead of cheddar. Add a drizzle of BBQ sauce on top. Outrageously good.
- Buffalo Chicken Cups: Fill with shredded rotisserie chicken tossed in buffalo sauce, blue cheese crumbles, and a celery piece. Perfect for game day.
- Breakfast Cups: Add a tiny crack of egg into the cup before the second bake, top with cheddar and chives. Brunch sorted.
- Vegetarian Cups: Skip the bacon entirely and fill with diced roasted peppers, black beans, and pepper jack cheese. Equally satisfying, zero meat required.
Frequently Asked Questions
Can I make Loaded Tater Tot Cups ahead of time?
You can bake the cups and melt the cheese up to 2 hours ahead. Store them on a tray at room temperature and reheat in the oven at 200C for 5 minutes before serving. Add the sour cream, bacon, and chives fresh just before you bring them out. FYI, this method works brilliantly for parties.
Can I use an air fryer instead of an oven?
Yes, and the results are excellent. Use silicone muffin cups in the air fryer basket. Cook the shaped cups at 200C for 12-14 minutes, then add cheese and cook for another 3-4 minutes. The air fryer gets them slightly crispier than the oven and cuts down the total cook time noticeably.
Why are my tater tot cups falling apart?
Two main culprits here. Either the muffin tin was not greased enough, or you tried to remove them before the cheese had a chance to set during that 2-minute rest. Make sure you press the tots firmly during shaping and always bake long enough to get a genuinely crispy exterior before adding the cheese.
Can I freeze Loaded Tater Tot Cups?
Absolutely. Bake and fill with cheese but skip the fresh toppings. Let them cool completely, place them on a tray and freeze until solid, then transfer to a freezer bag. They keep well for up to 6 weeks. Reheat straight from frozen at 200C for 10-12 minutes and add fresh toppings before serving.
What cheese works best in these cups?
Sharp cheddar is the classic choice and melts beautifully. Pepper jack adds a bit of heat if you enjoy spice. Smoked gouda brings a deeper, richer flavour. Avoid very hard cheeses like parmesan on their own — they do not melt well enough to fill the cup properly. A blend of cheddar and mozzarella also works great for extra stretch 🙂
Final Thoughts
Loaded Tater Tot Cups take everything people already love about loaded potato skins and make them more portable, more crispy, and honestly more fun. They hit every flavour note — salty, cheesy, smoky, creamy — all in one bite-sized package.
The method is simple enough for a weeknight but impressive enough for a crowd. And once you learn the technique, you open the door to endless variations that keep things interesting every single time you make them.
So grab a bag of tater tots and get that oven preheating. Your guests will think you spent hours on these. You and I both know the truth — but why spoil the fun? Make a batch this weekend and watch them disappear before you even get to sit down.

Loaded Tater Tot Cups
Ingredients
Method
- Thaw the frozen tater tots at room temperature for about 10-15 minutes.
- Preheat the oven to 220C (425F).
- Grease a standard 12-cup muffin tin well with cooking spray or olive oil.
- Press 3-4 slightly thawed tater tots into each muffin cup to form a cup shape.
- Sprinkle garlic powder and a pinch of salt over the shaped tots.
- Bake in the preheated oven for 15-18 minutes until golden brown and crispy.
- After baking, press down the center of each cup if puffed.
- Fill each cup with a generous pinch of shredded cheddar cheese and return to the oven for another 5-7 minutes.
- Let cool for 2 minutes before removing from the tin.
- Carefully remove cups from the tin and add toppings: a dollop of sour cream, crumbled bacon, chives, and smoked paprika.
- Serve immediately while warm.


