
Prep Time: 15 minutes | Rest Time: 30 minutes | Cook Time: 30 minutes | Total Time: 1 hour 15 minutes | Servings: 10-12 crepes
A Crepe That Actually Deserves the Hype
Let me be straight with you — crepes have a reputation for being fussy, fragile, and frankly a little intimidating. I used to think the same thing. Then I tried making Chocolate-Filled Rolled Crepes at home and realized the whole thing is much easier than it looks.
These thin, delicate crepes wrap around a rich, smooth chocolate filling and get rolled into neat little logs you can serve for breakfast, brunch, or dessert. They work at every occasion and they genuinely impress people every single time.
Have you ever seen something come out of your own kitchen and thought, “I can’t believe I made that”? That’s the feeling these crepes deliver. And once you get the technique down, you’ll be making them on repeat.
Why Chocolate-Filled Rolled Crepes Work So Well
The magic is in the contrast. A good crepe is paper-thin, lightly buttery, and almost neutral in flavor. The chocolate filling inside is rich, sweet, and deeply satisfying. Together, they balance each other out perfectly.
Rolling the crepes rather than folding them keeps the filling securely inside and gives you that clean, elegant cylinder shape that looks like it came from a French patisserie. IMO, presentation matters — and rolled crepes deliver it effortlessly.
The recipe also comes together with pantry staples. No exotic ingredients, no special equipment beyond a non-stick pan, and no professional skill required. Just a little patience and the right technique.
Everything You Need: Full Ingredient List
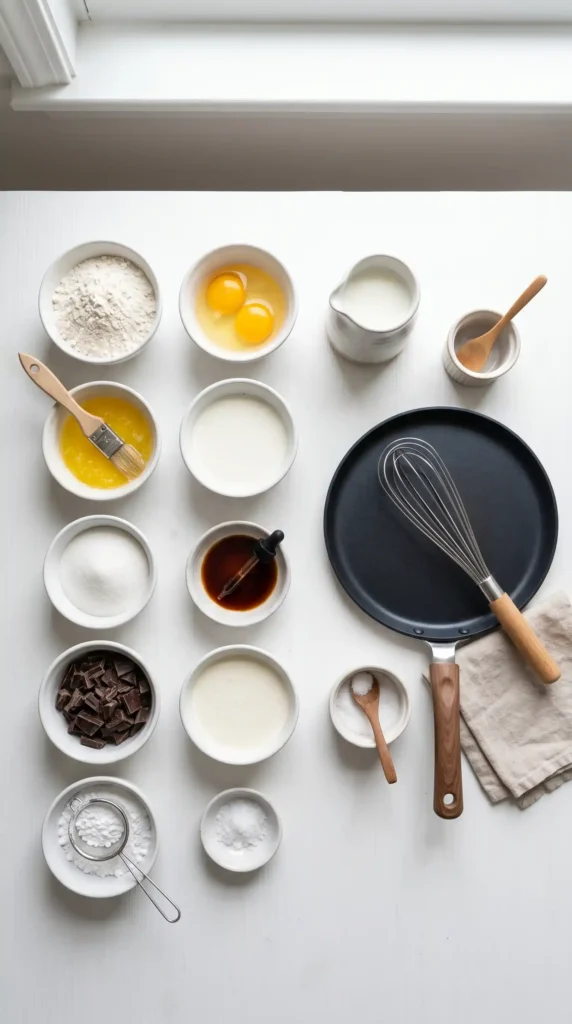
For the Crepe Batter
Room-temperature ingredients blend together much more smoothly here. Pull your eggs and milk out of the fridge about 20 minutes before you start — it makes a real difference in the texture of your batter.
- 1 cup all-purpose flour
- 2 large eggs, at room temperature
- 1 1/2 cups whole milk, at room temperature
- 2 tablespoons unsalted butter, melted and slightly cooled
- 1 tablespoon granulated sugar
- 1/4 teaspoon salt
- 1/2 teaspoon pure vanilla extract
- Extra butter or non-stick spray for greasing the pan
For the Chocolate Filling
Use good-quality chocolate here. Since the filling is the star, the quality of your chocolate directly affects the final flavor. A semi-sweet or dark chocolate with at least 55% cocoa works best.
- 6 oz (170g) semi-sweet or dark chocolate, finely chopped
- 1/2 cup heavy whipping cream
- 1 tablespoon unsalted butter
- 1 tablespoon powdered sugar
- 1/2 teaspoon pure vanilla extract
- Pinch of salt
For Serving (Optional but Recommended)
- Powdered sugar, for dusting
- Fresh strawberries or raspberries
- Whipped cream
- Extra melted chocolate or chocolate sauce for drizzling
How to Make Chocolate-Filled Rolled Crepes: Full Process
Let’s walk through this step by step. The process has a few distinct phases — making the batter, resting it, cooking the crepes, making the filling, and rolling everything together. None of these steps are complicated, but each one matters.
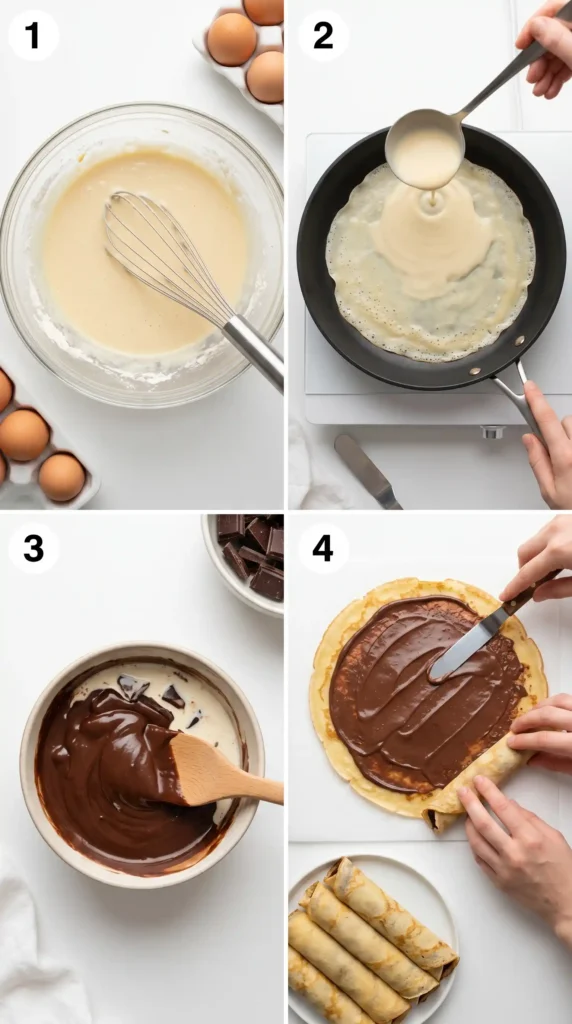
Step 1: Make the Crepe Batter
Add the 1 cup of flour and 1/4 teaspoon of salt to a large mixing bowl. Make a small well in the center of the flour. This small step helps the wet ingredients incorporate without sending flour flying everywhere.
Crack the 2 eggs into the well and add 1 tablespoon of sugar and 1/2 teaspoon of vanilla extract. Using a whisk, start mixing from the center outward, gradually drawing the flour in from the sides. This technique keeps lumps from forming.
Once the eggs are mostly incorporated, slowly pour in the 1 1/2 cups of milk in a thin, steady stream while whisking continuously.
Finally, whisk in the 2 tablespoons of melted butter. Your batter should look smooth, thin, and slightly pourable — almost like heavy cream in consistency. If you spot any lumps, strain the batter through a fine mesh sieve.
Step 2: Rest the Batter — Don’t Skip This
This is the step most people want to skip. Please don’t. Cover the bowl with plastic wrap and let the batter rest at room temperature for at least 30 minutes, or up to 2 hours.
Resting allows the flour to fully hydrate and the gluten to relax. The result is a crepe with a much more tender, silky texture that spreads evenly in the pan instead of snapping back and tearing. FYI — rested batter also produces crepes with fewer bubbles and holes.
While the batter rests, use that time to make your chocolate filling so everything is ready to go when the crepes come off the pan.
Step 3: Make the Chocolate Filling
Place your 6 oz of finely chopped chocolate in a heatproof bowl. The finer you chop it, the faster and more evenly it will melt — this matters more than people realize.
Pour 1/2 cup of heavy cream into a small saucepan and heat it over medium heat until you see small bubbles forming around the edges. You don’t want a full boil — just hot enough to melt the chocolate when combined.
Pour the hot cream over the chopped chocolate and let it sit undisturbed for exactly 2 minutes. Then add 1 tablespoon of butter, 1 tablespoon of powdered sugar, 1/2 teaspoon of vanilla, and a pinch of salt.
Gently stir from the center outward using a spatula or whisk until the mixture turns completely smooth and glossy. This is your ganache-style filling. Let it cool at room temperature until it thickens to a spreadable consistency — about 20 to 30 minutes.
If the filling thickens too much before you’re ready to use it, gently reheat it over a double boiler for 30 seconds and stir to loosen it back up.
Step 4: Cook the Crepes
Heat a non-stick skillet or crepe pan (8 to 10 inches works perfectly) over medium heat. Add a very small knob of butter — about 1/2 teaspoon — and swirl it around the pan to coat the surface evenly. Too much butter makes the crepe greasy; too little causes sticking.
Pour about 3 tablespoons of batter into the center of the pan. Immediately lift the pan off the heat and tilt it in a circular motion to spread the batter into a thin, even round. Work quickly — the batter sets fast.
Return the pan to the heat and cook for about 60 to 90 seconds. You’ll know the crepe is ready to flip when the edges look dry and lightly golden, and the surface no longer looks wet or shiny. Slide a thin spatula under the edge and flip it in one confident motion.
Cook the second side for only 20 to 30 seconds. It won’t look as golden as the first side and that’s perfectly fine — the second side is always paler. Slide the finished crepe onto a plate and repeat with the remaining batter.
Stack your finished crepes directly on top of each other. They won’t stick together — a common worry that turns out to be a non-issue. Keep them covered loosely with a clean kitchen towel while you finish the batch.
Step 5: Fill and Roll the Crepes
Now for the part that makes everything come together. Lay one crepe flat on a clean surface with the paler (second-cooked) side facing up. This side has a slightly rougher texture that grips the filling better.
Spoon about 1 1/2 to 2 tablespoons of the chocolate filling onto the center of the crepe. Spread it in a thin, even layer across most of the crepe, leaving about a half-inch border around the edges. Don’t overfill — more filling sounds better but it makes clean rolling much harder.
Starting from the edge closest to you, roll the crepe away from yourself into a tight, even cylinder. Apply gentle but steady pressure as you roll to keep the shape compact. If any filling squeezes out the sides, simply wipe it away with a clean spoon.
Place the finished roll seam-side down on your serving plate so it stays closed. Repeat this process for each crepe until you’ve used up all the batter and filling.
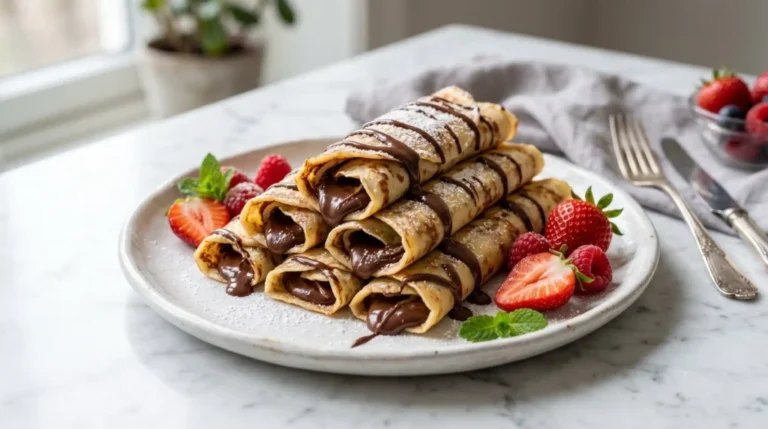
Step 6: Serve and Garnish
Arrange your Chocolate-Filled Rolled Crepes on a plate or platter with the seam side facing down. Dust them generously with powdered sugar using a small sieve — it takes 10 seconds and immediately makes everything look more elegant.
Add fresh berries alongside for color and a fruity contrast to the rich chocolate. A small drizzle of extra chocolate sauce or a dollop of whipped cream on the side takes things from great to genuinely spectacular.
Serve immediately while the crepes are still warm and the filling is soft and fudgy. These are best eaten fresh off the plate
Tips for Getting These Exactly Right

- Rest the batter every time: Even 30 minutes makes a significant difference in texture and spreadability. This is non-negotiable if you want restaurant-quality crepes.
- Keep the heat consistent: Medium heat is the sweet spot. Too high and the crepe browns before it can spread; too low and it takes forever and turns rubbery.
- The first crepe is always the test crepe: Seriously, plan for it. Use it to test your pan temperature and batter amount. Nobody needs to know.
- Don’t overfill: It’s tempting, but too much filling makes rolling messy and the ends won’t stay closed. Stick to 1 1/2 to 2 tablespoons per crepe.
- Make the filling ahead: The chocolate filling can be made up to 3 days in advance and stored in the fridge. Gently warm it before spreading.
- Batter keeps well: You can make the batter a day ahead and store it covered in the fridge. Give it a quick whisk before cooking.
Frequently Asked Questions
Can I make the crepe batter ahead of time?
Yes, and it’s actually a great idea. You can make the batter up to 24 hours in advance and keep it covered in the refrigerator. The extra resting time does the batter no harm — if anything, the crepes turn out even more tender. Whisk it gently before cooking to recombine.
What’s the best chocolate to use for the filling?
Semi-sweet chocolate with 55% to 65% cocoa gives the best balance of richness and sweetness. Dark chocolate (70% and above) works if you prefer a more intense, less sweet filling. Avoid milk chocolate for the filling — it tends to be too sweet and the texture can turn grainy when mixed with cream.
My crepes keep tearing — what am I doing wrong?
A few things could cause this. The batter might not have rested long enough, your pan might be too hot, or you could be using too little batter and spreading it too thin. Also check that your pan is properly greased. If all else fails, let the batter rest another 15 minutes and try again.
Can I use a different filling instead of chocolate?
Absolutely. Nutella straight from the jar works beautifully and requires zero prep. Peanut butter mixed with a little honey is another great option. For something lighter, try a sweetened cream cheese with a bit of lemon zest. The rolling technique stays exactly the same regardless of what you fill them with.
How do I store leftover Chocolate-Filled Rolled Crepes?
Store any leftover rolled crepes in an airtight container in the refrigerator for up to 2 days. The texture of the crepe softens slightly as it sits with the filling inside, but they still taste great cold or gently warmed in a pan for about 30 seconds per side.
Can I freeze the crepes?
You can freeze unfilled crepes very well. Stack them with a small piece of parchment paper between each one, then place them in a zip-lock freezer bag. They keep for up to 2 months. Thaw at room temperature for about 20 minutes before filling and rolling. Filled and rolled crepes don’t freeze as well — the filling can separate.
Final Thoughts
Chocolate-Filled Rolled Crepes sit in that rare category of recipes that look far more impressive than they are difficult. They’re elegant enough for a special occasion but simple enough for a Tuesday morning when you want something that feels a little special.
The key things to remember: rest your batter, keep the heat steady, don’t skip the chocolate quality, and don’t overfill. Get those four things right and the rest takes care of itself.
Once you make these once, you’ll realize they’re genuinely one of the most rewarding things you can cook. The look on someone’s face when you serve them a plate of rolled chocolate crepes? Completely worth the effort
Now go make them. You’ve got everything you need.
Chocolate-Filled Rolled Crepes
Ingredients
Method
- In a large mixing bowl, add the flour and salt. Make a small well in the center.
- Crack the eggs into the well and add sugar and vanilla extract. Whisk from the center outward, gradually incorporating flour.
- Slowly pour in the milk while whisking continuously until smooth.
- Whisk in the melted butter. Strain through a fine mesh sieve if there are lumps.
- Cover the bowl with plastic wrap and let it rest at room temperature for at least 30 minutes.
- Chop the chocolate finely and place it in a heatproof bowl.
- Heat the cream in a saucepan over medium heat until small bubbles form.
- Pour the hot cream over the chocolate and let sit for 2 minutes. Add butter, powdered sugar, vanilla, and salt.
- Stir until fully smooth and glossy. Cool until thick enough to spread.
- Heat a non-stick skillet over medium heat, adding a tiny knob of butter.
- Pour about 3 tablespoons of batter into the center and tilt the pan to spread thinly.
- Cook until edges are dry and the surface is no longer shiny, about 60-90 seconds then flip and cook for 20-30 seconds.
- Stack cooked crepes and keep warm under a clean towel.
- Lay a crepe flat, spread 1.5 to 2 tablespoons of filling in the center, leaving a border.
- Roll the crepe tightly from the edge closest to you, sealing well.
- Repeat until all crepes are filled.
- Dust the crepes with powdered sugar and serve with berries, whipped cream, and extra chocolate sauce.


