
Servings: 12 cream bombs | Prep Time: 35 minutes | Chill Time: 1 hour | Bake Time: 18-20 minutes | Total Time: ~2 hours
Picture a soft, pillowy dough ball with a golden, slightly crisp exterior — and when you bite into it, a wave of rich, sweet Italian cream floods out from the center. That’s not a fantasy. That’s an Italian Cream Bomb, and it belongs in your kitchen immediately.
I stumbled onto this recipe after eating three of them at a bakery and refusing to leave until I figured out what was inside. The answer turned out to be deceptively simple: a lightly sweetened dough wrapped around a mascarpone and vanilla cream filling. Genuinely life-changing.
These Italian Cream Bombs look bakery-level impressive but require no advanced skills. The dough is forgiving, the filling comes together in minutes, and the results make people react in a way that is, frankly, disproportionate to the effort. FYI, that’s the best kind of recipe.
What Makes Italian Cream Bombs So Irresistible
The name alone raises expectations, and the actual thing somehow still manages to exceed them. Have you ever bitten into something and immediately started thinking about when you can make it again? That’s the Italian Cream Bomb experience.
The dough itself is enriched with butter and egg, which gives it a slightly brioche-like quality — soft, a little rich, with a tender crumb. The outside bakes to a pale golden finish, and the contrast with that creamy center is extraordinary.
The filling is the star, though. Mascarpone cheese, whipped cream, powdered sugar, and vanilla — simple ingredients that combine into something genuinely luxurious. It tastes like the best cannoli filling you’ve ever had, but lighter and creamier.
Ingredients for Italian Cream Bombs
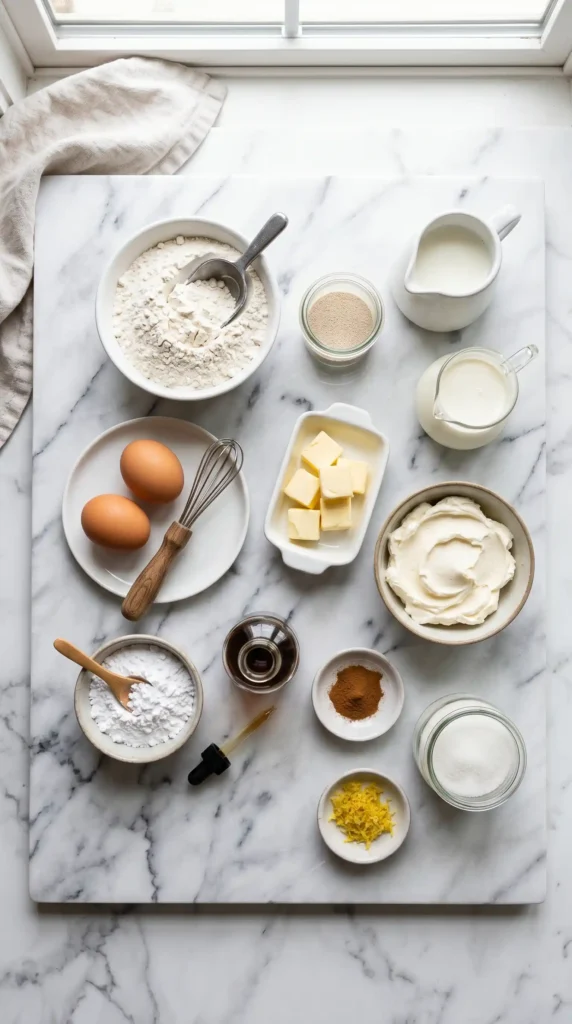
All of these ingredients are straightforward to find. The mascarpone is the one item some stores keep in the specialty cheese section rather than the regular cream cheese aisle, so check there first if you can’t spot it immediately.
For the Dough
- 3 cups (360g) all-purpose flour, plus extra for dusting
- 2 1/4 teaspoons (7g) active dry yeast or instant yeast (1 standard packet)
- 1/3 cup (67g) granulated sugar
- 1/2 teaspoon (3g) salt
- 1/2 cup (120ml) whole milk, warmed to 110°F
- 2 large eggs, at room temperature
- 4 tablespoons (57g) unsalted butter, softened
- 1 teaspoon (5ml) pure vanilla extract
For the Italian Cream Filling
- 8 oz (225g) mascarpone cheese, chilled
- 3/4 cup (180ml) heavy whipping cream, cold
- 1/2 cup (60g) powdered sugar, sifted
- 1 teaspoon (5ml) pure vanilla extract
- 1/2 teaspoon (2ml) almond extract (optional but highly recommended)
- Zest of 1 lemon (optional, adds brightness)
For Finishing
- 3 tablespoons (42g) unsalted butter, melted
- 1/2 cup (60g) powdered sugar for dusting
- 1 teaspoon (3g) cinnamon (optional, for dusting)
How to Make Italian Cream Bombs From Scratch
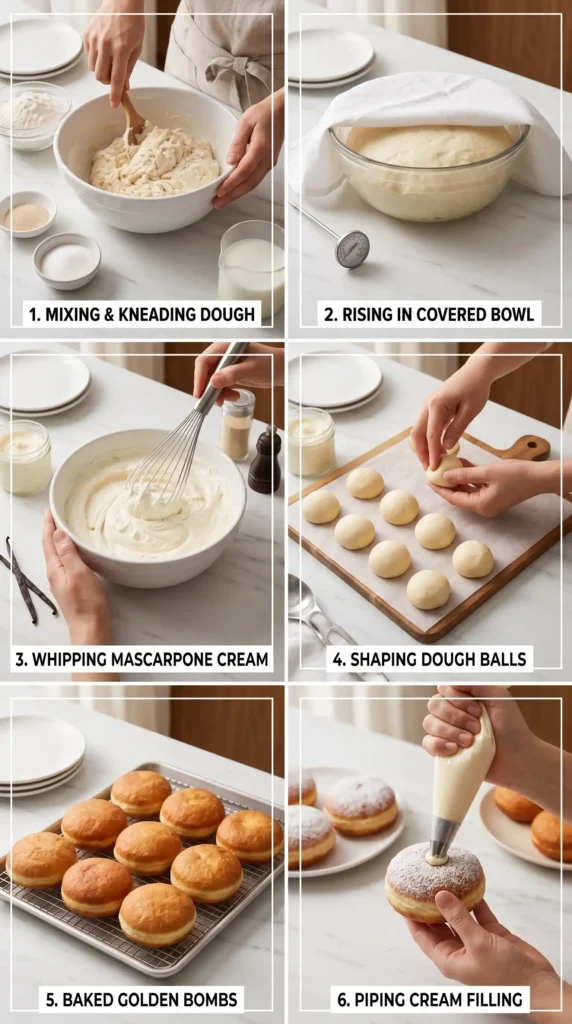
The process breaks into three clear stages: making and proofing the dough, preparing the cream filling, and assembling and baking the bombs. Each stage is straightforward — just take your time and don’t rush the dough.
Step 1: Activate the Yeast
Pour the warm milk into a small bowl and sprinkle the yeast over the top. Add one teaspoon of the sugar, stir gently, and let it sit for 5-10 minutes. You’re looking for the mixture to become foamy and fragrant — that foam tells you the yeast is active and alive.
If the mixture doesn’t foam after 10 minutes, the yeast is dead and you need a fresh packet before proceeding. Old or overheated milk kills yeast instantly. Use a thermometer — milk should feel warm to the touch but not hot, around 105-110°F (40-43°C).
Step 2: Make the Dough
In a large mixing bowl, whisk together the flour, remaining sugar, and salt. Make a well in the center and pour in the activated yeast mixture, eggs, softened butter, and vanilla extract.
Mix everything together with a wooden spoon until a shaggy dough forms, then turn it out onto a lightly floured surface. Knead the dough by hand for 8-10 minutes until it becomes smooth, slightly tacky, and elastic. It should spring back slowly when you poke it.
If you have a stand mixer with a dough hook, mix on medium speed for 6-7 minutes instead. The dough is ready when it pulls cleanly away from the sides of the bowl and feels soft but not sticky to the touch.
Don’t add too much extra flour during kneading. A slightly tacky dough produces softer, more tender bombs than a stiff, over-floured one. If it sticks to your hands but not to the counter, you’re in good shape.
Step 3: First Proof
Shape the dough into a smooth ball and place it in a lightly oiled bowl. Cover the bowl tightly with plastic wrap or a clean kitchen towel, and set it in a warm spot to rise for 1 to 1.5 hours, until it doubles in size.
The best warm spot in most kitchens is inside the oven with just the oven light on, or on top of the fridge. Avoid drafty areas — cold air slows the yeast significantly and leaves you waiting much longer than necessary.
Step 4: Make the Italian Cream Filling
While the dough proofs, make the filling. This step takes about 10 minutes and the filling holds well in the fridge while the dough finishes rising.
Add the cold heavy cream to a large chilled bowl and beat it with an electric mixer on medium-high speed until it forms soft peaks. The cream should look thick and hold gentle folds without collapsing when you lift the beater.
In a separate bowl, beat the chilled mascarpone with the sifted powdered sugar, vanilla extract, almond extract (if using), and lemon zest. Beat just until smooth and creamy. Overbeating mascarpone causes it to break and turn grainy, so stop as soon as it looks combined.
Gently fold the whipped cream into the mascarpone mixture using a rubber spatula, working in two additions. Use slow, sweeping folds from the bottom of the bowl upward. You want to keep as much air as possible in the mixture — that lightness is what makes the filling so luxurious.
Transfer the finished filling to a piping bag fitted with a round tip, or a zip-lock bag with a corner snipped off. Refrigerate until you’re ready to fill the bombs. The colder the filling, the easier it is to pipe cleanly.
Step 5: Shape the Bombs
Once the dough has doubled, punch it down gently and turn it out onto a lightly floured surface. Divide it into 12 equal portions — a kitchen scale makes this simple and ensures even-sized bombs that bake at the same rate.
Roll each portion into a smooth ball by cupping your hand over the dough and rolling it in small circles against the counter. The surface should be taut and smooth with no visible seams. Place finished balls on a parchment-lined baking sheet, spaced at least 2 inches apart.
Cover the tray loosely with a clean towel and let the shaped balls rest and rise for another 30-40 minutes. They should puff visibly and feel noticeably lighter when you pick one up. This second proof is what gives the baked bombs their soft, airy interior.
Step 6: Bake the Bombs
Preheat your oven to 375°F (190°C) about 20 minutes before the dough finishes its second proof. You want the oven fully up to temperature before the tray goes in.
Bake the bombs for 18-20 minutes until the tops turn pale golden. You don’t want deep brown on these — they should look lightly golden rather than toasty. A pale golden color means the interior is cooked through without the exterior getting tough.
As soon as they come out of the oven, brush each bomb generously with the melted butter while they’re still hot. The butter soaks into the warm surface and adds richness and a subtle sheen. Transfer them to a wire rack and let them cool completely before filling. :/)
Resist the urge to fill them while warm. Warm dough causes the cold cream filling to melt and run out, which defeats the entire purpose. Give them a solid 30-40 minutes to cool fully at room temperature.
Step 7: Fill the Bombs
Using a small sharp knife or a wooden skewer, poke a hole into the side or bottom of each cooled bomb. Wiggle the tool gently inside to create a small pocket for the cream — don’t push all the way through to the other side.
Insert the piping tip into the hole and squeeze the filling in slowly. You’ll feel slight resistance as the bomb fills up. Stop piping when you feel the bomb start to feel heavy and the dough puffs slightly around the entry point. Overfilling causes blowouts.
Each bomb typically holds about 2-3 tablespoons of filling. Work through all 12, then dust the tops generously with powdered sugar. Add a pinch of cinnamon to the sugar if you want a warmer, spicier finish.
Serving and Storing Italian Cream Bombs

Serve these at room temperature for the best texture and flavor. Straight from the fridge, the filling firms up and the dough tightens slightly. Give refrigerated bombs 15-20 minutes at room temperature before serving.
Store filled bombs in an airtight container in the fridge for up to 2 days. The unfilled baked bombs freeze well for up to 4 weeks — thaw at room temperature and fill fresh when needed. This is genuinely the best prep strategy if you want to make them ahead.
Tips for Perfect Italian Cream Bombs
- [object Object] — never fill warm dough with cold cream
- Don’t overbeat the mascarpone — stop the moment it looks smooth
- Use a kitchen scale to divide the dough — even portions mean even baking
- [object Object] — don’t skip it or rush it, it creates the soft texture
- Brush with butter the second the tray comes out of the oven while they’re hottest
Frequently Asked Questions
Can I use cream cheese instead of mascarpone for the filling?
You can, but the result will taste noticeably different. Mascarpone is milder, richer, and creamier than cream cheese, and it whips more smoothly. Cream cheese has a tangier flavor and a denser texture that makes the filling heavier and less airy. If mascarpone isn’t available, a 50/50 blend of cream cheese and heavy cream works better than cream cheese alone.
My dough didn’t rise. What went wrong?
The most common cause is dead yeast or milk that was too hot. Always proof your yeast in warm milk (105-110°F) before adding it to the flour. If the yeast mixture doesn’t foam within 10 minutes, start over with a fresh packet. Also check that your kitchen isn’t too cold — yeast needs warmth to activate properly.
Can I make Italian Cream Bombs ahead of time?
Absolutely. Bake and cool the bombs completely, then store them unfilled at room temperature for up to 24 hours, or freeze them for up to 4 weeks. Make the filling fresh on the day you plan to serve them and fill just before serving for the best texture and presentation.
How do I prevent the filling from leaking out?
Three things help: make sure the bombs are fully cooled before filling, don’t overfill each one, and pipe slowly. If the filling feels very soft when you start, put it back in the fridge for 15 minutes to firm up. A firmer filling stays put inside the bomb much better than a loose one.
Can I fry these instead of baking them?
Yes, and the fried version is incredible. Heat oil to 350°F and fry the shaped, proofed dough balls for 2-3 minutes per side until deep golden. Drain on paper towels, roll in cinnamon sugar while hot, cool completely, then fill with the cream. They’ll taste closer to traditional bomboloni that way.
Final Thoughts
These Italian Cream Bombs deliver something genuinely special — soft, enriched dough with a cloud of sweet, rich mascarpone cream hiding inside. Every component earns its place, and the finished result is far more impressive than the effort required to make it.
IMO, this is the kind of recipe that becomes a signature bake. People remember it. They request it. They talk about it to other people. That’s a rare quality in a home recipe, and these bombs have it.
Make a batch this weekend. Follow the steps, respect the proofing time, keep the filling cold, and dust them with a generous snowfall of powdered sugar right before serving. Watch what happens when someone takes the first bite.

Italian Cream Bombs
Ingredients
Method
- Pour the warm milk into a small bowl and sprinkle the yeast over the top. Add one teaspoon of the sugar, stir gently, and let it sit for 5-10 minutes.
- The mixture should become foamy and fragrant; if it doesn't foam after 10 minutes, the yeast is not active.
- In a large mixing bowl, whisk the flour, remaining sugar, and salt together. Make a well in the center and add the activated yeast mixture, eggs, butter, and vanilla extract.
- Mix with a wooden spoon until a shaggy dough forms, then knead by hand for 8-10 minutes until smooth and elastic.
- Alternatively, use a stand mixer with a dough hook to mix for 6-7 minutes.
- Shape the dough into a ball and place it in a lightly oiled bowl. Cover and let it rise in a warm spot for 1 to 1.5 hours, until doubled in size.
- Whip the cold heavy cream in a chilled bowl until soft peaks form.
- In a separate bowl, mix mascarpone with powdered sugar, vanilla, almond extract, and lemon zest until smooth.
- Gently fold the whipped cream into the mascarpone mixture and refrigerate.
- Once the dough has risen, punch it down and divide into 12 equal portions.
- Roll each piece into a ball and place on a parchment-lined baking sheet. Let them rise for another 30-40 minutes.
- Preheat the oven to 375°F (190°C) and bake bombs for 18-20 minutes until lightly golden.
- Brush with melted butter immediately after baking and let cool.
- Poke a hole in each cooled bomb and fill with the cream. Dust with powdered sugar and cinnamon if desired.


