
Prep Time: 20 minutes | Cook Time: 25 minutes | Total Time: 45 minutes | Servings: 6 chimichangas
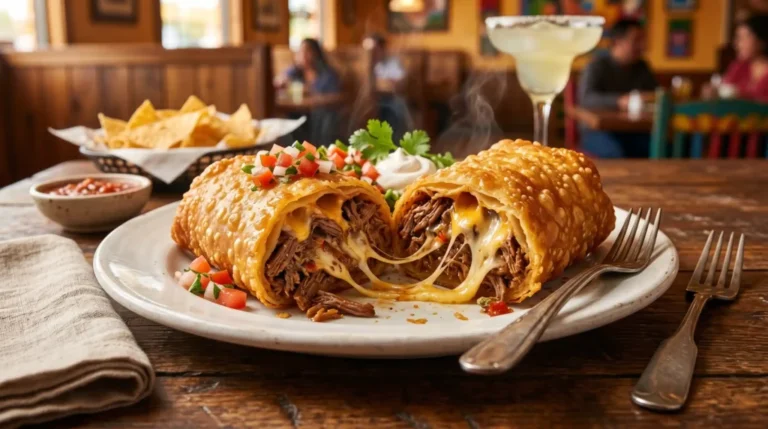
Picture a warm, golden-brown tortilla, stuffed to the brim with seasoned beef and melted cheese, then fried until it crackles at the edges. That’s a beef and cheese chimichanga, and yes, it’s every bit as good as it sounds.
The first time I made these at home, I honestly could not believe how easy they were. Restaurant-quality chimichangas from your own kitchen, in under an hour. Once you nail this recipe, you’ll stop paying twelve dollars for them at a Tex-Mex restaurant. IMO, homemade will always win.
Whether you fry them in oil or bake them in the oven, this recipe delivers every single time. Let’s get into it.
What Even Is a Chimichanga?
A chimichanga is basically a deep-fried burrito. You fill a large flour tortilla with a savory filling, fold it tightly, and then fry or bake it until the outside is crispy and golden. The inside stays warm, melty, and ridiculously satisfying.
Beef and cheese chimichangas are the most popular version, and for good reason. The combination of well-seasoned ground beef with gooey melted cheese inside a crunchy tortilla is practically unbeatable.
They’re a staple of Tex-Mex cuisine, and they work beautifully as a weeknight dinner, a party appetizer, or honestly just a self-reward on a Tuesday night. No judgment here.
Ingredients for Beef and Cheese Chimichangas
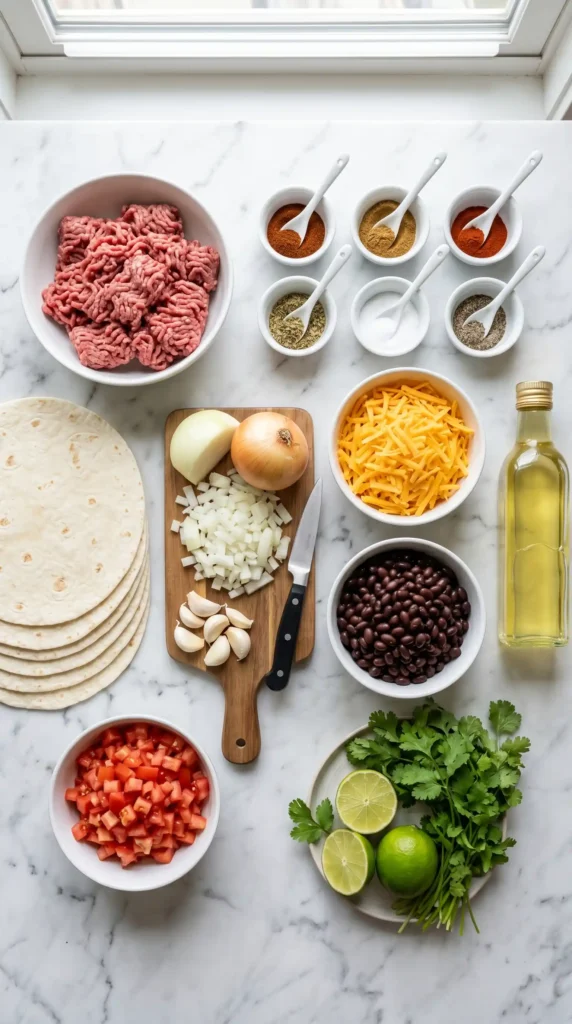
Here’s the great news: this recipe uses pantry staples you probably already have on hand. No specialty ingredients, no obscure spices. Here’s exactly what you need for 6 chimichangas:
For the Filling
- 1 pound (450g) ground beef (80/20 blend recommended)
- 1 cup shredded cheddar cheese (or Mexican blend)
- 1 medium white onion, finely diced
- 3 cloves garlic, minced
- 1/2 cup canned diced tomatoes, drained
- 1/2 cup canned black beans, rinsed and drained
- 1 teaspoon chili powder
- 1 teaspoon ground cumin
- 1/2 teaspoon smoked paprika
- 1/2 teaspoon garlic powder
- 1/2 teaspoon onion powder
- 1/2 teaspoon salt, or to taste
- 1/4 teaspoon black pepper
For Assembly
- 6 large (10-inch) flour tortillas
- Vegetable oil for frying (about 2 cups) OR 2 tablespoons oil for baking
Optional Toppings
- Sour cream
- Guacamole or sliced avocado
- Salsa or pico de gallo
- Shredded lettuce
- Pickled jalapenos
FYI, the 80/20 ground beef is the sweet spot here. It has enough fat to stay juicy and flavorful throughout the cooking process without being greasy. Leaner beef tends to dry out and lose that rich flavor in the filling.
How to Make Beef and Cheese Chimichangas From Scratch
This recipe breaks down into two main stages: making the filling and assembling the chimichangas. Neither stage is difficult, but doing both right is what separates a good chimichanga from a great one.
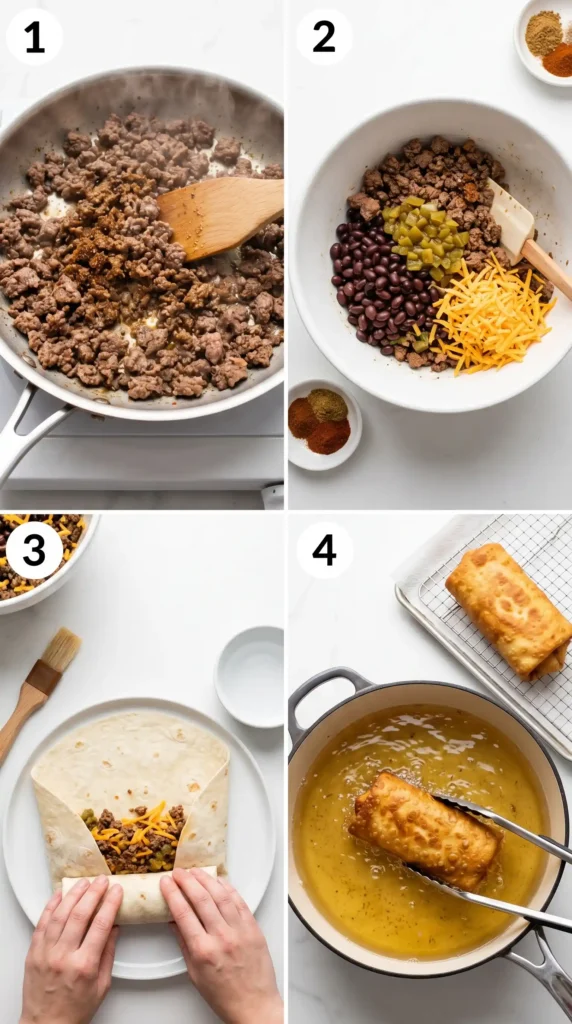
Step 1: Brown the Ground Beef
Place a large skillet or saute pan over medium-high heat. Once the pan is hot, add the 1 pound of ground beef in a single layer. Let it sit undisturbed for about 2 minutes before breaking it apart. This builds a nice sear on the meat rather than steaming it.
Use a wooden spoon or spatula to break the beef into small crumbles as it cooks. Keep breaking it down until no large chunks remain and the meat is fully browned, about 6 to 8 minutes total. You want small, uniform pieces for easy rolling later.
Once browned, tilt the pan slightly and use a spoon to remove excess grease. Leave about a tablespoon of fat in the pan because that fat carries flavor. Drain too much and your filling starts tasting dry and flat.
Step 2: Cook the Aromatics
Reduce the heat to medium. Add the finely diced onion to the pan with the beef and cook for about 3 to 4 minutes, stirring occasionally, until the onion softens and turns translucent. The onion will absorb some of the remaining beef fat and caramelize slightly.
Add the 3 cloves of minced garlic to the pan and stir everything together. Cook for about 1 minute, just until the garlic becomes fragrant. Be careful here because garlic burns fast over medium heat, and burnt garlic will add a bitter taste to your entire filling.
Step 3: Season the Filling
Now comes the flavor building. Add the chili powder, cumin, smoked paprika, garlic powder, onion powder, salt, and black pepper directly into the pan. Stir everything together so the spices coat the beef and onion mixture evenly.
Cook the seasoned beef for another 1 to 2 minutes, stirring constantly. Toasting the spices briefly in the hot pan activates their oils and deepens the flavor considerably. This small step makes a big difference in how the finished chimichanga tastes.
Add the drained diced tomatoes and the rinsed black beans to the pan. Stir to combine everything thoroughly. Cook for another 2 to 3 minutes until the tomatoes have softened and most of their liquid has cooked off. The filling should look thick and scoopable, not watery.
Step 4: Cool the Filling Slightly
Remove the pan from the heat and let the filling cool for about 5 minutes before assembling. This is important. Hot filling makes the tortilla soft and harder to fold tightly without tearing. A slightly cooled filling stays in place better during assembly.
While the filling cools, warm your 6 flour tortillas. Stack them and microwave for 30 to 45 seconds, or wrap them in a clean kitchen towel and warm them briefly in a dry skillet. Warm tortillas are more flexible and much less likely to crack when you fold them.
Step 5: Assemble the Chimichangas
Lay one warm tortilla flat on a clean work surface. Spoon about 1/3 cup of the beef filling into the center of the tortilla, leaving a 2-inch border on all sides. Spread it into a rough rectangle shape, not a ball, to make rolling easier.
Sprinkle about 2 to 3 tablespoons of shredded cheddar cheese directly on top of the beef filling. The cheese layer goes on top of the beef, not underneath, so it melts into the filling during cooking rather than sticking to the tortilla.
Fold the two sides of the tortilla inward over the filling. Then fold the bottom edge up and over the filling, and roll the whole thing away from you, tucking it tightly as you go. The fold should be snug but not so tight that you tear the tortilla.
Place the assembled chimichanga seam-side down on a plate or baking sheet. The weight of the chimichanga keeps the seam closed during cooking. Repeat with the remaining 5 tortillas until all six chimichangas are assembled and resting seam-side down.
Step 6: Fry the Chimichangas (Classic Method)
Pour about 2 cups of vegetable oil into a deep skillet or Dutch oven. Heat the oil over medium-high heat until it reaches 350 degrees Fahrenheit. Use a kitchen thermometer if you have one. Oil that’s too cool makes soggy chimichangas, and oil that’s too hot burns the outside before the inside heats through.
Carefully lower 2 chimichangas into the hot oil, seam-side down first. Fry for 2 to 3 minutes per side, turning gently with tongs, until all sides are deep golden brown and crispy. Don’t crowd the pan. Two at a time is the maximum for even frying.
Remove the fried chimichangas with tongs and place them on a wire rack set over a baking sheet. A wire rack keeps the bottom crispy instead of soggy. Paper towels work in a pinch, but the steam they trap can soften the bottom crust slightly.
Step 7: Baked Method (Lighter Option)
Prefer not to fry? The baked version is genuinely excellent. Preheat your oven to 400 degrees Fahrenheit. Brush each assembled chimichanga lightly all over with vegetable oil or spray them with cooking spray. Place them seam-side down on a greased baking sheet.
Bake for 20 to 25 minutes, flipping them once at the halfway point, until all sides are golden brown and crispy. The result won’t be quite as crunchy as the fried version, but it’s still deeply satisfying and significantly lighter in calories.
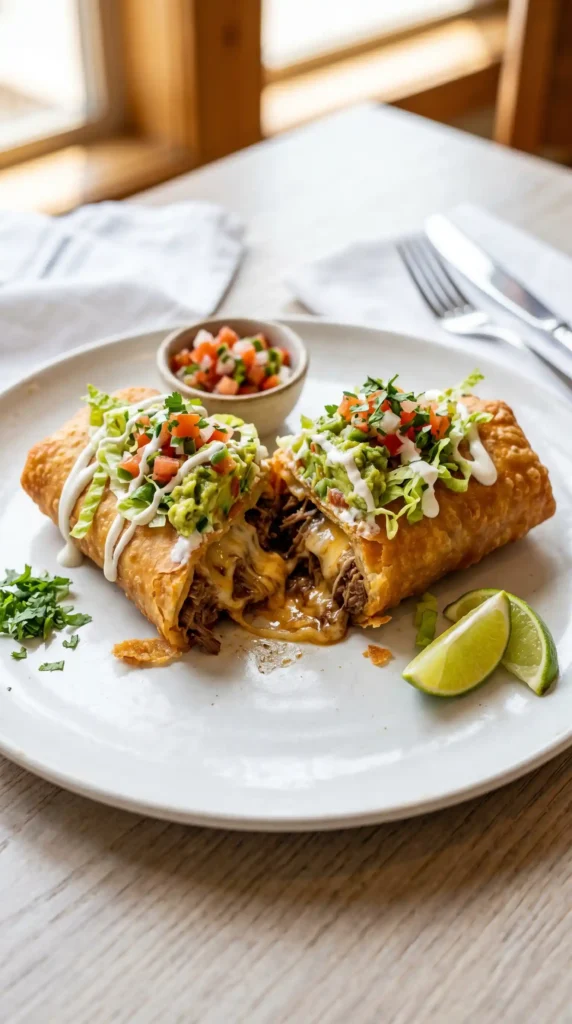
Step 8: Serve and Top
Plate the chimichangas immediately while they’re hot and crispy. Top each one generously with sour cream, guacamole, salsa, and shredded lettuce, or just go straight for it with no toppings at all. They’re fantastic either way.
Cut one in half at an angle if you’re serving them as part of a spread. The cross-section reveals that cheesy, beefy filling and honestly makes the whole dish look incredible on the table. Presentation matters, even at home.
Tips for the Best Beef and Cheese Chimichangas
After making these more times than I can count, here are the tips that actually move the needle:
- Warm the tortillas every time: Cold tortillas crack and tear during rolling. Warm tortillas are pliable and easy to fold tightly.
- Don’t overfill: More filling sounds better but it makes the chimichanga harder to seal and more likely to burst open in the oil.
- Seal the seam properly: Always start frying or baking seam-side down. The heat seals the fold closed so it stays intact.
- Rest the filling: Even 5 minutes of cooling prevents the tortilla from going limp before you seal it.
- Double the batch: Chimichangas freeze beautifully. Make 12, eat 6, and freeze the rest for a quick meal later in the week.
Easy Variations to Try
Spicy Beef Chimichangas
Add 1 diced jalapeno to the filling along with the onion, and increase the chili powder to 1.5 teaspoons. Stir in a tablespoon of your favorite hot sauce right before assembling. This version brings the heat without overwhelming the beef flavor.
Beef and Refried Bean Chimichangas
Replace the black beans with 1/2 cup of canned refried beans. Spread a thin layer of refried beans directly onto the tortilla before adding the beef filling. This creates an extra barrier that keeps moisture from making the tortilla soggy during frying.
Air Fryer Chimichangas
Spray assembled chimichangas with cooking spray and air fry at 375 degrees Fahrenheit for 10 to 12 minutes, flipping halfway through. The air fryer method delivers a genuinely crispy exterior without a drop of frying oil. Cleanup is also a dream.
Frequently Asked Questions
1. Can I make beef and cheese chimichangas ahead of time?
Yes, you can assemble them up to 24 hours ahead and refrigerate them uncooked, covered tightly. Just fry or bake them straight from the fridge, adding 2 to 3 extra minutes to the cook time. The filling also keeps well in the fridge for up to 3 days.
2. Can I freeze chimichangas?
Absolutely. Cool the cooked chimichangas completely, then wrap each one individually in plastic wrap and store in a freezer bag for up to 2 months. Reheat directly from frozen in a 375-degree oven for 15 to 20 minutes, or in the air fryer for 10 to 12 minutes.
3. What’s the best cheese for chimichangas?
Shredded cheddar, Monterey Jack, or a Mexican blend all work beautifully. Cheddar gives the sharpest flavor, Monterey Jack melts the most smoothly, and a Mexican blend offers the best of both worlds. Avoid pre-shredded cheese if possible because it contains anti-caking agents that prevent clean melting.
4. How do I keep chimichangas crispy after frying?
Place them on a wire rack over a baking sheet instead of paper towels. Paper towels trap steam on the bottom and soften the crust. A wire rack lets air circulate around the entire chimichanga, keeping it crispy on all sides until you’re ready to serve.
5. Can I use flour tortillas from scratch?
You can, and homemade flour tortillas taste incredible. However, store-bought large burrito-size tortillas work perfectly well and save significant time. The key is using 10-inch tortillas. Smaller tortillas won’t hold enough filling to roll properly without bursting.
6. Fried vs baked chimichangas: which is better?
Fried chimichangas have a crunchier, more satisfying exterior and a richer overall flavor. Baked versions are lighter and still delicious, but the texture is slightly softer. If you’re making these for a crowd and want maximum crispiness, fry them. For an easy weeknight dinner, bake them.
Time to Make Your Own Beef and Cheese Chimichangas
Beef and cheese chimichangas check every box: they’re satisfying, affordable, customizable, and genuinely fun to make. Once you’ve made them at home, the restaurant version honestly starts feeling overpriced and underwhelming.
The recipe is straightforward, the ingredients are simple, and the result tastes like something that took way more effort than it actually did. That’s my favorite kind of cooking win. Grab some ground beef and a pack of tortillas, and get cooking. Whether you fry or bake them, you’re about 45 minutes away from one of the best meals you’ve made at home in a while.
Beef and Cheese Chimichangas
Ingredients
Method
- Brown the ground beef in a large skillet over medium-high heat. Cook for 6 to 8 minutes until fully browned, breaking into small crumbles.
- Reduce heat to medium, add the diced onion, and cook for 3 to 4 minutes until translucent.
- Add minced garlic and cook for 1 minute until fragrant.
- Stir in chili powder, cumin, smoked paprika, garlic powder, onion powder, salt, and black pepper. Cook for 1 to 2 minutes.
- Add diced tomatoes and black beans. Cook until the mixture is thick, about 2 to 3 minutes.
- Remove from heat and allow to cool for 5 minutes. Warm tortillas in microwave or skillet.
- Lay a tortilla flat and place about 1/3 cup of the beef mixture in the center. Top with cheese.
- Fold the sides over the filling, then roll tightly from the bottom.
- Place seam-side down on a plate and repeat with remaining tortillas.
- For frying, heat oil to 350°F in a deep skillet. Fry chimichangas seam-side down, 2 to 3 minutes per side until golden brown.
- For baking, preheat oven to 400°F, brush with oil, and bake for 20 to 25 minutes, flipping halfway.
- Serve hot with optional toppings like sour cream, guacamole, and salsa.


