Servings: 16 bars | Prep Time: 15 minutes | Bake Time: 30 minutes | Total Time: 45 minutes
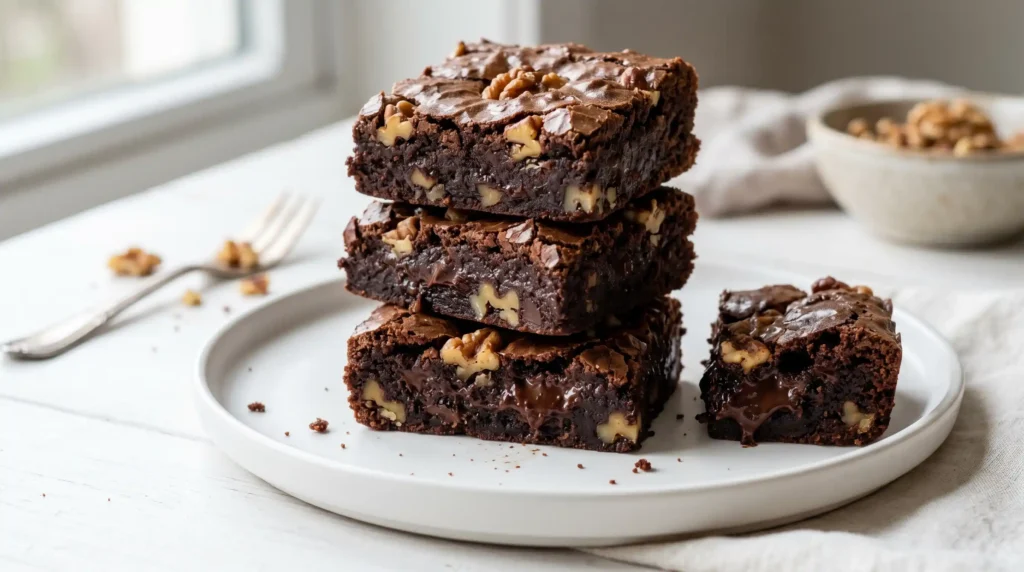
Let me be completely honest with you — the first time I made Chocolate Walnut Brownie Bars, I ate three in one sitting and felt zero regret. If rich, fudgy, nutty chocolate bars sound like your kind of thing, you are absolutely in the right place.
These bars are not your average grocery-store brownies. They pack real chocolate flavor, a chewy center, a crackly top, and the satisfying crunch of walnuts in every single bite. IMO, this is one of the best brownie recipes you will ever try.
What makes Chocolate Walnut Brownie Bars stand out? It comes down to simple, quality ingredients and a method that anyone can follow — even on a lazy Sunday afternoon.
Ingredients You Will Need
Before you even think about turning on your oven, let’s talk ingredients. Nothing fancy here — just pantry staples that come together to create something seriously delicious.
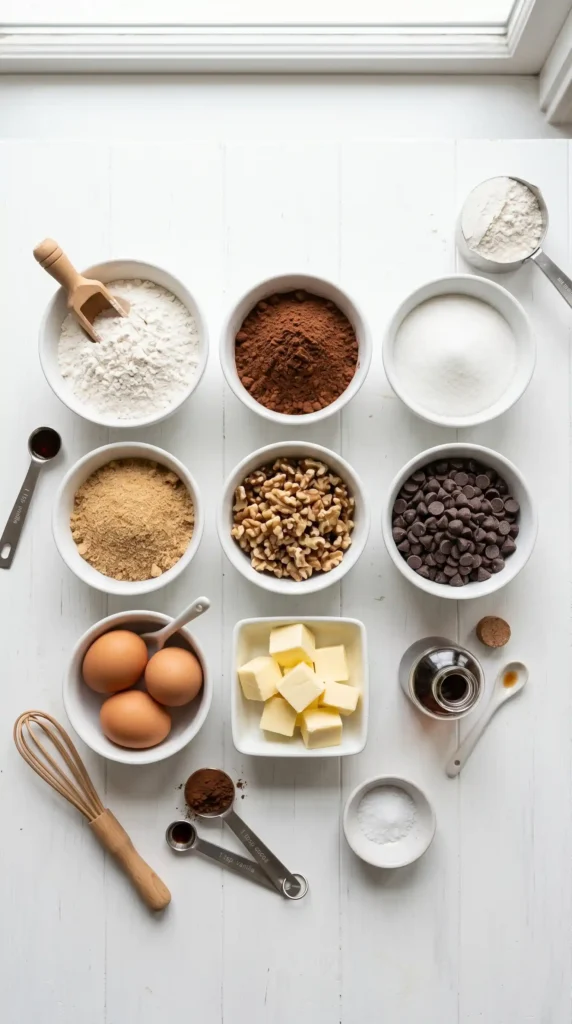
Dry Ingredients
- 1 cup (125g) all-purpose flour
- 1/2 cup (45g) unsweetened cocoa powder
- 1/2 teaspoon baking powder
- 1/4 teaspoon salt
Wet Ingredients
- 1 cup (225g) unsalted butter
- 1 and 1/2 cups (300g) granulated sugar
- 3 large eggs
- 2 teaspoons vanilla extract
Mix-Ins
- 1 cup (175g) semi-sweet chocolate chips
- 1 cup (115g) roughly chopped walnuts
That is it. No weird ingredients, no specialty store runs. Just good stuff that delivers incredible results every single time.
Why Walnuts? (Yes, It Matters)
Have you ever bitten into a brownie and wished it had more texture? That is exactly what walnuts solve. They add an earthy, slightly bitter crunch that perfectly offsets the sweet, rich chocolate base.
Walnuts also bring healthy fats and protein to the table, which lets you tell yourself these bars are practically nutritious. You are welcome.
Roughly chop the walnuts so you get real chunks throughout the bars — not dust. You want actual bites of walnut, not just a faint hint.
Equipment You Will Need
Good news — you do not need any fancy kitchen gadgets for this recipe. Here is the basic lineup:
- 9×13 inch baking pan
- Large mixing bowl
- Medium saucepan or microwave-safe bowl
- Whisk and rubber spatula
- Parchment paper
- Wire cooling rack
Lining your pan with parchment paper is not optional — it is the difference between bars that lift out cleanly and bars that stick and crumble. Trust me on this one.
How to Make Chocolate Walnut Brownie Bars
Now for the fun part. Making Chocolate Walnut Brownie Bars is genuinely easy, and I will walk you through every step so you get perfect results on your very first try.
Step 1: Preheat the Oven and Prepare Your Pan
Start by setting your oven to 350 degrees Fahrenheit (175 degrees Celsius). While the oven is warming up, grab your 9×13 inch baking pan and line it with parchment paper.
Leave a little overhang on each side — those paper edges act as handles later when you lift the entire slab out for easy, clean cutting. Lightly grease the parchment with butter or non-stick spray for extra insurance.
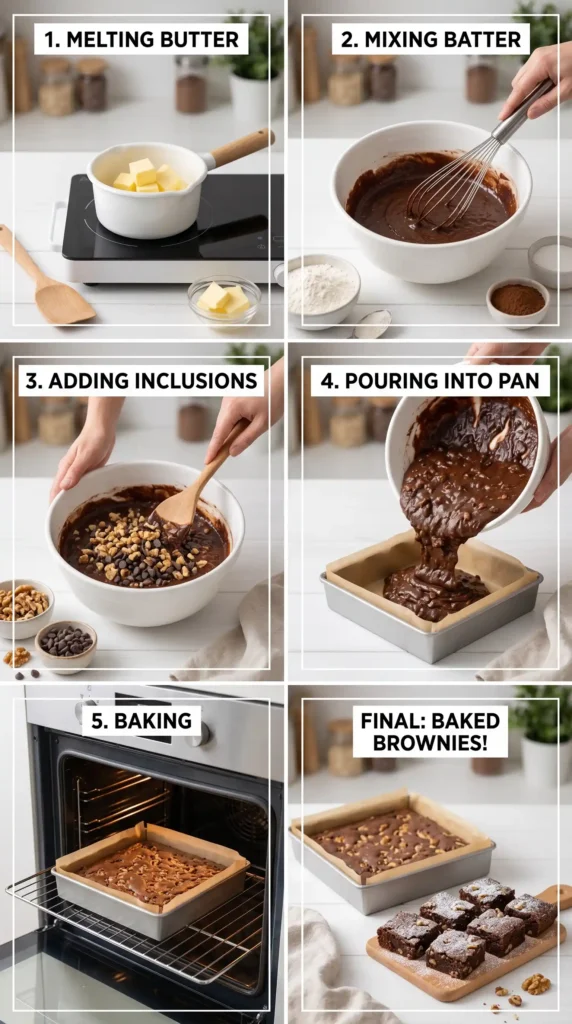
Step 2: Melt the Butter and Mix With Sugar
In a medium saucepan over low heat, melt 1 cup of unsalted butter. Stir gently and keep the heat low — you just want it melted, not browned or bubbling aggressively.
Once melted, remove the saucepan from the heat and stir in 1 and 1/2 cups of granulated sugar. Mix until the sugar is fully incorporated and the mixture looks glossy and smooth. This step is important because combining hot butter with sugar helps dissolve it properly, giving your brownie bars that signature shiny top.
Step 3: Add the Eggs and Vanilla
Let the butter-sugar mixture cool for about 3 to 5 minutes so you are not accidentally scrambling your eggs. Then crack in 3 large eggs, one at a time, whisking briskly after each addition.
Whisking each egg in fully before adding the next creates a better emulsion, which means a smoother, richer batter overall. Add 2 teaspoons of vanilla extract and give it one final whisk. At this point, your batter should look thick, glossy, and absolutely inviting.
Step 4: Sift and Fold in the Dry Ingredients
In a separate bowl, whisk together 1 cup of all-purpose flour, 1/2 cup of unsweetened cocoa powder, 1/2 teaspoon of baking powder, and 1/4 teaspoon of salt. Sifting the dry ingredients is a small step that makes a real difference — it removes lumps and ensures even mixing.
Add the dry ingredients to the wet mixture in two additions, folding gently with a rubber spatula after each. Do not overwork the batter. Fold just until you see no more dry streaks. Overmixing develops gluten and makes brownies tough and cakey instead of dense and fudgy — and nobody wants that.
Step 5: Fold in Chocolate Chips and Walnuts
Here comes the best part. Add 1 cup of semi-sweet chocolate chips and 1 cup of roughly chopped walnuts to the batter. Fold them in using a few gentle strokes of the spatula.
Make sure the chips and walnuts are evenly distributed throughout the batter. You want every single bar to have a good ratio of chocolate pockets and walnut crunch. This is what separates a great brownie bar from a truly unforgettable one.
Step 6: Pour Into the Pan and Spread Evenly
Scrape the batter into your prepared 9×13 pan. Use your rubber spatula to spread it into an even layer, reaching all four corners. The batter will be thick, so take your time with this step.
Give the pan a gentle tap or two on the counter to help release any air bubbles. Smooth the top as best you can — a flat top means even baking from edge to center. If you want, scatter a few extra walnut pieces on top for a visual finish.
Step 7: Bake to Fudgy Perfection
Slide the pan into your preheated oven and bake for 28 to 32 minutes. At the 28-minute mark, insert a toothpick into the center of the bars. You want it to come out with a few moist crumbs clinging to it — not wet batter, but definitely not bone dry.
If the toothpick comes out completely clean, your brownies are on the verge of being overbaked. Pull them out and let carryover heat finish the job. FYI, the center of the pan always lags slightly behind the edges, so always test the dead center.
Step 8: Cool, Cut, and Serve
Remove the pan from the oven and place it on a wire cooling rack. Let the bars cool in the pan for at least 30 minutes before attempting to cut them. I know this is the hardest part. I know.
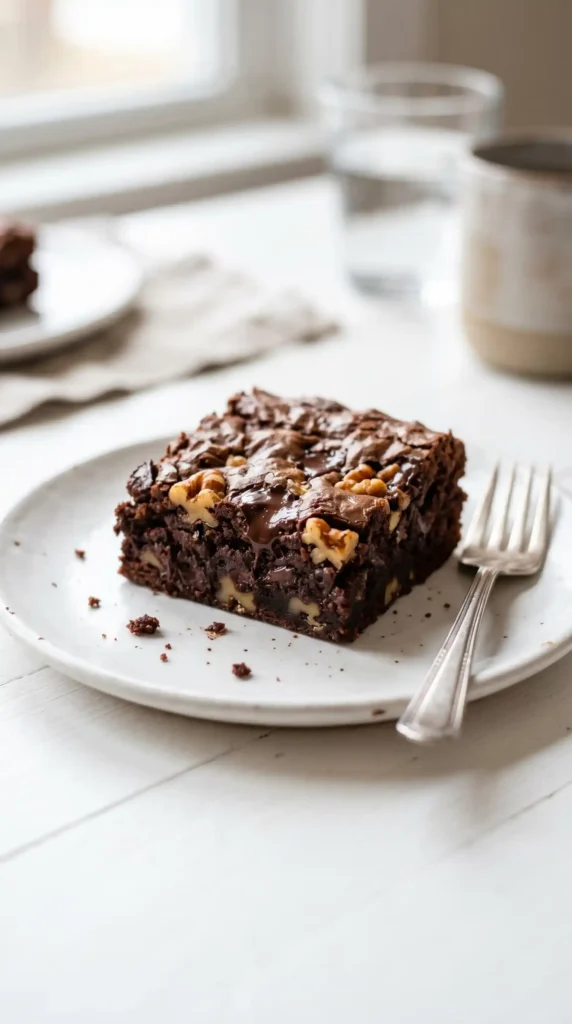
Once cooled, lift the entire slab out using the parchment paper handles. Place it on a cutting board and use a sharp knife to cut into 16 even bars. Clean the knife between cuts for neat edges. Serve at room temperature or slightly warm with a scoop of vanilla ice cream if you are feeling fancy.
Pro Tips for the Best Brownie Bars
Want to take your Chocolate Walnut Brownie Bars from great to absolutely legendary? Keep these tips in mind:
- Use room-temperature eggs for a smoother batter.
- Do not skip the cooling time — warm brownies fall apart when cut.
- Toast the walnuts in a dry skillet for 3 minutes before adding them to deepen their flavor.
- Store leftovers in an airtight container at room temperature for up to 4 days.
- For extra fudgy bars, slightly underbake by 2 minutes and refrigerate overnight.
Fun Variations to Try
Once you nail the base recipe, feel free to experiment. These bars are very forgiving and love a good remix:
- Swap walnuts for pecans or hazelnuts for a different nutty vibe.
- Add 1 teaspoon of espresso powder to the batter to intensify the chocolate flavor.
- Swirl in 2 tablespoons of peanut butter before baking for a chocolate-peanut combo.
- Top with a thin layer of dark chocolate ganache after cooling for an extra-indulgent finish.
FAQs About Chocolate Walnut Brownie Bars
Can I use salted butter instead of unsalted butter?
Yes, you can. Just skip the 1/4 teaspoon of salt in the dry ingredients to avoid the bars turning out too salty. The flavor will be slightly different but still absolutely delicious.
Can I make these bars gluten-free?
Absolutely. Substitute the all-purpose flour with a 1:1 gluten-free flour blend. The texture may be slightly denser, but the bars will still taste rich and fudgy. Make sure your cocoa powder and chocolate chips are certified gluten-free as well.
Why did my brownies turn out cakey instead of fudgy?
Cakey brownies usually happen for one of two reasons — too much flour or overmixing the batter. Measure your flour by spooning it into the measuring cup and leveling off the top, rather than scooping directly from the bag. And fold gently — do not beat the batter.
Can I freeze Chocolate Walnut Brownie Bars?
Yes, these bars freeze beautifully. Let them cool completely, cut into individual bars, wrap each one in plastic wrap, and store in a zip-lock freezer bag for up to 3 months. Thaw at room temperature for 1 to 2 hours before serving.
How do I know when my brownies are done baking?
The toothpick test is your best friend. Insert a toothpick into the center — if it comes out with moist crumbs (not wet batter), your bars are done. Also look for the edges pulling slightly away from the pan and a set (not jiggly) center.
Final Thoughts
There you have it — everything you need to bake the most satisfying Chocolate Walnut Brownie Bars of your life. Rich, fudgy, nutty, and impossible to stop at just one.
Whether you are baking for a crowd, gifting them to a friend, or just treating yourself after a long week, these bars always deliver. The recipe is simple, the ingredients are accessible, and the result is genuinely impressive.
So go ahead — preheat that oven. You deserve a brownie bar (or three). Enjoy every single bite, and let me know how your batch turned out!

Chocolate Walnut Brownie Bars
Ingredients
Method
- Preheat the oven to 350°F (175°C) and line a 9×13 inch baking pan with parchment paper, leaving an overhang.
- Lightly grease the parchment paper with butter or non-stick spray.
- Melt the butter in a medium saucepan over low heat.
- Remove from heat, stir in sugar until glossy and smooth.
- Let cool slightly, then whisk in eggs one at a time, followed by vanilla extract.
- In a separate bowl, whisk together flour, cocoa powder, baking powder, and salt.
- Fold dry ingredients into the wet mixture in two additions until just combined.
- Fold in chocolate chips and walnuts, ensuring even distribution.
- Pour the batter into the prepared pan and spread out evenly.
- Bake for 28 to 32 minutes, checking for moist crumbs with a toothpick.
- Let the brownies cool in the pan for at least 30 minutes before lifting out using parchment paper.
- Cut into 16 even bars with a sharp knife and serve at room temperature.


