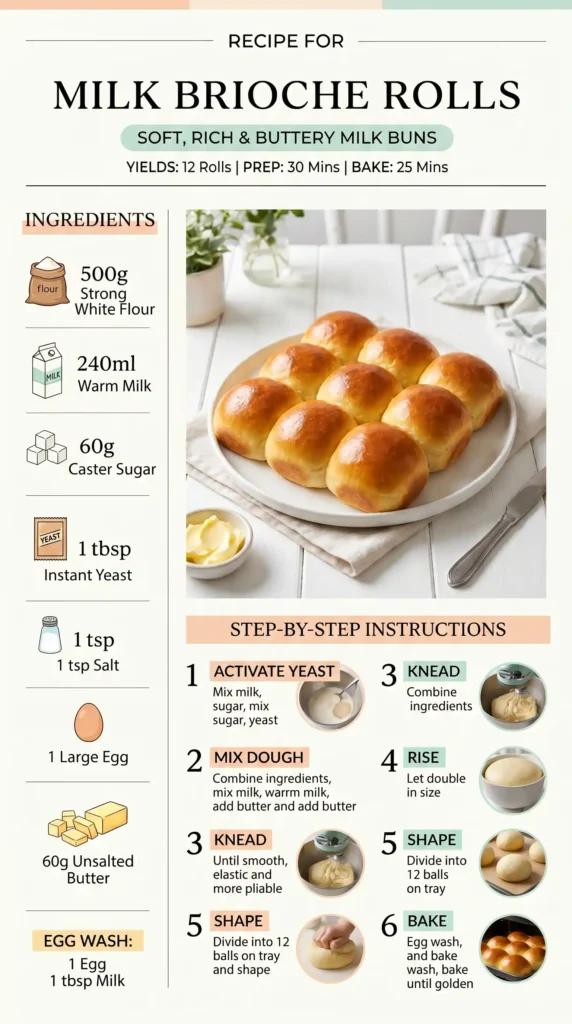
Servings: 12 rolls | Prep Time: 25 minutes | Rise Time: 2 hours | Bake Time: 18 to 22 minutes | Total Time: About 3 hours
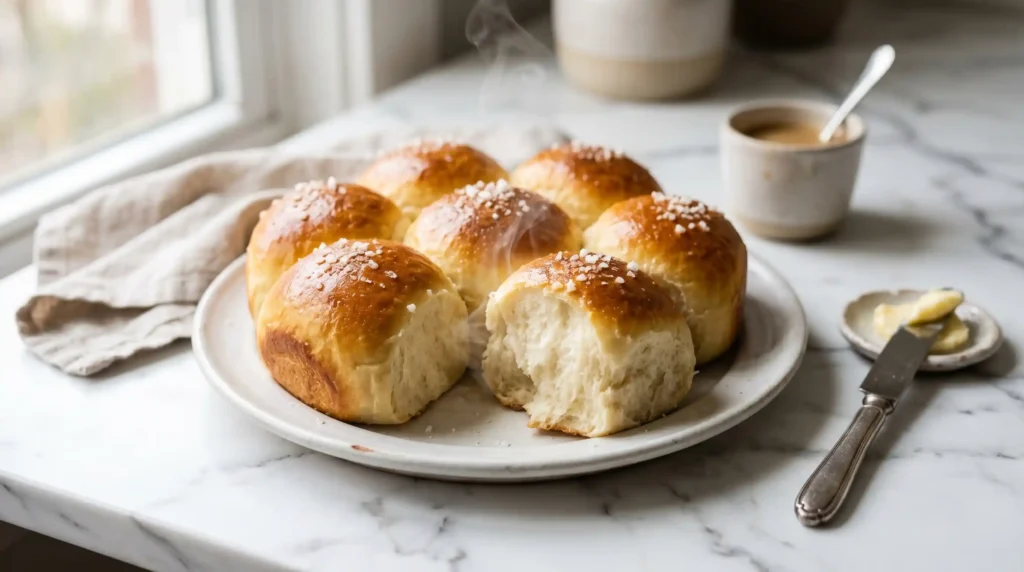
Pull a warm milk brioche roll apart with your hands and watch the steam rise from that impossibly soft, pillowy interior — and you will understand immediately why people bake these over and over again. That first tear, that cloud-like texture, that faint sweetness is something you simply cannot get from a store shelf.
I made my first batch of milk brioche rolls on a rainy Saturday with nothing but time and a craving for something genuinely special. They came out golden, feather-soft, and rich without being heavy. I have been making them on repeat ever since.
The good news is that this recipe is more approachable than most people assume. Yes, it involves yeast. Yes, there is a bit of kneading. But the steps are logical, the method is forgiving, and the result is worth every single minute.
What Makes Milk Brioche Rolls Different From Regular Rolls?
Regular dinner rolls are fine. Milk brioche rolls are extraordinary. The difference comes down to enrichment — this dough contains whole milk, eggs, and butter in amounts that transform an ordinary yeast roll into something tender, slightly sweet, and almost cake-like in texture.
The milk in particular does two things at once. It adds fat and protein that soften the crumb, and the natural sugars in milk help the crust develop that gorgeous deep golden color during baking. Every detail matters with enriched doughs.
IMO, the texture alone makes milk brioche rolls the superior roll for everything — from breakfast with jam to sliders at a dinner party. They adapt to sweet and savory applications effortlessly, which is rare for any single bread recipe.
Ingredients You Will Need
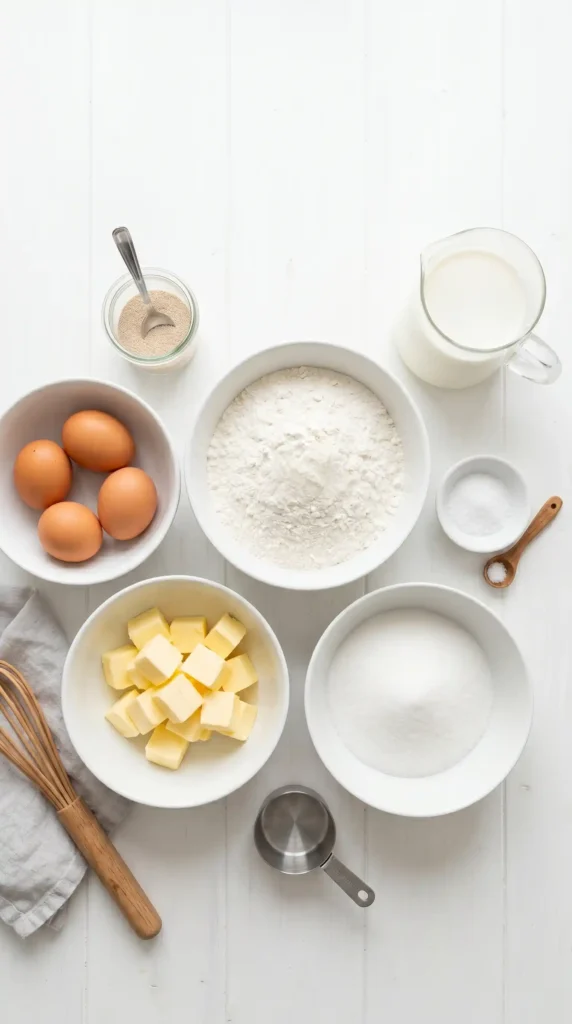
Everything in this recipe is a standard ingredient, but the quantities and their interaction with each other are what create the magic. Here is your full list:
For the Dough
- 3 cups (375g) all-purpose flour or bread flour
- 2 and 1/4 teaspoons (7g) active dry yeast or instant yeast
- 3 tablespoons (36g) granulated sugar
- 1 teaspoon salt
- 3/4 cup (180ml) whole milk, warmed to about 110 degrees F
- 2 large eggs, room temperature
- 4 tablespoons (57g) unsalted butter, softened and cut into small pieces
For the Egg Wash
- 1 egg yolk
- 1 tablespoon whole milk
A quick word on flour: bread flour gives you a slightly chewier, more structured roll because of its higher protein content. All-purpose flour produces a softer, more delicate crumb. Both work well — choose based on your texture preference.
Equipment You Will Need
You do not need a professional bakery setup. Here is what you actually need:
- Stand mixer with dough hook (or your hands and determination)
- Large mixing bowl
- 9×13 inch baking pan or two 9-inch round pans
- Pastry brush
- Kitchen scale (strongly recommended for accuracy)
- Clean kitchen towel or plastic wrap for covering the dough
- Wire cooling rack
If you do not own a stand mixer, you can absolutely knead this dough by hand. It will take 12 to 15 minutes of active kneading, and your arms will know about it afterward. The gluten development is the same – it just requires more patience and effort.
How to Make Milk Brioche Rolls
Here is the full step-by-step process for making milk brioche rolls from scratch. Read through everything once before you start — it helps to know what is coming so nothing catches you off guard mid-process.
Step 1: Activate the Yeast
Warm 3/4 cup of whole milk to between 105 and 110 degrees Fahrenheit – warm enough to feel comfortable on your wrist, but not hot. Pour it into a small bowl or measuring cup and stir in 1 teaspoon of the sugar and the 2 and 1/4 teaspoons of yeast.
Let the mixture sit for 5 to 10 minutes. It should become foamy and smell yeasty. If nothing happens after 10 minutes, your yeast is likely expired or your milk was too hot and killed it. Start over with fresh yeast — there is no salvaging a dead yeast dough. :/
Step 2: Combine the Dry Ingredients
In the bowl of your stand mixer (or a large mixing bowl if working by hand), whisk together 3 cups of flour, the remaining sugar, and 1 teaspoon of salt. Make a small well in the center of the dry ingredients and set the bowl aside.
Keeping the salt separate from the yeast at this initial stage is a smart habit. Salt can slow yeast activity if they come into direct contact before the liquid is incorporated. Mixing the salt into the flour first prevents any unnecessary sluggishness in your dough.
Step 3: Build the Dough
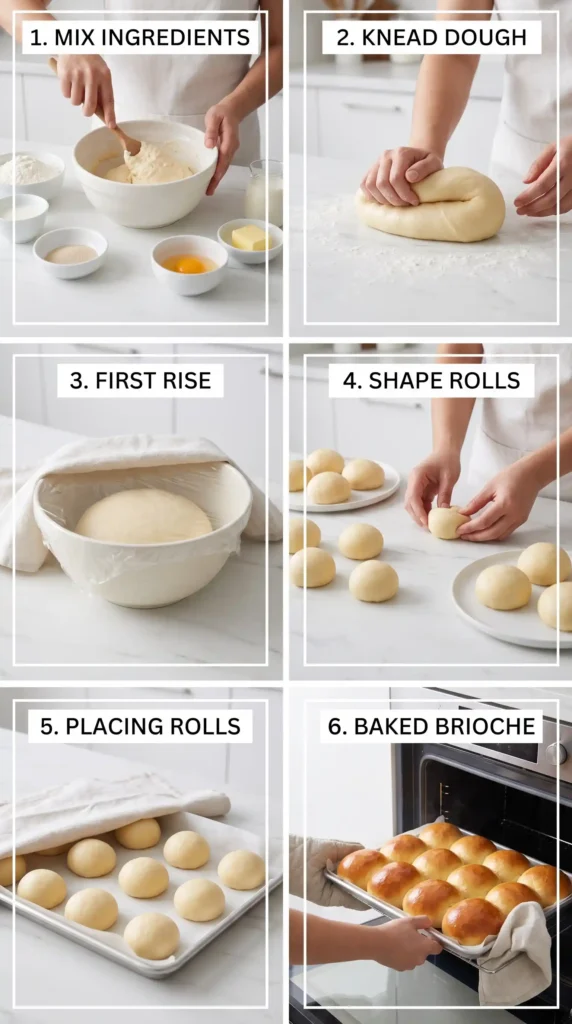
Pour the activated yeast mixture into the well in the center of the flour. Add both room-temperature eggs. If you are using a stand mixer, attach the dough hook and mix on low speed for about 2 minutes until a shaggy, rough dough forms.
Increase the speed to medium and knead the dough for about 5 minutes. The dough will look rough and uneven at first — that is completely fine. Keep going. It will gradually come together into a more cohesive ball as the gluten network develops.
Step 4: Add the Butter
This is the step that truly makes brioche what it is. With the mixer running on medium-low, add the softened butter one small piece at a time. Drop in one piece, let it incorporate fully, then add the next. Do not rush this process.
Adding all the butter at once prevents it from incorporating properly and leaves you with a greasy, unmanageable dough. Adding it gradually gives the flour time to absorb each piece before the next arrives. The whole butter-addition process should take 5 to 8 minutes.
Once all the butter is in, increase the mixer speed to medium-high and knead for another 6 to 8 minutes. The dough is ready when it pulls cleanly away from the sides of the bowl, feels smooth and slightly tacky, and stretches thin without tearing immediately when you pull a small piece.
Step 5: First Rise
Shape the dough into a ball and place it in a lightly greased large bowl. Turn it once to coat all sides with the oil. Cover the bowl tightly with plastic wrap or a clean damp kitchen towel and place it in a warm, draft-free spot.
Let the dough rise for 1 to 1.5 hours, or until it has roughly doubled in size. The timing depends on the temperature of your kitchen — a warmer room speeds things up, a cooler room slows them down. Do not rush this step by using excessive heat; slow rising builds better flavor.
Step 6: Shape the Rolls
Once the dough has doubled, gently punch it down to release the gas. Turn it out onto a lightly floured surface. Use a kitchen scale or eyeball it to divide the dough into 12 equal portions — about 65 to 70 grams each if you are being precise.
Take each portion and shape it into a smooth ball. To do this, cup your hand over the dough piece and roll it in tight circular motions against the work surface. The friction creates surface tension, which gives each roll a tight, smooth exterior that holds its shape beautifully during the second rise and baking.
Arrange all 12 shaped rolls in a greased 9×13 inch baking pan, placing them close together so they will touch and rise into each other. That connected bake is what gives pull-apart brioche rolls their signature look and wonderfully soft sides.
Step 7: Second Rise
Cover the pan loosely with plastic wrap or a clean kitchen towel. Let the shaped rolls rise again for 45 minutes to 1 hour, until they look noticeably puffed and the rolls have expanded to fill in the gaps between them.
About 15 minutes before the second rise finishes, preheat your oven to 375 degrees Fahrenheit (190 degrees Celsius). You want the oven fully up to temperature before the rolls go in. A cold oven start ruins the oven spring — that rapid final rise that happens in the first few minutes of baking.
Step 8: Apply Egg Wash and Bake
Whisk together 1 egg yolk and 1 tablespoon of whole milk in a small bowl. Using a pastry brush, gently brush the top of every roll with a thin, even coat of this egg wash. The egg wash is what gives milk brioche rolls their deeply golden, slightly glossy top.
Slide the pan into the preheated oven and bake for 18 to 22 minutes. The rolls should turn a rich golden brown on top. FYI — the internal temperature of a fully baked brioche roll should reach around 190 degrees Fahrenheit if you want to test with a thermometer.
Step 9: Cool and Serve
Remove the pan from the oven and let the rolls cool in the pan for 5 minutes. Then transfer them to a wire rack. You can serve them warm, which is genuinely the best way to eat them, or let them cool completely if you are storing them.
Pull them apart at the table for a dramatic, crowd-pleasing moment. The steam that escapes from a freshly pulled-apart milk brioche roll is one of baking’s great pleasures. Serve with butter, jam, honey, or just plain — they do not need much help at all.
How to Store Milk Brioche Rolls
- Room temperature: Store in an airtight bag or container for up to 2 days.
- Freeze after baking: Cool completely, wrap individually, and freeze for up to 1 month.
- Refresh stale rolls: Wrap in foil and warm in a 300 degrees F oven for 8 to 10 minutes.
- Make-ahead option: Refrigerate the shaped rolls overnight after Step 6 and bake directly from the fridge the next morning, adding 5 extra minutes to the bake time.
Pro Tips for Perfect Milk Brioche Rolls
- Use room-temperature eggs and softened butter — cold ingredients slow gluten development and make the dough harder to work with.
- Do not add extra flour if the dough feels sticky — brioche dough is naturally tacky and adding flour dries it out.
- The window-pane test confirms proper gluten development: stretch a small piece of dough thin enough to see light through without tearing.
- For extra golden tops, apply a second coat of egg wash right before baking.
- Overnight cold proofing in the fridge (after shaping) produces a more complex, slightly richer flavor.
FAQs About Milk Brioche Rolls
Can I make milk brioche rolls without a stand mixer?
Yes, you can knead entirely by hand. It takes about 12 to 15 minutes of vigorous kneading to develop the gluten and incorporate the butter properly. The dough will be sticky, especially when you start adding butter, but resist the temptation to add flour. Wet hands can help you manage it.
Why is my brioche dough so sticky?
Brioche dough is naturally stickier than regular bread dough because of the high butter and egg content. This is normal and correct. Avoid adding more flour — it will make your rolls dense and dry. Trust the process, keep kneading, and the dough will eventually become smoother and more manageable.
Can I use instant yeast instead of active dry yeast?
Yes. If you use instant yeast, you can skip the activation step and mix it directly into the flour with the other dry ingredients. Instant yeast is also slightly more potent, so your dough may rise a little faster. Keep an eye on volume rather than strictly following timing.
How do I know when my milk brioche rolls are fully baked?
Look for a deep, even golden brown color across the entire top surface. The sides that touch the pan should also look set and lightly colored. If you have a kitchen thermometer, the internal temperature should read around 190 degrees Fahrenheit. Tapping the bottom of a roll should produce a hollow sound.
Can I add fillings to milk brioche rolls?
Absolutely. You can flatten each dough portion slightly, add a small amount of filling — Nutella, jam, cream cheese, or even ham and cheese — then seal and shape it into a ball. Keep fillings small enough that you can seal the dough fully around them without tearing the surface.
Final Thoughts
Making milk brioche rolls from scratch takes more time than pulling a bag from the store shelf, but the difference in flavor, texture, and satisfaction is genuinely incomparable. Once you pull a tray of golden, pillowy rolls from your own oven, store-bought rolls start feeling like a real disappointment.
The process teaches you a lot about how enriched doughs behave, and each batch gets easier and more intuitive. The patience required for the rises is not wasted time — it is the secret ingredient. So clear an afternoon, gather your ingredients, and make a batch. Your kitchen will smell incredible, your rolls will look stunning, and the people you share them with will think you are a genius baker.

Milk Brioche Rolls
Ingredients
Method
- Warm 3/4 cup of whole milk to between 105 and 110 degrees Fahrenheit. Stir in 1 teaspoon of sugar and the yeast. Let sit for 5-10 minutes until foamy.
- In a mixing bowl, whisk together the flour, remaining sugar, and salt. Make a well in the center.
- Pour the activated yeast mixture into the well. Add the eggs and mix with a stand mixer on low for 2 minutes and then on medium for 5 minutes until a rough dough forms.
- Gradually add the butter with the mixer running, allowing for proper incorporation.
- Shape the dough into a ball, place in a greased bowl, cover, and let rise in a warm area for 1-1.5 hours until doubled in size.
- Punch down the dough, shape into 12 equal rolls, and place in a greased baking pan. Cover and let rise again for 45 minutes to 1 hour.
- Preheat oven to 375 degrees Fahrenheit 15 minutes before second rise finishes.
- Whisk together the egg yolk and milk for the wash. Brush the tops of the rolls with egg wash.
- Bake for 18-22 minutes until golden brown. The internal temperature should reach 190 degrees Fahrenheit.
- Cool the rolls in the pan for 5 minutes, then transfer to a wire rack to cool completely or serve warm.


