
Prep Time: 20 minutes | Bake Time: 18 to 22 minutes | Total Time: 40 minutes | Servings: 20 to 24 rolls
The Appetizer That Clears a Plate in Under Five Minutes
Baked Cream Cheese Rangoon Rolls-If you have ever watched an entire tray of cream cheese rangoon disappear at a party before you even got a chance to grab one, you understand exactly what kind of recipe this is. Baked Cream Cheese Rangoon Rolls are the appetizer people genuinely cannot stop eating.
I first made these for a casual game night and honestly expected half the tray to be left over for the next day. Instead, they vanished before halftime. Someone actually asked me if I had more. I did not, and I have regretted that ever since.
The baked version of cream cheese rangoon rolls gives you all the Baked Cream Cheese Rangoon Rolls-creamy, savory filling and that satisfying crunch — without the deep fryer, without the oil smell, and without standing over a hot pot babysitting each one. You just roll, brush, bake, and eat. That is the whole deal.
Why Bake These Instead of Frying Them?
Let me be upfront: deep-fried rangoon are incredible. But baking these rolls gives you something the fryer cannot — even, consistent browning on every single roll without any babysitting or oil temperature management. The oven does all the work.
Baked Cream Cheese Rangoon Rolls also hold their shape much better. When you fry spring roll wrappers, they can puff unevenly or burst open if the seal is not perfect. In the oven, they crisp up gradually and stay sealed without any drama.
The cleanup difference alone is worth it. No splattered oil, no disposal questions, no lingering smell. Just a sheet pan, parchment paper, and about 20 minutes of your oven’s time. IMO, baking is the smarter move for any recipe you plan to make regularly.
Everything You Need to Make Baked Cream Cheese Rangoon Rolls
Short ingredient list, big payoff. Everything here comes from a regular grocery store — nothing requires a special trip anywhere.
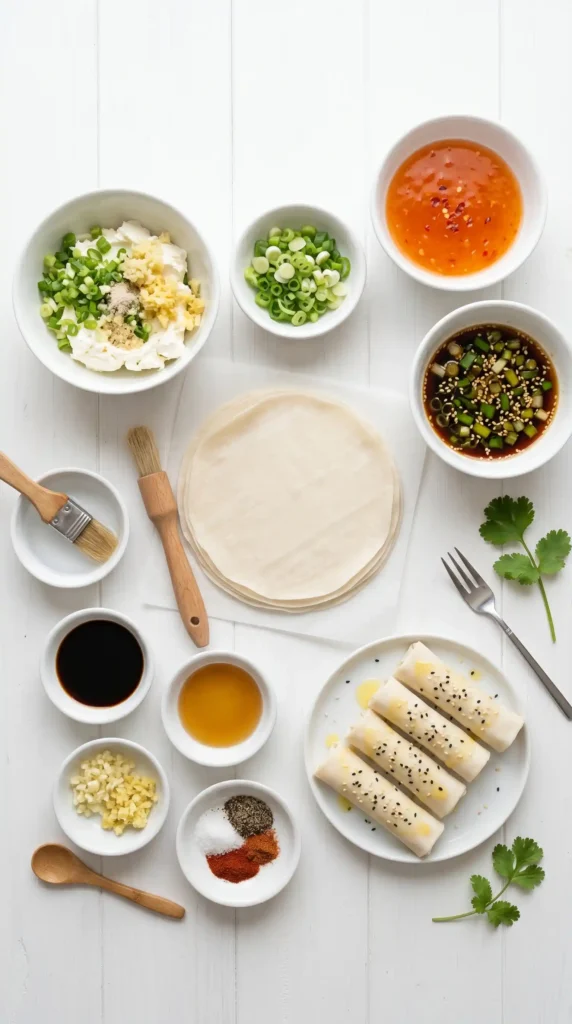
For the Cream Cheese Filling
- 225g (8 oz) full-fat cream cheese, softened to room temperature
- 3 green onions (scallions), finely sliced — use both the white and green parts
- 1 teaspoon soy sauce
- 1 teaspoon Worcestershire sauce
- 1/2 teaspoon garlic powder
- 1/4 teaspoon onion powder
- 1/4 teaspoon white pepper
- 1 teaspoon sesame oil
- Optional: 85g (3 oz) imitation crab meat or real crab, finely shredded — this is the classic rangoon addition and takes the filling to the next level
For the Rolls
- 20 to 24 spring roll wrappers (the thin, square ones — not egg roll wrappers, which are thicker and chewier)
- 2 tablespoons water mixed with 1 teaspoon cornstarch — this is your sealing paste
- 2 tablespoons neutral oil or melted butter — for brushing the outside of the rolls before baking
For Dipping (Optional but Strongly Recommended)
- Sweet chili sauce — the classic pairing and the one I always make
- Soy sauce with a few drops of sesame oil and a pinch of chili flakes
- Duck sauce or plum sauce also work beautifully if that is what you have
How to Make Baked Cream Cheese Rangoon Rolls — Detailed Step by Step
This recipe is genuinely beginner-friendly. If you can spread something onto a wrapper and roll it up, you can make these. Take your time on the first few rolls and you will find a rhythm quickly.
Step 1 : Soften the Cream Cheese Properly
Take the cream cheese out of the refrigerator at least 45 minutes before you plan to start. This is the step most people skip and then immediately regret. Cold cream cheese does not mix smoothly — you end up with lumps and uneven filling that can tear the wrapper when you try to roll it.
If you forgot to take it out in advance, cut the cream cheese into small cubes and let it sit for 20 minutes, or microwave it for 10 to 15 seconds in short bursts. You want it soft enough to mix with a fork, not melted.
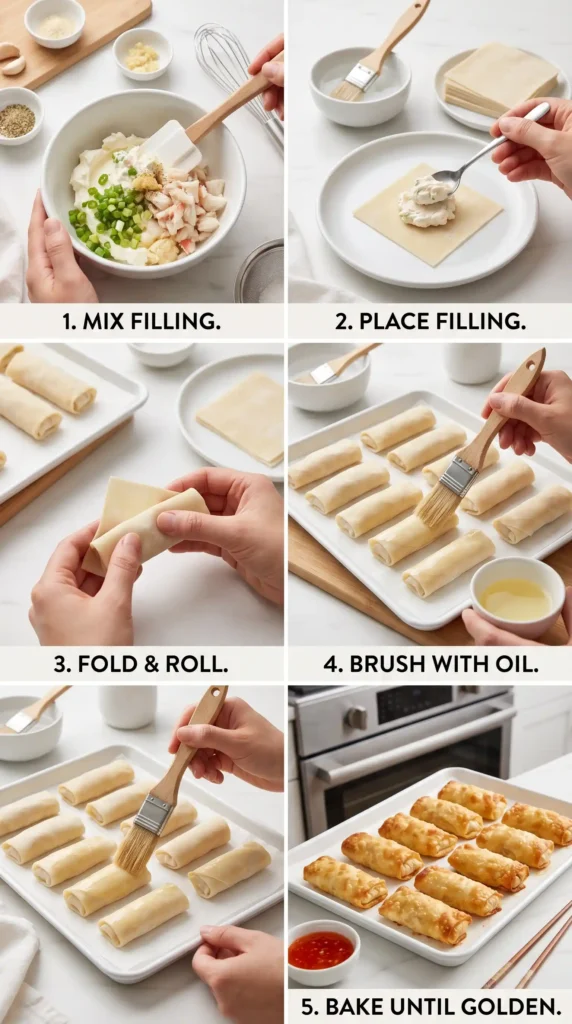
Step 2 : Make the Cream Cheese Filling
Place the softened cream cheese in a mixing bowl. Add the sliced green onions, soy sauce, Worcestershire sauce, garlic powder, onion powder, white pepper, and sesame oil all at once.
Mix everything together thoroughly using a fork or a rubber spatula until the filling is completely smooth and all the seasonings are evenly distributed. Taste the filling at this stage and adjust. If you want more savoriness, add a touch more soy sauce. If you want more depth, add another small drizzle of sesame oil.
If you are adding crab meat, fold it into the cream cheese filling gently at the end. You want visible pieces of crab throughout the filling rather than completely mashing it in. This gives you that classic crab rangoon texture with every bite.
Cover the bowl with plastic wrap and refrigerate the filling for 15 minutes. Chilling the filling firms it up slightly, which makes it much easier to portion and roll without it squishing out the sides of the wrapper. This step takes almost no effort and makes a noticeable difference.
Step 3 : Prepare Your Rolling Station
Preheat your oven to 200 degrees Celsius (400 degrees Fahrenheit). Line a large baking sheet with parchment paper and set it aside. You want the oven fully preheated before the rolls go in so they start crisping immediately rather than slowly warming up and potentially leaking.
Mix 2 tablespoons of water with 1 teaspoon of cornstarch in a small bowl to create your sealing paste. This paste is more effective than plain water for sealing spring roll wrappers because the starch creates a stronger bond that holds up to the heat of the oven. Set it near your work area with a small brush or just use your fingertip to apply it.
Separate your spring roll wrappers carefully and keep them covered under a slightly damp kitchen towel while you work. Spring roll wrappers dry out and crack very quickly when left exposed to air. Cracked wrappers tear when you try to roll them, which is frustrating and messy. Keep them covered between every single roll.
Step 4 : Fill and Roll
Place one spring roll wrapper on your clean work surface with one corner pointing toward you, like a diamond shape. Scoop about 1 and 1/2 teaspoons of the chilled cream cheese filling and place it in the lower center of the wrapper — roughly one-third of the way up from the bottom corner.
Do not overfill. This is genuinely the most common mistake people make the first time. Too much filling means the wrapper cannot close properly, the seams burst in the oven, and the cream cheese leaks out onto the baking sheet. A generous but controlled amount of filling is what gives you a clean, well-sealed roll.
Fold the bottom corner up and over the filling, tucking it snugly underneath. Then fold both the left and right corners inward toward the center, like you are folding an envelope. Pull them in firmly so there are no gaps on the sides.
Roll the whole thing away from you, pulling it tight as you go. Just before you reach the top corner, brush a small amount of the cornstarch sealing paste along the top corner and the side edges. Press everything down firmly and hold for a few seconds to let the seal set. Place the finished roll seam-side down on your prepared baking sheet.
Repeat this process with all the remaining wrappers and filling. Keep finished rolls spaced about 2 cm apart on the baking sheet so the hot air can circulate around them and crisp all sides evenly. Rolls touching each other will steam rather than crisp along the contact points.
Step 5 : Brush and Bake
Once all the rolls are on the baking sheet, brush the outside of each one generously with neutral oil or melted butter. Cover every surface you can reach — top, sides, and as much of the bottom edge as possible without moving the rolls. This fat coating is what turns the wrapper from pale and papery into deeply golden and satisfyingly crunchy.
For extra crunch and color, you can spray the rolls with a light coat of cooking spray instead of brushing with oil. Both methods work well — the spray gives slightly more even coverage while the brush gives you more control over how much fat you apply.
Slide the baking sheet into the center rack of your fully preheated oven. Bake for 18 to 22 minutes, flipping each roll over at the halfway point — around the 10-minute mark. Flipping ensures both sides get equally golden and crisp. Without flipping, the bottom side crisps beautifully while the top stays a little softer.
Watch the rolls closely in the last 3 to 4 minutes of baking. Oven temperatures vary, and spring roll wrappers go from perfectly golden to overcooked faster than you expect. Pull them out as soon as they look deep golden brown and feel firm when you tap one gently with a fork.
Step 6 : Rest and Serve
Remove the baking sheet from the oven and let the rolls rest for 3 to 4 minutes before serving. The cream cheese filling inside is extremely hot straight out of the oven — much hotter than the wrapper suggests. That short resting time lets the filling settle slightly so you do not burn your mouth on the very first bite 🙂
Arrange the baked cream cheese rangoon rolls on a serving plate alongside your chosen dipping sauce. Serve them while they are still warm — the filling is creamiest and most satisfying at this temperature, and the wrappers retain their crunch best in the first 15 to 20 minutes after baking.
Tips That Actually Make a Difference
Use full-fat cream cheese. Reduced-fat versions have higher water content, which makes the filling runnier and harder to roll without leaking.
Do not skip the oil brushing step. Unbrushed wrappers bake up pale and have a dry, papery texture rather than a proper crunch. The oil is essential.
Chill the filling before rolling. This 15-minute step makes rolling dramatically easier and gives you cleaner, tighter rolls every time.
Keep unused wrappers covered at all times. A dry, cracked wrapper is impossible to roll cleanly. The damp towel costs you nothing and saves a lot of frustration.
Easy Variations Worth Trying

Spicy Cream Cheese Rangoon Rolls: Add 1 teaspoon of sriracha and a pinch of red chili flakes to the cream cheese filling. The heat cuts through the richness of the cream cheese perfectly.
Bacon and Cream Cheese Rangoon Rolls: Fold in 3 strips of cooked, crumbled bacon. The smokiness and the savory cream cheese filling together are genuinely spectacular.
Everything Bagel Rangoon Rolls: Mix 1 teaspoon of everything bagel seasoning into the cream cheese filling and sprinkle a little more on top of the rolls before baking. This one is FYI for cream cheese fans everywhere.
Frequently Asked Questions
Can I make baked cream cheese rangoon rolls ahead of time?
Yes — you can roll them up to 8 hours in advance and refrigerate them uncooked on a lined baking sheet covered loosely with plastic wrap. When you are ready to serve, brush with oil and bake straight from the fridge. Add 2 to 3 extra minutes to the bake time since they are starting cold.
Can I freeze these before or after baking?
You can freeze them before baking for up to 2 months. Place rolled, unbaked rolls on a baking sheet in a single layer and freeze until solid, then transfer them to a freezer bag. Bake directly from frozen at the same temperature, adding 5 to 7 extra minutes. Baked rolls can also be frozen and reheated in the oven at 180C for 8 to 10 minutes to restore crunch.
What is the difference between spring roll wrappers and egg roll wrappers?
Spring roll wrappers are very thin, almost translucent, and made from rice flour or wheat starch. They crisp up light and papery when baked. Egg roll wrappers are thicker, more doughy, and made from wheat flour and egg. Both work for this recipe, but spring roll wrappers give you a much thinner, crispier result that feels closer to traditional rangoon.
Why do my rolls keep bursting open in the oven?
Bursting usually comes from one of three things: overfilling, a weak seal, or the filling being too warm when you rolled. Use a smaller amount of filling than you think you need, apply the cornstarch sealing paste generously and press firmly, and always chill the filling before rolling. These three fixes solve most bursting problems completely.
What dipping sauce works best with baked cream cheese rangoon rolls?
Sweet chili sauce is the classic and it works for a very good reason — its sweetness and gentle heat complement the rich, savory cream cheese filling perfectly. Plum sauce and duck sauce are also excellent traditional pairings. If you want something less sweet, try a simple dipping sauce of soy sauce, rice vinegar, and a few drops of sesame oil.
Can I use wonton wrappers instead of spring roll wrappers?
Wonton wrappers work but they give you a different result. They are smaller and thicker than spring roll wrappers, so you will get a more compact, dough-heavy roll rather than a thin, crispy one. They also need a longer baking time to crisp properly. If wonton wrappers are all you can find, they absolutely still taste great — the texture is just different from what you get with spring roll wrappers.
Final Thoughts
Baked Cream Cheese Rangoon Rolls hit every note you want from a good appetizer — creamy filling, satisfying crunch, easy dipping sauce, and no complicated technique required. They work for parties, game nights, family dinners, or just a Tuesday where you want something genuinely good.
The baked method gives you all the flavor of the classic without the hassle of deep frying, and the recipe scales up effortlessly. Double the batch if you are feeding a crowd. Triple it if you know your audience.
Roll them up this weekend and watch how fast they disappear. And maybe this time, make extra.

Baked Cream Cheese Rangoon Rolls
Ingredients
Method
- Soften the cream cheese by letting it sit at room temperature for 45 minutes.
- Mix all filling ingredients, including the softened cream cheese, in a bowl until smooth.
- Chill the filling in the refrigerator for 15 minutes.
- Preheat the oven to 200°C (400°F) and line a baking sheet with parchment paper.
- Prepare the sealing paste by mixing water and cornstarch.
- Place one spring roll wrapper on the work surface, scoop filling onto the center, and roll tightly.
- Seal the wrapper using the cornstarch paste, ensuring there are no gaps.
- Continue filling and rolling all wrappers, placing them seam-side down on the baking sheet.
- Brush each roll generously with oil or melted butter.
- Bake for 18 to 22 minutes, flipping halfway through to ensure even browning.
- Monitor the rolls for golden color and remove from the oven when brown and firm.
- Let the rolls rest for 3 to 4 minutes before serving.
- Serve warm with your choice of dipping sauce.


