
Servings: 8 | Prep Time: 20 minutes | Chill Time: 4 hours (or overnight) | Total Time: 4 hours 20 minutes
Okay, real talk — if you have never had Biscoff Banana Pudding, you are genuinely missing out on one of the best no-bake desserts ever created. I made this for the first time on a lazy Sunday, and my whole family basically forgot every other dessert existed.
This recipe takes the classic Southern banana pudding you know and love, and gives it a seriously delicious upgrade. Swapping out vanilla wafers for Biscoff cookies adds this warm, spiced, caramelized flavor that pairs perfectly with fresh bananas and creamy pudding layers.
The best part? You do not need to bake a single thing. No oven, no stress, just layering and a little patience while it chills. Trust me, the wait is absolutely worth it.
What Makes Biscoff Banana Pudding So Special?
If you have ever had a Lotus Biscoff cookie, you already know they taste like someone bottled up cinnamon, caramel, and autumn vibes into one crunchy little biscuit. They are wildly popular for a reason.
When you layer those cookies into a creamy banana pudding, something magical happens. The cookies soften just enough to become almost cake-like in texture while still holding their distinct spiced flavor. The bananas add natural sweetness and the whipped cream on top brings everything together.
IMO, this version totally blows the original out of the water. And I say that as someone who genuinely loves the classic. It is just on another level.
Ingredients You Will Need
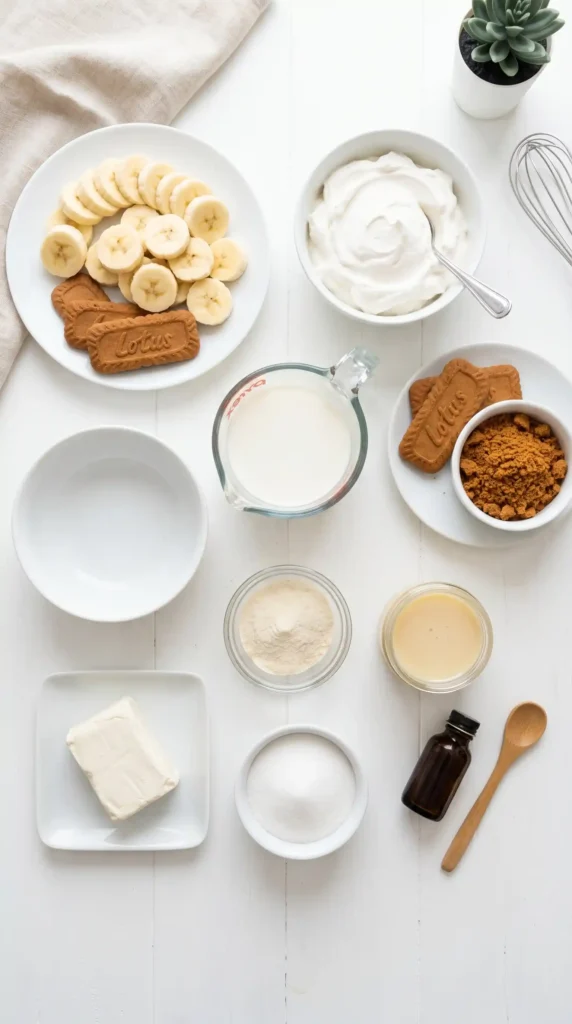
Here is everything you need to pull this off. These quantities make enough for 8 generous servings, which is great for a family gathering or a weekend treat.
For the Pudding Layer
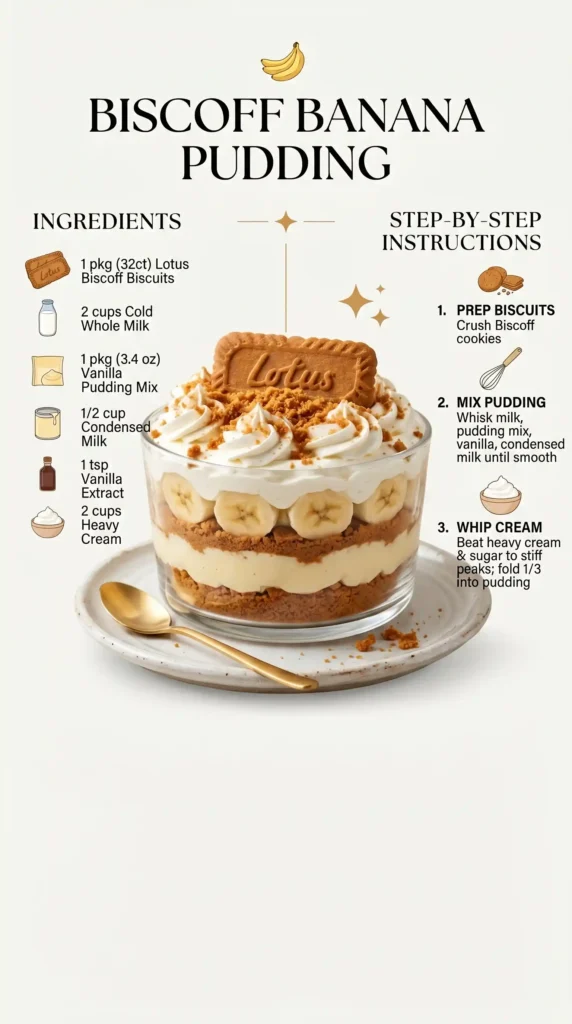
- 2 packages (3.4 oz each) instant vanilla pudding mix
- 3 cups whole milk
- 1 block (8 oz) full-fat cream cheese, softened to room temperature
- 1 can (14 oz) sweetened condensed milk
- 1 teaspoon pure vanilla extract
- 1 container (8 oz) frozen whipped topping (Cool Whip), thawed
For the Layers
- 2 packages (8.8 oz each) Lotus Biscoff cookies (about 50 cookies)
- 4 medium ripe bananas, sliced into 1/4-inch rounds
For the Topping
- 1 cup heavy whipping cream
- 2 tablespoons powdered sugar
- 1/2 teaspoon vanilla extract
- 3 to 4 Biscoff cookies, crushed for garnish
- 1 to 2 tablespoons Biscoff cookie butter spread (optional but highly recommended)
Equipment You Will Need
- A large mixing bowl
- A hand mixer or stand mixer
- A 9×13 inch baking dish or a large trifle bowl
- A rubber spatula
- Plastic wrap or a lid for chilling
How to Make Biscoff Banana Pudding Step by Step
Do not let the layer count intimidate you. This recipe is genuinely straightforward. Just take it one step at a time and you will have a show-stopping dessert on your hands.
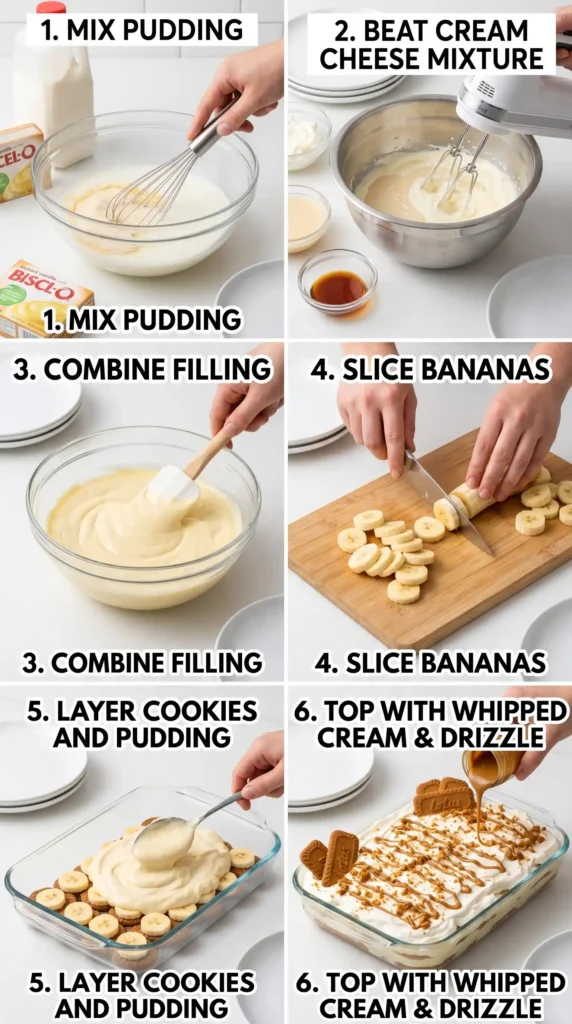
Step 1: Make the Vanilla Pudding Base
Start by grabbing your large mixing bowl. Pour in the 3 cups of cold whole milk and add both packages of instant vanilla pudding mix. Whisk everything together vigorously for about 2 full minutes until the mixture starts to thicken up nicely.
You want it to be smooth and lump-free, so take your time here. Once it thickens, set the bowl aside and let it sit for 5 minutes. This allows the pudding to firm up slightly before you mix in the other ingredients.
Step 2: Beat the Cream Cheese Mixture
In a separate bowl, add your softened cream cheese. Use your hand mixer and beat it on medium speed until it becomes fluffy and completely smooth with no lumps, about 2 to 3 minutes.
Add the 14 oz can of sweetened condensed milk and the teaspoon of vanilla extract to the cream cheese. Continue beating on medium speed for another 2 minutes until everything is silky and fully combined. This step is what gives the pudding that rich, cheesecake-like depth of flavor.
Scrape down the sides of the bowl with your rubber spatula to make sure nothing gets left behind. You want every bit of that cream cheese mixture fully incorporated.
Step 3: Combine Pudding and Cream Cheese
Now pour the prepared vanilla pudding into the cream cheese mixture. Using your rubber spatula or the hand mixer on low speed, gently fold and mix the two together until they are completely blended.
The result should be this thick, creamy, dreamy mixture that smells absolutely incredible. Take a small taste at this point — you will probably want to eat it straight from the bowl. Completely understandable.
Once combined, gently fold in the thawed Cool Whip using a rubber spatula. Use slow, sweeping motions to keep the mixture light and airy. Do not overmix or you will deflate all that fluffiness you worked for.
Step 4: Slice the Bananas
Peel your 4 ripe bananas and slice them into rounds about 1/4-inch thick. Ripe bananas work best here because they are naturally sweeter and softer, which complements the creamy pudding perfectly.
If you want to prevent the banana slices from browning too quickly, you can toss them lightly in a small squeeze of fresh lemon juice. This keeps them looking fresh and pretty for longer, especially if you are assembling the dish a few hours ahead of serving.
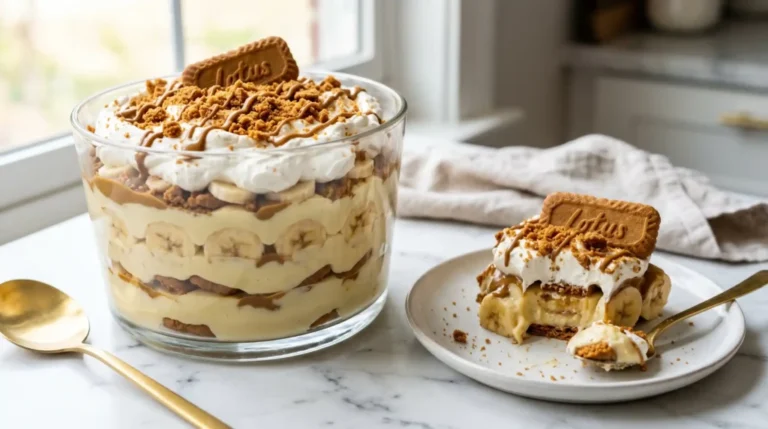
Step 5: Assemble the Layers
This is where the magic happens. Grab your 9×13 inch baking dish and start building your Biscoff Banana Pudding layers.
Start with a base layer of Biscoff cookies. Arrange them in a single, even layer across the bottom of the dish. They can overlap slightly and it is totally fine to break a few cookies to fill in gaps around the edges.
Next, spoon about half of the pudding mixture evenly over the cookie layer. Use your spatula to spread it gently from edge to edge, making sure the cookies are fully covered.
Now lay half of your banana slices in a single layer over the pudding. Space them evenly so every spoonful gets a bite of banana. Repeat the entire process: another layer of Biscoff cookies, the rest of the pudding mixture, and the remaining banana slices.
Step 6: Make the Whipped Cream Topping
Pour the 1 cup of cold heavy whipping cream into a clean mixing bowl. Add the 2 tablespoons of powdered sugar and 1/2 teaspoon of vanilla extract. Beat with your hand mixer on high speed for 2 to 3 minutes until stiff peaks form.
You are looking for a thick, fluffy whipped cream that holds its shape when you lift the beater. Do not over-whip or it will start to look grainy. Stop as soon as those stiff peaks hold.
Step 7: Top and Garnish
Spread the whipped cream evenly over the top layer of the pudding. Cover the entire surface for a clean, finished look. Now take your 3 to 4 Biscoff cookies and crush them into coarse crumbs either by hand or with a small zip-lock bag and a rolling pin.
Sprinkle the crushed cookies generously over the whipped cream. For extra flair, drizzle some Biscoff cookie butter spread on top. Warm it slightly in the microwave for 15 seconds first so it drizzles beautifully. FYI, this optional step makes the whole thing look absolutely gorgeous.
Step 8: Chill and Serve
Cover the dish tightly with plastic wrap and refrigerate for at least 4 hours. Overnight chilling gives the best results by far — the Biscoff cookies soften into this incredible, almost cake-like texture that is truly unforgettable.
When you are ready to serve, scoop generous portions into bowls or glasses. Make sure every serving gets all the layers for the full experience. Serve immediately after pulling from the fridge for the best texture and flavor.
Pro Tips for the Best Results
- Use ripe bananas: The riper, the sweeter and more flavorful your pudding will be.
- Chill overnight: Four hours works fine but overnight produces the absolute best texture.
- Full-fat everything: Use full-fat cream cheese and whole milk for the creamiest, richest result.
- Layer evenly: Spread each pudding layer all the way to the edges to prevent dry cookie spots.
- Assemble close to serving: Bananas can brown over time, so assemble the day before at most.
How to Store Biscoff Banana Pudding
Store any leftovers covered tightly in the refrigerator. The pudding stays good for up to 3 days, although the bananas may begin to soften and brown slightly after day 2.
Do not freeze this dessert. The creamy pudding layers and bananas do not hold up well to freezing and thawing — the texture becomes watery and unpleasant. :/ Keep it refrigerated and enjoy within 3 days for the best experience.
Frequently Asked Questions
Can I use homemade whipped cream instead of Cool Whip?
Absolutely, yes. Homemade whipped cream works great and honestly tastes even better. Whip 1 cup of heavy cream with 2 tablespoons of powdered sugar to stiff peaks and fold it in exactly like you would with Cool Whip.
Can I make this recipe ahead of time?
Yes, and it actually gets better the longer it sits. Assemble it the night before your event, cover it well, and refrigerate overnight. The cookies soften perfectly and the flavors meld together beautifully by the next day.
What can I use instead of Biscoff cookies?
If you cannot find Biscoff cookies, Speculoos cookies from any European grocery store are basically identical. Graham crackers or vanilla wafers also work, but they will give you a more classic banana pudding flavor rather than the spiced Biscoff version.
Can I make this in individual serving cups instead of a large dish?
Definitely. Individual mason jars or clear dessert cups work beautifully for this recipe and look stunning. Just layer the ingredients the same way but in smaller portions. They are perfect for parties or meal prepping individual desserts.
How do I keep the bananas from turning brown?
Toss your banana slices in a small amount of fresh lemon juice before layering them. This slows down the oxidation process significantly. Also, assembling the dish the day before rather than several days ahead keeps the bananas looking their best.
Final Thoughts
There you have it — a full, detailed guide to making the most incredible Biscoff Banana Pudding you have ever tasted. This recipe is the kind of thing people ask you to bring to every gathering once they have tried it once.
Between the spiced Biscoff cookie layers, the ultra-creamy pudding, fresh banana slices, and that gorgeous whipped cream topping, every single bite is pure joy. This is not just a dessert — it is an experience.
So go ahead, gather your ingredients, and get layering. Once you make your first pan of Biscoff Banana Pudding, there is absolutely no going back to the regular version. You have been warned.
Biscoff Banana Pudding
Ingredients
Method
- Start by grabbing your large mixing bowl. Pour in the 3 cups of cold whole milk and add both packages of instant vanilla pudding mix. Whisk everything together vigorously for about 2 full minutes until the mixture starts to thicken up nicely.
- In a separate bowl, add your softened cream cheese. Use your hand mixer and beat it on medium speed until it becomes fluffy and completely smooth with no lumps, about 2 to 3 minutes.
- Add the 14 oz can of sweetened condensed milk and the teaspoon of vanilla extract to the cream cheese. Continue beating on medium speed for another 2 minutes until everything is silky and fully combined.
- Pour the prepared vanilla pudding into the cream cheese mixture. Using your rubber spatula or the hand mixer on low speed, gently fold and mix the two together until they are completely blended.
- Once combined, gently fold in the thawed Cool Whip using a rubber spatula.
- Peel your 4 ripe bananas and slice them into rounds about 1/4-inch thick.
- Grab your 9×13 inch baking dish and start building your Biscoff Banana Pudding layers.
- Start with a base layer of Biscoff cookies, followed by half of the pudding mixture, and then half of your banana slices.
- Repeat the entire process: another layer of Biscoff cookies, the rest of the pudding mixture, and the remaining banana slices.
- Pour the 1 cup of cold heavy whipping cream into a clean mixing bowl. Add the 2 tablespoons of powdered sugar and 1/2 teaspoon of vanilla extract. Beat with your hand mixer on high speed for 2 to 3 minutes until stiff peaks form.
- Spread the whipped cream evenly over the top layer of the pudding. Crush 3 to 4 Biscoff cookies and sprinkle over the whipped cream.
- For extra flair, drizzle some Biscoff cookie butter spread on top.
- Cover the dish tightly with plastic wrap and refrigerate for at least 4 hours or overnight.
- When ready to serve, scoop generous portions into bowls or glasses.


