Servings: 10-12 slices | Prep Time: 30 minutes | Bake Time: 55-60 minutes | Chill Time: 6 hours or overnight | Total Time: ~8 hours
Snickerdoodle Cheesecake Someone at some point decided to combine the warm, cinnamon-sugar magic of a snickerdoodle cookie with the creamy richness of cheesecake. That person deserves a trophy. Seriously.
This Snickerdoodle Cheesecake recipe delivers everything you love about both desserts at once. You get a buttery cinnamon cookie crust, a silky smooth cream cheese filling, and a cinnamon-sugar dusted top that tastes like the best bite of a fresh-baked snickerdoodle.
I first made this for a holiday gathering and spent the rest of the evening fielding requests for the recipe. It became a permanent fixture in my dessert rotation after that first slice. FYI, it’s even better the next day after a full night in the fridge.
Why Snickerdoodle Cheesecake Is the Dessert You Didn’t Know You Needed
Regular cheesecake is undeniably good. But have you ever bitten into one and thought, ‘this needs more cinnamon’? Because that thought is exactly how this recipe was born, and it’s a completely valid thought.
The snickerdoodle flavor profile — warm cinnamon, a slight tang from cream of tartar, that signature sugary crust — translates beautifully into a cheesecake format. Every component gets the snickerdoodle treatment.
The crust uses crushed snickerdoodle cookies or cinnamon graham crackers. The filling carries cinnamon and a touch of cream of tartar for authenticity. The topping finishes with a cinnamon-sugar dusting. It’s cohesive, bold, and completely addictive.
Ingredients for Snickerdoodle Cheesecake
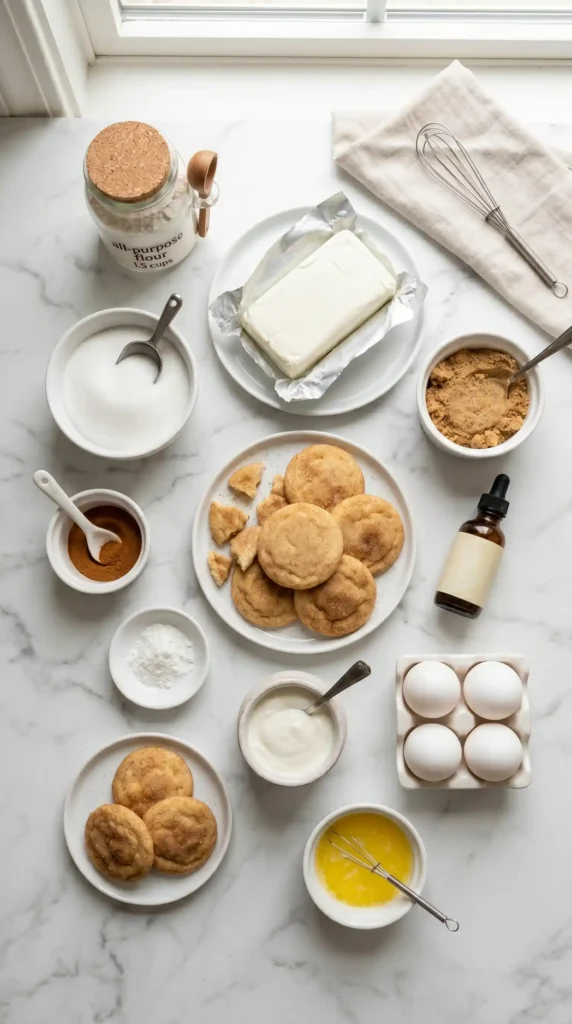
Every ingredient here plays a specific role. Don’t skip the cream of tartar — it’s what gives this cheesecake that genuine snickerdoodle character that sets it apart from a plain cinnamon cheesecake.
For the Crust
- 2 cups (200g) snickerdoodle cookie crumbs or cinnamon graham cracker crumbs
- 1/4 cup (50g) granulated sugar
- 1 teaspoon (3g) ground cinnamon
- 6 tablespoons (85g) unsalted butter, melted
For the Cheesecake Filling
- 24 oz (680g) full-fat cream cheese, softened to room temperature
- 1 cup (200g) granulated sugar
- 3 large eggs, at room temperature
- 1 cup (240g) full-fat sour cream
- 2 teaspoons (10ml) pure vanilla extract
- 1 1/2 teaspoons (4g) ground cinnamon
- 1/2 teaspoon (1.5g) cream of tartar
- 2 tablespoons (16g) all-purpose flour
- Pinch of salt
Now For the Cinnamon Sugar Topping
- 3 tablespoons (36g) granulated sugar
- 1 1/2 teaspoons (4.5g) ground cinnamon
- 1 tablespoon (14g) unsalted butter, melted (optional, for a caramelized top)
Equipment You’ll Need
Getting the equipment right before you start saves a lot of frustration mid-recipe.
- 9-inch springform pan — non-negotiable for clean release
- Stand mixer or electric hand mixer
- Large roasting pan for the water bath
- Aluminum foil (heavy duty if you have it)
- Instant-read thermometer (optional but helpful)
How to Make Snickerdoodle Cheesecake Step by Step

This recipe has several stages, but none of them are complicated. The key is patience — with your ingredients, with the baking, and especially with the chilling. Rushing any stage costs you quality.
Step 1: Get Your Ingredients to Room Temperature
Pull the cream cheese, eggs, and sour cream out of the fridge at least 60-90 minutes before you start. Cold cream cheese doesn’t blend properly — it stays lumpy no matter how long you beat it, and those lumps end up in your finished cheesecake.
Room temperature ingredients blend together smoothly, incorporate more air, and create that signature velvety texture that a great cheesecake needs. This single step makes a bigger difference than most people realize. Set a timer and be patient.
Step 2: Preheat and Prep the Pan
Preheat your oven to 325°F (163°C). While it heats, wrap the outside of your 9-inch springform pan tightly with two layers of heavy-duty aluminum foil, covering the bottom and reaching up the sides.
This foil wrap is critical because you’ll bake the cheesecake in a water bath. Without the foil, water seeps into the pan through the springform seam and gives you a soggy crust. Two layers adds serious insurance against leaks.
Lightly grease the inside of the springform pan with cooking spray or a thin coat of butter. Set the prepared pan aside inside your large roasting pan for now.
Step 3: Make the Cinnamon Cookie Crust
Crush your snickerdoodle cookies into fine crumbs using a food processor, or seal them in a zip-lock bag and use a rolling pin. You want uniform, fine crumbs with no large chunks that would make the crust uneven.
In a medium bowl, combine the cookie crumbs, granulated sugar, and cinnamon. Pour in the melted butter and stir until every crumb looks moistened and the mixture holds together when you press it between your fingers.
Pour the crust mixture into your prepared springform pan. Use the flat bottom of a measuring cup or glass to press it firmly and evenly across the bottom and about one inch up the sides. Pack it well — a firm, compact crust holds together beautifully when sliced.
Bake the crust alone at 325°F for 10 minutes. This pre-bake sets the crust so it doesn’t soften under the filling. Remove it from the oven and let it cool while you make the filling. Keep the oven on.
Step 4: Mix the Cheesecake Filling
Add your room-temperature cream cheese to the bowl of your stand mixer fitted with the paddle attachment. Beat on medium speed for 2-3 minutes until it’s completely smooth and creamy, scraping down the sides of the bowl once.
Add the granulated sugar and beat for another 2 minutes until the mixture looks light and fluffy. Don’t rush this stage — properly beaten cream cheese and sugar creates the foundation for the smooth texture you’re after.
Add the eggs one at a time, beating on low speed after each addition just until incorporated. Overmixing eggs introduces too much air into the batter, which causes the cheesecake to puff up dramatically during baking and then crack as it cools. Low and slow wins here.
Add the sour cream, vanilla extract, ground cinnamon, cream of tartar, flour, and salt. Mix on low speed until everything is just combined. Scrape the bowl bottom and sides once more and give it one final gentle mix. The batter should look smooth and pourable.
Step 5: Set Up the Water Bath
Pour the cheesecake batter over your pre-baked crust. Smooth the top with a spatula. Place the foil-wrapped springform pan inside the roasting pan.
Carefully pour hot water into the roasting pan until it reaches about halfway up the outside of the springform pan. This water bath — called a bain-marie — creates gentle, even heat around the cheesecake and adds steam to the oven environment.
The water bath prevents the cheesecake from overbaking on the edges while the center catches up. It dramatically reduces cracking and gives you that smooth, creamy texture throughout. IMO, it’s the single most important technique in cheesecake baking.
Step 6: Bake the Cheesecake
Carefully transfer the roasting pan with the cheesecake to the center rack of your preheated oven. Bake at 325°F for 55-60 minutes. The cheesecake is ready when the edges look set and slightly puffed, but the center still jiggles like Jell-O when you gently shake the pan.
That jiggle is correct. The center will firm up completely as it cools. If you bake until the center looks fully set in the oven, you’ve overbaked it and the texture will be grainy and dry rather than creamy.
When the time is up, turn the oven off. Crack the oven door open about an inch and leave the cheesecake inside for one full hour. This slow cool-down prevents the dramatic temperature change that causes the surface to crack.
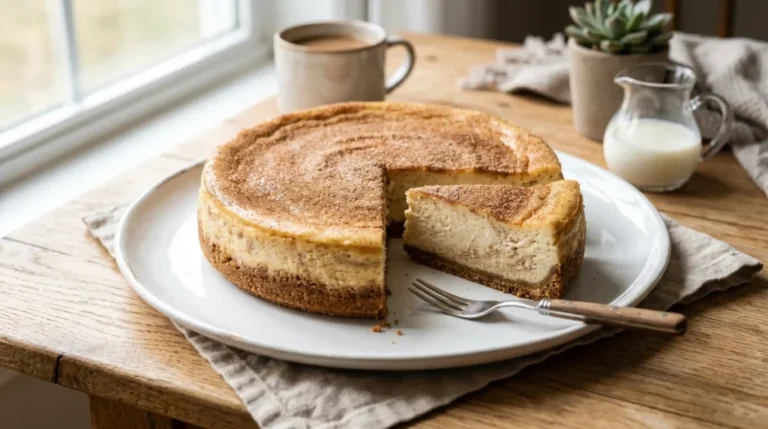
Step 7: Add the Cinnamon Sugar Topping
After the oven hour, remove the cheesecake and run a thin knife around the inside edge of the springform pan. This releases any part of the cheesecake that stuck to the sides during baking and prevents cracking as it contracts while cooling.
Mix the cinnamon and sugar together for the topping. If you want a slightly caramelized, crackly top, brush the surface lightly with melted butter first, then sprinkle the cinnamon sugar evenly over the entire surface.
For a simpler dusting without butter, just sprinkle the cinnamon sugar directly over the top. Either approach looks and tastes great. The cinnamon sugar top is what ties the whole Snickerdoodle Cheesecake concept together visually and flavor-wise.
Step 8: Chill Completely
Let the cheesecake cool on the counter for another hour after the oven step, then cover it loosely with plastic wrap and refrigerate for at least 6 hours, ideally overnight. This is the hardest part of the entire recipe.
Overnight chilling allows the filling to fully set, the flavors to deepen and meld, and the texture to reach that dense, creamy consistency that makes a cheesecake worth every calorie. Slicing it before it’s fully chilled gives you a soft, sloppy slice. Worth the wait. 🙂
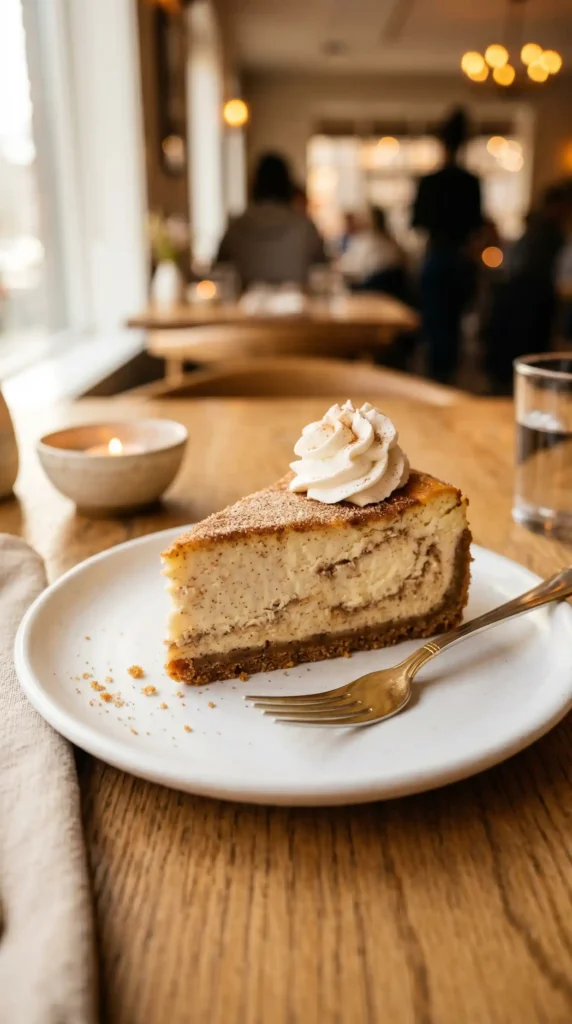
Step 9: Slice and Serve
Remove the springform ring just before serving. Run a sharp knife under hot water, wipe it dry, and slice. Clean the knife between cuts for the neatest slices.
Serve as-is, or with a small dollop of whipped cream and a fresh strawberry on the side. The cheesecake is rich enough to stand completely alone, but a little whipped cream never hurt anyone.
Pro Tips for a Perfect Snickerdoodle Cheesecake
- [object Object] are non-negotiable — plan ahead
- Never open the oven door during baking — temperature fluctuations cause cracks
- [object Object] — low-fat versions produce a looser, less creamy texture
- A water bath is worth the extra effort every single time
- Chilling overnight always beats chilling for just 6 hours when you have the time
Frequently Asked Questions
Why did my Snickerdoodle Cheesecake crack on top?
Cracking usually happens for one of three reasons: overmixing the eggs (too much air), overbaking, or cooling too quickly. Make sure you mix eggs on low speed, pull the cheesecake when the center still jiggles, and use the slow oven cool-down method before bringing it to room temperature.
Can I make this cheesecake without a water bath?
You can, but your results will be noticeably different. Without a water bath, the edges tend to overbake and pull away from the sides, and cracking is much more likely. If you skip it, reduce the oven temperature to 300°F and add 10 minutes to the bake time to compensate with gentler heat.
Can I freeze Snickerdoodle Cheesecake?
Yes, cheesecake freezes extremely well. Wrap individual slices tightly in plastic wrap, then in foil, and freeze for up to 3 months. Thaw slices overnight in the fridge — never at room temperature, as that creates condensation on the surface and makes the texture watery.
What can I use instead of cream of tartar?
You can substitute 1 teaspoon of lemon juice or white vinegar for every 1/2 teaspoon of cream of tartar. It won’t be identical, but it provides the slight tang that makes snickerdoodle flavor distinct. Plain cheesecake without any acidic element will taste great but won’t have that signature snickerdoodle character.
How do I know when the cheesecake is done baking?
Look for edges that appear set and slightly puffed, with a center that still jiggles when you shake the pan gently. If you have an instant-read thermometer, the internal temperature should read between 150°F and 155°F. Anything above 160°F and you’ve gone too far.
Final Thoughts
This Snickerdoodle Cheesecake is the kind of dessert that earns its reputation the moment someone takes their first bite. Two beloved classics sharing the same plate, each one making the other better.
The cinnamon cookie crust, the creamy tangy filling, and that cinnamon sugar top — every layer connects back to the snickerdoodle experience while living firmly in cheesecake territory. It’s genuinely one of the best flavor combinations I’ve worked with.
Make it for your next gathering, a holiday table, or honestly just a random weekend when you want something spectacular. Follow the steps, trust the process, chill it overnight. The results will do all the talking.
Snickerdoodle Cheesecake
Ingredients
Method
- Get your cream cheese, eggs, and sour cream to room temperature by taking them out of the fridge at least 60–90 minutes before starting.
- Preheat the oven to 325°F (163°C) and wrap the outside of your 9-inch springform pan tightly with two layers of heavy-duty aluminum foil.
- Lightly grease the inside of the springform pan.
- Crush the snickerdoodle cookies into fine crumbs using a food processor or rolling pin.
- Combine cookie crumbs, granulated sugar, and cinnamon in a medium bowl. Stir in the melted butter until moistened.
- Press the mixture firmly into the bottom and slightly up the sides of the prepared springform pan.
- Bake the crust for 10 minutes at 325°F. Let cool while preparing the filling.
- Using a stand mixer, beat the room temperature cream cheese on medium speed until smooth.
- Add granulated sugar and beat until light and fluffy, about 2 minutes.
- Add eggs one at a time, mixing on low until incorporated.
- Add sour cream, vanilla, cinnamon, cream of tartar, flour, and salt. Mix until just combined.
- Pour cheesecake batter over the crust and smooth the top.
- Place the springform pan in a large roasting pan and carefully pour hot water into the roasting pan until it reaches halfway up the sides of the springform pan.
- Bake at 325°F for 55–60 minutes until edges are set and the center jiggles slightly.
- Turn off the oven and leave the cheesecake inside for one hour to cool.
- Mix the sugar and cinnamon for the topping. Brush melted butter on the cooled cheesecake if desired, and sprinkle cinnamon sugar over the top.
- Cool the cheesecake for another hour on the counter, then cover and refrigerate for at least 6 hours, ideally overnight.
- Remove the springform ring just before serving, slice with a hot knife, and serve as-is or with whipped cream and strawberries.