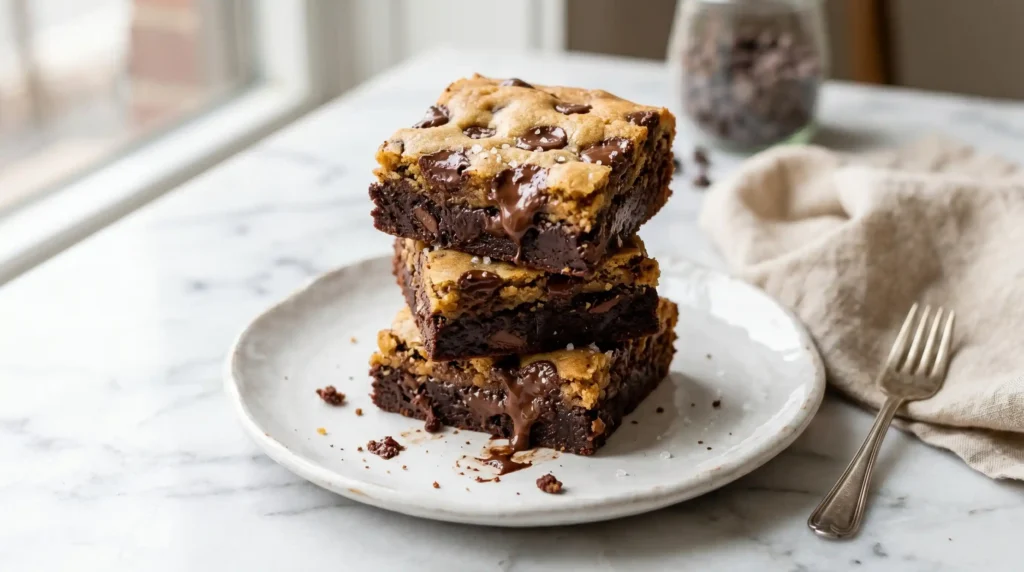
The cookie versus brownie debate has existed for as long as both have been on the same dessert table. Cookies bring the chew, the slight crisp edge, the chocolatey chip distribution. Brownies bring the fudgy density, the crackled top, the deep chocolate intensity. Brookies refuse to choose. They stack both in a single pan, bake them simultaneously, and produce a bar where each bite genuinely delivers both textures and both flavour profiles without either one being compromised.
I made brookies for the first time when I needed a single dessert for a party where half the room was firmly pro-cookie and the other half was firmly pro-brownie. The compromise was entirely successful. Every person believed their preferred layer had been prioritised. The pan disappeared in under twelve minutes. Since then I have made brookies for every occasion where a single dessert choice feels politically inadvisable — which is surprisingly often.
Have you ever needed one dessert to satisfy two genuinely different preferences simultaneously? This is precisely that dessert. Let us make it properly.
Why the Brownie and Cookie Combination Works as a Single Bake
The logical concern about brookies is that two different batters — one fudgy and dense, one chewy and egg-forward — would bake at different rates and produce a pan where one layer is done and the other is not. This concern is valid but solvable. The key is building each layer to similar consistency and similar moisture content so they bake at a compatible rate through the 35–40 minutes in the oven.
The Brownie Base
Goes in the pan first as a solid, even layer. The dark chocolate, cocoa powder, and relatively high sugar content make it bake slowly from the outside in — the outer edges firm and the centre stays fudgy at the ideal internal temperature.
The Cookie Top
Pressed in pieces over the brownie base rather than spread as a full layer. The gaps between cookie pieces allow heat to reach the brownie surface underneath and allow steam to escape rather than trapping moisture that would prevent either layer from setting.
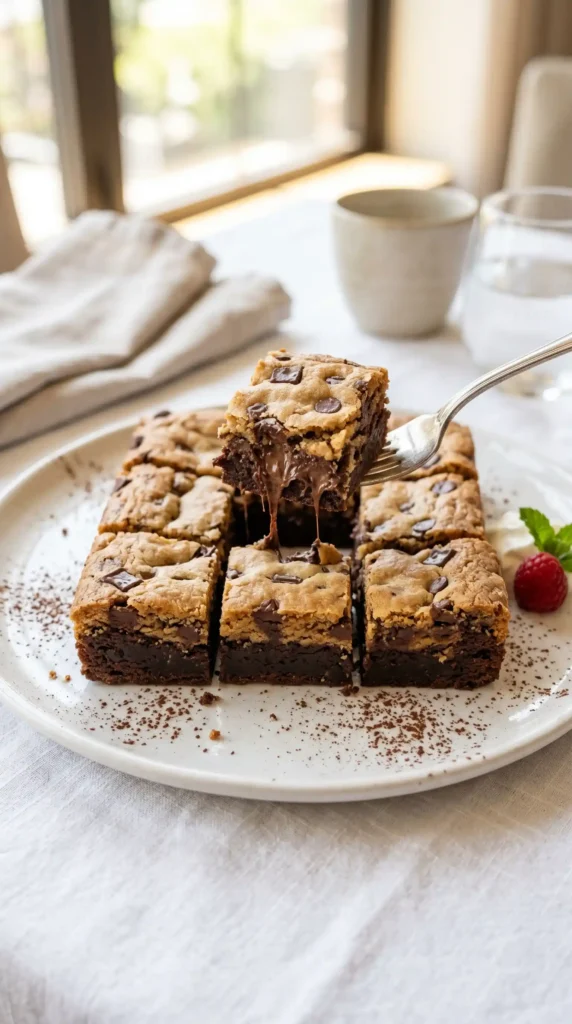
The layering direction also matters. Brownie on the bottom, cookie on top — not the reverse. The brownie base needs the direct pan contact to set its edges cleanly, and the cookie dough presses down into the brownie surface slightly during baking, creating an integrated middle layer where both textures blend rather than a stark separation. IMO, the blended middle section is the best part of a well-made brookie.
What You Need
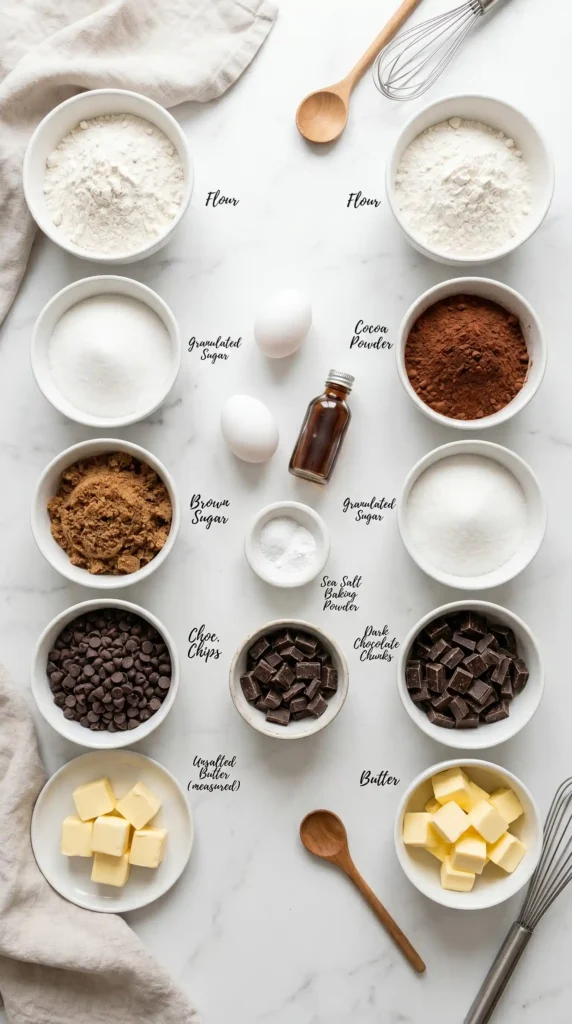
Two separate batters, each simple. The brownie uses dark chocolate in addition to cocoa powder — this double chocolate approach produces a deeper, more complex brownie layer than cocoa powder alone. The cookie uses an extra egg yolk in addition to the whole egg — the extra yolk adds fat and richness that makes the cookie layer denser and chewier rather than cakey and dry.
For the Brownie Layer
- 115g (about 4oz) good quality dark chocolate, chopped into small pieces
- 1/2 cup (113g) unsalted butter
- 3/4 cup (150g) granulated white sugar
- 2 large eggs
- 1 teaspoon pure vanilla extract
- 1/2 cup (62g) all-purpose flour
- 3 tablespoons unsweetened cocoa powder
- 1/4 teaspoon baking powder
- 1/4 teaspoon salt
For the Cookie Layer
- 1/2 cup (113g) unsalted butter, softened to room temperature
- 1/2 cup (100g) packed light brown sugar
- 1/4 cup (50g) granulated white sugar
- 1 large egg plus 1 egg yolk — the extra yolk is the chewiness secret
- 1 teaspoon pure vanilla extract
- 1 and 1/4 cups (156g) all-purpose flour
- 1/2 teaspoon salt
- 1/2 teaspoon baking soda
- 1 cup (170g) semi-sweet chocolate chips
Do Not Overmix Either Batter — This Is the Texture Instruction That Matters MostBoth brownie batter and cookie dough develop gluten when the flour is stirred into them. Excess gluten makes the brownie layer tough rather than fudgy and the cookie layer dense and breadlike rather than chewy. For the brownie: stir the flour in by hand with a spatula and stop the moment no dry streaks remain. For the cookie dough: mix the flour in on low speed and stop as soon as it incorporates. Neither batter should ever look completely smooth and over-mixed — a slightly rough, barely-combined appearance is correct for both.
How to Make Brookies Step by Step
Three stages: make the brownie batter, make the cookie dough, layer and bake. Both batters can be made in either order — neither needs to rest before using. The brownie batter will be quite fluid. The cookie dough will be soft and scoopable. Both are correct for their respective layers. Walk through each stage properly and the result will be exactly what brookies promise.
Step 1: Prepare the Pan and Preheat
Preheat the oven to 175°C (350°F). Grease a 9×13-inch (23x33cm) baking pan generously with butter. Line the base and two long sides with a strip of parchment paper, leaving overhangs on each long side. These overhangs act as handles for lifting the finished brookies from the pan for clean slicing on a cutting board rather than cutting in the pan. Grease the parchment lightly too.
Step 2: Make the Brownie Batter
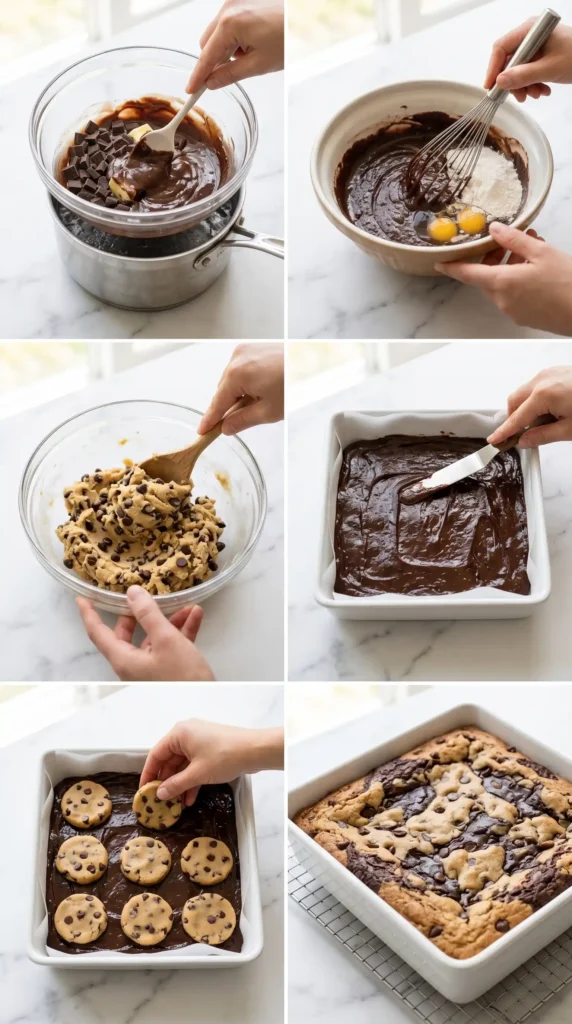
Place the chopped dark chocolate and butter together in a microwave-safe bowl. Microwave on medium power (50%) for 30 seconds. Stir. Microwave for another 20 seconds and stir again. Continue in 15-second intervals at medium power, stirring between each, until the chocolate and butter are completely melted and the mixture looks smooth and glossy. Allow to cool for 5 minutes — adding sugar and eggs to very hot chocolate scrambles the eggs.
Add the granulated sugar to the cooled chocolate-butter mixture and stir with a spatula until combined. Add the eggs one at a time, stirring vigorously after each — vigorous stirring at this stage incorporates a small amount of air and produces the characteristic crackled shiny top on the finished brownie layer. Add the vanilla extract and stir briefly.
Add the flour, cocoa powder, baking powder, and salt to the bowl all at once. Fold together with a spatula using as few strokes as possible — the dry ingredients are fully incorporated when no white flour streaks remain visible throughout the batter. Stop folding immediately at this point. The batter should look thick, glossy, and uniformly dark.
Pour the brownie batter into the prepared pan. Spread it evenly from corner to corner with an offset spatula or the back of a spoon, creating a flat, consistent layer approximately 1.5–2cm deep across the pan. Set the pan aside while you make the cookie dough — do not put it in the oven yet.
Step 3: Make the Cookie Dough
In a large bowl or the bowl of a stand mixer fitted with the paddle attachment, beat the room-temperature softened butter with the brown sugar and white sugar on medium-high speed for 2–3 minutes until the mixture looks pale and fluffy. Properly creamed butter and sugar is important for cookie dough that bakes up chewy rather than dense — the air beaten in during creaming provides the lift that baking soda alone cannot fully deliver.
Add the whole egg and the extra egg yolk to the creamed butter and sugar. Beat on medium speed for about 60 seconds until fully incorporated. The extra yolk provides additional fat that contributes to the characteristic chewiness of the cookie layer — whole egg alone produces a thinner, slightly crispier cookie layer that does not contrast as interestingly with the fudgy brownie base beneath it. Add the vanilla extract and mix briefly.
Add the flour, salt, and baking soda to the bowl. Mix on low speed until just combined — stop as soon as no visible dry flour remains. Fold in the chocolate chips using a spatula or the mixer on the lowest speed. The finished cookie dough should look thick, slightly sticky, and hold its shape when scooped.
Step 4: Layer the Doughs and Bake
The brownie layer is already in the pan. Scoop the cookie dough into rough balls using a tablespoon — each ball approximately the size of a large walnut. Flatten each ball slightly between your palms into a thick disc. Press these cookie dough discs evenly across the top of the brownie batter in the pan, distributing them so they cover most of the surface while leaving small gaps between each piece.
The gaps are important — they allow heat access to the brownie layer below and prevent the cookie dough from forming a sealed top that traps steam and produces a damp, undercooked brownie interior. The cookie dough discs will spread during baking and fill many of these gaps naturally, but starting with visible gaps between pieces ensures the best result.
Slide the pan into the preheated oven on the centre rack. Bake for 35–40 minutes. At the 20-minute mark, cover the pan loosely with aluminium foil to prevent the cookie top from browning too quickly before the brownie interior has cooked through. The finished brookies are done when the cookie top looks deep golden-brown and set, and a toothpick inserted into the brownie portion comes out with a few moist crumbs attached — not wet batter, but not completely dry. The moist crumb stage indicates a fudgy, properly cooked brownie layer. :/
Step 5: Cool Before Slicing
Remove the pan from the oven and allow to cool completely on a wire rack — a minimum of 1 hour, ideally 2 hours. The brownie layer needs this time to set from its baked temperature to a firm, sliceable consistency. Brookies sliced while still warm produce jagged edges where the fudgy brownie tears rather than cutting cleanly. Slice cooled brookies using a sharp knife with a single downward press motion rather than a sawing motion for the cleanest cuts.
Variations Worth Making
Peanut Butter Cookie Top Brookies
Replace the chocolate chip cookie dough layer with a peanut butter cookie dough — substitute 1/4 cup of the flour with 1/4 cup of smooth peanut butter, reduce the butter by 2 tablespoons, and omit the chocolate chips from the cookie layer. The peanut butter cookie on a dark chocolate brownie produces an intense peanut-butter-cup flavour combination that suits anyone who has ever wished Reese’s Cups came in bar form.
Stuffed Brookies
Divide the brownie batter into two halves. Spread the first half in the pan. Spoon small dollops of peanut butter, Nutella, or thick caramel sauce across the first brownie layer. Spread the second brownie layer on top of the filling. Then press the cookie dough pieces over the top brownie layer and bake as directed. The hidden filling creates a molten pocket in the centre of each bar that elevates a standard brookie significantly.
Storage Tips
Store Brookies in an airtight container at room temperature for up to 5 days. They actually improve slightly on days two and three as the brownie layer develops further fudginess and the flavours meld. Keep them in a single layer if possible, or separate layers with parchment paper to prevent sticking. If your kitchen is particularly warm, refrigerate them and allow each slice to come to room temperature for 15 minutes before eating.
Brookies freeze excellently for up to 3 months. Cut cooled brookies into individual bars, wrap each in cling film, and freeze in a zip-lock bag or airtight container. Thaw at room temperature for 45–60 minutes or warm briefly in a microwave for 15–20 seconds for a just-baked warmth. FYI — frozen and slightly warmed brookies are arguably better than room-temperature fresh ones, which is rare and worth knowing.
Frequently Asked Questions
Why are my brookies underbaked in the middle?
The most common cause is insufficient baking time — the brownie layer takes longer to bake through in the centre than at the edges, and the cookie layer on top can look done before the brownie is fully set. Always use the toothpick test in the brownie portion specifically — insert it into the centre of the pan and check for moist crumbs rather than wet batter. If the cookie top looks too dark before the centre is done, cover loosely with foil and continue baking. Oven temperatures vary; some take 42–45 minutes rather than 35–40.
Can I use a box brownie mix instead of making the brownie from scratch?
Yes — and this is a genuinely effective shortcut. Prepare the box brownie mix according to packet instructions for a fudgy result (typically using the minimum liquid quantity rather than the maximum). Spread it as the base layer and top with the homemade cookie dough from this recipe. The from-scratch brownie base produces a more complex, deeper chocolate flavour, but a quality box mix delivers acceptable results significantly faster and suits occasions where time is limited more than quality distinction matters.
Can I make brookies in a smaller pan?
Yes — use an 8×8-inch or 9×9-inch pan for thicker, more luxurious brookies. The increased depth requires a longer baking time — add 8–12 minutes to the standard time and use the toothpick test to confirm doneness rather than relying on timing alone. Reduce the oven temperature by 10°C to 165°C for thicker bars to prevent the top from burning before the dense centre cooks through. The thicker version produces a more dramatically fudgy brownie layer that many people prefer over the standard 9×13 bar.
Should I refrigerate brookies?
Room temperature storage in an airtight container is preferable for up to 5 days — refrigeration slightly firms the brownie layer and makes it taste less fudgy and more dense. If your kitchen is very warm or you live in a humid climate, refrigerate them to prevent the cookie layer from becoming sticky and the brownie from softening too much. Bring refrigerated brookies to room temperature for 15 minutes before eating to restore the intended texture, or warm briefly in the microwave for 10–15 seconds to replicate the fresh-baked experience.
Can I make brookies gluten-free?
Yes. Substitute the all-purpose flour in both the brownie layer and the cookie dough with a 1-to-1 certified gluten-free baking flour blend that contains xanthan gum — the xanthan gum replaces the gluten structure and produces a result very similar to the standard version. Use the same quantities as the regular flour in this recipe. Check that your chocolate chips and cocoa powder are certified gluten-free since some contain traces of gluten from cross-contamination. The baking time may need a 3–5 minute adjustment since gluten-free flours can set slightly differently.
Final Thoughts
These Brookies solve a problem that nobody realised needed solving until they appeared — two baked goods that work independently but work better together in a single pan that produces sixteen bars of genuine dual satisfaction. The fudgy brownie base sets the chocolate intensity. The chewy chocolate chip cookie top provides the textural contrast. The integrated middle layer is what makes every bite genuinely interesting from start to finish.
Make the brownie batter with minimal stirring once the flour goes in. Cream the cookie butter and sugar properly. Press the cookie dough in pieces with gaps between them. Foil the top at the 20-minute mark. Cool completely before slicing. These five decisions produce brookies that deliver exactly what they promise and generate the kind of response from anyone who tries them that confirms the hybrid concept was absolutely the right call all along.
Make a pan tonight. Cut them into bars tomorrow morning after a full overnight rest. Watch them disappear from the plate before you have a chance to photograph them for posterity. That outcome is genuinely inevitable and IMO it is the best possible problem to have from a dessert recipe.

Brookies
Ingredients
Method
- Preheat the oven to 175°C (350°F). Grease a 9×13-inch baking pan generously with butter and line with parchment paper.
- Melt the dark chocolate and butter in a microwave-safe bowl until smooth.
- Cool for 5 minutes, then add sugars and eggs one at a time, stirring vigorously.
- Fold in flour, cocoa powder, baking powder, and salt until just combined.
- Pour brownie batter into prepared pan and spread evenly.
- Cream the softened butter and sugars until light and fluffy.
- Add the egg and extra yolk, mixing until combined.
- Mix in flour, baking soda, and salt until just combined.
- Fold in chocolate chips.
- Scoop cookie dough into discs and place over brownie layer, leaving gaps between.
- Bake for 35-40 minutes, covering with foil at the 20-minute mark.
- Allow brookies to cool completely on a wire rack for at least 1 hour before slicing.


