
Servings: 6 tarts | Prep Time: 20 minutes | Cook Time: 15 minutes | Chill Time: 2 hours | Total Time: ~2 hours 35 minutes
Okay, real talk — the moment I pulled these Creamy Coconut Custard Tarts With Fresh Berries out of the fridge for the first time, I actually gasped. Like an actual, out-loud gasp. They looked almost too pretty to eat. Almost.
If you have ever wanted a dessert that feels fancy but does not require a culinary degree, you have found it. This recipe is creamy, tropical, refreshing, and somehow impressive every single time. Let us get into it.
Why You Will Absolutely Love This Recipe
Have you ever bitten into something and thought, “wait, I made this?” That is exactly what these tarts do to you. The coconut custard filling is silky-smooth with a subtle tropical sweetness. Paired with bright, juicy fresh berries, every bite hits differently.
Here is what makes this recipe a winner:
- Simple, everyday ingredients
- No fancy equipment needed
- Works great for dinner parties or casual weeknight treats
- Stores beautifully in the fridge
IMO, this is one of those recipes that genuinely earns its place in your regular rotation. You will make it once and wonder where it has been your whole life.
Ingredients You Will Need
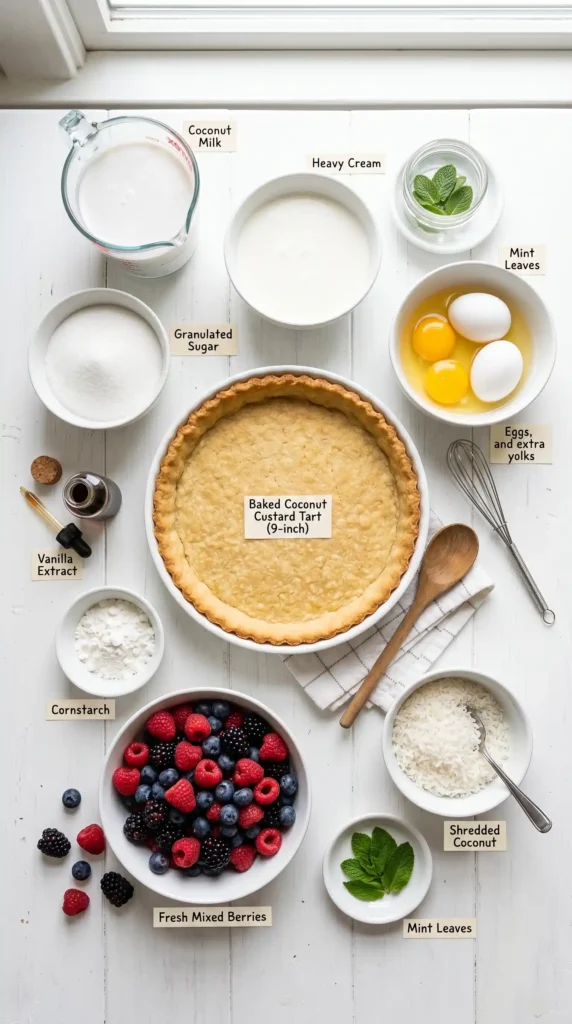
These quantities make 6 individual tarts or one large 9-inch tart. Everything is pretty easy to find at any grocery store.
- 1 cup coconut milk
- 1 cup heavy cream
- 0.5 cup granulated sugar
- 3 large eggs
- 1 teaspoon vanilla extract
- 0.25 cup cornstarch
- 1 pre-made tart shell (store-bought or homemade)
- 1 cup mixed fresh berries (strawberries, blueberries, raspberries — your call)
- Extra shredded coconut for garnish, to taste
- Fresh mint leaves for garnish, to taste
Pro tip: Full-fat coconut milk gives you that rich, creamy texture. Do not swap it for the light version unless you enjoy disappointment
Equipment You Will Need
Nothing wild here. You probably already own all of this:
- Medium saucepan
- Two mixing bowls (one medium, one large)
- Whisk
- Measuring cups and spoons
- Rubber spatula
- Tart shell(s)
- Refrigerator (obviously)
How to Make Creamy Coconut Custard Tarts With Fresh Berries
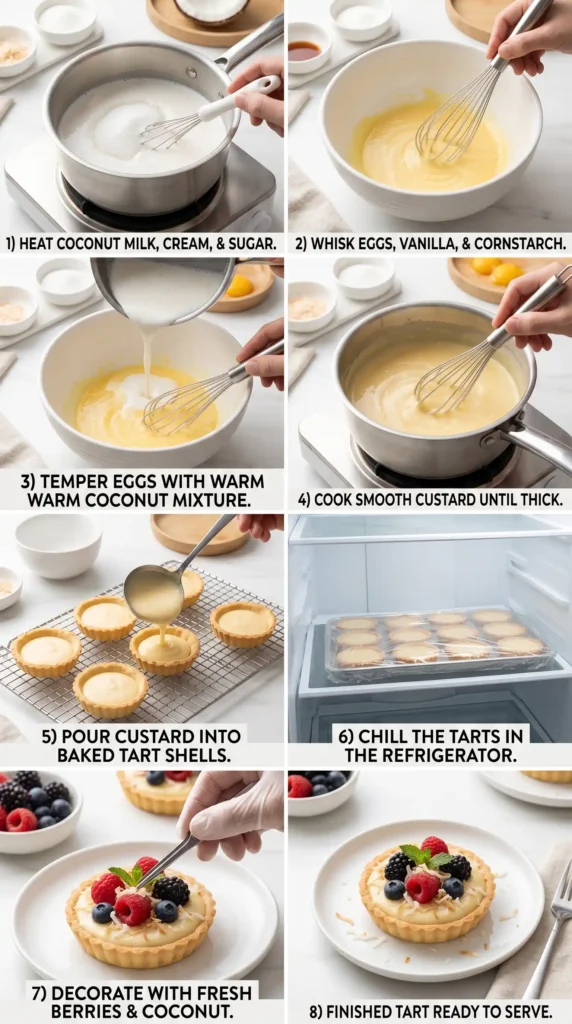
Step 1: Heat the Coconut Milk Base
Grab your medium saucepan and pour in the 1 cup of coconut milk and 1 cup of heavy cream. Add the 0.5 cup of granulated sugar right in there with them.
Place the saucepan over medium heat. Stir the mixture gently and consistently as it heats up. You are not boiling it — you just want the sugar to fully dissolve and the mixture to turn warm and slightly steamy. This usually takes about 4 to 5 minutes. Keep your eyes on it and do not wander off to check your phone.
Step 2: Prepare the Egg Mixture
While the coconut mixture heats, grab a separate bowl. Crack in your 3 large eggs and add the 1 teaspoon of vanilla extract and 0.25 cup of cornstarch.
Whisk these together firmly until the mixture looks completely smooth and pale. No lumps allowed here. The cornstarch is what gives your custard that thick, set consistency — it does the heavy lifting. A minute of solid whisking gets you there.
Step 3: Temper the Eggs Carefully
Here is the step that separates silky custard from scrambled eggs. You need to temper the eggs — which just means slowly raising their temperature so they do not cook too fast and turn lumpy.
Grab a ladle or measuring cup. Scoop a small amount of the warm coconut mixture and pour it very slowly into the egg bowl while whisking non-stop. Add another small pour. Then another. Keep going until you have added about half of the warm mixture. Now your egg mixture is warm enough to combine safely with the rest.
Why does this matter? Because pouring cold eggs directly into hot liquid gives you sweet coconut scrambled eggs. And nobody wants that.
Step 4: Cook the Custard Until Thick
Pour your tempered egg mixture back into the saucepan with the remaining coconut-cream mixture. Set the heat to medium and start stirring. Do not stop stirring. Seriously — constant motion keeps the custard smooth and prevents it from scorching on the bottom.
Watch the custard as it cooks. After about 5 to 7 minutes, you will notice it starting to thicken up noticeably. The moment it coats the back of your spoon and holds a line when you drag your finger through it, you are done. Pull it off the heat right away. Overcooking makes it grainy, and we are not doing that.
Step 5: Cool the Custard Slightly
Set the saucepan aside and let the custard cool down for about 8 to 10 minutes. You do not need it to be cold — just not piping hot. Pouring blazing custard into your tart shell can soften the pastry too quickly. A little patience here pays off big time.
Stir it gently while it cools to prevent a skin from forming on top. If a skin does form, just skim it off. No biggie.
Step 6: Fill the Tart Shell
Place your pre-made tart shell on a flat, stable surface. Pour the warm custard in slowly and use a spatula to spread it evenly all the way to the edges. Fill it right up to just below the rim of the shell. Tap the tart gently on the counter once or twice to release any air bubbles hiding in there.
If you are using individual tart shells, divide the custard evenly among all six. Each one deserves an equal share.
Step 7: Refrigerate Until Set
Cover the tart loosely with plastic wrap or foil. Slide it into the refrigerator and let it chill for at least 2 hours. The custard needs this time to firm up and become sliceable. FYI — overnight chilling actually makes it even better. The flavor deepens and the texture becomes perfectly set.
Resist the urge to peek and poke it every 20 minutes. Trust the process.
Step 8: Top with Fresh Berries
Once the custard has fully set, take the tart out of the fridge. Arrange 1 cup of mixed fresh berries across the top however you like. Go rustic and casual, or go full Pinterest mode with precise little rows. Either way, those berries are going to pop visually against the creamy white custard.
The contrast of the cool, creamy coconut filling and the bright, tart berries is honestly one of the best flavor combinations out there.
Step 9: Garnish and Serve
Sprinkle a small handful of shredded coconut over the top of the berries. This adds a gentle crunch and reinforces that tropical coconut flavor. Tuck in a few fresh mint leaves for color and a clean, fresh aroma.
Slice and serve immediately, or return to the fridge until your guests arrive. This tart holds beautifully for up to 24 hours in the refrigerator.
Tips for the Best Coconut Custard Tarts
Want to take yours from good to genuinely great? Here are a few things I have learned the hard way:
- Use full-fat coconut milk. The fat content is what makes the custard rich and luscious.
- Do not rush the tempering step. Pour slowly, whisk constantly. It takes an extra two minutes but saves the whole dish.
- Chill for the full two hours. Under-chilled custard is runny and sad.
- Add berries right before serving. They release juice over time and can make the top look messy.
- Homemade tart shells work best but store-bought shortcrust shells are a totally respectable shortcut.
Storage Instructions

Got leftovers? Lucky you. Here is how to keep them fresh:
- Refrigerator: Cover tightly and store for up to 3 days. The custard holds up well but the berries may soften slightly.
- Freezer: The custard can be frozen without the berries for up to 1 month. Thaw overnight in the fridge and add fresh toppings before serving.
- Do not leave at room temperature for more than 2 hours — custard is dairy-based and needs to stay cold.
Variations Worth Trying
Once you nail the base recipe for Creamy Coconut Custard Tarts With Fresh Berries, you can play around endlessly. Here are some fun directions to take it:
- Mango + Coconut: Swap the berries for fresh mango slices. Tropical paradise in tart form.
- Chocolate Drizzle: A drizzle of dark chocolate over the berries adds richness and drama.
- Lemon Zest: Stir a teaspoon of lemon zest into the custard for a bright citrus note.
- Toasted Coconut: Toast the shredded coconut garnish in a dry pan for a nuttier, deeper flavor.
- Passion Fruit Glaze: Spoon a thin layer of passion fruit pulp over the set custard before adding berries.
Frequently Asked Questions
Can I make the custard filling ahead of time? Absolutely. You can make the custard up to 2 days ahead and store it covered in the fridge. Just give it a good stir before pouring it into your tart shell, and then chill it again to set properly.
Can I use canned coconut cream instead of coconut milk? Yes, and it actually makes the custard even richer and creamier. Use the same quantity — 1 cup — and reduce the heavy cream slightly if you find it too thick. Coconut cream gives a stronger coconut flavor, which most people love.
Why did my custard turn out lumpy or grainy? This usually happens when the eggs get cooked too fast. Either the tempering step was skipped or rushed, or the heat was too high when cooking the custard. Always use medium heat and stir constantly. If it does turn grainy, you can strain it through a fine mesh sieve to smooth it out.
Can I use a homemade tart shell instead of store-bought? Definitely, and a homemade buttery shortcrust pastry takes this recipe to a whole new level. Just make sure the shell is fully baked and cooled before you pour in the custard. A warm shell can make the base go soggy.
How do I know when the custard is thick enough? The classic spoon test works perfectly. Dip a spoon into the custard and lift it out. Run your finger across the back of the spoon — if the line holds clean and does not run back together, the custard is ready. It should look thick, glossy, and smooth.
Final Thoughts
Creamy Coconut Custard Tarts With Fresh Berries might just be your new go-to dessert for any occasion. They look stunning, taste even better, and honestly require very little effort once you understand the process.
Whether you make one big tart or six little individual ones, the result is always the same — people are impressed, plates are clean, and someone always asks for the recipe. So go ahead and bookmark this one. You will come back to it.

Creamy Coconut Custard Tarts With Fresh Berries
Ingredients
Method
- In a medium saucepan, combine coconut milk, heavy cream, and sugar. Heat over medium, stirring gently until warm.
- In a separate bowl, whisk together eggs, vanilla extract, and cornstarch until smooth.
- Temper the egg mixture by slowly adding warm coconut mixture while whisking constantly.
- Pour the tempered egg mixture back into the saucepan, stirring constantly over medium heat until thickened.
- Allow custard to cool slightly before pouring into the tart shell.
- Cover tart and refrigerate for at least 2 hours until set.
- Top the set custard with fresh berries.
- Garnish with shredded coconut and mint leaves.
- Serve immediately or keep refrigerated until ready to serve.


