Servings: 6 parfaits | Prep Time: 20 minutes | Chill Time: 5 minutes | Total Time: ~25 minutes
All the Campfire Magic, Zero Campfire Required
Raise your hand if you’ve ever wanted s’mores but couldn’t be bothered to build an actual fire. Same. That’s exactly why these S’Mores Parfaits exist — rich chocolate pudding, crunchy graham cracker crumbs, fluffy marshmallows, and whipped topping, all layered beautifully in a cup.
I first threw these together for a family movie night when the kids were begging for something fun. They were gone before the opening credits finished. No baking, no campfire, no drama — just pure, nostalgic dessert joy. Let’s make them.
What You’ll Need: Ingredients for S’Mores Parfaits
Here’s your full ingredient list before you start:
For the Parfaits:
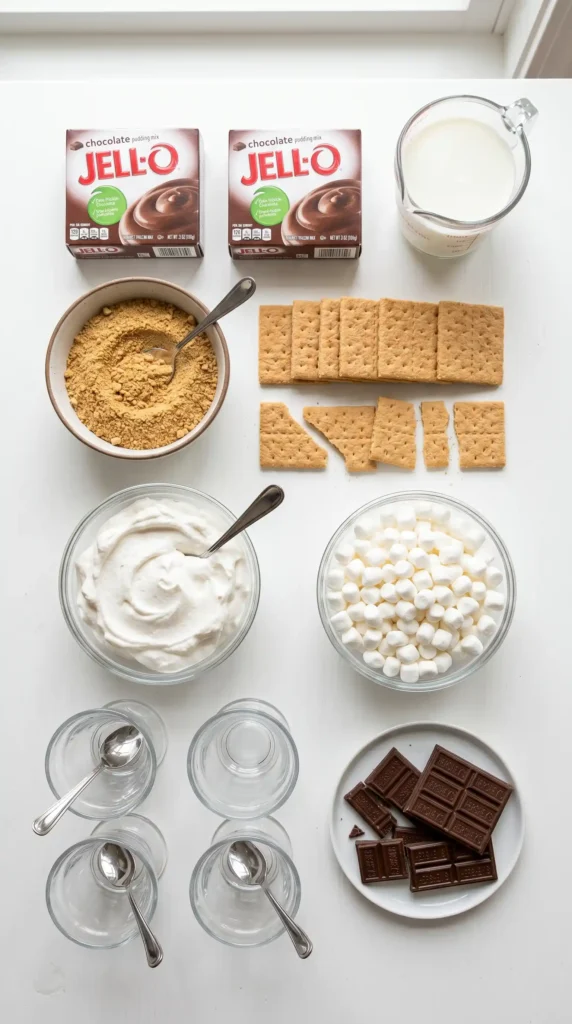
- 2 boxes (3.9 oz each) instant chocolate pudding mix
- 2 cups cold milk
- 2 cups whipped topping (Cool Whip or homemade)
- 2 cups graham cracker crumbs (about 14 full crackers, crushed)
- 1½ cups mini marshmallows
For Garnish:
- 2 full-size Hershey’s chocolate bars, broken into pieces
- 6 small graham cracker pieces (one per cup)
Every single item here comes from a standard grocery store. No specialty ingredients, no expensive equipment — just classic s’mores flavors layered into something that looks way more impressive than the effort it takes.
How to Make S’Mores Parfaits
Step 1: Make the Chocolate Pudding
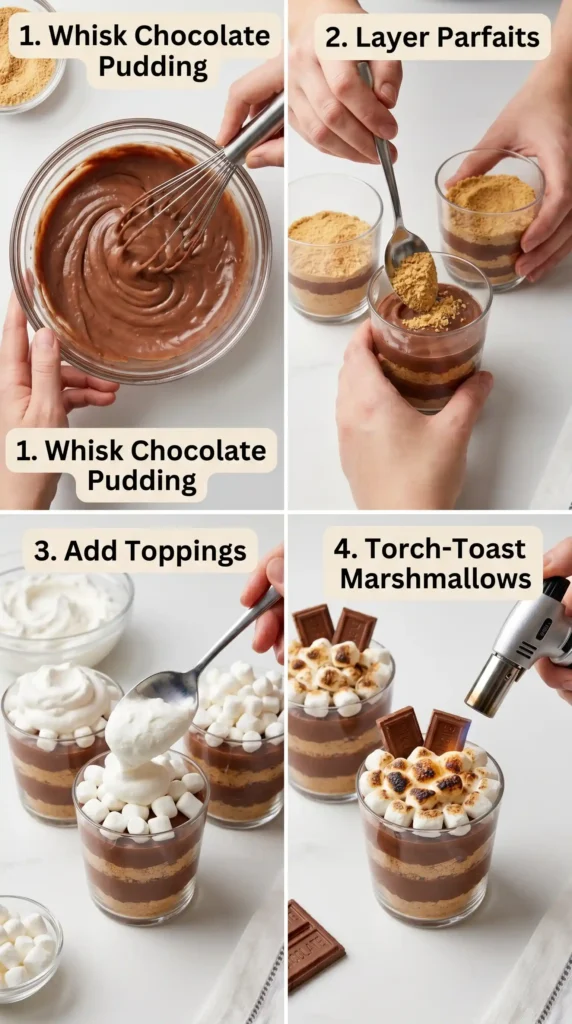
Start by opening both boxes of instant chocolate pudding mix and pouring them into a large mixing bowl. Add 2 cups of cold milk — not warm, not room temperature, cold milk straight from the fridge. Warm milk prevents the pudding from setting properly.
Whisk everything together vigorously for about 2 to 3 minutes. You’ll feel the mixture start to thicken as you go. Keep whisking until it looks smooth, glossy, and completely lump-free. Any dry patches of pudding mix hiding at the bottom of the bowl will create an uneven texture, so scrape the sides and bottom as you whisk.
Once it looks perfectly creamy and uniform, place the bowl in the refrigerator for 5 minutes. This short rest helps the pudding firm up just enough to layer cleanly without sliding all over the place when you assemble the cups.
Step 2: Crush the Graham Crackers
While the pudding chills, grab your graham crackers and get them crushed. The easiest method? Place the crackers inside a large zip-lock bag, seal it, and use a rolling pin to crush them. Roll back and forth with firm, even pressure.
You’re aiming for a mixture of fine crumbs and a few slightly larger bits. The fine crumbs create a sandy base layer while the slightly coarser pieces add a satisfying crunch. Perfectly uniform dust isn’t the goal here — a little texture variation makes each bite more interesting. FYI, a food processor also works great if you want to save some elbow grease.
Set the crumbs aside in a bowl and keep 6 small whole cracker pieces separate — those go on top as garnish at the end.
Step 3: Set Up Your Cups
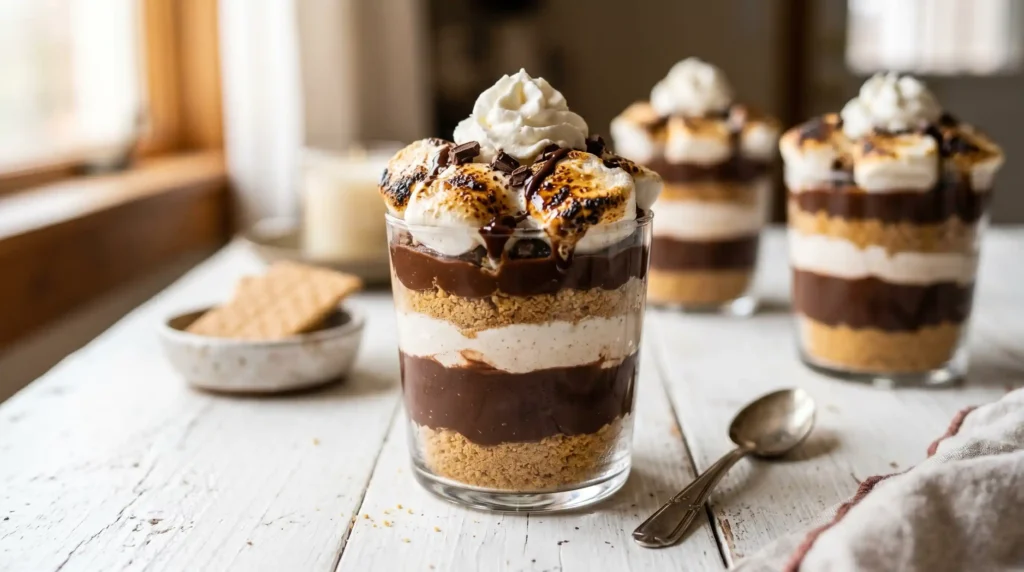
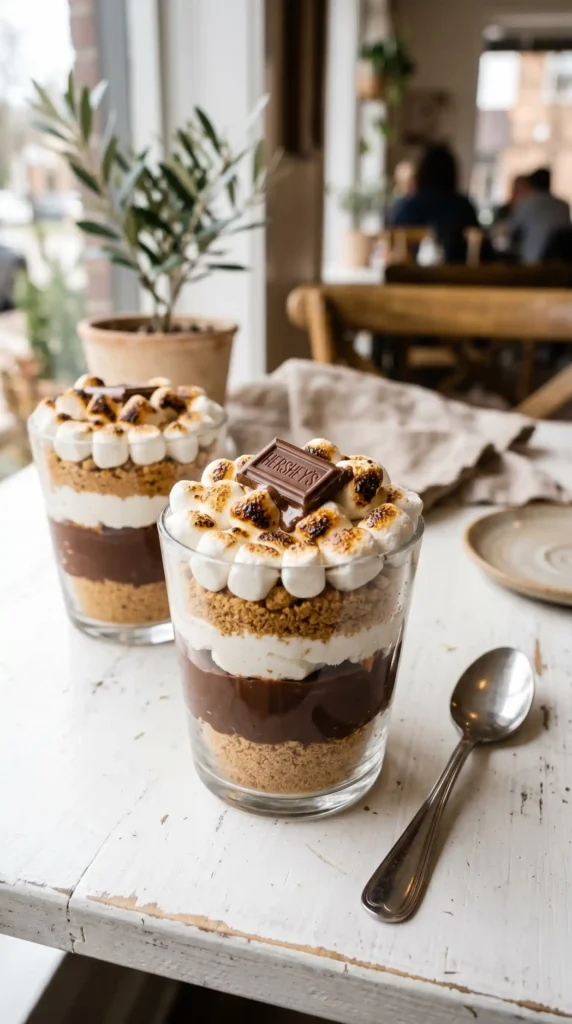
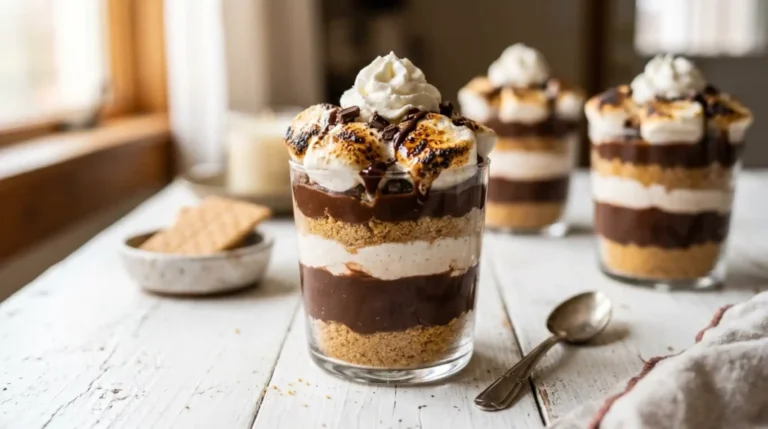
Line up 6 clear plastic cups, mason jars, or any tall dessert glasses you have on hand. Clear containers work best here because the layers are genuinely beautiful and part of the whole appeal of S’Mores Parfaits. Seeing the distinct chocolate, crumb, and white whipped layers stacked up looks incredible.
Give each cup a quick rinse and dry if they’ve been sitting in a cabinet. You want a clean, dry surface so the layers hold their edges and don’t smear against the glass. Arrange all six in a row so assembly moves quickly and smoothly.
Step 4: Build the First Layers
Pull your chilled pudding from the fridge — it should look thick and smooth now. Using a spoon or small cookie scoop, add about 3 tablespoons of chocolate pudding to the bottom of each cup. Spread it out gently so it creates an even base layer.
Next, spoon about 2 tablespoons of graham cracker crumbs over the pudding layer in each cup. Sprinkle them evenly so every bite through the crumb layer hits that buttery, slightly sweet graham flavor. Press down lightly if needed to compact the crumbs a little — this keeps them from mixing into the pudding below.
Now repeat: another 3-tablespoon layer of chocolate pudding over the crumbs. Smooth it out carefully so it covers all the crumbs underneath. You should already see those gorgeous distinct layers forming through the sides of the cup.
Step 5: Add the Whipped Topping Layer
Spoon a generous 2-tablespoon dollop of whipped topping over the second pudding layer in each cup. Use the back of your spoon to spread it gently to the edges, creating an even white layer that contrasts beautifully against the dark chocolate beneath it.
Don’t press down hard — you want to maintain that light, airy texture. The whipped topping layer represents the “cream” element of the s’mores flavor profile, and keeping it fluffy makes all the difference in both texture and visual appeal.
Step 6: Top With Mini Marshmallows
Now pile the mini marshmallows generously on top of the whipped topping in each cup. Use about ¼ cup of mini marshmallows per parfait. Cover the whipped topping completely so every cup looks full and pillowy.
Here’s where it gets fun. If you own a kitchen torch, use it to carefully toast the marshmallows until they turn golden-brown and start to blister slightly. Move the flame in small, steady circles to toast evenly without burning. The smell alone is enough to transport you straight to a campfire.
No kitchen torch? No problem — and no, your phone’s flashlight won’t work. :/ Instead, place the assembled cups (without the chocolate bar garnish) on a baking sheet and put them under your oven broiler for 30 to 60 seconds, watching constantly. Pull them the moment the marshmallows look golden. Just make sure you’re using oven-safe glasses or mason jars if you use the broiler method — not plastic cups.
Step 7: Garnish and Serve Immediately
Add the finishing touches right before serving. Place a piece of Hershey’s chocolate bar on top of each cup — it’ll start to soften slightly against the warm toasted marshmallows, which is exactly the point. Stick one small graham cracker piece upright into the marshmallows for that classic s’mores look.
Serve these S’Mores Parfaits immediately while the marshmallows are still warm and the chocolate is just starting to melt. That contrast between the warm, toasty top and the cold, creamy layers underneath is what makes this dessert genuinely special.
Tips for the Best Results
- Use cold milk for the pudding — it activates the instant mix properly and sets up firmer.
- Don’t over-torch the marshmallows — golden is the goal, not black and ashy.
- Clear cups or mason jars show off the layers best and add to the presentation.
- Assemble close to serving time — graham cracker crumbs soften the longer they sit in the pudding.
- Chill assembled parfaits for up to 2 hours before toasting the marshmallows if you want to prep ahead.
- Double the batch easily — the recipe scales perfectly for larger groups.
Easy Variations
- Peanut Butter S’Mores — add a thin layer of peanut butter between the pudding layers for a Reese’s-inspired twist.
- Vanilla Pudding Version — swap chocolate pudding for vanilla for a lighter, creamier flavor base.
- Gluten-Free — use certified gluten-free graham crackers; everything else in the recipe is already gluten-free.
- Vegan Option — use dairy-free pudding mix with almond or oat milk, and coconut whipped cream instead of Cool Whip.
- Fruit Addition — layer sliced strawberries or bananas between the pudding and crumbs for a fruity twist.
Frequently Asked Questions
Can I make S’Mores Parfaits ahead of time?
You can assemble the layers up to 2 hours ahead and refrigerate. Hold off on toasting the marshmallows and adding the chocolate garnish until right before serving. The crumbs will soften slightly overnight, so same-day assembly always gives the best texture contrast.
What if I don’t have a kitchen torch?
Use your oven broiler on high heat. Place the parfaits in oven-safe glasses on a baking sheet and broil for 30 to 60 seconds, watching every second. Pull them out the moment the marshmallows turn golden. Never use plastic cups under the broiler.
Can I use large marshmallows instead of mini ones?
Yes — just use scissors or a sharp knife to cut regular marshmallows into quarters. They toast a little differently than mini marshmallows and take slightly longer under the torch, but the flavor is identical.
How long do S’Mores Parfaits last in the fridge?
They keep for up to 2 days covered in the fridge, but the graham cracker crumbs lose their crunch after the first day as they absorb moisture from the pudding. For best results, eat them within a few hours of assembly.
Can kids help make these?
Absolutely, and IMO that’s half the fun. Kids can crush the graham crackers, spoon layers, and drop marshmallows on top. Just handle the kitchen torch or broiler step yourself — that part stays in adult territory.
Final Thoughts
These S’Mores Parfaits deliver everything you love about campfire s’mores — the chocolate, the graham cracker crunch, the toasty marshmallows — without any of the actual campfire logistics. They look stunning, taste incredible, and take about 25 minutes start to finish.
Make them for a weeknight treat, a dinner party dessert, or any occasion that calls for something fun and crowd-pleasing. Build them once and they’ll become a regular request. Guarantee it.
S’Mores Parfaits
Ingredients
Method
- Open both boxes of instant chocolate pudding mix and pour them into a large mixing bowl.
- Add 2 cups of cold milk and whisk vigorously for 2 to 3 minutes until thick and lump-free.
- Refrigerate the pudding for 5 minutes to firm up.
- Crush graham crackers by placing them in a zip-lock bag and using a rolling pin to crush them.
- Set the crumbs aside and keep 6 whole pieces for garnish.
- Line up 6 clear cups or mason jars for assembly.
- Add about 3 tablespoons of chocolate pudding to the bottom of each cup.
- Top with approximately 2 tablespoons of graham cracker crumbs.
- Repeat another layer of chocolate pudding (3 tablespoons) over the crumbs.
- Spoon a generous 2-tablespoon dollop of whipped topping over the pudding layer.
- Pile mini marshmallows generously on top of the whipped topping, about ¼ cup per parfait.
- Toast the marshmallows using a kitchen torch or broil under the oven for 30 to 60 seconds until golden.
- Add a piece of Hershey's chocolate on top of each parfait and a small graham cracker piece upright in the marshmallows.
- Serve immediately while the marshmallows are warm and the chocolate is melting.


