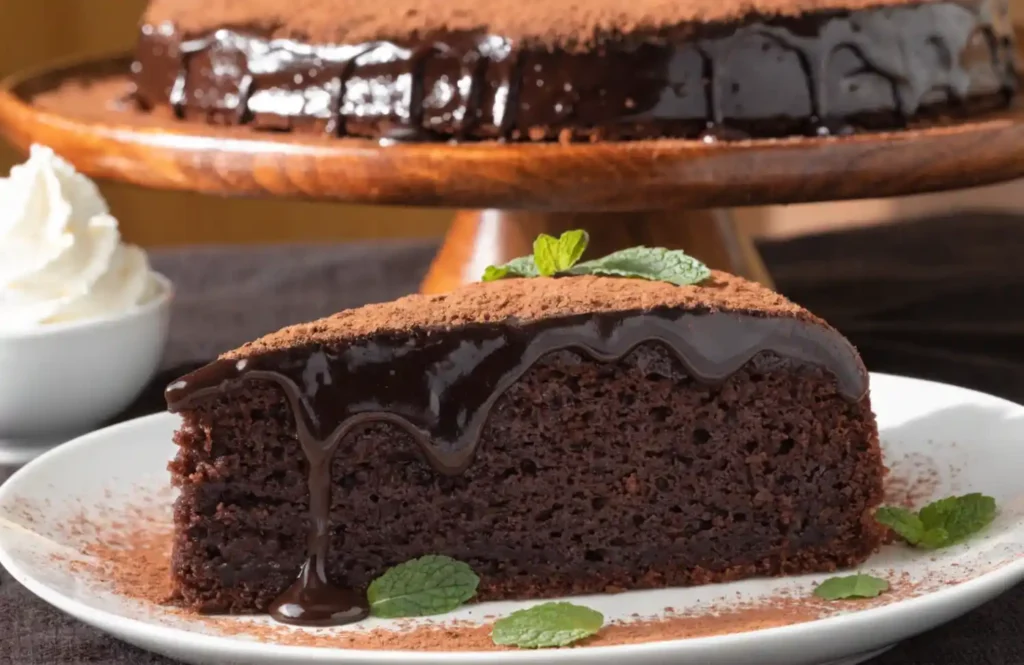
Ever bitten into a cake that’s so moist and decadent you swear it contains butter and sugar in equal parts? That’s what awaits you with this almond flour chocolate cake recipe. I’m obsessed with how simple yet impressive this dessert truly is.
Why This Almond Flour Chocolate Cake Works So Well
Here’s the thing about almond flour chocolate cakes—they defy all baking expectations. Most people assume gluten-free baking means dry, crumbly disasters. Wrong.
Almond flour naturally contains oils that keep your cake impossibly moist. The protein content also creates a tender crumb without any bouncy texture. Have you ever wondered why some bakers swear by almond flour for chocolate desserts? There’s real science behind it.
The chocolate flavor deepens significantly when combined with the subtle nutty notes from almond flour. This combination creates complexity that plain wheat flour simply cannot match. Honestly, FYI, once you try this version, regular chocolate cake becomes forgettable.
The Essential Ingredients You’ll Need
Let me break down exactly what goes into this magic cake. These quantities make one 9-inch round cake serving approximately 8-10 people.
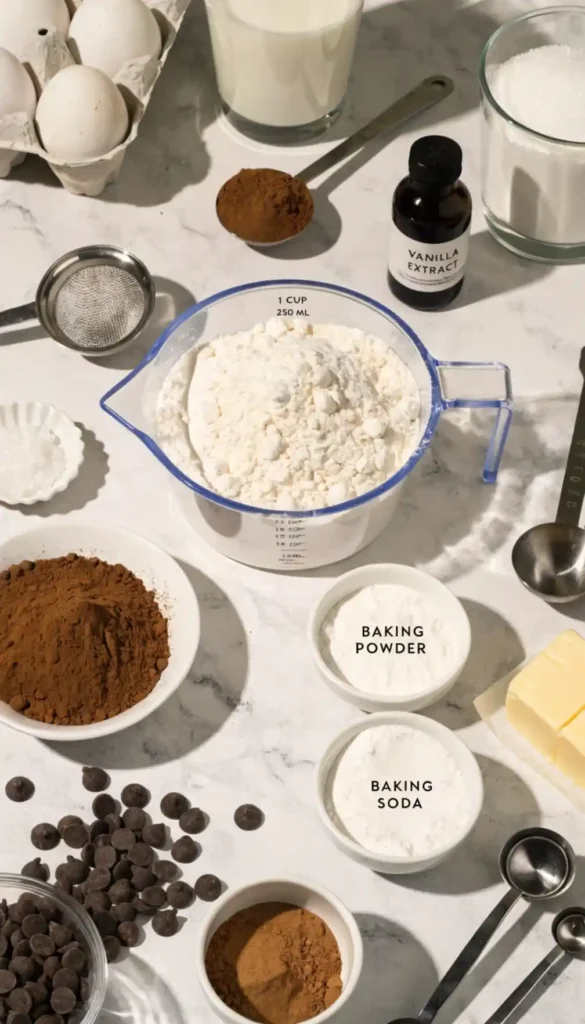
Dry Ingredients:
- 2 cups almond flour (finely ground)
- 3/4 cup cocoa powder (unsweetened, high quality)
- 1/2 cup all-purpose flour (or additional almond flour for fully gluten-free)
- 1 3/4 cups granulated sugar
- 2 teaspoons baking powder
- 1/2 teaspoon baking soda
- 1/2 teaspoon sea salt
- 1/2 teaspoon ground cinnamon (optional but recommended)
Wet Ingredients:
- 3 large eggs (room temperature works best)
- 1/2 cup vegetable oil or coconut oil
- 3/4 cup whole milk or almond milk
- 2 teaspoons vanilla extract
- 1/2 cup hot water or strong brewed coffee
Optional Additions:
- 1/2 cup dark chocolate chips
- 2 tablespoons additional cocoa powder for topping
The beauty of this recipe lies in its flexibility. You can swap ingredients based on dietary preferences without compromising results.
Understanding Why Each Ingredient Matters
Almond flour serves as your structural foundation here. It provides moisture, richness, and binding power that regular flour cannot offer alone. The natural oils prevent the dense, dry texture people associate with gluten-free baking.
Cocoa powder delivers that deep chocolate flavor while keeping fat content reasonable. Use high-quality cocoa for noticeably better results. Seriously, the difference between standard and premium cocoa is dramatic.
Eggs act as binders and create lift when beaten properly. Room temperature eggs incorporate more air, resulting in a lighter crumb structure. Cold eggs straight from the refrigerator won’t blend as smoothly.
The combination of oil and milk creates richness without heaviness. This balance keeps your cake moist for days after baking. Have you noticed how some cakes dry out overnight? This one maintains moisture like a dream.
Hot water or coffee intensifies chocolate flavor while adding moisture. The heat also helps cocoa powder fully dissolve into the batter. This simple trick elevates the chocolate experience dramatically.
Preparing Your Kitchen and Equipment
Gather everything before you start mixing. Mise en place—the French principle of having ingredients ready—prevents mistakes and keeps you organized.
You’ll need mixing bowls, measuring cups and spoons, an electric mixer or whisk, a 9-inch round cake pan, parchment paper, and an oven thermometer. Seriously, invest in an oven thermometer. Many ovens run hot or cold without the baker knowing.
Preheat your oven to 350°F about fifteen minutes before baking. Position the rack in the center of your oven for even heat distribution. This prevents the top from browning too quickly while the center remains undercooked.
Grease your pan generously with butter or cooking spray, then line the bottom with parchment paper. This simple step guarantees easy removal every single time. Nothing worse than a cake stuck permanently in its pan.
The Detailed Step-by-Step Making Process
Combining Your Dry Ingredients
Start by whisking together almond flour, cocoa powder, all-purpose flour, baking powder, baking soda, sea salt, and cinnamon in a large mixing bowl. Whisk for about one minute to distribute leavening agents evenly throughout the dry ingredients.
Why whisk instead of simply mixing? Whisking incorporates air and ensures the baking powder and baking soda distribute uniformly. Uneven distribution leads to lopsided rising and inconsistent texture throughout your cake.
Set this mixture aside for now. You’ll incorporate it into the wet ingredients soon, but keeping them separate prevents premature activation of leavening agents.
Preparing Your Wet Ingredients
Crack three room-temperature eggs into a separate mixing bowl. Add the vegetable oil or coconut oil to the eggs. Beat this combination on medium speed for approximately two minutes until well incorporated and slightly pale.
The eggs and oil mixture should look creamy and light when ready. This aeration creates tiny air pockets that expand during baking, yielding a tender crumb. Skipping this step produces a denser, heavier cake.
Add your vanilla extract to the egg mixture and beat for another thirty seconds to combine fully. The vanilla should distribute evenly throughout the mixture.
Combining Wet and Dry Components
Alternate adding your dry ingredient mixture and milk to the egg mixture, beginning and ending with dry ingredients. Add about one-third of the dry mixture first, then half the milk, then another third of dry, the remaining milk, and finally the last of the dry mixture.
Mix on low speed after each addition, stirring just until combined. Overmixing develops gluten, which toughens your cake and creates a dense crumb. You want smooth incorporation without aggressiveness.
After adding all ingredients, gently stir in the hot water or strong coffee by hand. The batter will look thinner than typical cake batter—this is completely normal and necessary for moisture.
Final Batter Preparation
Fold in dark chocolate chips if using them. These add bursts of richness and texture throughout each slice. Folding rather than stirring preserves those air pockets you created earlier.
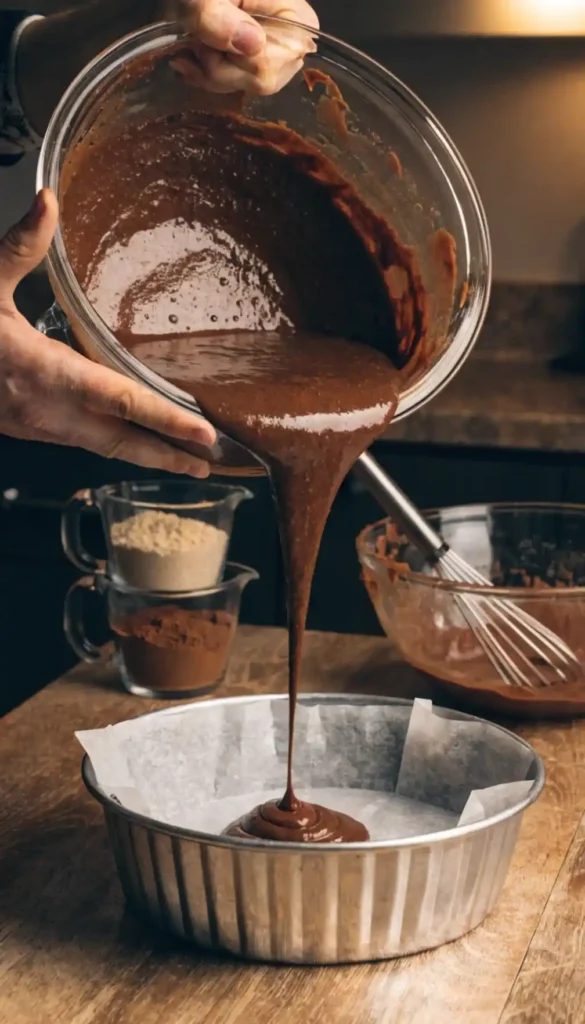
Your final batter should look smooth, glossy, and pourable. It resembles thick brownie batter more than traditional cake batter. This consistency ensures the characteristic moisture almond flour cakes are known for.
Baking Your Masterpiece
Pour the batter into your prepared 9-inch pan, smoothing the top with a spatula. The batter should reach approximately halfway up the sides of your pan. Don’t overfill, as the cake will rise during baking.
Place the pan in your preheated 350°F oven on the center rack. Bake for approximately 35-40 minutes, depending on your oven’s accuracy. The cake is done when a toothpick inserted into the center comes out with just a few moist crumbs clinging to it.
Don’t remove the cake when a few chocolate chips stick to your toothpick—that’s completely different from underbaked batter. You want a set, springy cake that bounces back when lightly pressed.
Cooling and Setting
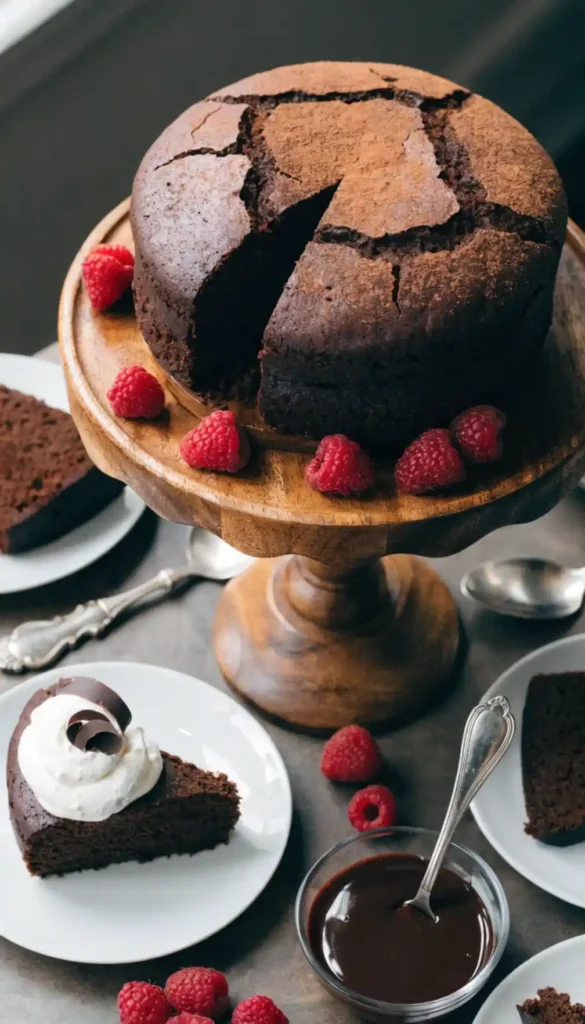
Remove the cake from the oven and let it cool in the pan for fifteen minutes. This resting period allows the crumb structure to set without breaking apart when you flip it.
Run a thin knife around the edges to loosen the cake from the pan sides. Carefully invert the cake onto a cooling rack and peel away the parchment paper. The cake should release easily if you greased properly.
Let your almond flour chocolate cake cool completely on the rack before frosting or serving. This typically takes about one hour. Frosting a warm cake causes the frosting to melt and slide off unevenly.
Storage and Serving Suggestions
Store your finished cake in an airtight container at room temperature for up to three days. The cake actually tastes better on day two as flavors meld overnight.
You can refrigerate for up to five days or freeze for up to three months. Wrap carefully in plastic wrap and then aluminum foil to prevent freezer burn. Thaw at room temperature before serving.
Pair with whipped cream, chocolate ganache, or simple vanilla buttercream frosting. The moist crumb structure supports heavy frostings beautifully.
Why Almond Flour Beats Regular Flour for Chocolate Cake
Regular flour creates drier cakes that require constant moisture management. Almond flour’s natural oils eliminate this problem entirely.
The protein structure in almond flour differs from wheat, creating tenderness without requiring special techniques. You won’t develop tough gluten networks accidentally.
IMO, almond flour chocolate cakes offer superior flavor complexity compared to traditional recipes. The subtle nuttiness complements chocolate in ways that plain flour simply cannot match.
Variations to Elevate Your Almond Flour Chocolate Cake
Add espresso powder to intensify chocolate flavor without adding sweetness. Use one tablespoon of espresso powder mixed into your cocoa powder.
Create a mocha version by replacing regular milk with strong brewed coffee. This deepens the chocolate experience dramatically.
Top with a raspberry layer between cake and frosting for fruity contrast. The tartness balances richness beautifully.
Swirl in peanut butter batter for a chocolate-peanut butter combination. Chocolate and peanut butter remain an unbeatable pairing.
Frequently Asked Questions About Almond Flour Chocolate Cake
Can I use store-bought almond flour instead of grinding my own?
Absolutely. Store-bought almond flour works perfectly and saves preparation time. Just ensure you purchase finely ground almond flour, not almond meal. The particle size matters significantly for texture.
What happens if my cake comes out dry?
Dry almond flour cakes usually result from overbaking or too much almond flour relative to wet ingredients. Reduce baking time by five minutes next attempt. Check for doneness starting at thirty-five minutes instead of forty.
Can I make this recipe dairy-free?
Yes, substitute almond milk or oat milk for regular milk without adjusting quantities. Use coconut oil instead of vegetable oil. Everything else remains unchanged.
Does almond flour chocolate cake work for people with nut allergies?
No, this recipe centers entirely on almond flour. People with tree nut allergies must avoid this dessert. Sunflower seed flour offers a texture alternative for those with allergies.
How do I prevent a sunken center?
A sunken center indicates underbaking or oven temperature inaccuracy. Use an oven thermometer to verify actual temperature. Underbaked cakes sink as they cool because the center lacks structural integrity.

Almond Flour Chocolate Cake
8-10
servings385
kcal1
hour55
minutesThis almond flour chocolate cake delivers incredibly moist, tender crumbs through natural oils in almond flour combined with quality cocoa powder. The recipe balances dry and wet ingredients perfectly, creating a gluten-free dessert that surpasses traditional chocolate cakes. Bake at 350°F for 35-40 minutes, then cool completely before serving. Store for up to three days at room temperature or freeze for later enjoyment. Perfect for celebrations or simple indulgences.
Ingredients
2 cups almond flour (finely ground)
3/4 cup cocoa powder (unsweetened)
1/2 cup all-purpose flour
1 3/4 cups granulated sugar
2 teaspoons baking powder
1/2 teaspoon baking soda
1/2 teaspoon sea salt
1/2 teaspoon ground cinnamon (optional)
3 large eggs (room temperature)
1/2 cup vegetable oil or coconut oil
3/4 cup whole milk or almond milk
2 teaspoons vanilla extract
1/2 cup hot water or strong brewed coffee
1/2 cup dark chocolate chips (optional)
2 tablespoons cocoa powder for topping (optional)
Directions
- Preheat oven to 350°F
- Grease and line 9-inch cake pan with parchment paper
- Whisk almond flour, cocoa powder, all-purpose flour, baking powder, baking soda, salt, and cinnamon together
- Beat room-temperature eggs and oil on medium speed for two minutes
- Add vanilla extract to egg mixture
- Alternate adding dry ingredients and milk to wet ingredients, starting with dry
- Mix gently until just combined after each addition
- Stir in hot water or coffee by hand
- Fold in chocolate chips if using
- Pour batter into prepared pan
- Bake for 35-40 minutes until toothpick comes out with moist crumbs
- Cool in pan for fifteen minutes
- Invert onto cooling rack carefully
- Remove parchment paper
- Cool completely for about one hour before frosting or serving
Final Thoughts
This recipe transforms what could be a mediocre gluten-free experience into something genuinely special. The combination of almond flour and quality chocolate creates a dessert that impresses everyone, regardless of dietary restrictions.
You’ve learned why each ingredient matters, how proper technique creates results, and how flexibility allows personal customization. Stop treating almond flour chocolate cake recipes as inferior alternatives and start celebrating them as superior creations.
Your next gathering deserves this cake. Your family deserves this cake. Honestly, you deserve this cake right now. Go preheat that oven.