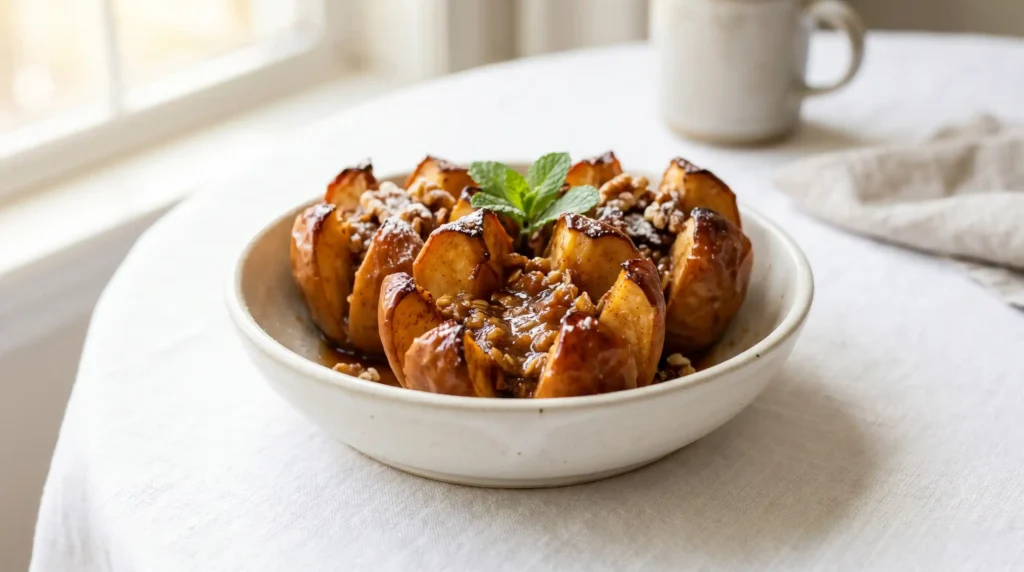
Servings: 4 | Prep Time: 15 minutes | Bake Time: 35 to 40 minutes | Total Time: About 55 minutes
The Apple Dessert You Did Not Know You Needed
Okay, hear me out. What if you could take a regular apple, score it into a blooming flower shape, stuff it with a brown sugar cinnamon filling, and bake it until it is soft, caramelized, and absolutely breathtaking? That is exactly what Bloomin Baked Apples are.
I made these for the first time on a rainy Sunday when I was bored and had a bag of apples sitting on the counter. Let me tell you, I was not prepared for how impressive the final result looked with virtually zero effort involved.
These apples look like you spent hours on them. You did not. And that gap between effort and result is honestly my favorite thing about this recipe. Want a showstopper dessert with pantry staples? Keep reading.
What Exactly Are Bloomin Baked Apples
Think of them like the dessert cousin of a bloomin onion. You score the apple all the way around in a pattern that allows the sections to spread open as they bake, creating a stunning flower-like appearance that is as fun to eat as it looks.
Each apple opens up into a bloom as it softens in the oven, revealing layers of warm cinnamon-spiced filling tucked between the petals. The result is tender, juicy, and packed with cozy fall flavor in every single bite.
Have you ever put something in the oven that looked plain and pulled out something gorgeous? That is the Bloomin Baked Apples experience in a nutshell. They work for dinner parties, holiday tables, or a Tuesday night when you want something special.
Everything You Need to Make Bloomin Baked Apples
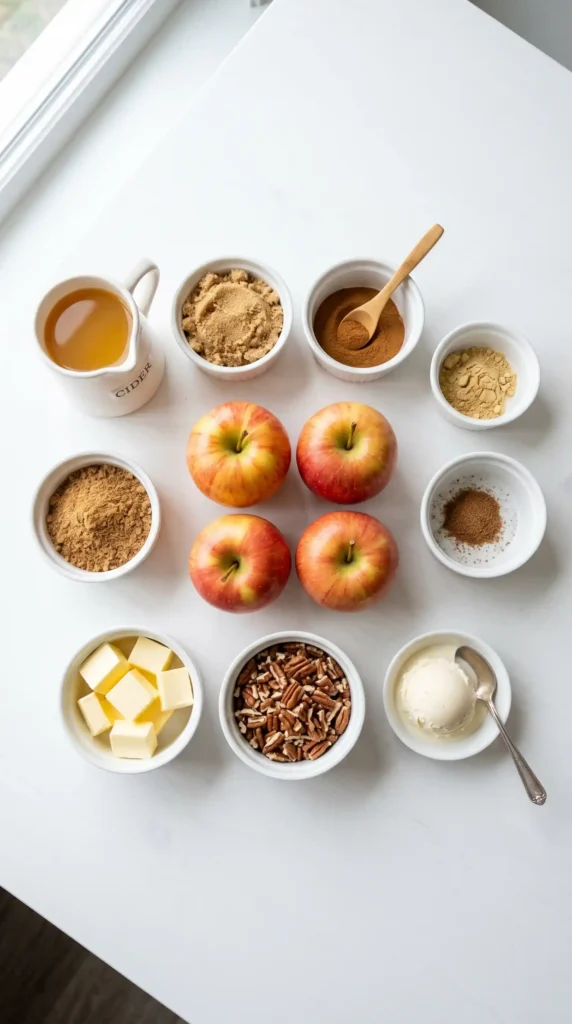
Good news: you probably already have most of this in your kitchen. The ingredient list is short, simple, and completely approachable. Here is exactly what you need to make 4 servings.
For the Apples
- 4 large firm apples (Honeycrisp, Fuji, or Granny Smith work best)
- 2 tablespoons unsalted butter, cut into small cubes
For the Brown Sugar Cinnamon Filling
- 1/3 cup packed light brown sugar
- 1 teaspoon ground cinnamon
- 1/4 teaspoon ground nutmeg
- 1/8 teaspoon ground ginger
- 1 pinch of salt
For the Baking Liquid
- 1/2 cup apple cider or apple juice
- 1 tablespoon unsalted butter, melted
For Serving (Optional but Highly Recommended)
- Vanilla ice cream or whipped cream
- Caramel sauce for drizzling
- Chopped pecans or walnuts for crunch
Which Apple Works Best and Why It Matters
Apple choice makes a real difference here. You need a firm variety that holds its shape through the entire baking process without turning to mush. Soft apples like McIntosh will collapse before they even bloom properly, which is a sad outcome for everyone involved.
- Honeycrisp: The best overall choice. Firm, sweet, slightly tart, and holds its shape beautifully through baking.
- Fuji: Sweet and dense with a sturdy texture. Great if you want less tartness.
- Granny Smith: The tart option. Pairs brilliantly with the sweet filling for a balanced flavor contrast.
- Braeburn: A solid runner-up with a sweet-spicy flavor that works really well with cinnamon.
IMO, Honeycrisp is the clear winner every time. The texture stays perfectly tender without going mushy, and the natural sweetness plays really well with the brown sugar filling.
How to Make Bloomin Baked Apples Step by Step
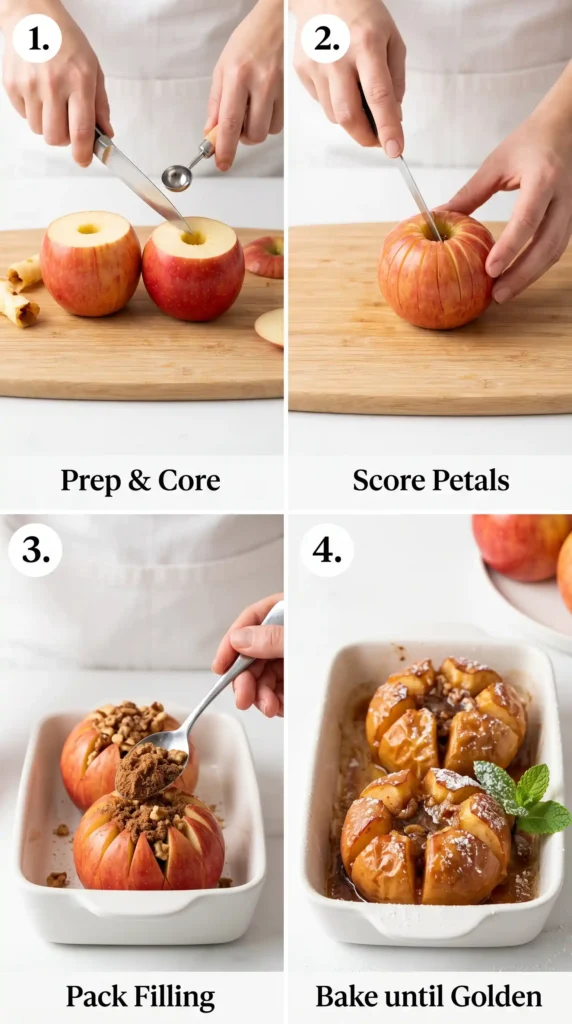
Let us walk through the whole process together. Each step here matters, so take your time and do not rush. The prep is where the magic happens, and I want to make sure every step makes complete sense before you start.
Step 1: Preheat Your Oven and Set Up Your Baking Dish
Start by preheating your oven to 375 degrees Fahrenheit (190 degrees Celsius). Give the oven a full 10 to 15 minutes to come up to temperature before you put anything in. A properly preheated oven ensures even baking from the very start.
While the oven heats up, get out a baking dish that fits all 4 apples snugly but with a little space between each one. A 9×13 inch baking dish works well. Having the apples close together helps them steam gently as they bake, which contributes to that perfectly tender texture.
Step 2: Wash and Dry the Apples
Give each apple a thorough rinse under cold running water. Use your hands or a soft brush to scrub off any wax coating or residue, especially if they came from a grocery store. Then dry each apple completely with a clean kitchen towel.
Dry apples are important here because any moisture on the surface can prevent the butter from adhering properly when you brush it on later. This small step takes about 30 seconds per apple but genuinely makes a difference to the final result.
Step 3: Slice Off the Tops and Remove the Core
Using a sharp knife, slice about half an inch off the top of each apple. Set the tops aside; you will not need them anymore, but they make a cute little snack while you work. Make sure your cut is as level as possible so the apple sits flat.
Now use a melon baller or a small sturdy spoon to scoop out the core from the top, going down about three-quarters of the way into the apple. You want to create a generous well for the filling without punching all the way through the bottom.
Removing the seeds and core entirely is important because you do not want any bitter seed flavor in your final bite. Take your time with this step and make the cavity wide enough to hold a good amount of filling. Bigger is better here.
Step 4: Score the Apples Into a Bloomin Pattern
This is the most fun part of the whole recipe, and honestly the step that makes Bloomin Baked Apples look so spectacular. Place each apple on your cutting board and hold it steady with one hand while you score with the other.
Using a sharp paring knife, make vertical cuts down the outside of each apple from just below the rim all the way to just above the base. Space the cuts about half an inch apart all the way around the apple. You should end up with roughly 8 to 12 cuts per apple depending on its size.
Then make a single horizontal cut around the entire middle of the apple, about halfway down, connecting all your vertical cuts. This creates the individual petal sections that will open up beautifully during baking. Work slowly and stay consistent with your spacing.
Do not cut all the way through the bottom. Leave about half an inch of apple at the base intact. This keeps the whole structure together and gives the bloom something to hold onto as it opens in the oven. Think of the base as the stem of your flower.
Step 5: Mix the Brown Sugar Cinnamon Filling
Combine the 1/3 cup of packed light brown sugar, 1 teaspoon of ground cinnamon, 1/4 teaspoon of ground nutmeg, 1/8 teaspoon of ground ginger, and a pinch of salt in a small bowl. Stir everything together until it looks uniform with no clumps of sugar left.
Smell that mixture for a second. Go ahead. That warm, spiced caramel scent is exactly what is going to bake into your apples and make your whole kitchen smell like the best possible version of autumn. Worth appreciating before it goes in the oven.
Step 6: Fill the Apples Generously
Place your scored apples into the baking dish. Spoon the brown sugar filling into the hollowed-out center of each apple first, pressing it down gently with the back of your spoon to pack it in. Fill each cavity right to the top.
Then take extra filling and use your fingers or a small spoon to work it down between the scored petal sections all the way around each apple. Gently pry each petal section open slightly with your fingers to create space, then push filling into those gaps.
The more filling you tuck between the petals, the more flavor you get in every bite. Do not be shy with this step. Use every last bit of the filling mixture across all four apples and make sure it gets into every crevice you scored.
Step 7: Add the Butter Pieces on Top
Take your 2 tablespoons of cubed unsalted butter and place a few small pieces right on top of each apple, nestled into the filling. As the butter melts in the oven, it will run down through the scored sections and baste the petals from the inside out.
This butter is not optional if you want that glossy, caramelized finish on the outside of each petal. The fat from the butter helps the brown sugar melt into a rich toffee-like coating that clings to the apple rather than dripping straight off. Trust the butter.
Step 8: Add the Baking Liquid to the Dish
Mix together the 1/2 cup of apple cider and 1 tablespoon of melted butter in a small bowl. Pour this mixture directly into the bottom of the baking dish around the apples, not over them. This liquid creates steam during baking and keeps the apples moist.
The apple cider adds another layer of apple flavor and contributes to the pan sauce that forms at the bottom of the dish during baking. That pan sauce is liquid gold. You can spoon it over the apples when you serve them for even more flavor.
Step 9: Cover and Bake
Cover the baking dish tightly with aluminum foil. This traps steam inside and allows the apples to cook evenly and thoroughly from all sides. Place the dish in your preheated 375 degree oven and bake for 25 minutes covered.
After 25 minutes, carefully remove the foil. You will already see the petals starting to open and the filling beginning to caramelize. This is when things start getting exciting. Continue baking uncovered for another 10 to 15 minutes until the apples are fully tender and the tops are golden and slightly caramelized.
Test doneness by inserting a skewer or thin knife into the thickest part of an apple. It should slide through without any resistance at all. If you feel any firmness, give the apples another 5 minutes and test again. Underbaked apples are a letdown after all this effort.
Step 10: Rest, Plate, and Serve
Pull the dish out of the oven and let the apples rest for 5 minutes before serving. This resting time lets the filling settle and thicken slightly so it does not run everywhere the moment someone picks up their spoon.
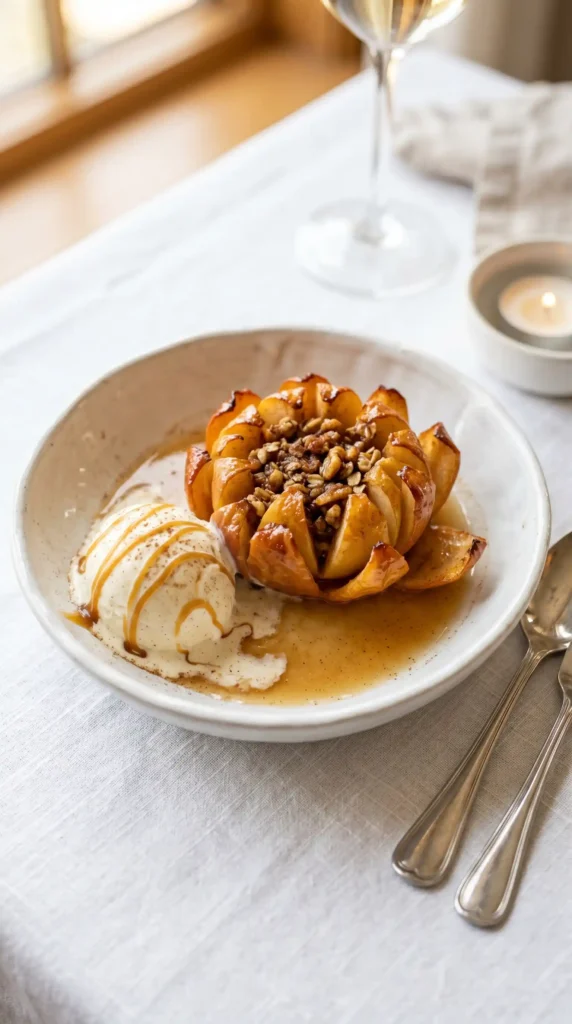
Carefully transfer each bloomin baked apple to a serving bowl using a large spoon. Spoon some of the pan sauce from the baking dish over each apple. Add a scoop of vanilla ice cream right alongside the warm apple, drizzle with caramel sauce, and sprinkle with chopped pecans if you want that crunchy contrast.
Serve immediately while the apples are still warm and the ice cream is just starting to melt into all those caramelized crevices. That melting ice cream meeting warm spiced apple is genuinely one of the better things you can eat.
Tips That Make a Real Difference
A handful of small adjustments can take these from good to genuinely unforgettable. Here are the ones that I have found actually matter.
- Use a very sharp paring knife: Dull knives make scoring difficult and uneven. Sharp knives give you clean, consistent cuts.
- Pack in the filling: More filling between the petals means more flavor in every bite. Do not hold back.
- Do not skip the baking liquid: It creates steam, prevents drying out, and builds that pan sauce.
- Pick similar-sized apples: Uniform sizes mean they all finish baking at the same time.
- Rest before serving: Five minutes of resting makes the filling thicker and easier to eat.
Storing and Reheating Bloomin Baked Apples
These honestly taste best fresh out of the oven. That said, leftovers keep well. Store any extras in an airtight container in the refrigerator for up to 3 days. The texture will soften further overnight but the flavor stays great.
Reheat in a 325 degree oven for about 10 minutes or microwave for 60 to 90 seconds until warmed through. FYI, reheating in the oven gives a better result because it revives some of the caramelized texture that the microwave tends to soften away.
FAQs About Bloomin Baked Apples
1. Can I make Bloomin Baked Apples ahead of time?
Yes. You can score and fill the apples up to 4 hours before baking, then cover the dish and refrigerate until you are ready. Add 5 extra minutes to the baking time if you pull them straight from the fridge. This makes them great for dinner parties where prep time is limited.
2. What apples should I avoid for this recipe?
Avoid soft apple varieties like McIntosh, Cortland, or Golden Delicious. These apples break down too quickly in the oven and you will end up with apple sauce instead of a blooming apple with structure. Stick with firm varieties like Honeycrisp, Fuji, or Granny Smith.
3. Can I add other fillings inside the apples?
Absolutely. Chopped walnuts or pecans mixed into the filling add great texture. Raisins or dried cranberries tucked between the petals add little bursts of sweetness. A tablespoon of cream cheese pressed into the bottom of the cavity before the sugar filling creates a rich, cheesecake-like center that is genuinely incredible.
4. My apple petals are not opening up during baking. What went wrong?
This usually means the scoring cuts were not deep enough or were spaced too far apart. The cuts need to go almost all the way through the apple skin and flesh, with only the very base left intact. Next time, make your cuts deeper and closer together for a more dramatic bloom.
5. Can I make this recipe without butter?
You can substitute coconut oil for the butter if needed. Use the same quantities and it works reasonably well. The flavor will be slightly different with a mild coconut undertone, but the caramelizing and basting effect still happens. For a fully dairy-free version, use coconut oil throughout and it holds up :/
6. Can I use a different sweetener instead of brown sugar?
Coconut sugar works as a direct swap and gives a slightly more complex, molasses-forward flavor. Maple sugar is another great option. Plain white granulated sugar also works but lacks the depth and caramel notes that make brown sugar so ideal for this recipe. Avoid liquid sweeteners like honey as they make the filling too runny.
Make These This Weekend
The Bloomin Baked Apples recipe is one of those rare finds where the effort is minimal and the reward is massive. A sharp knife, a bag of apples, and a few pantry staples are all that stand between you and one of the prettiest desserts you will ever serve.
Warm spiced apple, caramelized brown sugar filling, melting vanilla ice cream, and a drizzle of caramel sauce. Every element works together and every bite rewards you. This is comfort food that also happens to look stunning on the table.
Make them for guests and watch everyone reach for their phones before they reach for their spoons. Make them just for yourself on a quiet evening because you deserve a beautiful dessert on a regular Tuesday too. Either way, get those apples scored and get them in the oven.
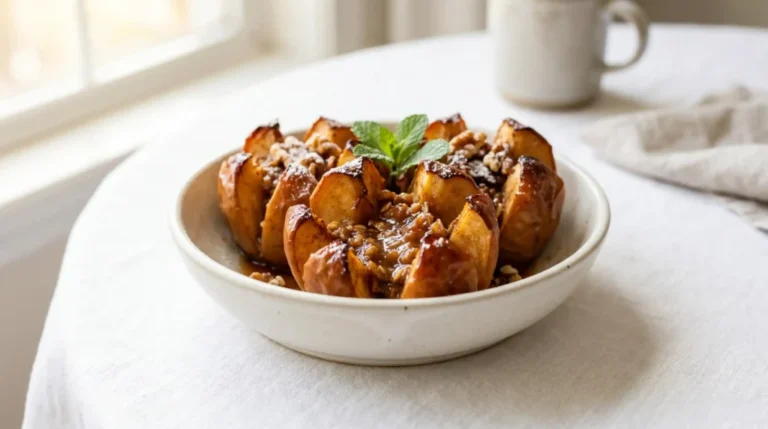
Bloomin Baked Apples
Ingredients
Method
- Preheat your oven to 375°F (190°C) and prepare a baking dish.
- Wash and dry the apples thoroughly.
- Slice off the tops of the apples and remove the core to create a well.
- Score the apples in a blooming pattern without cutting all the way through.
- Mix the brown sugar filling ingredients together in a bowl.
- Generously fill each apple with the brown sugar mixture.
- Place butter pieces on the top of each apple.
- Prepare the baking liquid by mixing apple cider and melted butter and pour into the baking dish.
- Cover the dish with aluminum foil and bake for 25 minutes.
- Remove foil and bake for an additional 10 to 15 minutes until tender and caramelized.
- Let the apples rest for 5 minutes before serving.
- Serve warm with pan sauce, and top with ice cream, caramel sauce, and chopped nuts.



