These little flavor bombs are about to become your new party MVP. Crispy, spicy, creamy, and dangerously addictive – buffalo chicken stuffed mini peppers check every box.
I brought these to one Super Bowl party and got asked for the recipe 11 times. True story.
Prep Time: 20 minutes
Cook Time: 25 minutes
Total Time: 45 minutes
Servings: 12 stuffed pepper halves (6 whole peppers)
Why These Stuffed Peppers Are Total Game-Changers
Here’s the thing about most appetizers – they’re either delicious but a pain to make, or easy but boring. These stuffed mini peppers manage to be both simple and spectacular.
The sweet mini peppers balance the spicy buffalo sauce perfectly. That contrast is what makes people keep reaching for more.
Unlike traditional buffalo wings, these give you all that flavor without the mess. No sticky fingers, no pile of bones, just pure enjoyment.
Plus, they’re naturally gluten-free and low-carb. Your keto friends will worship you for bringing these to the party.
The Ingredients That Make Magic Happen
Let me break down what you need for these bad boys. Nothing fancy or hard to find, I promise.
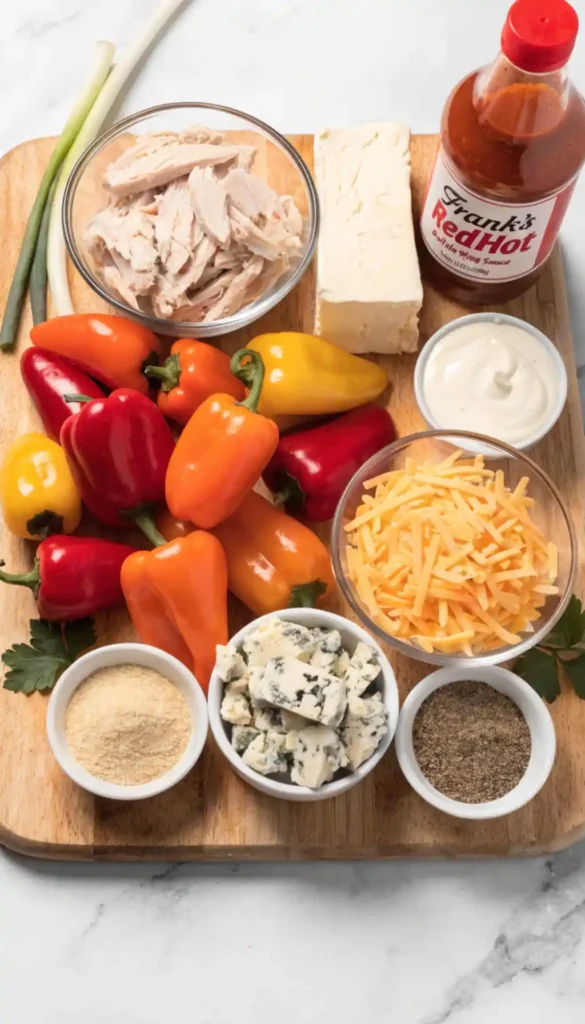
For the Filling:
- 2 cups cooked chicken breast, shredded
- 4 ounces cream cheese, softened
- ½ cup buffalo sauce (Frank’s RedHot works great)
- ½ cup shredded cheddar cheese
- ¼ cup ranch dressing
- 2 green onions, finely chopped
- ½ teaspoon garlic powder
- ¼ teaspoon black pepper
For the Peppers:
- 6 large mini sweet peppers (or 12 small ones)
- ½ cup crumbled blue cheese (optional but recommended)
- 2 tablespoons chopped fresh parsley
Now For Serving:
- Extra ranch or blue cheese dressing
- Celery sticks
- Carrot sticks
Choosing Your Peppers: Size Matters
You want those colorful mini sweet peppers, not the spicy jalapeños. Unless you’re trying to burn everyone’s face off, in which case, go wild.
Look for peppers about 3-4 inches long. They should be firm with smooth, glossy skin. Avoid any with wrinkles or soft spots.
The color mix is partly aesthetic. Red, yellow, and orange peppers all taste the same – sweet and mild. Pick whatever looks prettiest to you.
I usually grab a bag that has mixed colors. Makes the final presentation way more Instagram-worthy, and yes, that matters. 🙂
Preparing Your Chicken: Options Galore
Let’s talk chicken prep. You’ve got several routes here, all perfectly valid.
Rotisserie Chicken Method: Grab a rotisserie chicken from the grocery store. Shred the breast meat. Done in 5 minutes. This is my go-to for lazy days.
Poached Chicken Method: Simmer chicken breasts in water for 15-20 minutes. Let cool, then shred. Super moist results, totally worth the extra time.
Leftover Method: Use yesterday’s grilled or baked chicken. Waste not, want not. This might be the most flavorful option honestly.
Make sure your chicken is completely cooled before mixing with other ingredients. Hot chicken melts the cream cheese too much and creates soup.
Making the Buffalo Chicken Filling
This is where the magic happens. Grab a medium mixing bowl and let’s build some flavor.
Add your softened cream cheese first. Room temperature is crucial – cold cream cheese creates lumps nobody wants.
Pour in the buffalo sauce and ranch dressing. Mix these together until smooth and creamy. The ranch mellows the buffalo heat perfectly.
Fold in the shredded chicken, cheddar cheese, and green onions. Make sure everything gets evenly distributed throughout the mixture.
Add garlic powder and black pepper. Taste and adjust seasoning. Want it spicier? Add more buffalo sauce. Too spicy? More ranch or cream cheese.
The filling should hold together well but still be creamy. Not dry, not soupy – just right, like Goldilocks approved it.
Prepping the Mini Peppers
Preheat your oven to 375°F. Trust me, do this now before you forget and wonder why nothing’s cooking later.
Wash and dry your peppers thoroughly. Any water left on them creates steam during baking, which makes them soggy.
Cut each pepper in half lengthwise. Slice from stem to tip for the most stable boats.
Scoop out all the seeds and membranes with a small spoon. Get in there and clean them out completely.
Those white ribs inside? Remove them too. They’re bitter and add nothing good to the party.
Lay your pepper halves cut-side up in a baking dish. They should fit snugly without too much space between them.
Stuffing Your Peppers Like a Pro
Here’s where patience pays off. You want each pepper generously filled but not overflowing everywhere.
Use a small spoon to scoop filling into each pepper half. Pack it in there firmly – no wimpy portions allowed.
Mound the filling slightly above the pepper rim. It will settle during baking, so don’t be shy.
IMO, overstuffed peppers are never a problem. Understuffed ones are sad and disappointing though.
Press the filling down gently to eliminate air pockets. This helps everything cook evenly and prevents the filling from falling out.
Leave about ⅛ inch at the top if you’re adding blue cheese. Otherwise, fill them completely to the brim.
The Blue Cheese Question
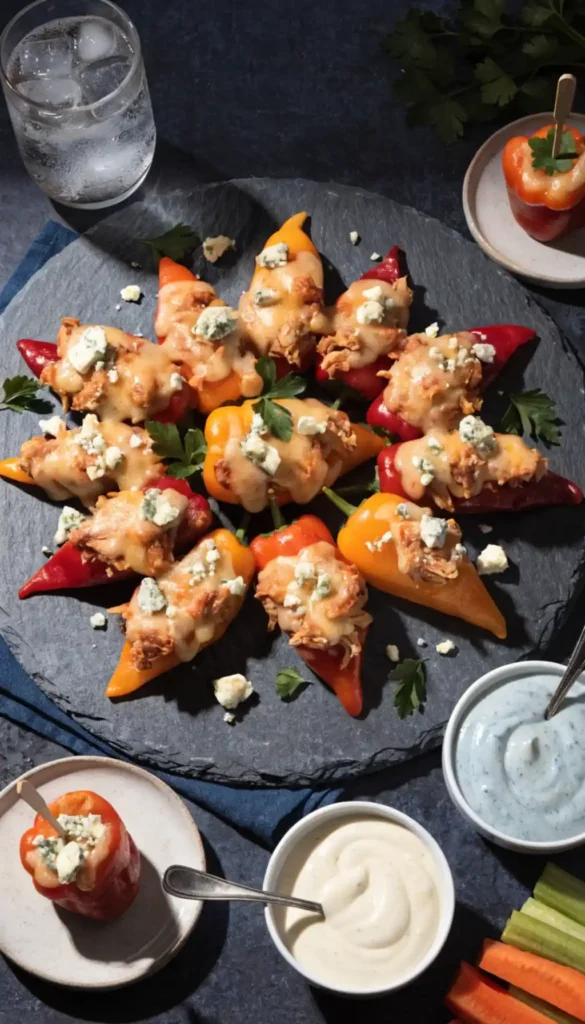
Let’s address the controversy: blue cheese or ranch? I’m firmly team blue cheese, but I respect ranch people too.
If using blue cheese, sprinkle crumbles over the top of each stuffed pepper. Don’t bury it in the filling – you want that sharp, tangy flavor on top.
The blue cheese gets slightly melty and creates this incredible crust. It’s next-level good.
Not a blue cheese fan? Skip it entirely or use extra cheddar instead. Your peppers, your rules.
Baking to Crispy, Melty Perfection
Slide your baking dish into that preheated 375°F oven. Set a timer for 20 minutes and resist the urge to peek.
The peppers should soften but still hold their shape. You want them tender-crisp, not mushy baby food texture.
The filling should be bubbly and golden on top. The cheese will melt and brown slightly around the edges.
Total baking time runs 20-25 minutes depending on pepper size. Smaller peppers need less time, bigger ones need more.
Want extra crispy tops? Turn on the broiler for the last 2 minutes. Watch carefully – they go from perfect to burnt fast.
Cooling and Serving Strategy
Pull those beauties from the oven. Let them cool for 5 minutes before serving. This isn’t optional – molten buffalo filling burns mouths.
The filling needs time to set up slightly. Right out of the oven, it’s too loose and will slide out everywhere.
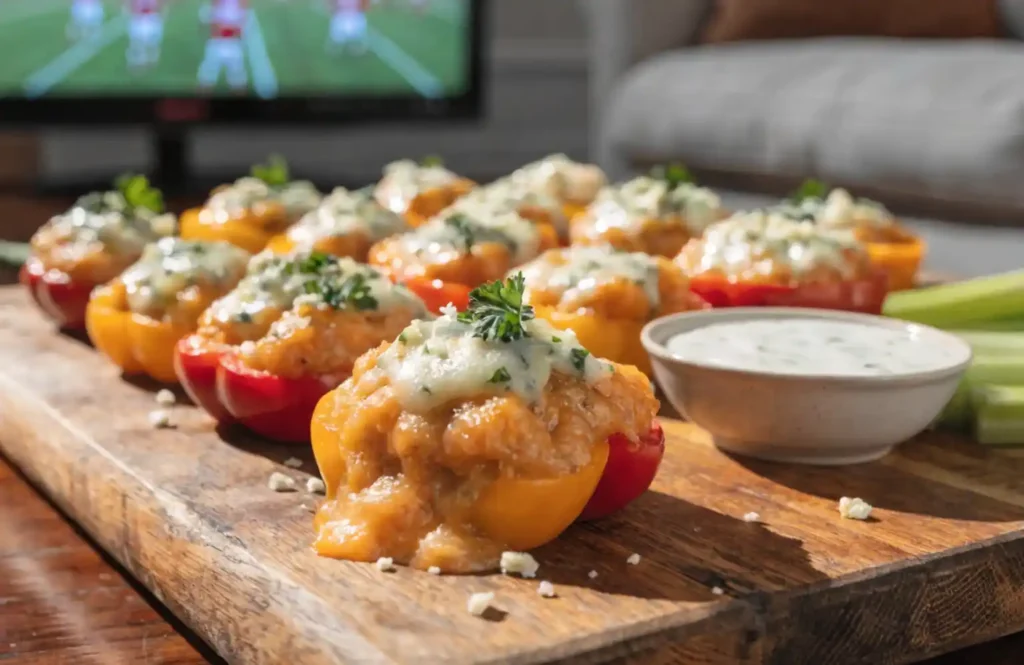
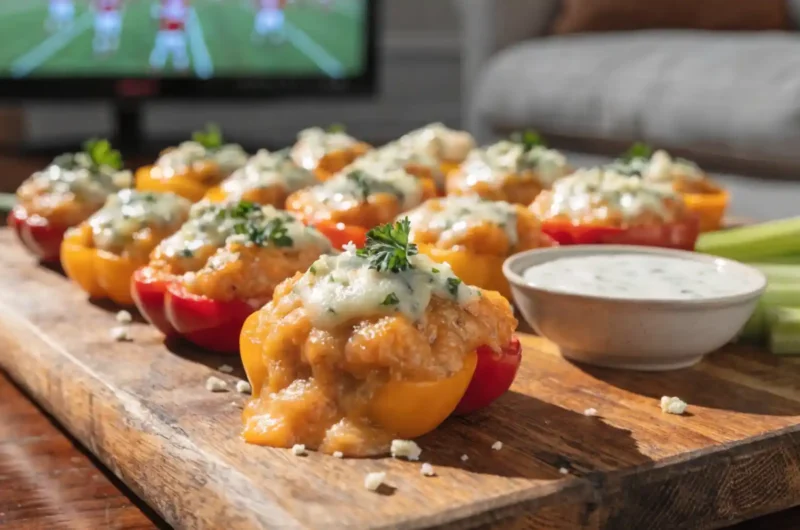
Transfer to a serving platter using a spatula. Arrange them colorful-side up for maximum visual impact.
Garnish with chopped fresh parsley. This adds a pop of green and makes them look fancy.
Serve with ranch or blue cheese dressing on the side for dipping. Some people want extra sauce – accommodate them.
Make-Ahead Magic for Busy Hosts
Want to prep these ahead? Absolutely doable. Let me share my tested strategies.
Day Before: Prepare the filling completely. Store in an airtight container in the fridge. Prep and stuff peppers, cover tightly, refrigerate overnight.
Morning Of: Stuff the peppers and refrigerate until party time. Bake fresh when guests arrive. Your house will smell amazing.
Freezer Option: Freeze stuffed peppers before baking. Add 10-15 minutes to baking time when cooking from frozen.
Just don’t bake them ahead and try to reheat. They get soggy and sad. Nobody wants sad peppers. :/
Variations That Actually Work
These buffalo chicken stuffed peppers are perfect as-is. But sometimes you want to shake things up.
BBQ Chicken Version: Replace buffalo sauce with BBQ sauce. Add bacon bits to the filling. Use mozzarella instead of cheddar.
Ranch Lovers: Double the ranch in the filling. Skip the buffalo sauce entirely. Add dill and chives.
Extra Spicy: Mix in diced jalapeños with the filling. Use extra-hot buffalo sauce. Top with pepper jack cheese.
Bacon Addition: Crumble cooked bacon into the filling. Everything’s better with bacon. This is science.
What to Serve Alongside
These stuffed peppers work as appetizers or light meal. Here’s what pairs perfectly with them.
Crispy celery and carrot sticks balance the richness. Plus, they’re traditional buffalo accompaniments.
A simple green salad cuts through the cheese and sauce beautifully. Keep the dressing light and fresh.
Tortilla chips or crackers work for people who want something crunchy. FYI, Ritz crackers are weirdly amazing with these.
Beer is the obvious beverage pairing. A crisp lager or light IPA complements the spice perfectly.
Storage and Reheating Tips
Leftover stuffed peppers keep in an airtight container for 3-4 days refrigerated. They’re great cold or reheated.
Reheat in a 350°F oven for 10-12 minutes until warmed through. Microwave works but makes them soggy.
Don’t freeze after baking. The peppers get mushy and weird. Trust me, I learned this the hard way.
The filling can be frozen separately though. Thaw overnight in the fridge before using.
Common Mistakes to Avoid
Let me save you from the errors I made perfecting this recipe.
Using Regular Bell Peppers: Too big and too thick-walled. Mini sweet peppers are essential for the right pepper-to-filling ratio.
Skipping the Cream Cheese: Some recipes use all buffalo sauce. That’s just spicy chicken salad in a pepper. The cream cheese creates that creamy, luxurious texture.
Overbaking: Mushy peppers are sad peppers. They should still have structure and a slight bite.
Cold Filling: Room temperature filling spreads easier and bakes more evenly. Take the cream cheese out early.
Why Homemade Beats Store-Bought
Pre-made stuffed peppers from stores taste like cardboard with mystery filling. Hard pass on those.
Making these yourself takes 45 minutes total. That’s less time than driving to a store and back.
You control the spice level, cheese type, and filling ratio. Customization is impossible with pre-made versions.
The cost is maybe $12 for 12 peppers. Store versions charge $8-10 for maybe 6 peppers with inferior filling.
Perfect for Every Occasion
Game day is the obvious choice. These disappear faster than you’d believe at Super Bowl parties.
Potlucks love these. They’re easy to transport and arrive looking beautiful.
Holiday gatherings appreciate having a non-sweet appetizer option. Not everything needs to be cookies.
Meal prep works too. Make a double batch and eat them throughout the week.
Have you noticed how versatile these little guys are? That’s part of their genius.
Nutritional Benefits Worth Noting
These aren’t health food, but they’re not terrible either. Plenty of protein from the chicken and cheese.
The peppers add vitamin C and fiber. That counts for something, right?
Low-carb and gluten-free means most dietary restrictions are covered. Keto people especially love these.
Each pepper half has roughly 80-100 calories. That’s reasonable for an indulgent appetizer.
Final Thoughts on Pepper Perfection
Buffalo chicken stuffed mini peppers prove that the best recipes are often the simplest. Six ingredients create something people request repeatedly.
The combination of sweet peppers, spicy buffalo, and creamy cheese hits every flavor note. It’s balanced, satisfying, and completely addictive.
These make you look like a culinary genius with minimal effort. I’m not above taking credit for an easy recipe.
So grab those peppers and get stuffing. Your taste buds will thank you, and so will everyone at your next party.
Buffalo Chicken Stuffed Mini Peppers: Game Day Perfection in Every Bite
12
servings85
kcal45
minutesBuffalo chicken stuffed mini peppers combine shredded chicken, cream cheese, buffalo sauce, and cheddar cheese in sweet mini pepper halves. Baked until bubbly and golden, these low-carb appetizers deliver all the flavors of buffalo wings without the mess. Perfect for parties, game days, or meal prep with optional blue cheese topping.
Ingredients
2 cups cooked chicken breast, shredded
4 oz cream cheese, softened
½ cup buffalo sauce
½ cup shredded cheddar cheese
¼ cup ranch dressing
2 green onions, finely chopped
½ tsp garlic powder
¼ tsp black pepper
6 large mini sweet peppers
½ cup crumbled blue cheese (optional)
2 tbsp chopped fresh parsley
Extra ranch or blue cheese for serving
Directions
- Preheat oven to 375°F
- Shred or chop cooked chicken breast into small pieces
- Mix softened cream cheese, buffalo sauce, and ranch until smooth
- Fold in shredded chicken, cheddar cheese, and green onions
- Add garlic powder and black pepper, mix well
- Wash and dry mini peppers thoroughly
- Cut peppers in half lengthwise from stem to tip
- Remove all seeds and white membranes from inside
- Arrange pepper halves cut-side up in baking dish
- Spoon filling generously into each pepper half
- Pack filling firmly and mound slightly above rim
- Sprinkle blue cheese crumbles on top if using
- Bake for 20-25 minutes until peppers are tender
- Optional: broil 2 minutes for crispy tops
- Cool 5 minutes before serving
- Garnish with fresh parsley and serve with extra dressing
FAQs
Can I use regular bell peppers instead of mini peppers? You can, but the ratio gets off. Regular bell peppers are much bigger and thicker, requiring longer cooking time. Cut them into quarters rather than halves, and increase baking time to 30-35 minutes for best results.
How spicy are these stuffed peppers? They’re moderately spicy – about the same heat level as buffalo wings. The cream cheese and ranch mellow the buffalo sauce significantly. For milder versions, use less buffalo sauce or mix in more ranch dressing.
Can I make these vegetarian? Absolutely! Replace the chicken with riced cauliflower or chopped mushrooms. Sauté them first to remove excess moisture, then mix with the cream cheese and buffalo sauce exactly as written.
What if I don’t have buffalo sauce? Mix ¼ cup hot sauce with 2 tablespoons melted butter and 1 teaspoon white vinegar. This creates homemade buffalo sauce that works perfectly in this recipe.
Do these need to be served hot? They’re best served warm, but room temperature works too. The filling firms up as it cools, making them easier to eat with your hands. Avoid serving them cold straight from the fridge though.