Servings: 4 | Prep Time: 10 minutes | Cook Time: 30 minutes | Total Time: ~40 minutes
If you’ve never cooked with pepperoncini before, tonight is the night that changes. This creamy pepperoncini chicken skillet takes a single pan and turns it into something genuinely special — tangy, savory, rich, and ready in about 40 minutes from start to finish.
I discovered this recipe when I had a jar of pepperoncini in the back of my fridge and no clear dinner plan. Threw them into a cream sauce with some seared chicken thighs and accidentally made one of the best things I’d eaten all month. It’s been in my regular rotation ever since.
Why Pepperoncini Deserves a Spot in Your Cooking
Most people only know pepperoncini as the little pepper sitting forgotten on a deli plate. That’s a shame. These mild, tangy peppers bring a bright acidity and gentle heat to dishes that’s genuinely hard to replicate with anything else.
In a cream sauce, they do something magical. The tang cuts through the richness of the cream and balances the savory chicken perfectly. The result doesn’t taste spicy — it tastes complex. That’s exactly what makes the creamy pepperoncini chicken skillet so much more interesting than your standard cream sauce chicken.
What Pepperoncini Actually Taste Like
If you’re new to this ingredient, here’s a quick flavor profile:
- Heat level — very mild, closer to a banana pepper than a jalapeño
- Flavor — bright, tangy, slightly vinegary with a subtle sweetness underneath
- Texture in sauces — softens beautifully during cooking without falling apart completely
- Brine — the liquid in the jar is also useful; a splash into the sauce adds depth instantly
- Versatility — works in Italian-style dishes, sandwiches, pasta, and exactly this kind of skillet
IMO, pepperoncini is one of the most underused pantry ingredients in home cooking — and this recipe fixes that completely.
Ingredients You’ll Need
This recipe uses one skillet and a focused ingredient list. Everything here pulls its weight in the final dish.
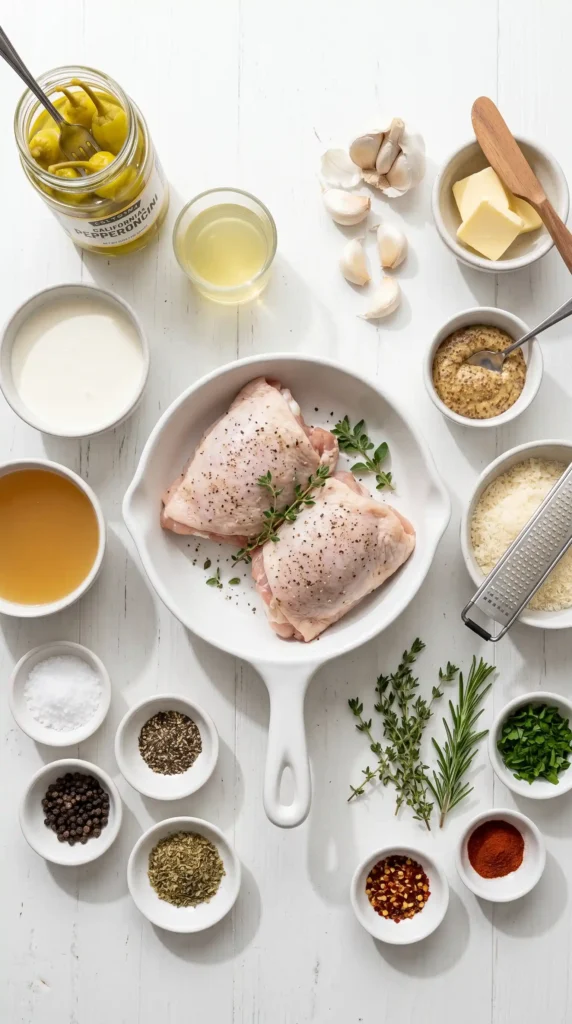
For the Chicken
- 4 bone-in, skin-on chicken thighs (about 2 pounds total)
- 1 teaspoon garlic powder
- 1/2 teaspoon onion powder
- 1/2 teaspoon smoked paprika
- 1/2 teaspoon salt
- 1/4 teaspoon black pepper
- 1 tablespoon olive oil
For the Creamy Pepperoncini Sauce
- 3 cloves garlic, minced
- 1/2 cup sliced pepperoncini peppers (from a jar, drained but reserve the brine)
- 2 tablespoons pepperoncini brine (from the jar)
- 1 cup chicken broth
- 1 cup heavy cream
- 1 teaspoon Dijon mustard
- 1/2 teaspoon dried Italian seasoning
- 1/4 teaspoon red pepper flakes (optional, for extra heat)
- 2 tablespoons unsalted butter
- 1/4 cup freshly grated Parmesan cheese
- Salt and black pepper to taste
- Fresh parsley, chopped, for garnish
How to Make Creamy Pepperoncini Chicken Skillet Step by Step

Let’s go through every stage carefully. This is a one-skillet recipe, which means the order of steps and the residual fond (the browned bits left in the pan) all contribute to the final sauce flavor. Don’t rush any of it.
Step 1: Season the Chicken Thighs
Pat your 4 chicken thighs completely dry with paper towels before seasoning. This step matters more than most people realize. Moisture on the surface of the chicken creates steam when it hits the hot pan, which prevents proper browning and the formation of a golden crust.
Once dry, mix together 1 teaspoon garlic powder, 1/2 teaspoon onion powder, 1/2 teaspoon smoked paprika, 1/2 teaspoon salt, and 1/4 teaspoon black pepper in a small bowl. Rub this seasoning mixture evenly over both sides of each chicken thigh, pressing it gently into the surface so it adheres.
Bone-in, skin-on thighs are the right choice for this recipe. They stay juicier during the longer cook time needed to develop the sauce, and the rendered skin fat adds flavor to the pan that boneless, skinless thighs simply can’t replicate. The skin also provides a textural contrast against the creamy sauce.
Step 2: Sear the Chicken Skin-Side Down
Heat 1 tablespoon of olive oil in a large, heavy-bottomed skillet — cast iron or stainless steel both work excellently — over medium-high heat. Let the oil heat for about 60 seconds until it shimmers and moves fluidly when you tilt the pan. A properly heated pan is critical for achieving a golden crust without sticking.
Place the chicken thighs skin-side down into the hot skillet. Do not move them. Resist every urge to check, shift, or adjust them for the first 6–7 minutes. The chicken releases naturally from the pan surface when the skin has properly crisped and browned. If you try to move it before that release point, the skin tears and the crust stays behind on the pan.
Sear the skin side for a full 6–7 minutes until deeply golden. Flip each thigh and sear the flesh side for 4–5 minutes. The chicken doesn’t need to be fully cooked through at this stage — it finishes cooking in the sauce. Remove all four thighs from the skillet and set them aside on a plate.
Step 3: Build the Flavor Base
Lower the heat to medium. You should see a generous layer of rendered chicken fat and dark, caramelized bits coating the bottom of the pan — that’s your flavor foundation. Don’t drain it and absolutely don’t wipe the pan clean. Those bits are pure concentrated flavor and the secret to why restaurant-style skillet sauces taste better than home versions.
Add 2 tablespoons of unsalted butter to the skillet and let it melt into the existing fat. Once melted, add your 3 minced garlic cloves and stir them continuously for about 60 seconds. Garlic burns fast and turns bitter in a hot pan — constant stirring keeps it cooking evenly without scorching.
Add the 1/2 cup of sliced pepperoncini peppers to the pan. Let them cook in the fat and butter for about 2 minutes, stirring occasionally. You’ll hear them sizzle and soften slightly. This brief cook time allows the pepperoncini to release their tangy flavor compounds directly into the fat base rather than just floating in the sauce later.
Step 4: Deglaze and Build the Sauce
Pour in the 2 tablespoons of pepperoncini brine and the 1 cup of chicken broth together. As soon as the liquid hits the hot pan, use a wooden spoon or spatula to scrape all those browned bits off the bottom. This deglazing step lifts every bit of concentrated flavor from the seared chicken and incorporates it into the sauce.
Let the broth mixture simmer for about 3 minutes, stirring occasionally, until it reduces slightly and the raw alcohol smell from the brine cooks off. You should see the liquid reduce by roughly a quarter during this time. This concentration step is important — adding cream to a properly reduced broth base produces a thicker, more flavorful final sauce than adding it to watery broth.
Add 1 teaspoon of Dijon mustard and 1/2 teaspoon of Italian seasoning to the reduced broth and stir them in fully. The mustard adds a subtle depth and helps emulsify the cream sauce later, giving it a slightly richer body without any noticeable mustard flavor in the finished dish.
Step 5: Add the Cream and Return the Chicken
Pour in the 1 cup of heavy cream in a slow, steady stream while stirring constantly. Adding cream gradually prevents it from separating when it contacts the hot broth. Stir everything together until the broth and cream look completely combined and the sauce starts to turn a warm, pale golden color from the pepperoncini and chicken fond.
Add the optional 1/4 teaspoon red pepper flakes now if you want a subtle background heat. Nestle your seared chicken thighs back into the sauce, skin-side up. Press them down gently so they sit partially submerged in the cream sauce while keeping the skin above the liquid surface. Submerged skin loses its crispness — positioning the thighs correctly maintains that textural contrast between crispy top and creamy bottom.
Reduce heat to medium-low. Let everything simmer uncovered for 15–18 minutes. The chicken finishes cooking through during this simmer and the sauce reduces and thickens simultaneously. Spoon sauce over the chicken every 5 minutes to baste the meat and keep it moist throughout the cook time.
Step 6: Finish the Sauce and Serve
Check chicken doneness at the 15-minute mark by inserting an instant-read thermometer into the thickest part of a thigh — it should read 165°F. Once the chicken hits temperature, stir 1/4 cup of freshly grated Parmesan into the sauce around the chicken pieces. The Parmesan thickens the sauce slightly and adds a savory, salty depth that ties the entire dish together.
Taste the sauce and adjust seasoning now — add salt if it needs more, a splash more pepperoncini brine if you want more tang, or a pinch of black pepper to finish. This final seasoning check makes the difference between a good dish and a genuinely great one.
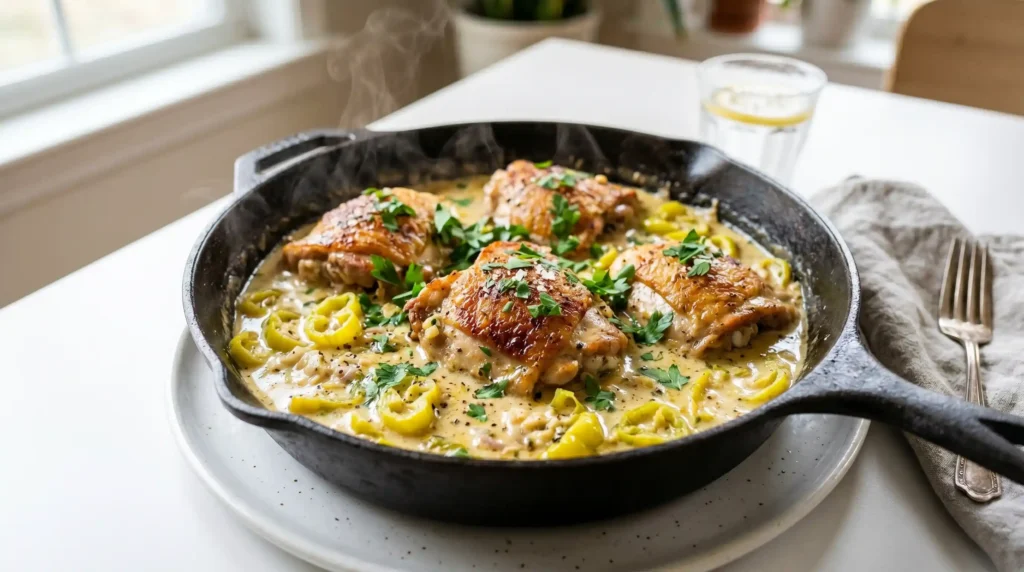
Scatter fresh chopped parsley generously over the top and serve the creamy pepperoncini chicken skillet directly from the pan. Bring the whole skillet to the table — it looks impressive and stays hot longer than plated portions do.
What to Serve Alongside This Dish
The cream sauce in this recipe is rich and plentiful, so you want something that soaks it up effectively. These sides all work beautifully:
- Mashed potatoes — classic, and the sauce turns them into something extraordinary
- Egg noodles or pasta — toss them directly in the sauce for a complete one-bowl meal
- Crusty bread — for scooping up every last drop of the pepperoncini cream sauce
- Steamed rice — absorbs the sauce cleanly and balances the richness well
- Roasted vegetables — zucchini, asparagus, or broccoli all complement the tangy sauce
FYI, the sauce is genuinely so good that people will want something to mop it up with. Plan accordingly.
Tips for Getting This Recipe Right Every Time
A few deliberate habits produce consistently excellent results:
- Dry the chicken thoroughly before seasoning — moisture prevents browning
- Don’t move the chicken while searing — let the crust form before flipping
- Keep the fond in the pan — it’s the flavor foundation of the entire sauce
- Add cream gradually while stirring — prevents separation and keeps the sauce smooth
- Taste before serving and adjust tang or seasoning in small increments
Variations Worth Trying

Once you’ve nailed the base recipe, these directions take it somewhere new:
- Lemon pepperoncini version: Add 1 tablespoon of fresh lemon juice at the end for a brighter, more citrus-forward sauce
- Mushroom addition: Sauté 1 cup of sliced cremini mushrooms after removing the chicken, then proceed as normal
- Sun-dried tomato mix-in: Add 2 tablespoons of chopped sun-dried tomatoes with the pepperoncini for extra savory depth
- Boneless version: Use boneless skinless thighs and reduce searing time to 4 minutes per side
FAQ: Creamy Pepperoncini Chicken Skillet Recipe
Q1. Can I use chicken breasts instead of thighs? Yes, boneless skinless chicken breasts work but require adjustments. Pound them to even thickness before seasoning and sear for 4–5 minutes per side. They cook faster than thighs and dry out more easily, so pull them from the sauce at exactly 165°F rather than letting them simmer longer than needed.
Q2. How spicy is this dish? Very mild. Pepperoncini peppers rank extremely low on the heat scale — similar to banana peppers. The dish tastes tangy and savory rather than hot. If you want noticeable heat, increase the red pepper flakes to 1/2 teaspoon or add a diced fresno pepper with the garlic.
Q3. Can I make creamy pepperoncini chicken skillet ahead of time? Yes. Cook it fully, cool completely, and store in the fridge for up to 3 days. Reheat gently on the stovetop over medium-low heat, adding a splash of chicken broth to loosen the sauce if it thickened too much during refrigeration. Avoid microwaving — it makes the cream sauce separate.
Q4. What if I can’t find pepperoncini? Banana peppers are the closest substitute — similar mild tang and texture. Mild pickled cherry peppers also work. In a pinch, a combination of mild green olives and a tablespoon of white wine vinegar approximates the tangy, briny flavor profile reasonably well.
Q5. Can I use half-and-half instead of heavy cream? You can, but the sauce will be noticeably thinner and more prone to breaking when it simmers. If you use half-and-half, add 1 teaspoon of cornstarch mixed with 1 tablespoon of cold water to the broth before adding the cream — this stabilizes the sauce and prevents separation during cooking.
Conclusion
The creamy pepperoncini chicken skillet proves that genuinely interesting weeknight dinners don’t require complicated techniques or a long grocery list. One pan, 40 minutes, and a jar of pepperoncini you probably already have sitting in your fridge — that’s all this takes.
Follow the searing steps carefully, keep the fond in the pan, and build the sauce layer by layer. Once you’ve made it once, the process becomes completely intuitive and dinner starts feeling like something you actually look forward to making.
Get that skillet hot tonight. Your fridge is already hiding the ingredient that makes this whole dish sing.
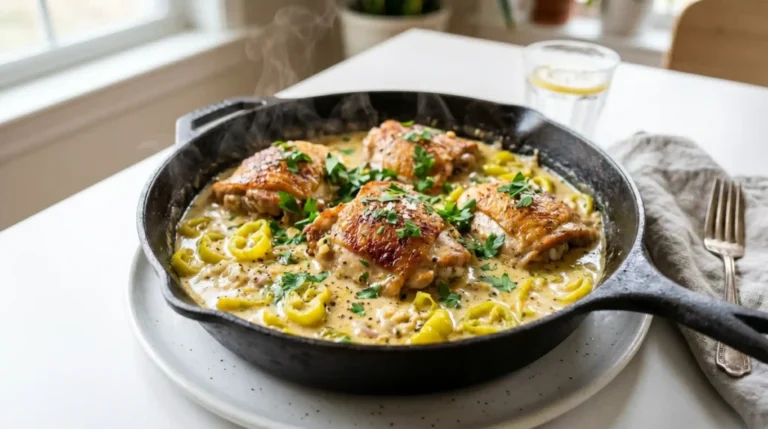
Creamy Pepperoncini Chicken Skillet
Ingredients
Method
- Pat the chicken thighs completely dry with paper towels.
- Mix the garlic powder, onion powder, smoked paprika, salt, and black pepper together.
- Rub the seasoning mixture evenly over the chicken thighs.
- Heat olive oil in a large skillet over medium-high heat.
- Sear the chicken thighs skin-side down for 6–7 minutes until golden brown.
- Flip and sear the flesh side for 4–5 minutes.
- Remove chicken and set aside.
- Lower heat to medium and melt butter in the skillet.
- Add garlic and sauté for 1 minute.
- Stir in the sliced pepperoncini and cook for 2 minutes.
- Pour in pepperoncini brine and chicken broth, deglazing the pan.
- Let simmer for 3 minutes until slightly reduced.
- Stir in Dijon mustard and Italian seasoning.
- Gradually add heavy cream while stirring constantly.
- Nestle the chicken thighs back in and simmer for 15–18 minutes.
- Check doneness using an instant-read thermometer; chicken should reach 165°F.
- Stir in Parmesan cheese and adjust seasoning to taste.
- Garnish with fresh parsley and serve.