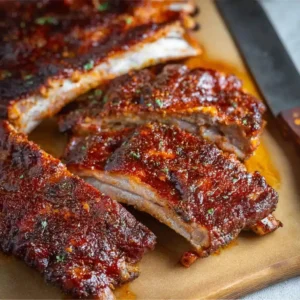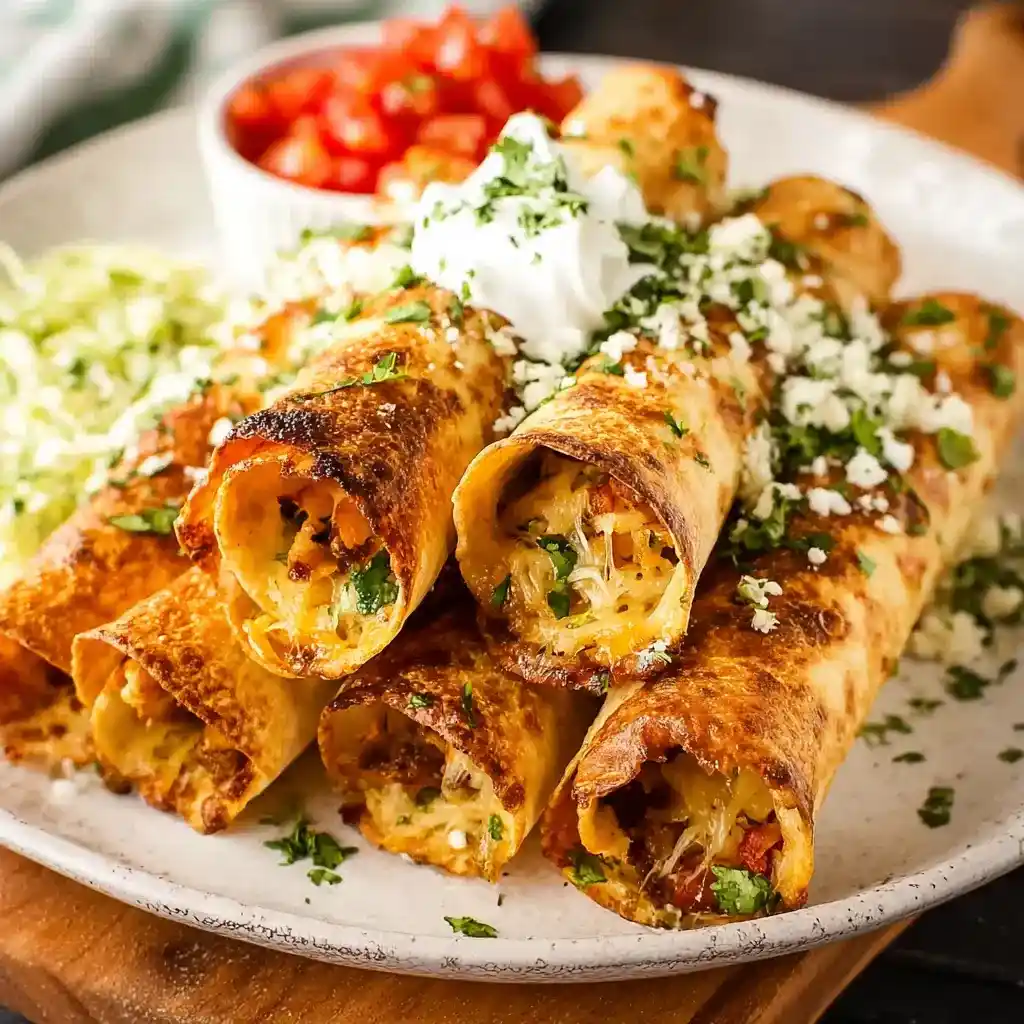
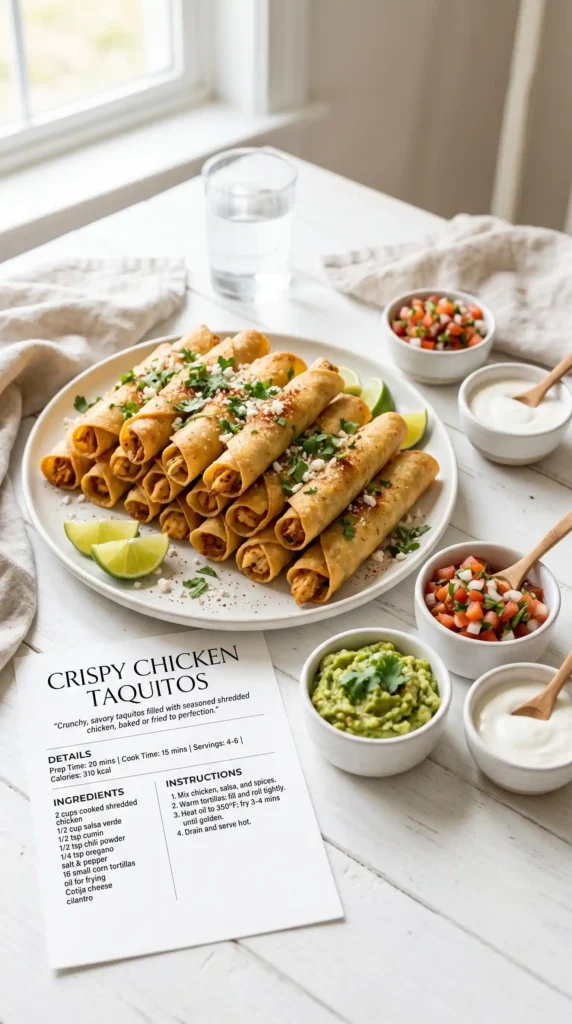
A taquito is a rolled, fried or baked corn tortilla filled with seasoned meat and cheese — a Mexican staple that most people first encounter as a frozen snack and then spend the rest of their lives trying to find a better version of. Homemade Crispy Chicken Taquitos are that better version. The shell shatters properly, the filling tastes of actual seasoning, and the whole thing comes together in 35 minutes with a rotisserie chicken and a can of cream cheese doing most of the heavy lifting.
I started making these when someone brought frozen taquitos to a party and the disappointment in the room was palpable. Not because they were awful — they were fine. But fine is not the same as good, and good is entirely within reach when you make them yourself. I tested several filling combinations before landing on the cream cheese version that keeps the filling moist, binds the shredded chicken beautifully, and does not dry out or turn rubbery under the high heat required to crisp the shell.
Have you ever made something at home that immediately made you unable to eat the shop-bought version ever again? That is the homemade taquito effect. Let us make them properly.
Why Homemade Taquitos Are Worth Making From Scratch
Frozen taquitos have two problems: the filling and the shell. The filling in most commercial versions skips meaningful seasoning and uses low-quality protein that tastes bland even when the tortilla is perfectly crisp. The shell often gets soggy during the reheating process because the freezing-and-thawing cycle creates moisture that the tortilla absorbs before it can crisp again.
Homemade taquitos solve both problems completely. You control the filling seasoning — which means bold, properly spiced, creamy chicken with enough flavour to be noticeable through the crunchy shell. You also control the cooking method — which means a fresh, properly warmed corn tortilla that crisps to a genuine crunch in either a hot oven or a shallow pan of oil without ever becoming soggy.
The cream cheese in the filling is the home-cook upgrade that most recipes skip. It adds richness, prevents the chicken from drying out during high-heat cooking, and creates a filling that stays together when you roll the tortilla rather than falling out in pieces. IMO, cream cheese is the secret ingredient that makes homemade taquitos significantly better than anything from a freezer bag.
What You Need
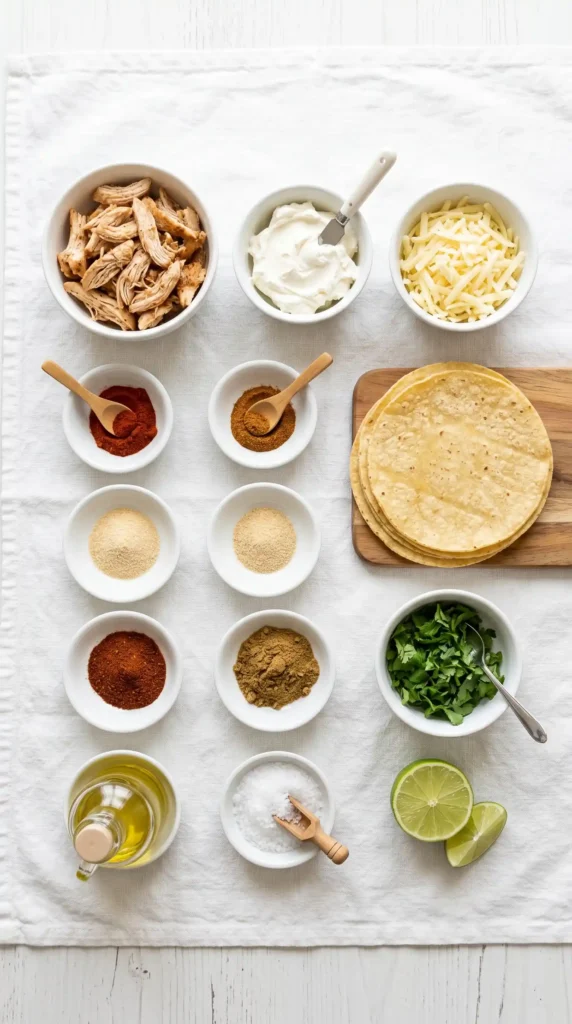
Simple ingredients, most of which you already have. Rotisserie chicken saves significant time — pull the meat from the bones and shred it before you start seasoning. If you do not have rotisserie chicken, two medium chicken breasts poached in well-seasoned water for 18 minutes and then shredded works identically. The key is using shredded chicken, not diced, which rolls more easily inside the tortilla and stays in place during cooking.
For the Chicken Filling
- 3 cups (about 360g) cooked shredded chicken — rotisserie chicken is the quickest option
- 115g (4oz) full-fat cream cheese, softened to room temperature
- 1/2 cup (55g) shredded Monterey Jack or pepper jack cheese
- 1/4 cup (60g) sour cream
- 1 teaspoon ground cumin
- 1 teaspoon chilli powder
- 1 teaspoon garlic powder
- 1/2 teaspoon onion powder
- 1/2 teaspoon smoked paprika
- 1/4 teaspoon cayenne pepper (optional — adjust to heat preference)
- 1/2 teaspoon salt
- 2 tablespoons fresh lime juice
- 3 tablespoons fresh cilantro, finely chopped (optional)
For the Taquitos
- 18–20 small corn tortillas (15cm / 6-inch) — corn tortillas are traditional and crisp better than flour; flour tortillas can be substituted but produce a chewier rather than shattering crust
- Cooking spray or 2–3 tablespoons of oil (for the baked version) OR 1/2 cup neutral oil in a pan (for the fried version)
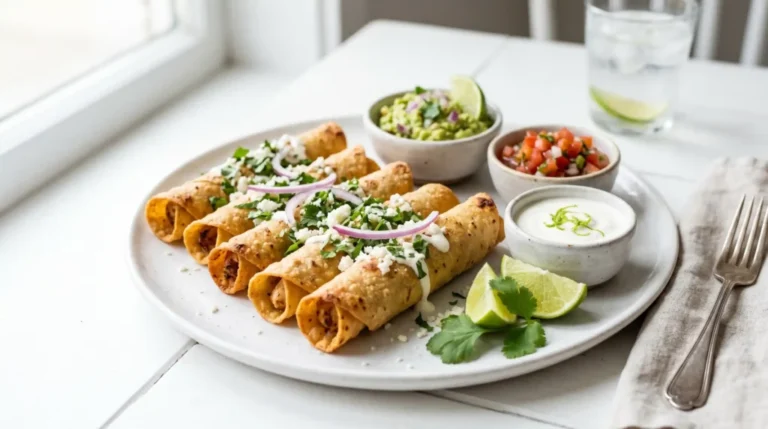
Now For Serving
- Guacamole, sour cream, and salsa for dipping
- Fresh cilantro and lime wedges for garnishing
Warm the Corn Tortillas Before Rolling — This Prevents Every Crack and BreakCold corn tortillas crack and split the moment you try to roll them — the corn masa becomes rigid and brittle at room temperature, and attempting to roll it without warming first wastes filling and produces ugly, broken taquitos. Warm them for 20–30 seconds per side in a dry skillet, or wrap a stack in damp paper towels and microwave for 45 seconds. Work with one warmed tortilla at a time and roll immediately while it is still pliable. FYI — this one step is the difference between rolling success and rolling frustration.
How to Make Crispy Chicken Taquitos Step by Step
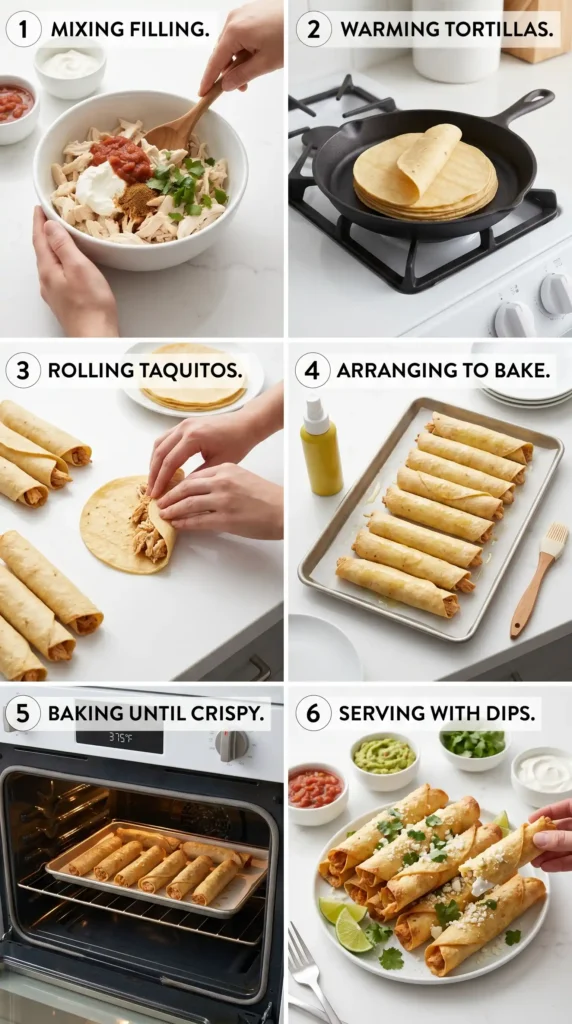
Three stages: make the filling, roll the taquitos, then cook them crispy using either the baked or fried method. Both methods produce genuinely crisp results — the oven method is hands-off and healthier, the pan method is faster and produces a slightly more dramatic golden colour. Both methods are covered in detail below so you can choose based on what suits your kitchen and timeline.
Step 1: Make the Chicken Filling
Place the softened cream cheese in a large mixing bowl and stir vigorously until smooth and spreadable. Cold cream cheese from the fridge will not mix with the other ingredients smoothly — pull it out 30 minutes ahead or microwave briefly in 10-second intervals until softened. Add the sour cream, shredded Monterey Jack cheese, cumin, chilli powder, garlic powder, onion powder, smoked paprika, cayenne if using, and salt. Stir everything together until fully combined and uniformly seasoned throughout.
Add the shredded chicken and fresh lime juice to the cream cheese mixture. Fold together with a spatula until every strand of chicken is coated in the cream cheese base and the filling looks thick, cohesive, and evenly coloured throughout. Add the fresh cilantro if using and fold briefly. Taste the filling at this stage — it should taste boldly seasoned, slightly spicy, tangy from the lime, and richly creamy from the cream cheese. This is the moment to adjust — add more cumin for depth, more cayenne for heat, more lime for brightness.
The filling should hold together when scooped on a spoon — it should not be runny or loose. If it looks very wet, the cream cheese was too warm when mixed — refrigerate the filling for 10 minutes to firm it slightly before rolling. A filling that holds its shape produces taquitos that do not leak or burst during cooking.
Step 2: Warm the Tortillas and Roll the Taquitos
Warm tortillas in batches — three or four at a time in a dry skillet over medium heat, about 20–30 seconds per side, until they feel pliable and slightly soft. Alternatively, wrap a stack of 8–10 tortillas in damp paper towels and microwave for 45 seconds. Keep warmed tortillas under a clean kitchen towel while you work through the stack so they stay pliable.
Place one warm tortilla flat on your work surface. Spoon about 2 tablespoons of the chicken filling onto the lower third of the tortilla — spread it in a narrow horizontal line across the full width of the tortilla, stopping about 1cm from each edge. The filling should look like a generous but not overloaded stripe. Do not overfill — too much filling prevents a tight roll and causes the taquito to split along the seam during cooking. Less filling, rolled tightly, produces a better result than an overstuffed taquito every time.
Roll the tortilla tightly from the bottom edge upward, keeping the filling compressed against itself as you roll. The rolled taquito should feel firm and compact — the seam should sit at the bottom. Place it seam-side-down on a baking sheet lined with parchment paper or in a preparation dish. The seam-down position keeps the taquito closed without requiring toothpicks or any additional sealing — the weight of the roll holds it shut.
Repeat with the remaining tortillas and filling until all 18–20 taquitos are rolled and arranged on the baking sheet. Keep them close together but not touching — enough space so the hot air can reach all sides during baking. If you are frying, arrange them on a plate ready to go into the oil in batches.
Step 3, Option A: Bake the Taquitos
Preheat the oven to 220°C (425°F). Spray the taquitos generously with cooking spray or brush them lightly with oil on all sides — the oil is what produces the golden colour and crisp texture in the oven since there is no hot oil surrounding them as in frying. Insufficient oil produces pale, slightly cardboard-textured taquito shells rather than the golden, genuinely crisp ones you are aiming for.
Place the baking sheet on the centre rack and bake for 18–20 minutes, turning the taquitos once at the 10-minute mark using tongs. The turning is essential — the bottom side against the pan browns faster than the top, and flipping halfway through ensures even crisping on all surfaces. The finished taquitos should look deeply golden all over and feel firm and crisp when pressed gently with a spatula. Allow them to rest for 2 minutes before serving — they crisp further as they cool slightly.
Step 3, Option B: Shallow-Fry the Taquitos
Pour enough neutral oil into a large skillet to come about 1.5cm up the sides — approximately 1/2 cup. Heat over medium-high heat until the oil reaches 180°C or a small piece of tortilla dropped in sizzles actively on contact. Fry the taquitos in batches of 4–5, placing them seam-side-down first and cooking for 1.5–2 minutes per side until deeply golden on all sides.
Use tongs to turn each taquito — rotate them as needed to ensure every surface contacts the oil and browns evenly. Remove each batch to a wire rack set over paper towels to drain excess oil — a wire rack allows steam to escape from the bottom of the taquito rather than being trapped against paper towels, which keeps the shell crisper for longer. Maintain the oil temperature between batches by allowing it to reheat for 30–60 seconds before adding the next batch.
Serve the finished Crispy Chicken Taquitos immediately while the shell is at maximum crispness. They soften slightly as they sit — not dramatically, but the first 10 minutes after cooking are when they taste best.
The Best Dips and Sides for Chicken Taquitos
Taquitos without dipping sauces are like a concert without sound — technically the event is happening but the most important part is missing. These pairings work at different levels and for different reasons:
Guacamole
The classic. Rich, creamy, and cooling against the spiced, crispy shell. Make it fresh with ripe avocados, lime, salt, and a little jalapeño for the best result.
Salsa Roja
A bright, slightly smoky tomato salsa cuts through the richness of the cream cheese filling and adds a fresh tomato note that balances the overall heaviness beautifully.
Sour Cream
Simple and cooling. A plain sour cream dip with a squeeze of lime and a pinch of salt works better than most fancy sauces and takes 30 seconds to prepare.
Chipotle Ranch
Mix 1/2 cup ranch dressing with 1 tablespoon chipotle in adobo, finely minced. The smoky heat paired with the creamy ranch produces a genuinely addictive taquito dip.
Variations Worth Making
Black Bean and Cheese Taquitos
Replace the chicken entirely with a filling of mashed black beans, cream cheese, shredded Monterey Jack, cumin, chilli powder, and garlic. This vegetarian version tastes just as satisfying as the chicken version — the black beans provide protein and a slightly earthy flavour that pairs beautifully with the spices. Add finely diced jalapeño to the filling for extra heat and a small amount of lime-dressed corn for sweetness and texture.
Buffalo Chicken Taquitos
Add 3 tablespoons of buffalo hot sauce to the cream cheese mixture and replace the Monterey Jack with crumbled blue cheese. The buffalo chicken filling transforms these from Mexican-inspired into game-day food — the vinegary heat of the buffalo sauce, the creamy blue cheese, and the crunchy shell together produce something that disappears at any gathering faster than anything else on the snack table. Serve with a cool ranch or blue cheese dip.
Birria-Inspired Beef Taquitos
Replace the chicken with slow-braised shredded beef seasoned with dried ancho and guajillo chillies, cumin, garlic, and beef broth. Omit the cream cheese and sour cream — birria filling is rich enough from the braising liquid without additional dairy. Serve with a small bowl of the warm braising consommé for dipping, which is the traditional birria taquito presentation and produces the most flavourful dipping experience available in the taquito universe.
Storage and Freezing Tips
Store cooked Crispy Chicken Taquitos in an airtight container in the refrigerator for up to 4 days. Reheat in a 200°C oven for 8–10 minutes or in an air fryer at 190°C for 5–6 minutes — both methods restore significant crispness. Avoid the microwave for reheating, which makes the shell chewy and soft rather than restoring the original crunch.
These freeze beautifully both cooked and uncooked. To freeze uncooked: roll the taquitos, arrange on a tray in a single layer, freeze until solid, then transfer to a zip-lock bag. Bake directly from frozen at 220°C for 22–25 minutes. To freeze cooked: cool completely, freeze on a tray, then bag. Reheat from frozen in the oven at 200°C for 12–15 minutes. The uncooked-and-frozen version produces a slightly crispier result after baking.
Frequently Asked Questions
Can I use flour tortillas instead of corn tortillas?
Yes, though the texture differs significantly. Corn tortillas crisp to a hard, shattering crunch that is characteristic of traditional taquitos. Flour tortillas create a softer and slightly chewier shell, which many people enjoy. When made with flour tortillas, these are often called flautas instead of taquitos. Since flour tortillas are usually larger, choose the smallest size you can find, around 15–18cm, and add a slightly more generous amount of filling. Unlike corn tortillas, flour tortillas are naturally flexible and less likely to crack, although warming them briefly still makes rolling easier.
Can I make taquitos in an air fryer?
Yes — the air fryer produces excellent taquitos with a very similar result to oven baking in about half the time. Spray the rolled taquitos with cooking spray, place them seam-side-down in the air fryer basket in a single layer without touching, and cook at 200°C for 8–10 minutes, flipping once at the 5-minute mark. Work in batches — crowding the basket prevents even crisping. The air fryer method is the most efficient for small batches and weeknight cooking.
Why do my taquitos keep cracking when I roll them?
Cracking happens when the corn tortilla is cold and rigid before rolling. The corn masa needs warmth to become pliable — even 15 seconds less warming than needed can mean the difference between a clean roll and a cracked tortilla. Warm each tortilla until it feels genuinely soft and flexible when bent rather than just slightly less stiff. If your tortillas are cracking despite warming, they may be old or dried out — add a slightly damp paper towel to the warming stack and microwave for a full 60 seconds.
How do I keep taquitos crispy for a party?
Bake them 15–20 minutes before guests arrive and keep them warm on a wire rack in an oven set to 90°C (the lowest setting). A wire rack rather than a plate keeps air circulating around all sides and prevents the bottoms from becoming soggy. Avoid covering them with foil, which traps steam and softens the shell. If making large quantities ahead, the reheating method (oven at 200°C for 8 minutes) also works well and restores most of the original crunch.
Can I make the filling ahead of time?
Yes — the chicken filling keeps covered in the refrigerator for up to 3 days. On the day of cooking, pull the filling from the fridge and allow it to sit at room temperature for 10 minutes before rolling — cold cream cheese-based filling is slightly stiffer and harder to spread, which can make rolling more difficult and increases the risk of overfilling one side of the tortilla unevenly. Room-temperature filling spreads easily and produces more consistent taquitos throughout the batch.
Final Thoughts
These Crispy Chicken Taquitos solve every problem with the frozen version — the filling is genuinely seasoned and creamy, the shell is genuinely crisp, and the whole thing takes 35 minutes from start to serving platter. They work for weeknight dinners, game day spreads, party snack tables, and any occasion where you need something that people reach for enthusiastically rather than politely.
Make the filling boldly. Warm those tortillas properly before rolling. Keep the rolls tight and seam-side-down. And give them the full oven time or fry time to develop genuine crunch rather than pulling them early because they look close. Close is not crispy. Crispy is what you are here for.
Make a double batch tonight. Freeze half before baking. Have oven-fresh taquitos available on demand for the next month with zero additional work. That is genuinely the most useful information in this entire article and IMO the most satisfying use of 35 minutes available in snack cooking.
Crispy Chicken Taquitos
Ingredients
Method
- Place the softened cream cheese in a large mixing bowl and stir vigorously until smooth and spreadable.
- Add the sour cream, shredded Monterey Jack cheese, cumin, chili powder, garlic powder, onion powder, smoked paprika, cayenne if using, and salt. Stir until fully combined.
- Add the shredded chicken and fresh lime juice to the cream cheese mixture. Fold together until the filling is thick and well combined.
- Taste and adjust seasoning if necessary, then fold in fresh cilantro if using.
- Warm tortillas in a skillet or microwave until pliable.
- Place one tortilla flat, spoon about 2 tablespoons of chicken filling on the lower third, and roll tightly, seam-side down.
- Repeat until all taquitos are rolled and keep them seam-side down on the baking sheet.
- For baking: Preheat oven to 425°F. Spray taquitos with cooking spray and bake for 18-20 minutes, turning halfway.
- For frying: Heat oil in a skillet and fry taquitos in batches until golden brown, about 1.5-2 minutes per side.
- Serve immediately with dipping sauces.