Servings: 20–24 balls | Prep Time: 25 minutes | Chill Time: 30 minutes | Cook Time: 15 minutes | Total Time: About 1 hour 10 minutes
You know how a classic Reuben sandwich somehow manages to be the best thing on every deli menu? Now imagine all that — the corned beef, the Swiss, the tangy sauerkraut — packed into a crispy, golden, bite-sized ball. That’s exactly what Crispy Reuben Balls are, and they’re as good as they sound.
I first made these for a game day spread two years ago, mostly because I had leftover corned beef and zero interest in making another sandwich. They disappeared in under ten minutes. That’s all you really need to know.
What Are Crispy Reuben Balls?
Crispy Reuben Balls are fried (or baked) appetizer bites loaded with all the classic Reuben sandwich fillings. Think chopped corned beef, Swiss cheese, cream cheese, and sauerkraut rolled into balls, coated in breadcrumbs, and cooked until deeply golden and crunchy on the outside.
They hit every note a great appetizer should. Creamy interior, crispy exterior, savory filling, and a dipping sauce that ties it all together. Whether you serve them at a party or just make a batch for yourself on a Friday night — no judgment here — they deliver every time.
Ingredients You’ll Need
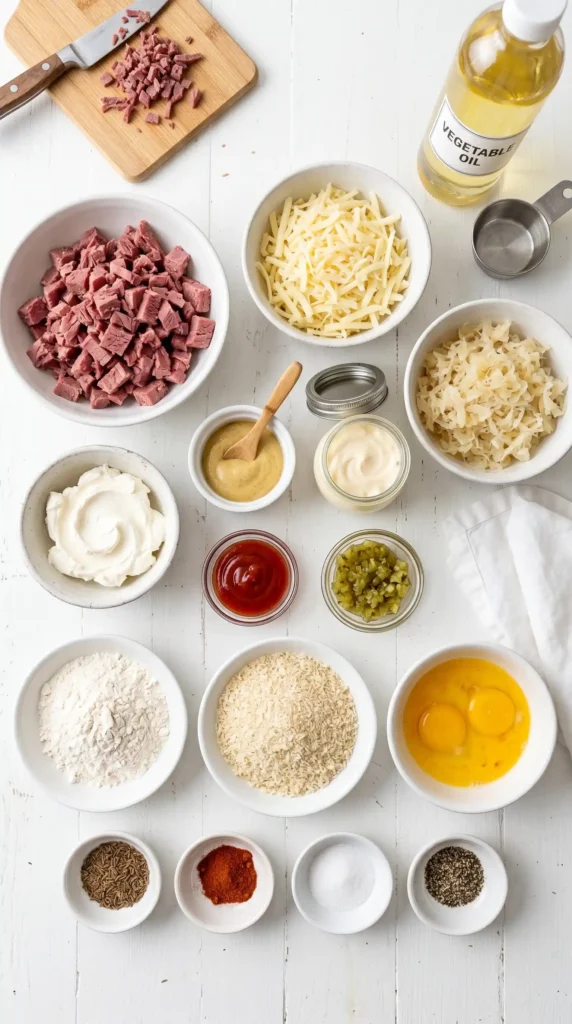
Measure everything out before you start. The filling comes together quickly, and having ingredients ready saves you from frantic searching mid-recipe.
For the Reuben Balls:
- 2 cups corned beef, finely chopped (about 12 oz deli-sliced or leftover)
- 8 oz cream cheese, softened to room temperature
- 1 cup shredded Swiss cheese
- 3/4 cup sauerkraut, well-drained and roughly chopped
- 2 tsp Dijon mustard
- 1 tsp caraway seeds (optional but highly recommended)
- 1/2 tsp garlic powder
- 1/4 tsp black pepper
For the Coating:
- 2 large eggs, beaten
- 2 tbsp whole milk
- 1 cup all-purpose flour
- 1.5 cups seasoned breadcrumbs (or panko for extra crunch)
- 1/2 tsp paprika
- 1/2 tsp salt
For Frying:
- Vegetable oil or canola oil for frying (about 3–4 cups, enough for 2 inches depth)
For the Dipping Sauce (Thousand Island Style):
- 1/2 cup mayonnaise
- 2 tbsp ketchup
- 1 tbsp sweet pickle relish
- 1 tsp white vinegar
- Salt and pepper to taste
How to Make Crispy Reuben Balls
Take your time with each step. The filling needs to be cold and firm before you coat and fry — that chill time is doing real work.
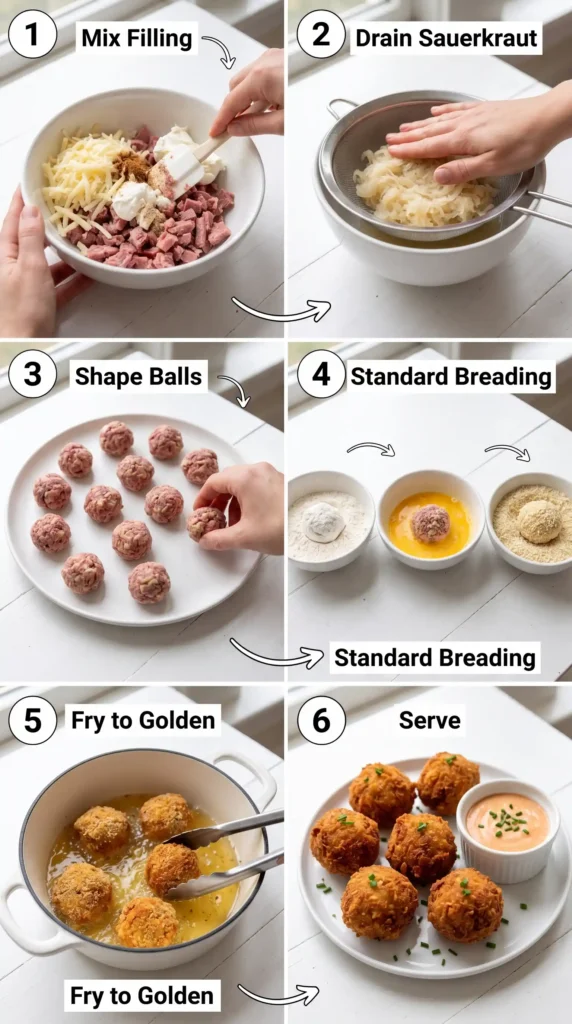
Step 1: Drain the Sauerkraut Thoroughly
Start with the sauerkraut. Dump it into a fine mesh strainer and press it firmly with the back of a spoon. Keep pressing until you’ve squeezed out as much liquid as you possibly can.
Wet sauerkraut is the enemy of a tight, rollable filling. If the mixture turns too wet, the balls won’t hold their shape and they’ll fall apart in the oil — which is both a mess and a tragedy. Give it a good press, then press it again for good measure.
Step 2: Make the Filling
Add the softened cream cheese to a large mixing bowl. Beat it briefly with a fork or spatula until it’s smooth and spreadable — no lumps. Cold cream cheese won’t blend cleanly, which is why room temperature matters here.
Add the finely chopped corned beef, shredded Swiss cheese, drained sauerkraut, Dijon mustard, garlic powder, black pepper, and caraway seeds if using. Mix everything together until the filling looks uniform and well-combined. Taste it at this point. Does it need a tiny pinch more salt? A touch more mustard? Adjust now, before you roll.
Step 3: Chill the Filling
Cover the bowl tightly with plastic wrap and place it in the refrigerator for at least 30 minutes. This step firms up the cream cheese and makes the filling much easier to roll into neat balls. IMO, chilling for a full hour gives you even better results.
You can also make the filling the night before and keep it refrigerated overnight. It makes the whole recipe faster on the day you actually want to cook and serve them.
Step 4: Set Up Your Breading Station
While the filling chills, set up a classic three-bowl breading station on your counter. This makes the coating process smooth and organized instead of a chaotic one-handed juggling act.
- Bowl 1: all-purpose flour combined with salt and paprika
- Bowl 2: beaten eggs mixed with the 2 tablespoons of milk
- Bowl 3: seasoned breadcrumbs (or panko) spread evenly
Line a baking sheet with parchment paper and place it at the end of your station. This is where the coated balls will rest before frying.
Step 5: Roll the Balls
Pull the chilled filling out of the fridge. Use a cookie scoop or a heaping tablespoon to portion it out evenly. Roll each portion between your palms into a firm, round ball about 1.5 inches in diameter.
Work quickly and keep your hands cool. If the filling starts softening and sticking to your hands, pop the whole bowl back in the fridge for 10 minutes and continue after it firms back up. Place the rolled balls on the parchment-lined sheet as you go.
Step 6: Bread the Balls
Pick up one ball at a time. Roll it in the seasoned flour first, coating it lightly on all sides. Shake off any excess flour — a thick flour coating creates a pasty exterior, not a crispy one.
Next, roll the floured ball in the egg wash, letting the excess drip off. Finally, roll it in the breadcrumbs, pressing gently so the crumbs stick well and cover every surface. Place the coated ball back on the parchment sheet and repeat with the rest.
Double-coating tip: For an extra-thick, extra-crunchy crust, dip each ball back into the egg wash and then the breadcrumbs a second time. This works especially well if you use panko. The difference in crunch is genuinely noticeable.
Step 7: Heat the Oil
Pour 2–3 inches of vegetable or canola oil into a heavy-bottomed pot or deep skillet. Heat the oil over medium-high heat until it reaches 350°F (175°C). Use a kitchen thermometer — guessing the oil temperature is how you end up with greasy, undercooked centers.
If you don’t have a thermometer, drop a breadcrumb into the oil. If it sizzles immediately and turns golden within about 30 seconds, the oil is ready. If it just sinks and sits there, the oil needs more time.
Step 8: Fry the Reuben Balls
Carefully lower 4–5 Reuben Balls into the hot oil using a slotted spoon or spider strainer. Don’t overcrowd the pot — adding too many at once drops the oil temperature and causes the balls to absorb grease rather than fry crisply.
Fry each batch for about 3–4 minutes, turning them occasionally so all sides brown evenly. You’re looking for a deep golden-brown color all the way around. Once done, transfer them to a plate lined with paper towels to drain. Let each batch drain for at least 1–2 minutes before serving.
Step 9: Make the Dipping Sauce
While the balls fry, mix together the mayonnaise, ketchup, sweet pickle relish, and white vinegar in a small bowl. Add a pinch of salt and pepper, then stir until smooth and well-combined.
Taste it. Is it tangy enough? Add a touch more vinegar. Too sharp? A tiny bit more mayo balances it right out. This sauce takes about two minutes to make and it completes the whole Crispy Reuben Balls experience — don’t skip it.
Step 10: Serve Hot
Plate the Crispy Reuben Balls immediately alongside the dipping sauce. They’re at their absolute best right out of the fryer while the crust is still crackling. The interior should be creamy, hot, and loaded with that classic Reuben flavor.
If you need to keep them warm before serving, place them on a wire rack set over a baking sheet in a 200°F oven for up to 20 minutes. Avoid stacking them — stacking traps steam and softens the crust you worked hard to build.
Baked Reuben Balls: A Lighter Option

Not feeling the deep fry? The oven works too, though FYI, the crust won’t be quite as shattering-crispy as the fried version.
- Preheat oven to 400°F (200°C).
- Place coated balls on a greased wire rack set over a baking sheet.
- Spray the tops generously with cooking spray.
- Bake for 20–22 minutes, flipping once at the halfway point, until deeply golden.
The baked version still delivers excellent flavor and a satisfying crunch. It just plays things a little safer than the deep fryer.
Tips for the Best Crispy Reuben Balls
A few things I’ve learned from making these more times than I care to admit:
- Always chill the filling. It’s not optional. Warm filling equals misshapen, falling-apart balls.
- Drain the sauerkraut aggressively. Press it twice if you need to.
- Use panko for maximum crunch. Regular breadcrumbs are fine, but panko delivers noticeably more texture.
- Fry in small batches. Four to five at a time keeps the oil temperature stable.
- Serve immediately. Reuben Balls lose their crunch as they sit. Time them close to when your guests actually arrive.
Can You Make These Ahead of Time?
Yes — and this is honestly one of the best things about this recipe. You can roll and bread the balls up to 24 hours in advance. Arrange them in a single layer on a parchment-lined sheet, cover loosely, and refrigerate until you’re ready to fry.
You can also freeze uncooked, breaded balls on a sheet pan until solid, then transfer them to a zip-lock bag. Fry them straight from frozen at 325°F, adding about 2–3 extra minutes to the cook time. The texture holds up surprisingly well.
FAQs About Crispy Reuben Balls
Q: Can I use leftover corned beef instead of deli-sliced? Absolutely — leftover corned beef actually works better because it tends to have more flavor from the cooking process. Chop it finely so the pieces blend smoothly into the cream cheese filling. Large chunks make the balls harder to roll and cause uneven texture.
Q: What’s the best way to drain sauerkraut for this recipe? Press it firmly in a fine mesh strainer, then wrap it in a clean kitchen towel and squeeze it out even further. The goal is to remove as much liquid as possible. Wet sauerkraut makes the filling loose and prevents the balls from holding their shape during rolling.
Q: Can I air fry Reuben Balls instead of deep frying? Yes. Spray the coated balls well with cooking oil spray and air fry at 390°F for 10–12 minutes, shaking the basket halfway through. The result is crispier than baked but slightly less golden than deep fried. It’s a solid middle-ground option.
Q: How do I stop the filling from leaking out during frying? Make sure the filling is fully chilled and firm before you coat the balls. Also ensure the breadcrumb coating covers every surface evenly with no thin spots or gaps. A double coating adds extra protection and makes leaks much less likely.
Q: Can I make a vegetarian version of Reuben Balls? Yes. Swap the corned beef for finely chopped, well-seasoned tempeh or a hearty mushroom mixture sautéed until dry. Keep the sauerkraut, Swiss, and cream cheese base the same. The flavor won’t be identical to a traditional Reuben, but it’s a genuinely tasty variation worth trying.
Final Thoughts
Crispy Reuben Balls take everything great about a classic Reuben sandwich and make it snackable, shareable, and honestly even more fun to eat. They’re the kind of appetizer that gets people hovering near the kitchen before you’ve even finished frying.
Make them for your next gathering, your next game day, or your next “I just feel like frying things on a Saturday” situation — all equally valid. Once you nail these, they’ll become a permanent fixture in your appetizer rotation.

Crispy Reuben Balls
Ingredients
Method
- Drain the sauerkraut thoroughly using a fine mesh strainer and press out as much liquid as possible.
- In a large mixing bowl, add softened cream cheese and beat it until smooth.
- Combine corned beef, Swiss cheese, drained sauerkraut, Dijon mustard, garlic powder, black pepper, and caraway seeds into the cream cheese and mix until uniform.
- Cover and refrigerate the filling for at least 30 minutes.
- Set up a three-bowl breading station with flour, egg wash, and breadcrumbs.
- Roll the chilled filling into firm balls about 1.5 inches in diameter.
- Coat each ball in seasoned flour, then egg wash, and finally breadcrumbs, ensuring even coverage.
- Heat oil in a heavy-bottomed pot until it reaches 350°F (175°C).
- Carefully fry 4–5 balls at a time, turning occasionally, for about 3–4 minutes until deep golden brown.
- Drain on paper towels before serving.
- Mix mayonnaise, ketchup, pickle relish, vinegar, salt, and pepper in a small bowl until well combined.
- Serve hot alongside the dipping sauce.