Forget waiting for an owl to deliver anything magical. Harry Potter’s Frozen Butterbeer comes together in your own kitchen, and it takes less time than rewatching your favorite scene from the movies.
Servings: 4 servings Prep Time: 5 minutes Total Time: 5 minutes
I first made this during a movie marathon night, and it disappeared faster than the popcorn. Now it’s become the go-to drink whenever a themed night calls for something a little enchanted.
Why Harry Potter’s Frozen Butterbeer Works So Well
Have you ever noticed how the best fan-inspired treats feel like they capture a whole vibe in one bite? This frozen drink pulls off exactly that, blending buttery sweetness with a frosty, milkshake-like texture.
Here’s why this recipe earns a permanent spot on your treat list:
- Five-minute prep — no cooking, no waiting, just blend and pour
- Creamy, frosty texture — closer to a milkshake than a soda
- Butterscotch-forward flavor — sweet, buttery, and instantly recognizable
- Easy to customize — dozens of variations to fit any taste
Ingredients You’ll Need
Here’s your full shopping list for this frozen treat.
- 4 cups vanilla ice cream
- 1 cup cream soda
- 2 tablespoons unsalted butter, melted and slightly cooled
- ¼ cup butterscotch sauce, plus extra for drizzling
- 1 cup whipped cream, for topping
Five ingredients, one blender, zero fuss. That’s IMO exactly what a good themed drink recipe should look like.
How to Make Harry Potter’s Frozen Butterbeer
Let’s walk through each step so your frozen drink comes out thick, creamy, and perfectly balanced.
Step 1: Add the Base Ingredients to Your Blender
Start by scooping the vanilla ice cream directly into your blender jar. Pour the cream soda in right on top of it, followed by the melted butter and the butterscotch sauce. Adding the ingredients in this order helps everything blend more evenly once you turn the machine on.
Letting the melted butter cool slightly before adding it matters here. Butter that’s too hot can start melting the ice cream prematurely, which leaves you with a thinner, less frosty final texture.
Step 2: Blend Until Smooth and Thick
Secure the lid on your blender and start on a low speed, gradually increasing to medium as the ingredients combine. Blend for about 30 to 45 seconds, stopping to scrape down the sides if needed. You’re looking for a completely smooth, thick consistency with zero ice cream chunks remaining.
Avoid over-blending, since running the blender too long melts more of the ice cream than you want. The goal is a thick, milkshake-like texture that holds its shape when poured, not a thin, runny drink.
Step 3: Taste and Adjust the Sweetness
Before pouring anything out, dip a spoon in and give the mixture a taste. If you want a sweeter, more pronounced butterscotch flavor, blend in another tablespoon of butterscotch sauce. This is your moment to fine-tune the flavor exactly to your liking.
Have you ever made a drink that tasted almost right but not quite? This quick taste-test step is how you avoid that letdown entirely.
Step 4: Pour Into Glasses
Grab whatever glassware feels right for the occasion, whether that’s simple mugs, mason jars, or something a little more whimsical. Pour the blended mixture slowly into each glass, leaving about an inch of space at the top. That extra room gives you plenty of space for the toppings coming next.
Pouring slowly also helps prevent the thick mixture from splashing over the sides. If your blender jar has a narrow spout, tilt the glass slightly while pouring for a cleaner result.
Step 5: Top with Whipped Cream and Butterscotch
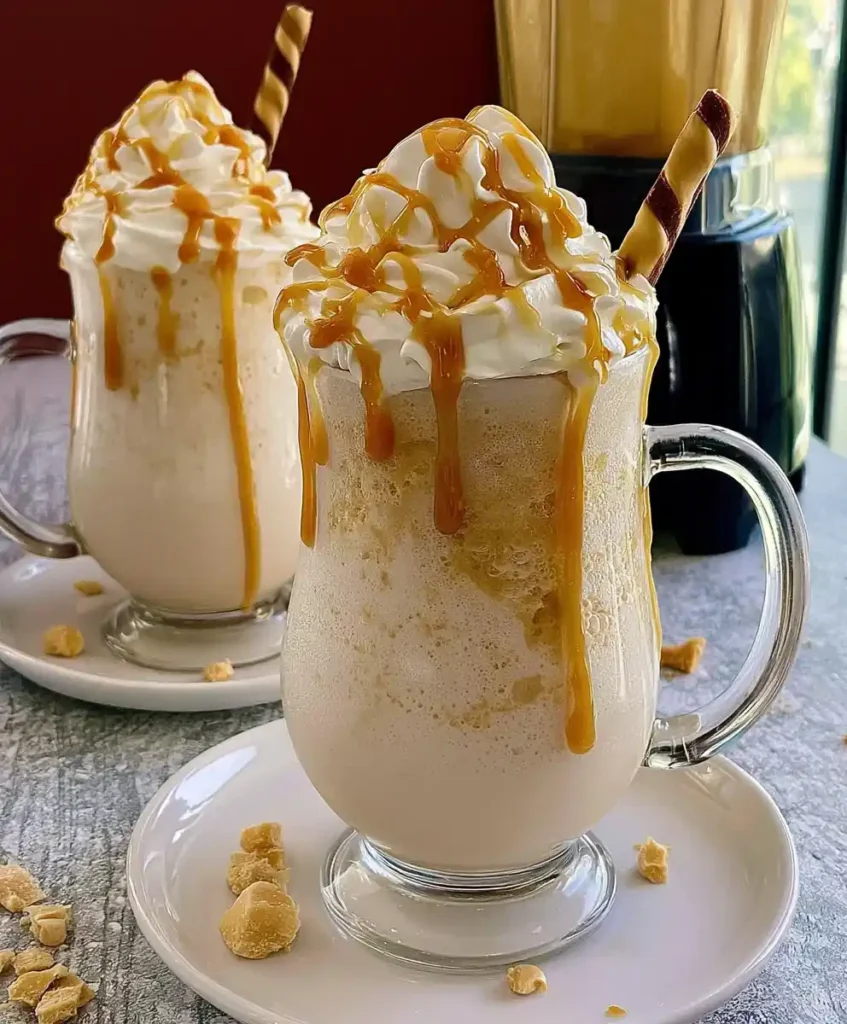
Spoon a generous dollop of whipped cream onto the top of each glass. Don’t hold back here, since a thick, cloud-like layer is part of what makes this drink feel special. Let it pile up naturally rather than pressing it down flat.
Finish with a drizzle of butterscotch sauce over the whipped cream, letting it run down the sides a little for visual appeal. This final touch adds both extra sweetness and a genuinely impressive presentation.
Step 6: Serve Immediately
Frozen drinks like this one are best enjoyed right after blending, while the texture is still thick and frosty. Hand out spoons along with straws, since the consistency often sits somewhere between a drink and a soft-serve treat. Serve them right away and watch how fast they disappear.
Tips for the Best Frozen Butterbeer
A few things I’ve picked up after making this more times than I can count.
- Use cold ingredients for the frostiest possible texture
- Chill your glasses in the freezer beforehand for extra refreshment
- Add a small pinch of sea salt to balance out the sweetness
- Don’t over-blend, since a thick texture beats a runny one every time
- Prepare the base mixture just before serving for the best results
Equipment You’ll Need
Simple tools, nothing fancy required for this one.
- Blender — a standard countertop blender works perfectly
- Mugs or glassware — whatever fits the theme of your gathering
- Measuring spoons — for the butter and butterscotch sauce
- Spatula — for scraping down the blender jar as needed
Fun Variations to Try
Once you’ve nailed the classic version, these twists keep things interesting.
- Chocolate butterbeer: blend in a tablespoon of chocolate syrup
- Dairy-free version: use coconut milk ice cream and a dairy-free soda
- Spiced butterbeer: add a dash of cinnamon or nutmeg for warmth
- Fruity twist: blend in a handful of frozen strawberries or raspberries
- Lighter version: cut back on the butterscotch sauce for less sweetness
Serving Suggestions
Round out your themed night with a few easy pairings.
- Serve alongside buttery popcorn for a cozy movie night
- Pair with other themed treats for a full spread
- Use colorful straws or fun stirrers for extra presentation
- Serve in mismatched vintage glassware for a whimsical touch
Frequently Asked Questions
Can I make Harry Potter’s Frozen Butterbeer ahead of time? This drink tastes best fresh, but you can blend the base and freeze it briefly. Just re-blend it right before serving to bring back that smooth, frosty texture before it separates.
Is this recipe kid-friendly? Yes, this frozen drink works great for kids and adults alike. Just watch how much butterscotch sauce you add if you’re serving it to younger palates who prefer things less sweet.
Can I adjust how sweet the drink tastes? Absolutely. Add more butterscotch sauce for a sweeter version, or cut back for something more balanced. Taste as you blend so you can fine-tune it exactly to your preference.
What can I use instead of cream soda? A clear, carbonated soda like ginger ale or a lemon-lime soda works as a solid substitute. It won’t taste identical, but it keeps that fizzy quality the recipe relies on.
Does this recipe contain common allergens? Yes, this recipe includes dairy from both the ice cream and butter. Swap in dairy-free ice cream and a plant-based whipped topping if you need an allergen-friendly version.
Can I make a bigger batch for a party? Yes, simply double or triple the ingredients depending on your blender’s capacity. Blend in batches rather than overfilling the jar, since overcrowding leads to uneven blending.
Final Thoughts on Harry Potter’s Frozen Butterbeer
Harry Potter’s Frozen Butterbeer turns five basic ingredients into a genuinely fun, buttery-sweet treat perfect for any themed gathering. It takes five minutes, needs zero cooking, and delivers a frosty texture that feels like a proper indulgence.
Give this one a try at your next movie night or themed party and watch how quickly the glasses empty. Grab your blender, gather your ingredients, and let the magic happen right in your own kitchen.