Servings: 4 | Prep time: 15 minutes (plus 3 hours freezing) | Total time: about 3 hours 15 minutes
Craving something cold, crunchy, and a little bit nostalgic? Mexican ice cream nails all three at once. I first tried this at a friend’s backyard party years ago, and I’ve been making my own version ever since.
This isn’t complicated, fried, or fussy despite how impressive it looks on a plate. IMO, it’s one of the easiest desserts to fake your way into looking like a pro. Let’s get into why it works.
Why This Mexican Ice Cream Recipe Actually Works
A lot of frozen desserts either melt too fast or turn into a soggy mess before you can serve them. This recipe avoids both problems with a smart double-freeze method.
Have you ever bitten into a coated ice cream treat where the crunch had already gone soft? Disappointing, right? Freezing twice here locks in that crispy cornflake shell for real.
The cinnamon-cornflake coating is doing the heavy lifting flavor-wise. It adds crunch, warmth, and a slightly toasty sweetness that plain vanilla ice cream just can’t deliver alone.
What You’ll Need for Mexican Ice Cream
Round up these ingredients before you start scooping. This recipe keeps things simple, with a short list and a lot of room for topping customization.
- 4 scoops vanilla ice cream (about 1 cup per scoop)
- 3 cups crushed frosted corn flakes
- 1 teaspoon ground cinnamon
- 3 tablespoons honey (optional drizzle)
- Canned whipped topping (optional topping)
- Chocolate syrup (optional drizzle)
- 4 maraschino cherries (optional topping)
That’s genuinely it. No fryer, no batter, no complicated technique standing between you and a seriously satisfying dessert.
How to Make Mexican Ice Cream, Step by Step
Let’s walk through the actual process now. I’ll break each stage down slowly, because rushing the freezing steps is exactly how you end up with a melty puddle instead of a neat, coated ball.
Step 1: Prep Your Baking Sheet
Line a baking sheet with parchment paper before you touch the ice cream. This keeps everything from sticking once it freezes, saving you a frustrating scraping session later.
Set the lined sheet somewhere flat in your freezer where it won’t get bumped. A stable surface matters more than you’d think for keeping your ice cream balls round.
Step 2: Scoop and Shape the Ice Cream
Scoop out four large portions of vanilla ice cream, roughly a cup each, and place them onto the parchment-lined sheet. Work quickly here since ice cream softens fast at room temperature.
Shape each scoop lightly into a round ball using your hands or the back of a spoon. Perfectly round isn’t required, but a rounder shape coats more evenly later.
Step 3: Freeze Until Firm
Slide the baking sheet into the freezer and let the scoops firm up for a full hour. This first freeze matters because soft ice cream won’t hold a coating properly.
Skipping this step or rushing it leads straight to melty, misshapen balls once you try coating them. Patience here genuinely pays off in the final texture.
Step 4: Mix the Cinnamon-Cornflake Coating
While the ice cream firms up, combine the crushed frosted corn flakes with the ground cinnamon in a mixing bowl. Stir until the cinnamon distributes evenly throughout the cereal crumbs.
Crushing the cornflakes finely enough matters here. Large chunks make coating awkward, while finer crumbs stick better and create a more consistent, crunchy shell around each scoop.
Step 5: Coat Each Scoop
Remove the ice cream scoops from the freezer once they’re firm. Working one at a time, roll each scoop in the cornflake mixture, pressing gently so the coating sticks evenly on all sides.
Reshape the scoop into a smooth ball as you coat it, patching any bare spots with extra cornflake mixture. Speed matters here, since the ice cream starts softening the moment it leaves the freezer.
Step 6: Freeze Again Until Fully Set
Place each coated ice cream ball back onto the parchment-lined baking sheet. Return the entire sheet to the freezer and let the balls set for a full 2 hours this time.
This second freeze locks the coating firmly in place and re-hardens the ice cream inside. Skipping ahead to serving now means a coating that slides right off instead of staying put.
Step 7: Add Toppings Right Before Serving
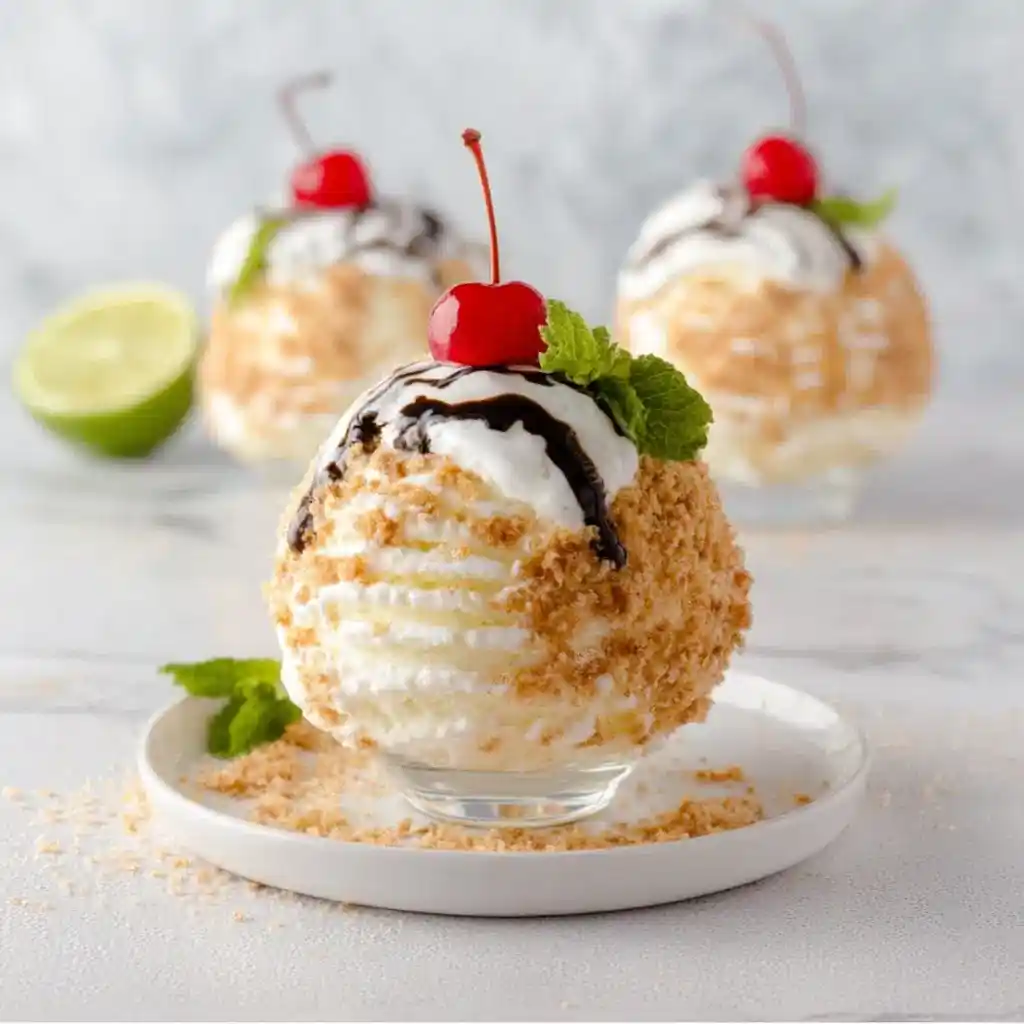
Once the ice cream balls are fully frozen and firm, drizzle honey over each one just before serving. Add whipped topping, a swirl of chocolate syrup, and a maraschino cherry if you want the full effect.
FYI, timing really matters here. Adding toppings too early softens the coating and creates a soggy mess nobody wants to eat.
Step 8: Serve Immediately
Serve your Mexican ice cream right away while everything’s still cold and crisp. This dessert doesn’t wait around patiently, so gather everyone before you finish plating.
Have you ever served a dessert that disappeared within minutes? This is one of those, so don’t blink or you’ll miss the compliments rolling in 🙂
Serving and Storage Tips
Mexican ice cream is best enjoyed fresh, but you can absolutely prep it ahead with the right approach. Here’s how to serve and store it properly.
- Serve immediately after adding final toppings for the best texture.
- Store coated ice cream balls in an airtight container in the freezer for up to 1 week.
- Place parchment paper between layers to prevent them from sticking together.
- Add toppings only right before serving to avoid melting or sogginess.
- Prepare and freeze the coated balls a day ahead for easy party planning.
- Refreeze for 20 to 30 minutes if the coating starts to soften before serving.
Fun Variations to Try Next Time
Once you’ve mastered the basic version, this recipe leaves plenty of room to play around. Here are a few twists worth trying on your next batch.
- Chocolate Mexican ice cream: use chocolate ice cream instead of vanilla for a richer bite.
- Dulce de leche drizzle: swap the honey for dulce de leche for deeper caramel flavor.
- Nutty crunch: add chopped pecans or almonds into the cornflake coating.
- Coconut coating: mix shredded coconut with the cornflakes for a tropical twist.
- Churro style: add extra cinnamon sugar to mimic that classic churro flavor.
IMO, the dulce de leche version might just beat the original. Give it a try before deciding I’m wrong 🙂
Frequently Asked Questions About Mexican Ice Cream
Can I use regular cornflakes instead of frosted ones?
Yes, regular cornflakes work fine, though you may want to add a little extra sugar or cinnamon to make up for the missing sweetness in the coating.
Can I make this dessert ahead of time?
Absolutely. You can freeze the fully coated ice cream balls up to a week in advance, making this a great option for parties or planned gatherings.
Why does my coating keep falling off?
This usually happens when the ice cream is too soft during coating. Freeze the scoops longer before rolling them in the cornflake mixture for better adhesion.
Can I skip the honey drizzle?
Yes, the honey is entirely optional and only adds extra sweetness. The dessert still tastes great with just the cornflake coating and your favorite toppings.
Can I use homemade ice cream instead of store-bought?
You can, as long as it’s firm enough to hold its shape while scooping and shaping. Soft homemade ice cream may need extra freezer time before you start.
How do I prevent the ice cream from melting while I coat it?
Work quickly and return the scoops to the freezer if they start softening. Coating in batches of one or two at a time helps keep things manageable.
Can I use different cereals for the coating?
Yes, rice cereal or crushed granola both work as substitutes. Just make sure whatever you choose crushes into small, even crumbs for the best coating texture.
Final Thoughts on This Mexican Ice Cream Recipe
So there you have it, a Mexican ice cream recipe that’s crunchy, creamy, and genuinely simple despite how impressive it looks. No frying, no complicated equipment, just smart freezing and a great coating.
Give this one a try at your next gathering, or honestly, just for yourself on a hot afternoon. Once that crunchy shell gives way to cold, creamy ice cream, you’ll get why this treat sticks around.