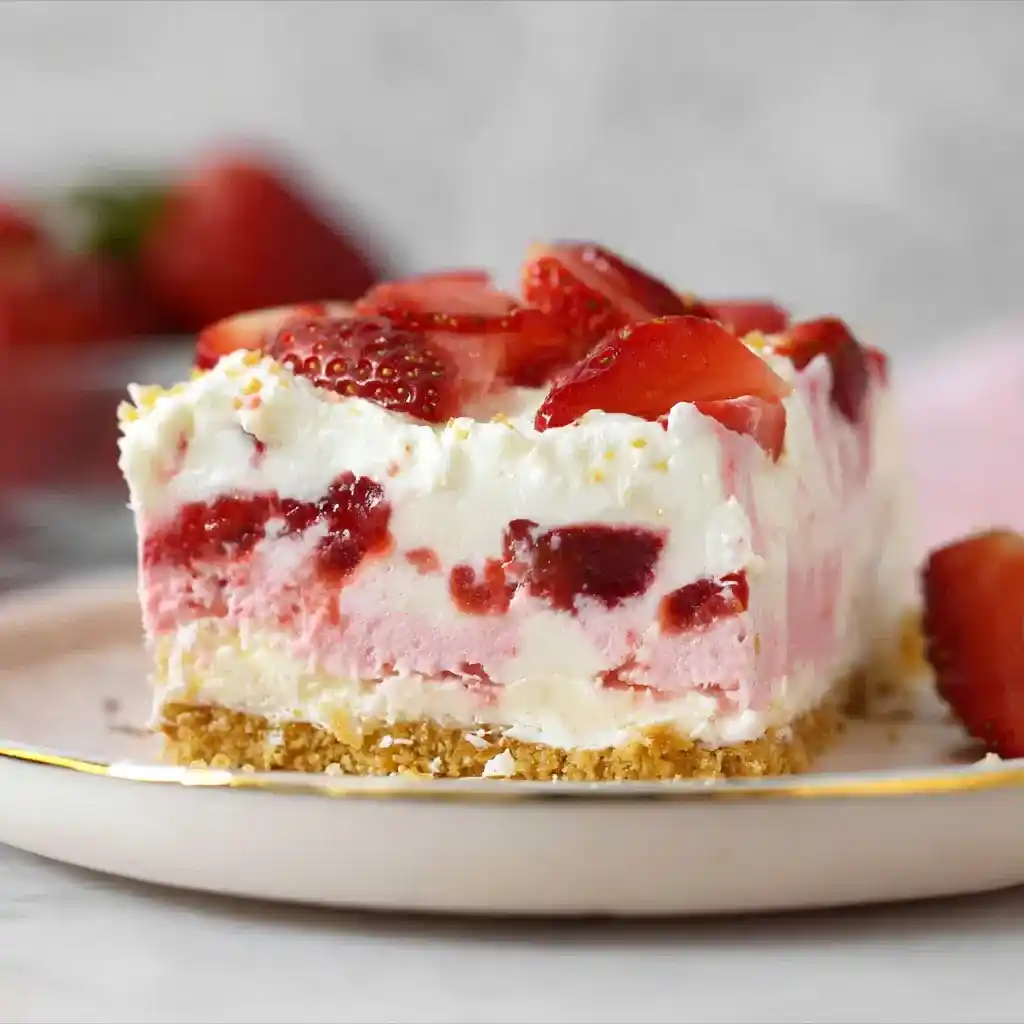
Layers of buttery crust, creamy cheesecake filling, and fresh strawberries, all without touching your oven. This dessert delivers everything you want from summer treats in one chilled slice.
I started making this on hot days when baking felt like the last thing I wanted to do. Turns out this no-bake version impresses just as much as anything that came from an oven.
Servings: 9 Prep time: 40 minutes Chill time: 4 to 6 hours Total time: Roughly 5 hours
Why No-Bake Strawberry Delight Works So Well
Regular strawberry desserts often require baking, cooling, and careful timing. This version skips all of that and still delivers rich, creamy layers packed with fresh strawberry flavor.
Have you ever wanted a showstopper dessert without turning your kitchen into a sauna? IMO, that’s exactly the problem this no-bake recipe solves.
The combination of tangy cheesecake filling and sweet, juicy strawberries creates a balance that feels light but still indulgent. Every layer plays its own role here.
What You’ll Need
Let’s break this recipe down by component, since there are a few layers to build.
For the Crust
- Graham cracker crumbs
- Unsalted butter, melted
For the Filling
- Fresh strawberries, washed and dried
- Full-fat cream cheese, room temperature
- Granulated sugar
- Fresh lemon juice
- Pure vanilla extract
- Heavy whipping cream
- Powdered sugar
- Strawberry Jello mix
For the Topping
- Heavy whipping cream
- Powdered sugar
Longer ingredient list than your average no-bake dessert, sure. But every layer adds its own texture and flavor to the final result.
How to Make No-Bake Strawberry Delight
This recipe has several components, so let’s tackle them one section at a time. None of it is difficult, but a little patience through each stage really pays off.
Step 1: Make the Crust
Grind your graham crackers into fine crumbs using a blender or food processor. Combine the crumbs with melted butter and mix until every bit is evenly coated.
Press the mixture firmly into a 9×9 inch pan, using the back of a spoon or the bottom of a measuring cup for even pressure. Place the crust in the refrigerator to chill while you prepare the rest of the dessert.
Step 2: Prep the Strawberries
Wash all your strawberries thoroughly and pat them completely dry. Excess moisture at this stage can make your dessert watery later, so don’t rush this part.
Remove the stems, then dice enough strawberries to make about a cup of small pieces and set them aside. Slice the remaining strawberries lengthwise and pat them dry once more with paper towels.
Step 3: Whip the Cream for the Filling
Place a mixing bowl in the freezer for 5 to 10 minutes before starting. A chilled bowl helps your cream whip up faster and hold its structure better.
Beat your heavy whipping cream at medium-high speed until soft peaks form. Gradually add powdered sugar and continue beating until the cream reaches stiff peaks, then set it aside.
Step 4: Make the Cheesecake Base
Beat your cream cheese, granulated sugar, lemon juice, and vanilla extract together until completely smooth. Scrape down the sides of the bowl as needed to avoid any hidden lumps.
Fold your prepared whipped cream into the cream cheese mixture using a spatula. Fold gently rather than stirring, since this keeps the mixture light and airy instead of dense.
Step 5: Split and Flavor the Filling
Divide your cheesecake mixture into two equal portions. Have you ever wondered why some layered desserts have such distinct flavor zones? This split is exactly how that effect gets created.
Mix your strawberry Jello powder and diced strawberries into one of the two portions. This creates a bright, fruity layer that contrasts beautifully with the plain cheesecake portion.
Step 6: Layer the Dessert
Arrange your sliced strawberries evenly over the chilled graham cracker crust. Spread the plain cheesecake filling directly over the strawberries, smoothing it out with a spatula.
Spread the strawberry-flavored cheesecake filling evenly on top of that layer. Take your time here, since even layers make for a much cleaner presentation once sliced.
Step 7: Make the Whipped Topping
Beat your heavy whipping cream until soft peaks form, just like you did for the filling earlier. Add powdered sugar and continue beating until stiff peaks form.
Spread or pipe this whipped topping evenly over the assembled dessert. This final layer adds that classic fluffy finish everyone loves.
Step 8: Chill Until Set
Cover your dessert with plastic wrap and refrigerate for 4 to 6 hours, or until fully set. This chilling time is essential for clean, sliceable layers.
Resist the urge to slice into it early. Trust the process here, even if the wait feels endless with that smell in the fridge.
Serving Suggestions Worth Trying
This dessert pairs beautifully with a handful of simple additions. A few of my personal favorites:
- Extra fresh strawberries on top for garnish
- A drizzle of strawberry sauce for added flavor
- A hot cup of coffee or tea alongside each slice
- A sprinkle of crushed graham crackers for extra texture
Bring this to your next gathering and watch how fast it disappears. FYI, you might want to hide a slice for yourself before it’s all gone.
Storing and Reheating Leftovers
Refrigerator storage keeps this dessert fresh for up to 3 days when covered tightly. Keeping it tightly wrapped also prevents it from absorbing any odors from your fridge.
Freezing isn’t recommended here, since the cream filling’s texture tends to change once thawed. If making this ahead of time, prepare it the night before for the best texture and flavor.
Use a sharp knife wiped clean between slices for the neatest cuts. Skipping that step usually leaves messy, smeared portions :/
Fun Variations to Try
Once you’ve nailed the classic version, feel free to experiment. A few worth trying:
- Chocolate version with a layer of chocolate ganache between the crust and strawberries
- Oreo version replacing graham crackers with crushed Oreo cookies
- Lemon version adding extra lemon zest to the cheesecake filling
- Coconut version mixing toasted coconut flakes into the crust
Why stick to one combination when there’s so much room to make it your own? Pick a variation based on whatever flavors sound best for your gathering.
Frequently Asked Questions
Can I use frozen strawberries instead of fresh? Fresh strawberries work best here, since frozen strawberries release too much moisture and can make the layers watery.
Can I make this dessert ahead of time? Yes, it holds up well made a day in advance, making it a great option for planning ahead of gatherings.
What can I use instead of graham crackers for the crust? Digestive biscuits, vanilla wafers, or other crushed cookies all work well as substitutes.
How long does this dessert need to chill? At least 4 hours is recommended, though 6 hours gives you the cleanest, most set layers.
Can I use store-bought whipped topping instead of homemade whipped cream? Yes, store-bought whipped topping works as a convenient shortcut if you’re short on time.
Final Thoughts
No-Bake Strawberry Delight brings together everything great about layered desserts without requiring a single minute in the oven. Creamy cheesecake filling, fresh strawberries, and a buttery crust come together into something genuinely impressive.
Make this for your next warm-weather gathering and watch it disappear before anything else on the table. Just don’t be surprised when people start requesting it for every summer get-together after this :



