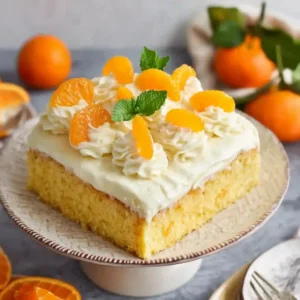
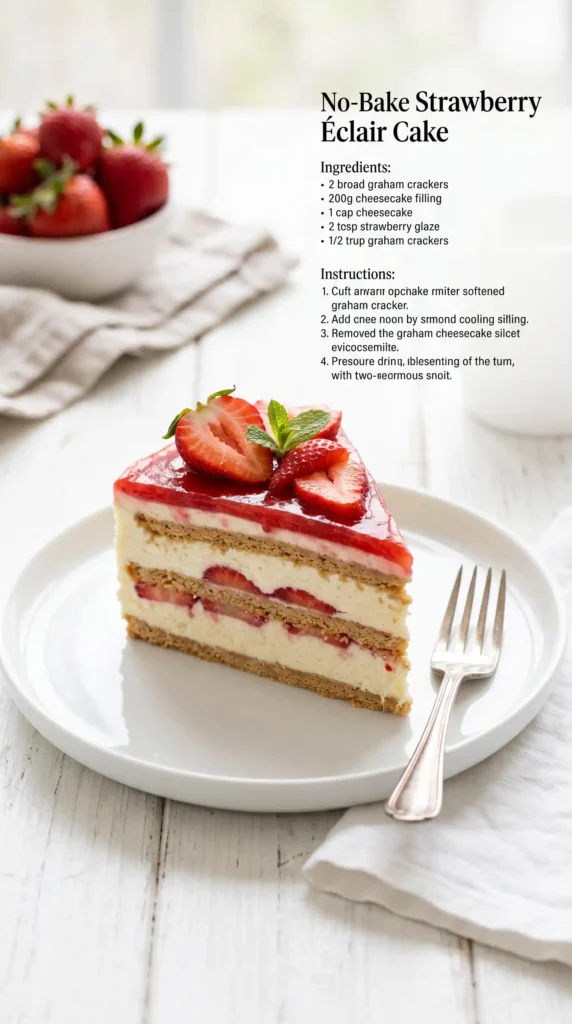
Some desserts sound simple and taste adequate. Some sound elaborate and taste exactly like you hoped. And some — a rare, fortunate few — sound simple and taste so much better than they have any right to that you make them once and immediately schedule every future social event around the opportunity to make them again. No-Bake Strawberry Eclair Cake belongs firmly in that third category.
I made this for a summer cookout when I needed a dessert for twenty people and had exactly forty minutes and a refrigerator available to me. The result was a 9×13 pan that generated more enthusiastic responses than anything I had cooked that day — including the items I had actually cooked. The magic is the chill time. The graham crackers soften overnight into layers that genuinely eat like sponge cake, and the combination of cheesecake pudding, fresh strawberries, and glossy strawberry frosting produces something that looks considerably more intentional than twenty minutes of prep should allow.
Have you ever made a dessert that immediately became the most requested thing in your repertoire? This is that dessert for summer. Let us make it properly.
Why This No-Bake Technique Produces Something Genuinely Cake-Like
The eclair cake technique relies on a process called osmosis in the refrigerator — the moisture in the pudding and fresh strawberries migrates into the dry graham cracker layers during the chilling period, softening and swelling the crackers until they lose their crunchy, dry texture and develop a dense, moist, sponge-like consistency. After overnight chilling, you genuinely cannot distinguish the softened graham cracker layers from cake layers by texture alone.
This technique works because graham crackers have a porous, absorbent structure that accepts moisture readily without dissolving completely. They hold their shape throughout the chilling process while softening internally — producing a layer that has the structural integrity to be sliced and lifted cleanly but feels exactly like a moist, tender cake layer in the mouth. It is one of the most satisfying examples of kitchen chemistry producing a result that feels like it should require more skill to achieve.
The cheesecake pudding is the filling choice that makes this version stand out from standard eclair cakes that use vanilla pudding. Cheesecake-flavour pudding adds a slight tang and a cream cheese-like depth that vanilla pudding entirely lacks. Combined with the whipped topping, it produces a filling that tastes noticeably more complex and dessert-worthy than the ingredient list would suggest. IMO, always choose cheesecake pudding over vanilla for this recipe. The difference is immediately noticeable.
What You Need
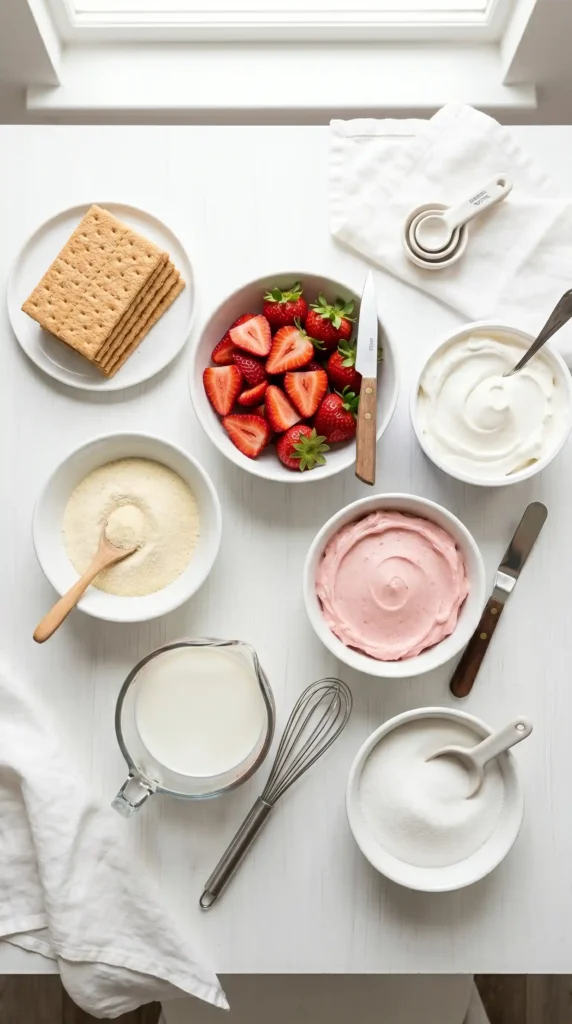
Six ingredients. Every single one available at any grocery store. The fresh strawberries are the ingredient that elevates this above the standard chocolate eclair cake version — their natural acidity and freshness cut through the sweetness of the pudding and frosting, producing a balanced dessert rather than an overwhelmingly sweet one. Use ripe, flavourful strawberries for the best result; out-of-season pale strawberries will not produce the same bright, fresh flavour layer.
- 1 box (about 410g / 14.4oz) honey graham crackers — you need enough for three complete layers in a 9×13 pan; one standard box provides exactly the right quantity
- 2 packages (96g / 3.4oz each) instant cheesecake pudding mix — or substitute instant vanilla pudding if cheesecake flavour is unavailable
- 3 cups (720ml) cold whole milk — cold milk is essential; warm milk does not cause instant pudding to set properly
- 1 tub (225g / 8oz) whipped topping (Cool Whip or equivalent), fully thawed
- 1 pound (450g) fresh strawberries, hulled and sliced approximately 5mm thick
- 1 can (450g / 16oz) strawberry frosting — the canned frosting is used as a glaze and must be warmed until pourable; it creates the glossy, even topping characteristic of éclair cake
The Overnight Chill Is the Most Important Step — Do Not Rush ItThe graham crackers need a minimum of 4 hours in the refrigerator to absorb enough moisture from the pudding filling to soften from crunchy to genuinely cake-like. At 4 hours, they are mostly softened but may still have slight resistance at the very edges. At 6–8 hours, they are completely softened throughout. Overnight chilling produces the absolute best texture — fully transformed, uniformly tender layers that slice and eat exactly like a proper layered cake. Make this the evening before your event and experience the difference.
How to Make No-Bake Strawberry Eclair Cake Step by Step
The active preparation takes 20 minutes. The refrigerator handles the remaining transformation over 4–8 hours. The technique involves three distinct steps — making the filling, layering everything in a pan, and applying the frosting glaze. Each step is genuinely simple but doing each one correctly produces a noticeably better result. Let us walk through the full process with the detail it deserves.
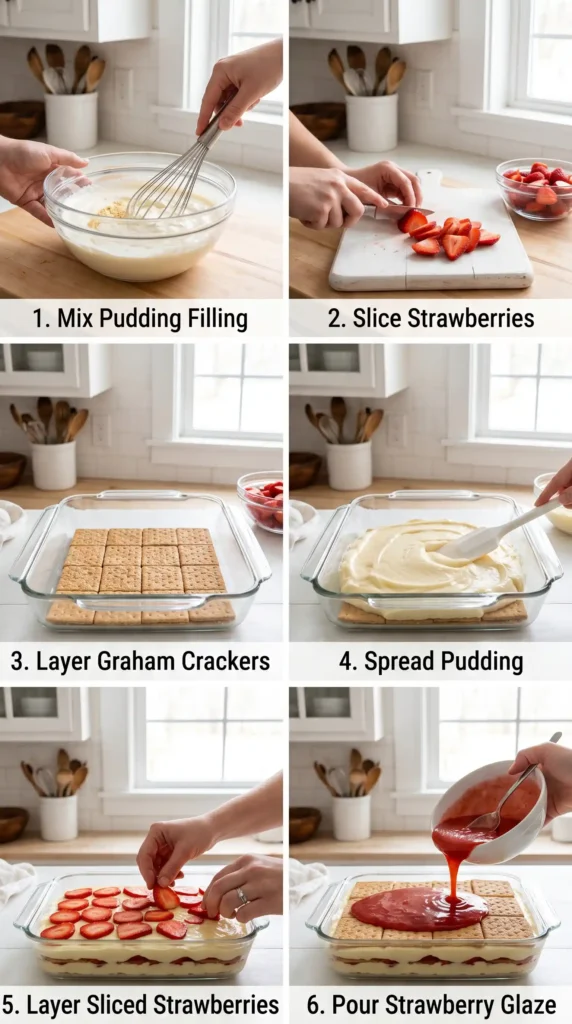
Step 1: Make the Cheesecake Pudding Filling
Pour the 3 cups of cold whole milk into a large mixing bowl. Add both packages of the instant cheesecake pudding mix — tip them both in at once over the cold milk. Using a whisk, beat the pudding mix and milk together vigorously for exactly 2 full minutes, working continuously without stopping. The mixture will begin to thicken as you whisk — this is the correct result and it happens because the starch in the instant pudding reacts with the cold milk and gels as it is agitated.
After 2 minutes of whisking, the mixture should look significantly thicker than plain milk — similar to a loosely set pudding or a thick yogurt in consistency. It should coat a spoon and hold a slight track when a finger is drawn through it. If it still looks thin and liquid after 2 minutes, whisk for another 30 seconds. Do not let the pudding sit for more than 1–2 minutes after whisking before adding the whipped topping — instant pudding continues to set and becomes firmer with every passing minute, which makes folding in the whipped topping progressively more difficult.
Add the fully thawed whipped topping to the pudding mixture. Fold together using a rubber spatula with large, gentle strokes from the bottom of the bowl upward — aim for 8–10 strokes total, stopping when the whipped topping is fully incorporated and no white streaks remain. The finished filling should look light, fluffy, and pale cream-coloured — noticeably airier and more voluminous than the pudding alone. It should hold a soft peak when scooped with a spoon. Set it aside and move immediately to layering.
Step 2: Hull and Slice the Strawberries
While the pudding filling rests, prepare the strawberries. Hull each berry by pressing a small paring knife into the top of the strawberry at an angle and cutting out the green stem and the white core below it in a circular motion. Slice each hulled strawberry crosswise into rounds approximately 5mm thick — thin enough to lay flat and cover the filling surface evenly, thick enough to retain their structure and texture after chilling rather than becoming soft and mushy.
Pat the sliced strawberries gently with a paper towel to remove excess surface moisture — wet strawberries release liquid into the filling layer during chilling that can make the pudding layer slightly watery around the strawberry pieces. Thoroughly dried slices distribute their moisture more slowly and evenly through the filling, producing a more stable result after the full chilling period.
Step 3: Build the Layers
Take a 9×13-inch (23x33cm) baking dish and place it on a flat surface. Line the base with a complete, single layer of graham crackers — break individual crackers where needed to fill gaps at the edges. The crackers do not need to overlap or be pressed together tightly — simply cover the base as completely as possible with a single layer. This first cracker layer becomes the bottom layer of the finished cake after chilling.
Spoon approximately half of the cheesecake pudding filling over the first cracker layer. Spread it from edge to edge using an offset spatula or the back of a large spoon, creating an even layer approximately 1–1.5cm deep across the full surface of the pan. Arrange half of the sliced strawberry rounds across the pudding layer in an even single layer — work quickly and deliberately from one end of the pan to the other so the strawberries distribute evenly.
Add the second layer of graham crackers directly on top of the strawberry layer — again, break pieces to fit and cover the surface as completely as possible. Spread the remaining pudding filling evenly over this second cracker layer. Distribute the remaining sliced strawberries across the second pudding layer in an even single layer. Finish with the third and final layer of graham crackers placed flat on top of the second strawberry layer. Press the top cracker layer very gently to create a flat, even surface for the frosting glaze.
Step 4: Apply the Strawberry Frosting Glaze
Remove the lid from the can of strawberry frosting and peel away any foil seal. Place the open can in the microwave and heat on full power for 20–30 seconds until the frosting becomes warm and fluid — it should look pourable and glossy rather than stiff and spreadable. Stir briefly to check consistency. If it still looks thick, microwave for an additional 10 seconds and stir again. The frosting should pour from a spoon in a steady, fluid stream — similar to a warm chocolate sauce in consistency.
Pour the warmed frosting directly over the top cracker layer, starting from the centre of the pan and working outward toward the edges. Tilt the pan gently to encourage the frosting to flow to the corners, or use the back of a spoon to spread it to the edges. The warm frosting will self-level across the cracker surface as it cools — do not over-spread it, as excessive spreading can dislodge the cracker layer below. Allow it to settle naturally into a smooth, even glaze across the entire top surface.
Step 5: Chill Completely Before Serving
Cover the assembled pan loosely with cling film — avoid pressing the cling film against the frosting surface, which would stick and pull the glaze when removed. Refrigerate for a minimum of 4 hours. Overnight refrigeration is the ideal — the graham crackers transform most completely after 8 or more hours, the strawberries release their flavour more fully into the surrounding pudding, and the frosting sets to a firm, glossy surface that slices cleanly.
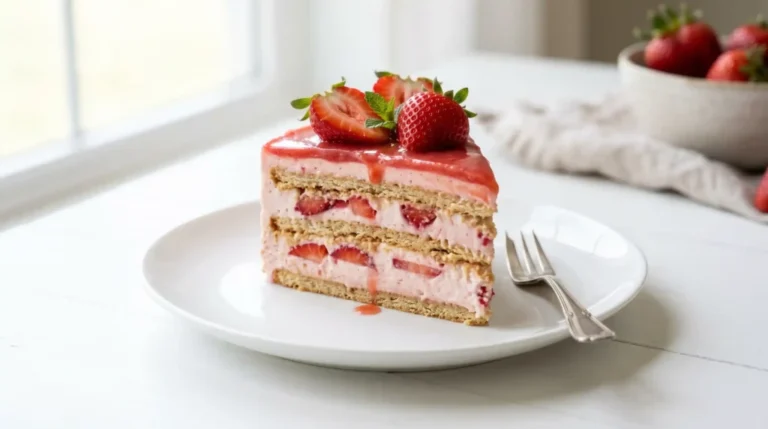
Just before serving, remove the No-Bake Strawberry Eclair Cake from the refrigerator and garnish the top with additional fresh strawberry slices arranged across the glaze surface. This fresh garnish adds a bright, vivid red colour contrast against the pink-red glaze and signals fresh fruit content that the chilled interior strawberries cannot communicate visually from the top of the pan. Slice with a sharp knife wiped clean between cuts, and serve with a flat spatula to lift clean, intact portions.
Variations Worth Making
Chocolate Strawberry Eclair Cake
Replace the strawberry frosting with chocolate frosting warmed to a glaze. The combination of chocolate topping, fresh strawberries, and cheesecake filling produces a black forest-inspired flavour that suits winter gatherings as well as summer.
Mixed Berry Eclair Cake
Replace the fresh strawberries with a mixture of strawberries, blueberries, and raspberries distributed through the pudding layers. Use raspberry frosting as the glaze for a mixed berry-forward flavour that looks visually striking.
Strawberry Lemon Eclair Cake
Add 2 teaspoons of fresh lemon zest to the pudding filling before folding in the whipped topping. The lemon zest adds a bright citrus note that cuts through the sweetness of the condensed pudding and frosting and makes the strawberry flavour taste more vivid and fresh.
Freezer Strawberry Eclair Cake
After the full chilling period, transfer the pan to the freezer for 2 hours before serving. Slice directly from frozen and allow 3–5 minutes at room temperature. The frozen version produces an ice cream cake-like texture that suits hot weather gatherings particularly well.
Storage Tips
Store leftover No-Bake Strawberry Eclair Cake covered in the refrigerator for up to 4 days. The graham cracker layers continue softening slightly with each day, and by day three the texture is at its absolute most cake-like — many people prefer the three-day version over the same-day version for exactly this reason. The strawberries may release additional moisture into the pudding layers during extended storage, slightly loosening the filling — still entirely delicious but different in consistency from the freshly chilled version.
Individual slices freeze beautifully for up to 1 month — wrap each slice in cling film, then foil, and freeze flat. Thaw in the refrigerator overnight or at room temperature for 30 minutes for a standard chilled texture. The frosted top maintains its glossy appearance after thawing. Do not refreeze previously frozen slices.
Frequently Asked Questions
Can I use regular vanilla pudding instead of cheesecake pudding?
Yes — vanilla instant pudding produces an excellent result with a more straightforward, classic flavour profile. The cheesecake pudding adds a pleasant tang and cream cheese-like depth that vanilla alone lacks, which many people prefer. If you substitute vanilla pudding, consider adding 2 tablespoons of softened cream cheese whisked into the cold milk before adding the pudding mix — this partially replicates the tangy, creamy note that cheesecake pudding provides and produces a more interesting filling than vanilla pudding alone.
Can I use homemade whipped cream instead of whipped topping?
Yes. Whip 1 cup of cold heavy cream with 2 tablespoons of powdered sugar to stiff peaks. Use in place of the 8oz whipped topping. Fresh whipped cream produces a richer, less sweet filling but is significantly less stable than commercial whipped topping — the finished cake should be consumed within 24–48 hours before the cream begins to weep. Commercial whipped topping stays stable for 4–5 days and is the more practical choice for a make-ahead dessert.
What if I cannot find strawberry frosting in a can?
Several alternatives produce a comparable result. Make a simple strawberry glaze by whisking 1 and 1/2 cups of powdered sugar with 3 tablespoons of fresh strawberry puree (blend and strain fresh berries) until smooth and pourable. Alternatively, warm a good quality strawberry jam with 1 tablespoon of water until fluid, strain out any seeds, and use as the glaze. Both produce a glossy, flavourful top layer. Raspberry frosting or jam also works and produces a slightly different but equally delicious berry flavour.
How do I get clean slices from the eclair cake?
Three techniques produce clean slices. First, chill the cake overnight — the longer chill produces layers that are more firmly set and slice more cleanly. Second, run a long, sharp knife under hot water and wipe completely dry before each cut — the warm blade melts through the frosting and glides through the pudding layers without dragging. Third, use a decisive, single downward stroke rather than a sawing motion, which can dislodge the cracker layers from the filling. Clean the blade between every cut for the neatest edges.
Can I make this eclair cake the day before serving?
Yes — and it is the preferred approach. Making this the evening before allows a full overnight chill of 8+ hours, which produces the most completely softened cracker layers and the most cohesive, evenly flavoured dessert. The pudding filling has more time to infuse into the crackers, the strawberries release their flavour more deeply into the surrounding layers, and the frosting sets to a more stable, cleanly sliceable surface. This is one of the few desserts that genuinely improves with time, making it an ideal make-ahead party dessert.
Final Thoughts
This No-Bake Strawberry Eclair Cake earns its status as the ultimate summer dessert through the most genuine possible means — it consistently exceeds every expectation anyone has when they hear the ingredient list. Six ingredients, twenty minutes of active preparation, and an overnight refrigerator doing the transformative work produces a dessert that feeds sixteen people and generates an enthusiasm level associated with significantly more complex baking.
Use cheesecake pudding. Use fresh, ripe strawberries. Warm the frosting until truly pourable before applying. And chill overnight rather than for the minimum four hours whenever time permits. These four decisions produce the best possible version of an already excellent recipe — the version that people talk about when they ask you what dessert you brought.
Make it tonight for tomorrow’s event. Make it a week from now and freeze individual slices for a dessert whenever the craving strikes. And accept — with genuine grace — every single recipe request that follows its appearance on any table you bring it to. FYI — you will receive those requests. That is guaranteed.
No-Bake Strawberry Eclair Cake
Ingredients
Method
- In a large mixing bowl, pour 3 cups of cold whole milk.
- Add both packages of instant cheesecake pudding mix and whisk vigorously for exactly 2 full minutes.
- After whisking, it should look thicker like loosely set pudding.
- Fold in the fully thawed whipped topping using large, gentle strokes until fully combined.
- Hull each strawberry by cutting out the green stem and core.
- Slice the strawberries into rounds approximately 5mm thick.
- Pat the sliced strawberries gently with a paper towel to remove excess moisture.
- Line a 9x13-inch baking dish with a layer of graham crackers.
- Spread half of the cheesecake pudding filling over the first cracker layer.
- Arrange half of the sliced strawberries across the pudding layer.
- Add a second layer of graham crackers over the strawberries.
- Spread the remaining pudding filling and distribute remaining strawberries.
- Finish with a final layer of graham crackers flat on top.
- Warm the strawberry frosting in the microwave for 20-30 seconds until pourable.
- Pour the warmed frosting over the top layer of graham crackers.
- Tilt the pan and use the back of a spoon to spread the frosting evenly.
- Cover the pan loosely with cling film and refrigerate for a minimum of 4 hours.
- For best results, refrigerate overnight.