Remember those basic Rice Krispie treats from childhood? Now imagine them leveled up with gooey caramel and flaky sea salt. These salted caramel Rice Krispie treats are about to become your new obsession.
I’m going to show you how to make the ultimate grown-up version. Get ready for sweet-salty perfection.
Prep Time: 15 minutes
Cook Time: 10 minutes
Total Time: 25 minutes
Servings: 16 squares
Why This Recipe Works
Here’s what makes these salted caramel Rice Krispie treats absolutely perfect. The homemade caramel adds rich, buttery depth you can’t get from the basic version.
The sea salt creates that addictive sweet-salty balance. It’s scientifically proven to make everything taste better.
I started making these for bake sales and people literally fought over them. Not kidding – there was an incident.
The technique is surprisingly simple. Anyone who can melt butter can nail this recipe.
The Essential Ingredients
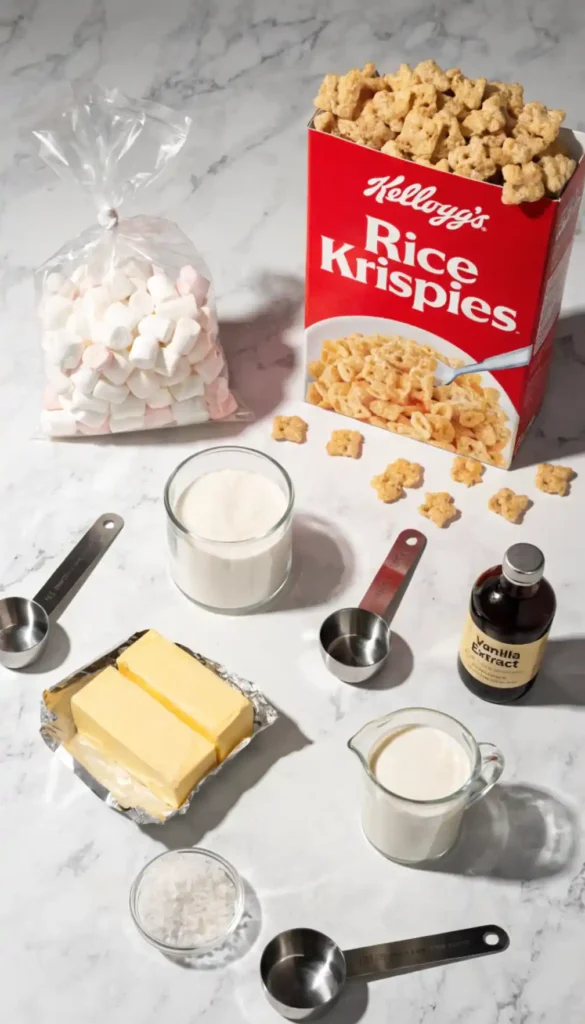
Let’s break down what you need for these elevated treats. Quality ingredients make noticeable difference here.
For the Rice Krispie Base:
- 6 cups Rice Krispies cereal
- 4 tablespoons butter
- 1 bag (10 oz) mini marshmallows
- 1 teaspoon vanilla extract
- Pinch of salt
Now For the Caramel Layer:
- 1 cup granulated sugar
- 6 tablespoons butter, cubed
- ½ cup heavy cream
- 1 teaspoon vanilla extract
- ½ teaspoon sea salt
For Topping:
- Flaky sea salt (like Maldon)
- Extra caramel drizzle (optional)
Understanding Caramel Basics
Homemade caramel seems scary but it’s actually straightforward. You just need to watch it carefully.
The sugar melts and caramelizes. This creates complex flavor you can’t buy in a jar.
Store-bought caramel sauce works in a pinch. But homemade tastes infinitely better.
The key is not stirring while sugar melts. This prevents crystallization.
Have you noticed how restaurant desserts always have homemade caramel? There’s a reason for that.
Making the Caramel
Heat sugar in a heavy-bottomed saucepan over medium heat. Don’t stir it yet.
The sugar will start melting around the edges. Gently swirl the pan to distribute heat.
Continue swirling until all sugar melts into amber liquid. This takes 8-10 minutes.
Remove from heat and add butter. Be careful – it’ll bubble vigorously.
Stir until butter melts completely. Pour in heavy cream slowly while stirring.
The mixture will bubble up. Keep stirring until smooth and combined.
Add vanilla and salt. Stir well and let cool for 10 minutes.
The Rice Krispie Base
Melt butter in a large pot over low heat. Don’t let it brown.
Add marshmallows and stir constantly. They’ll melt into gooey perfection.
Once smooth, remove from heat. Add vanilla and pinch of salt.
Pour in Rice Krispies cereal. Fold gently until every piece is coated.
Work quickly – the mixture sets as it cools. Speed matters here.
Assembling the Treats
Grease a 9×13 baking pan generously. Use butter or cooking spray.
Press half the Rice Krispie mixture into the bottom. Pack it firmly and evenly.
Pour cooled caramel over the base layer. Spread it to the edges.
Top with remaining Rice Krispie mixture. Press down gently but firmly.
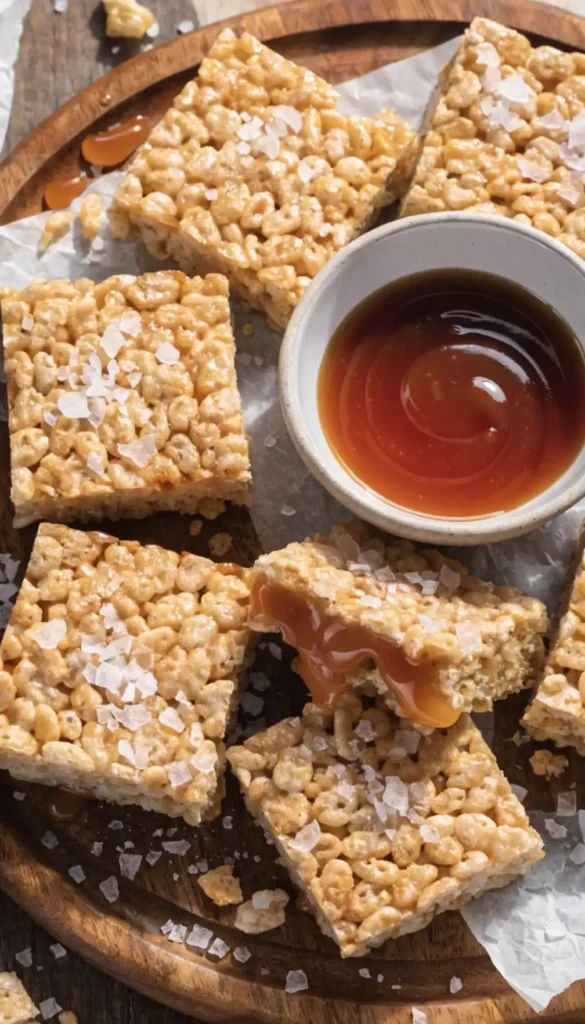
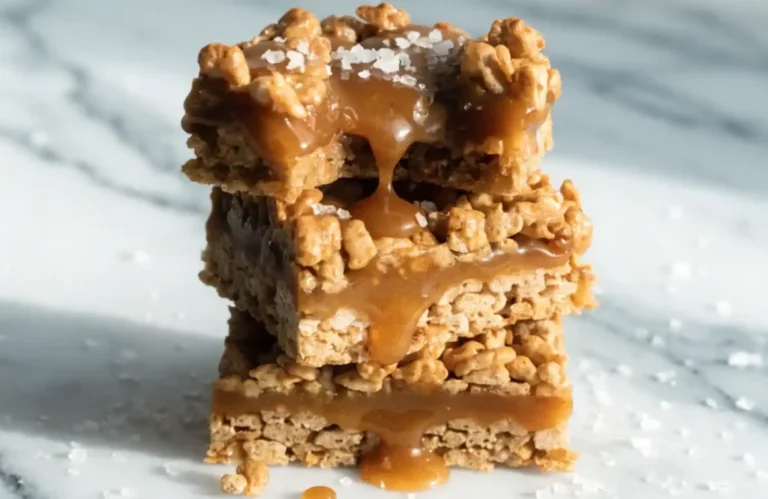
The caramel layer should be completely covered. This creates the surprise center.

Adding the Salt
Sprinkle flaky sea salt over the top immediately. Don’t wait or it won’t stick.
Use good quality sea salt like Maldon. The flakes create better texture and flavor.
Don’t overdo it. About 1 teaspoon of flakes is perfect.
The salt crystals catch light beautifully. They also warn people about the awesome flavor.
Cutting Perfect Squares
Let treats cool completely before cutting. This takes about 1 hour.
Use a sharp knife dipped in hot water. Wipe it clean between cuts.
Cut into 16 squares for standard size. Or make 24 smaller pieces.
The first cut is always messy. After that, they get easier.
Lift squares out gently. A thin spatula helps immensely.
Storage Guidelines
Store in airtight containers at room temperature for up to 5 days. They keep surprisingly well.
Layer parchment paper between layers. This prevents sticking.
Don’t refrigerate them. Cold makes them hard and less enjoyable.
They actually taste best on day two. The flavors meld overnight.
FYI, these never last 5 days at my house. They disappear immediately.
Variation Ideas
Add chocolate chips to the Rice Krispie mixture. Chocolate and caramel are best friends.
Drizzle melted chocolate over the top. Creates triple-layer decadence.
Mix in chopped pretzels. Extra crunch and salt distribution.
Use brown butter instead of regular. Adds nutty depth.
Sprinkle crushed toffee on top. Takes them over the top.
Making Ahead Strategy
Make the treats up to 3 days ahead. Store in airtight containers.
Don’t add the salt topping until serving day. It can get soggy.
The caramel layer stays perfectly gooey. No texture degradation.
These work great for parties and bake sales. Prep stress-free.
Troubleshooting Common Issues
Caramel too thick? Add a tablespoon of cream and gently reheat.
Caramel crystallized? Start over. Once it crystallizes, you can’t fix it.
Rice Krispies too hard? You overcooked the marshmallows. Use lower heat next time.
Can’t cut clean squares? Let them cool longer and use hot knife.
Why Homemade Beats Store-Bought
Store Rice Krispie treats taste stale and artificial. Your homemade version is fresh.
The caramel layer elevates these from snack to dessert. Total game-changer.
Making them costs maybe $6 total. Store versions charge $3+ per square.
The satisfaction of making these yourself is genuinely rewarding. Plus bragging rights.
IMO, once you make these, you’ll never buy the packaged version again. The difference is huge.
Perfect for Every Occasion
Make them for bake sales. They sell out instantly.
Bring them to parties. Everyone requests the recipe afterward.
Pack them for gifts. Wrap individually in cellophane.
Serve them at kids’ birthday parties. Adults steal them.
Make them for yourself. Sometimes you deserve fancy treats.
Presentation Ideas
Cut into shapes with cookie cutters. Hearts, stars, whatever you want.
Wrap individual squares in wax paper. Tie with twine for rustic look.
Stack them on a tiered stand. Creates impressive display.
Drizzle with extra caramel and chocolate. Makes them look professional.
Kid-Friendly Adjustments
Reduce the salt if kids are eating them. Some children don’t appreciate the sweet-salty thing yet.
Let kids help press the mixture into the pan. They love hands-on tasks.
Cut into smaller pieces. Kids don’t need giant squares.
Skip the fancy presentation. Kids just want to eat them.
Dietary Modifications
Make them gluten-free using certified GF Rice Krispies. Everything else is naturally gluten-free.
You can’t easily make these dairy-free. Butter and cream are essential.
Use vegan marshmallows and plant butter. The caramel needs testing though.
There’s no low-sugar version that works. Sugar is kind of the point here.
Cost Breakdown
Ingredients cost about $6-8 total. Makes 16 generous squares.
That’s 37-50 cents per serving. Bakery charges $3-4 each.
The ingredients are basic and widely available. No specialty store needed.
One batch feeds a crowd. Perfect for budget-conscious entertaining.
Final Thoughts on Treat Perfection
These salted caramel Rice Krispie treats prove simple recipes can create spectacular results. The addition of caramel and sea salt transforms the classic.
The combination of crispy cereal, gooey caramel, and flaky salt delivers pure satisfaction. Every bite is textured perfection.
Once you make these, basic Rice Krispie treats become unacceptable. The elevated version spoils you forever.
So grab that cereal and start melting. Your new favorite treat is about to happen.
FAQ
Can I use store-bought caramel sauce? Yes, but homemade tastes much better. If using jarred, warm it first and use about 1 cup. The texture and flavor won’t be identical but still works.
Why did my caramel crystallize? This happens if you stir the sugar while it’s melting or if water gets in. Make sure all utensils are completely dry. Swirl the pan instead of stirring.
Can I make these without the caramel layer? Sure, but they’ll just be regular Rice Krispie treats with salt on top. The caramel is what makes this recipe special and worth the extra effort.
How do I keep treats from being too hard? Don’t overcook the marshmallows – remove from heat as soon as they’re melted. Press gently when forming – aggressive packing makes them dense.
Can I freeze these? Not recommended. The texture changes when frozen and thawed. The caramel layer especially doesn’t freeze well. Better to make them fresh or store at room temp.
Salted Caramel Rice Krispie Treats
Ingredients
Method
- Heat sugar in a heavy-bottomed saucepan over medium heat without stirring.
- Allow sugar to melt around the edges, gently swirling the pan to distribute heat.
- Continue swirling until all sugar melts into an amber liquid, about 8-10 minutes.
- Remove from heat and carefully add butter; it will bubble vigorously.
- Stir until butter is melted, then gradually pour in heavy cream while stirring until smooth.
- Add vanilla and salt into the mixture, stir well, and let cool for 10 minutes.
- Melt butter in a large pot over low heat, making sure not to brown it.
- Add marshmallows and stir constantly until fully melted.
- Once smooth, remove from heat and stir in vanilla and a pinch of salt.
- Fold in the Rice Krispies cereal until fully coated, working quickly before it sets.
- Grease a 9×13 baking pan generously with butter or cooking spray.
- Press half of the Rice Krispie mixture into the bottom of the pan firmly and evenly.
- Pour the cooled caramel over the Rice Krispie base and spread to the edges.
- Top with the remaining Rice Krispie mixture, pressing down gently to cover the caramel.
- Immediately sprinkle flaky sea salt over the top.
- Allow the treats to cool completely before cutting, about 1 hour.
- Use a sharp knife dipped in hot water for clean cuts, wiping it between slices.
- Store in airtight containers at room temperature for up to 5 days, with parchment paper between layers to prevent sticking.