
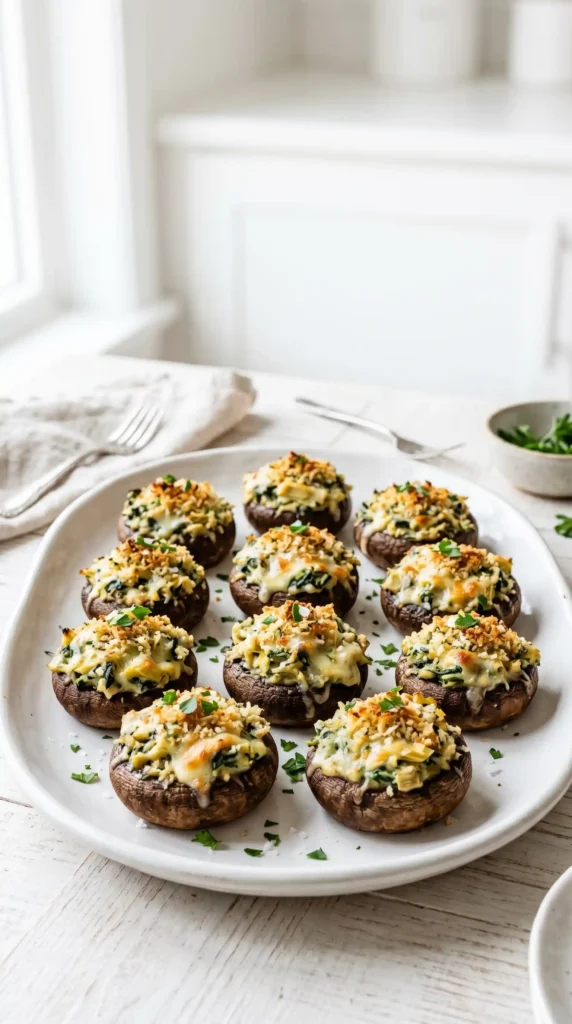
You know that appetizer that disappears within five minutes at every party? Yeah, that’s this one. Spinach Artichoke Stuffed Mushrooms combine creamy, garlicky filling with a crispy breadcrumb topping and a tender mushroom base. I made these once for a dinner gathering and people literally asked me for the recipe before they’d even finished eating.
Servings: About 8–10 stuffed mushroom caps (depending on mushroom size) Prep Time: 20 minutes Cook Time: 30 minutes Total Time: 50 minutes
Why Spinach Artichoke Stuffed Mushrooms Are Worth Making
Have you ever tried a bite-sized appetizer that actually tastes like a full dish? That’s exactly what these deliver. The spinach and artichoke filling is rich, savory, and packed with flavor. Topped with melted mozzarella and golden Panko crumbs, these little guys punch way above their weight.
IMO, this recipe is also one of the most versatile appetizers out there. You can serve them at a dinner party, bring them to a potluck, or just make a batch on a Sunday and snack on them all week. No complaints here.
Ingredients You’ll Need
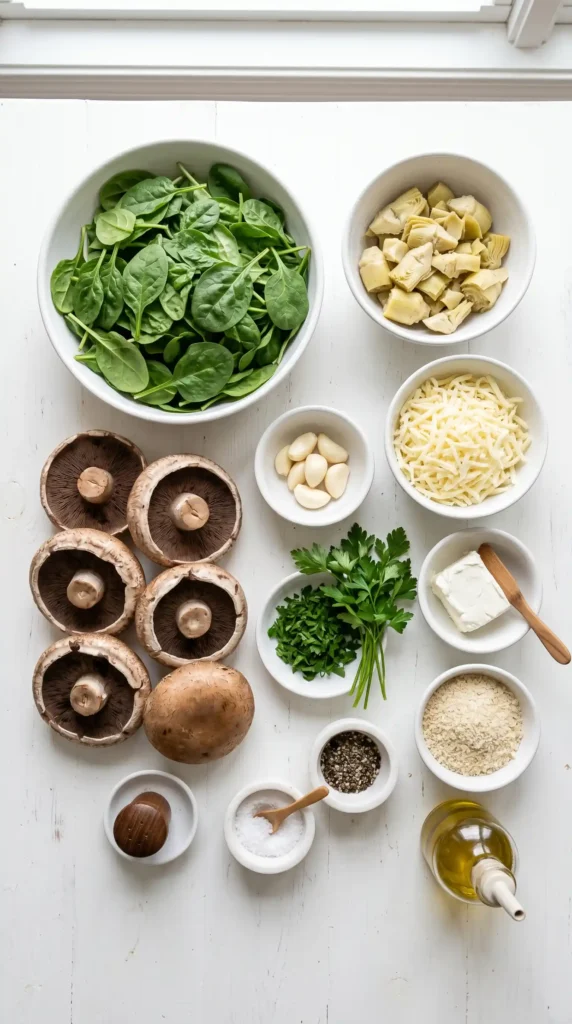
Here’s a full breakdown of everything that goes into this recipe. Don’t let the list intimidate you — most of this is stuff you probably already have.
For the Mushrooms:
- 24 oz portobello mushrooms, large enough to stuff
- Stems from about half the mushrooms (saved and diced for the filling)
- 3 tbsp avocado or olive oil, divided (for caps and for cooking)
- Kosher coarse salt to taste
- Black pepper to taste
For the Spinach Artichoke Filling:
- 6–7 oz marinated artichoke hearts in water (drained and chopped)
- 5 oz fresh spinach (roughly chopped)
- 3 garlic cloves (peeled and pressed)
- 8 oz cream cheese (room temperature works best)
- 1 cup shredded mozzarella cheese (to mix into the filling)
- 2 tbsp fresh parsley (minced)
- 1/3–1/2 cup shredded mozzarella cheese (for topping)
- 1/4 cup Panko bread crumbs
Pro Tip: Squeeze out the artichoke hearts well before chopping. Extra liquid in the filling makes everything watery and sad. :/ You’ve been warned.
How to Make Spinach Artichoke Stuffed Mushrooms Step by Step
This recipe has a few moving parts, but nothing tricky. I’ll walk you through each stage clearly so you don’t have to guess at anything.
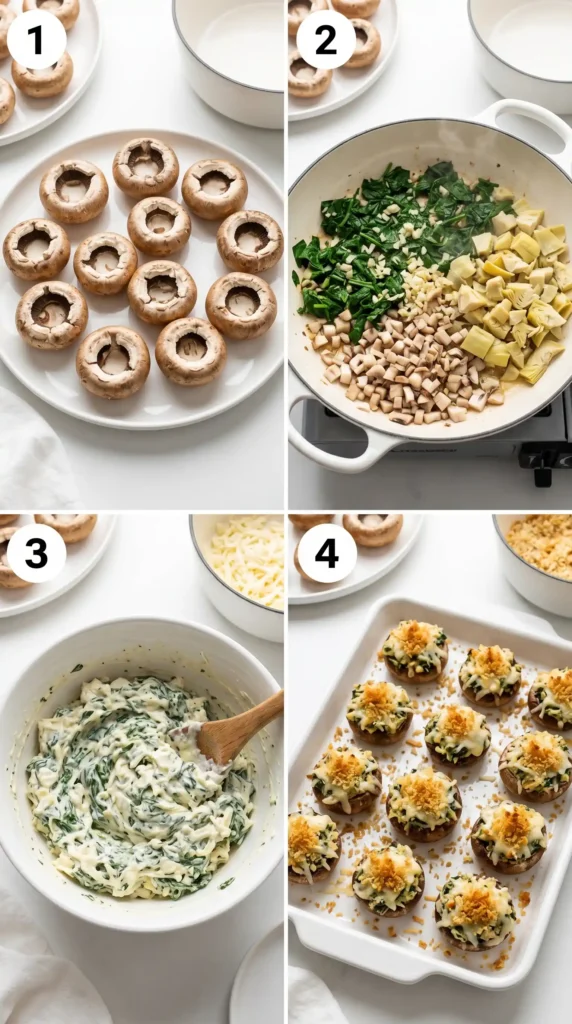
Step 1: Prep the Mushrooms
Rinse the mushrooms quickly under cold water using a mesh strainer. Dry them immediately with a clean paper towel — mushrooms are like sponges, so don’t let them sit in water. Speed is everything here.
Gently pop the stems off each mushroom cap. Save the stems from about half the mushrooms to fold into your filling later. Trim the dirty bottoms off any stems you’re keeping, then dice them into small, even pieces. Set everything aside.
Preheat your oven to 350°F and grease a large baking dish. Rub each mushroom cap inside and outside with avocado or olive oil, then season generously with salt and pepper on both surfaces. Place them cap-side down in the baking dish so the cavity faces up, ready to be filled.
Step 2: Prep the Filling Ingredients
Before you heat anything, get your filling ingredients ready. Roughly chop the fresh spinach into manageable pieces. Peel and press the 3 garlic cloves using a garlic press or the side of your knife. Take the artichoke hearts out of the jar, give them a good squeeze to remove the excess liquid, then chop them into small, bite-sized chunks.
This step matters more than it sounds. Wet artichoke hearts will make the filling loose and runny, which means it won’t hold together nicely inside the mushroom caps. Squeezing them dry only takes 10 seconds and makes a real difference.
Step 3: Cook the Filling
Preheat a skillet or cooking pan over medium heat and add a drizzle of oil. Toss in the diced mushroom stems and let them cook for about 4–5 minutes, stirring occasionally, until they turn golden and soften. You want a little color on them — raw mushroom stems have a bland texture, but cooked ones add real depth to the filling.
Add the chopped artichoke hearts to the pan and cook them alongside the mushroom stems for another 2 minutes, letting them warm through and develop a bit of flavor. Next, push everything to the sides of the pan and make a small well in the center. Add the pressed garlic directly into that well and let it cook for 30–45 seconds until fragrant. Don’t let it brown — just enough to wake it up. Then stir it into the rest of the mixture.
Add all the chopped fresh spinach to the pan and season with salt and pepper. Stir everything together and cook until the spinach completely wilts down, which usually takes 3–4 minutes. The spinach will look like a massive pile at first — then it’ll shrink to almost nothing. This is completely normal, not a mistake.
Step 4: Drain and Cool the Veggies
Once the spinach is fully wilted, check the bottom of the pan. If liquid has accumulated — and it often does — drain it off before the next step. Excess moisture is the enemy of a firm, scoopable filling. Tip the mixture into a mixing bowl and let it rest for a few minutes while you gather the remaining filling ingredients.
Cooling the veggie mixture slightly before adding the cream cheese matters. If the veggies are too hot, they can melt the cream cheese unevenly and make the filling harder to mix. Even a 3–4 minute rest makes the mixing process smoother and easier.
Step 5: Mix the Filling
Into the mixing bowl with your cooled veggie mixture, add the 8 oz of cream cheese, 1/4 cup of Panko bread crumbs, 2 tbsp minced parsley, and 1 cup of shredded mozzarella cheese. Mix everything together until fully combined and evenly distributed.
The filling should look creamy and thick, not runny. If it seems too loose, let it chill in the fridge for 10 minutes — it firms up quickly. Taste and adjust the salt and pepper before you start stuffing. This is your last real chance to season the filling properly.
Step 6: Fill the Mushroom Caps
Spoon the spinach artichoke filling generously into each prepared mushroom cap. Don’t be shy — fill them in a dome shape that mounds above the rim of the cap. The filling will settle slightly during baking, so overfilling is actually the right move here. Each cap should look full and satisfying.
Step 7: Add the Cheese Topping and Bake
Sprinkle 1/3 to 1/2 cup of shredded mozzarella evenly over each filled mushroom cap. This topping layer melts into a golden, bubbly crust that looks incredible and adds a second layer of cheesy goodness. Don’t skip it — it’s one of the best parts.
Slide the baking dish into the preheated 350°F oven and bake for 24–26 minutes. If your mushroom caps are particularly large and thick, they may need up to 30 minutes. You’re looking for mushrooms that are tender, a topping that’s golden and bubbling, and filling that’s fully heated through.
Step 8: Rest Before Serving
Pull the pan out of the oven and let the mushrooms rest for 3–5 minutes before serving. The filling gets absolutely scalding hot during baking — it holds heat longer than you’d expect. Rushing this step means burning your mouth on the first bite. Be patient. It’s worth the wait.
Tips to Make This Recipe Even Better
A few extra things I’ve picked up from making these multiple times:
- Room temperature cream cheese mixes in far more smoothly than cold. Pull it out 30 minutes before you start.
- Don’t skip drying the mushrooms. Wet mushrooms steam instead of bake and end up soggy.
- Fresh spinach beats frozen here every time. Frozen spinach holds more water and needs extra squeezing.
- Panko over regular breadcrumbs. The texture difference is noticeable — Panko stays crunchier and lighter.
- Season in layers. Salt the mushrooms, salt the filling, taste before baking. This builds real depth.
Can You Make These Ahead of Time?
Absolutely. This is actually one of my favorite things about Spinach Artichoke Stuffed Mushrooms — they’re very prep-friendly. Make the filling up to 24 hours in advance and store it covered in the fridge. Prep and oil the mushroom caps the day before as well. When you’re ready, just fill, top with cheese, and bake.
FYI, fully assembled (but unbaked) mushrooms can sit covered in the fridge for up to 8 hours before baking. This makes them perfect for dinner parties where you want to do all the work in advance and just slide them into the oven when guests arrive.
Variations Worth Trying
Locked in on this recipe? These small swaps keep things interesting:
- Add sun-dried tomatoes to the filling for a tangy, slightly sweet punch.
- Swap mozzarella for gruyere if you want a nuttier, more complex flavor.
- Use baby bella mushrooms for smaller, one-bite party portions.
- Add red pepper flakes to the filling if you like a little heat with your creaminess.
Frequently Asked Questions
Q: Can I use frozen spinach instead of fresh? You can, but you need to thaw it completely and squeeze out as much water as possible first. Frozen spinach holds significantly more moisture than fresh, and any extra liquid will make your filling watery and difficult to work with.
Q: What type of mushrooms work best for stuffed mushrooms? Large portobello caps or cremini mushrooms work best because they have a deep, wide cavity for the filling. Baby bellas are great for smaller, party-sized bites. Avoid button mushrooms that are too small to hold a decent amount of filling.
Q: How do I keep stuffed mushrooms from getting soggy? Dry the mushrooms thoroughly after rinsing, drain any liquid from the cooked spinach mixture before mixing, and don’t overcrowd the baking dish. All three of these steps significantly reduce sogginess.
Q: Can I make Spinach Artichoke Stuffed Mushrooms without cream cheese? Yes — ricotta or mascarpone work as substitutes. Ricotta gives a lighter texture; mascarpone keeps the richness but adds a slightly sweeter note. The overall result will be a bit different but still delicious.
Q: How do I store and reheat leftover stuffed mushrooms? Store leftovers in an airtight container in the fridge for up to 3 days. Reheat in an oven or air fryer at 350°F for about 8–10 minutes to keep them from going soggy. The microwave technically works but makes the topping soft rather than crispy.
Final Thoughts
Spinach Artichoke Stuffed Mushrooms are exactly the kind of recipe that feels impressive but doesn’t stress you out to make. Rich filling, crispy topping, tender mushroom base — every element earns its place. Whether you’re making these for a crowd or just for yourself on a quiet evening, this recipe will not let you down.

Spinach Artichoke Stuffed Mushrooms
Ingredients
Method
- Rinse the mushrooms quickly under cold water using a mesh strainer. Dry them immediately with a clean paper towel.
- Gently pop the stems off each mushroom cap, saving the stems from half the mushrooms to fold into your filling later. Trim and dice the dirty bottoms of the saved stems.
- Preheat the oven to 350°F and grease a large baking dish. Rub each mushroom cap inside and outside with oil, then season with salt and pepper.
- Chop the fresh spinach and press the garlic cloves.
- Drain and squeeze the artichoke hearts to remove excess liquid, then chop.
- In a skillet, heat oil over medium heat and cook the diced mushroom stems for 4-5 minutes until golden.
- Add the chopped artichoke hearts and cook for an additional 2 minutes.
- Push the mixture to the sides and add the pressed garlic in the center, cooking for 30-45 seconds.
- Stir in the chopped spinach and season with salt and pepper. Cook until spinach is wilted.
- Drain any excess liquid, then let the mixture cool.
- In a bowl, mix the cooled veggie mixture with cream cheese, Panko bread crumbs, minced parsley, and shredded mozzarella. Adjust seasoning if needed.
- Generously fill each mushroom cap with the spinach artichoke mixture, mounding above the rim.
- Sprinkle shredded mozzarella on top of each filled cap.
- Bake in the preheated oven for 24–26 minutes, or up to 30 minutes for larger caps, until the mushrooms are tender and the topping is golden.
- Let the mushrooms rest for 3–5 minutes before serving.


