
Servings: 10 biscuit bombs | Prep Time: 20 minutes | Bake Time: 14 minutes | Total Time: 34 minutes
Some recipes just make you stop and rethink everything you thought you knew about breakfast. The first time I made Strawberry Cream Stuffed Biscuit Bombs, my family ate every single one before I could grab my second. That kind of instant reaction tells you everything you need to know.
Picture a golden, fluffy biscuit with a soft, pillowy exterior that gives way to a warm, sweet strawberry cream cheese center. It tastes like a strawberry Danish and a fresh biscuit had the best possible collaboration. The result belongs on every breakfast table, brunch spread, or dessert tray immediately.
The best part? These come together in about 34 minutes from start to finish. No special equipment, no fancy techniques, no reason whatsoever to not make them this weekend.
What Makes Strawberry Cream Stuffed Biscuit Bombs So Good
Have you ever bitten into something and immediately thought it belonged in a bakery window? That’s exactly what these deliver. The contrast between the buttery, fluffy biscuit shell and the cool, tangy strawberry cream cheese filling is just genuinely perfect.
What sets these apart from a regular filled pastry is the texture combination. The outside bakes up golden and slightly crisp, while the inside stays tender and soft. The filling melts into the warm biscuit as it bakes, creating a pocket of sweet, fruity cream that hits differently from any standard breakfast pastry.
IMO, the secret weapon here is using fresh strawberries rather than jam. Fresh strawberries give the filling bright, natural flavor and a bit of texture. Jam works, but fresh fruit elevates the whole thing into something that actually feels homemade and special.
Ingredients You Will Need
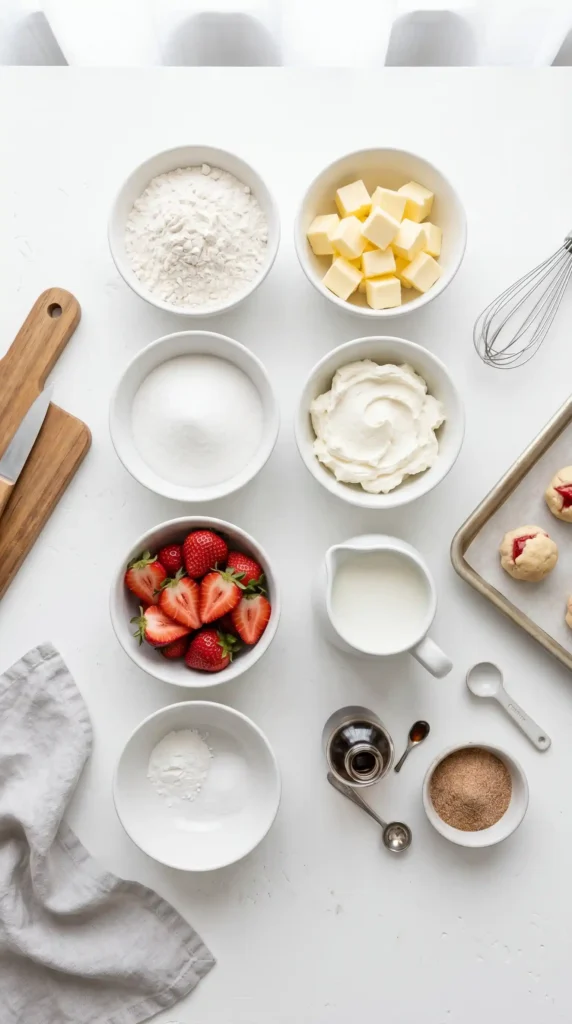
For the Biscuit Dough
You can use homemade biscuit dough or a quality canned biscuit dough for a shortcut. Here’s what the homemade version needs:
- 2 cups all-purpose flour
- 1 tablespoon baking powder
- 1 teaspoon granulated sugar
- 1/2 teaspoon fine salt
- 1/3 cup cold unsalted butter, cubed
- 3/4 cup cold whole milk or buttermilk
For the Strawberry Cream Filling
This is the heart of the recipe. Keep it simple and it will absolutely sing:
- 8 ounces cream cheese, softened to room temperature
- 3 tablespoons powdered sugar
- 1 teaspoon pure vanilla extract
- 1/2 cup fresh strawberries, finely diced (about 6 to 8 medium berries)
- 1 tablespoon strawberry jam (optional, for extra strawberry punch)
For the Topping
- 3 tablespoons unsalted butter, melted
- 2 tablespoons granulated sugar
- 1/2 teaspoon cinnamon
- Optional: 1/4 cup powdered sugar mixed with 1 tablespoon milk for a simple glaze
Equipment You Will Need
Nothing complicated here. You probably own all of this already:
- Large mixing bowl
- Pastry cutter or two forks (for cutting butter into flour)
- Hand mixer or stand mixer (for the cream cheese filling)
- Baking sheet
- Parchment paper
- Rolling pin
- Small cookie scoop or spoon
- Pastry brush
How to Make Strawberry Cream Stuffed Biscuit Bombs Step by Step
Step 1: Make the Strawberry Cream Filling First
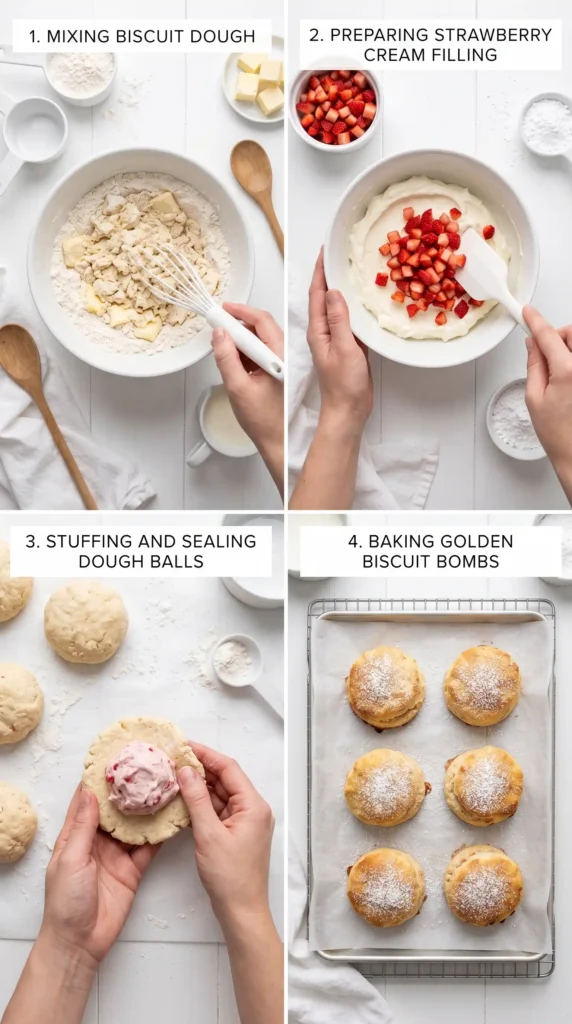
Start with the filling so it has time to chill while you prepare the dough. In a medium bowl, beat 8 ounces of softened cream cheese with a hand mixer on medium speed for about 2 minutes until it’s completely smooth with no lumps. Room temperature cream cheese is non-negotiable here. Cold cream cheese will stay lumpy no matter how long you beat it.
Add 3 tablespoons of powdered sugar and 1 teaspoon of vanilla extract. Beat again for about 30 seconds until fully combined and fluffy. Taste it. It should be lightly sweet and creamy. If you want it sweeter, add another half tablespoon of powdered sugar now before the strawberries go in.
Fold in the finely diced fresh strawberries using a rubber spatula. If you’re using the optional tablespoon of jam, stir that in too. The jam deepens the strawberry flavor and adds a beautiful pink color to the filling. Stir gently so you don’t completely crush all the strawberry pieces.
Cover the bowl with plastic wrap and place it in the refrigerator for at least 15 minutes. Chilling the filling makes it firmer and much easier to portion and seal inside the biscuit dough. Trying to work with warm cream cheese filling is a recipe for a sticky mess This step makes a real difference.
Step 2: Make the Biscuit Dough
Preheat your oven to 400 degrees F (205 degrees C). Line a baking sheet with parchment paper and set it aside. In a large bowl, whisk together 2 cups of all-purpose flour, 1 tablespoon of baking powder, 1 teaspoon of sugar, and 1/2 teaspoon of salt until combined.
Add the cold cubed butter to the flour mixture. Using a pastry cutter, two forks, or your fingertips, work the butter into the flour until the mixture looks like coarse crumbs with some pea-sized butter chunks remaining. Those chunks of cold butter create steam as the biscuits bake, which is exactly what produces those flaky, tender layers.
Pour in 3/4 cup of cold milk or buttermilk and stir gently with a fork just until the dough comes together into a shaggy, slightly sticky mass. Do not overwork it. The more you mix biscuit dough, the tougher it gets. Stop the moment you stop seeing dry flour patches in the bowl.
Turn the dough out onto a lightly floured surface and give it two or three gentle folds, just enough to bring it together. Then gently pat or roll it to about half an inch thick. You don’t need a rolling pin necessarily. Your hands work perfectly well for this and give you better control over the thickness.
Step 3: Cut and Portion the Dough
Use a 3-inch round cutter or a glass with a 3-inch opening to cut circles from the dough. Press straight down without twisting, which would seal the edges and prevent the biscuits from rising properly. You should get about 10 circles from this batch. Re-roll the scraps once to cut any remaining circles.
Lay the dough circles out on your work surface. Take a moment to look at each one and check that the edges are roughly even in thickness. Thin edges tear when you try to seal the filling inside, and that means leaking cream cheese in your oven. Nobody wants that.
Step 4: Fill and Seal the Biscuit Bombs
Remove the strawberry cream filling from the refrigerator. Use a small cookie scoop or a heaping tablespoon to place about 1 and a half tablespoons of filling right in the center of each dough circle. Resist the urge to add more than that. Overfilling makes sealing very difficult and leads to burst biscuit bombs in the oven.
Lift the edges of the dough circle up and around the filling, pulling them toward the center from all sides like you’re closing a drawstring bag. Pinch and press all the seams together firmly at the top until they’re completely closed. Then roll the sealed bomb gently between your palms to smooth it into a round ball shape.
Place each finished bomb seam-side down on your parchment-lined baking sheet. Leave about 2 inches of space between each one. The seam-down position keeps the filling contained during baking and also hides any slightly messy seams under the golden crust. Smart and practical.
Step 5: Add the Topping and Bake
Brush the top of each biscuit bomb generously with melted butter using a pastry brush. In a small bowl, stir together 2 tablespoons of granulated sugar and 1/2 teaspoon of cinnamon. Sprinkle this mixture evenly over every buttered bomb. The sugar creates a lightly caramelized, slightly crunchy top as they bake, which is an absolutely wonderful contrast to the soft interior.
Bake at 400 degrees F for 12 to 14 minutes, until the biscuit bombs are golden brown on top and cooked through. They should look deeply golden, not pale. A pale biscuit bomb is an underbaked biscuit bomb, and the center filling won’t be warm enough to enjoy. Check them at the 12-minute mark and add more time if needed.
Let them cool on the pan for 5 minutes before touching them. The filling gets very hot during baking and needs a moment to settle and thicken back up slightly. If you want to add the optional glaze, drizzle it over the bombs while they’re still warm but not scorching hot. The glaze sets beautifully within a couple of minutes.
Tips for Perfect Results Every Time
- Keep everything cold: Cold butter in the dough and chilled filling both make assembly far easier and produce a better final texture. Don’t skip the filling chill step.
- Don’t overfill: 1 and a half tablespoons of filling per bomb is the right amount. More filling means burst seams and a messy baking sheet.
- Seal firmly: Pinch every seam twice and roll between your palms. Any gap becomes a leak in the oven.
- Use fresh strawberries when possible: Fresh berries give brighter flavor and better texture than jam alone. If strawberries are out of season, frozen and thawed berries work well too. Just pat them dry before dicing.
- Serve warm: These taste best within 20 minutes of coming out of the oven. The filling is gooey and warm, the exterior is crisp, and everything is at peak deliciousness.
Fun Variations to Try

Once you nail the classic version, the filling possibilities are honestly endless:
- Blueberry Lemon Cream: Swap strawberries for fresh blueberries and add 1 teaspoon of lemon zest to the cream cheese filling.
- Raspberry Vanilla: Use fresh raspberries and a tiny pinch of almond extract instead of vanilla for a bakery-style flavor.
- Peach Honey: Diced fresh peaches with a drizzle of honey mixed into the cream cheese is a summer dream.
- Mixed Berry: Use a combination of strawberries, blueberries, and blackberries for a colorful, bold filling.
How to Serve Strawberry Cream Stuffed Biscuit Bombs
These shine at brunch when served warm on a big platter with a dusting of powdered sugar and a bowl of extra strawberries on the side. They also work beautifully as a dessert with a scoop of vanilla ice cream alongside. FYI, they disappear fast, so always make more than you think you need.
For a party presentation, drizzle the simple powdered sugar glaze over the entire platter right before serving. They look stunning, taste incredible, and guests always assume they came from a bakery. You don’t have to correct them.
Storing and Reheating
Store any leftover Strawberry Cream Stuffed Biscuit Bombs in an airtight container in the refrigerator for up to 3 days. The cream cheese filling means they need refrigeration. To reheat, pop them in a 300 degree oven for 6 to 8 minutes until warmed through. The microwave works but softens the exterior. The oven keeps that slight exterior crispness intact.
You can also freeze baked biscuit bombs for up to 1 month. Freeze them on a baking sheet first until solid, then transfer to a freezer bag. Reheat from frozen at 325 degrees for about 12 to 15 minutes. They reheat surprisingly well and taste almost as good as fresh.
Frequently Asked Questions
Can I use canned biscuit dough instead of homemade?
Absolutely. A can of refrigerated biscuit dough (the large biscuit size) works perfectly as a shortcut. Flatten each biscuit round with your palm, add the filling, and seal as directed. The flavor won’t be quite as buttery as homemade, but the result is still delicious and cuts your prep time in half.
Why did my biscuit bombs burst open during baking?
The most common reason is overfilling or weak seals. Make sure you’re using no more than 1 and a half tablespoons of filling per bomb, and pinch the seams together very firmly before placing them seam-side down on the pan. Chilling the filling before assembly also helps because firmer filling is easier to contain.
Can I make these ahead of time?
You can assemble them the night before, cover the baking sheet with plastic wrap, and refrigerate overnight. Bake them straight from the refrigerator the next morning, adding 2 to 3 extra minutes to the bake time since they’ll be cold. The filling can also be made up to 2 days ahead and stored covered in the fridge.
Can I use frozen strawberries in the filling?
Yes, frozen strawberries work well. Thaw them completely, then pat them very dry with paper towels before dicing and folding into the cream cheese. Frozen strawberries release a lot of moisture as they thaw, and too much liquid in the filling makes the dough soggy and difficult to seal. Drying them well solves that problem entirely.
How do I prevent the filling from leaking out during baking?
Three things matter most here: chilling the filling, not overfilling, and sealing the seams firmly. Placing the bombs seam-side down on the baking sheet adds a final layer of protection. If you do get some leakage, it usually just caramelizes on the parchment and tastes wonderful anyway. Still, tighter seams mean cleaner results.
The Bottom Line on Strawberry Cream Stuffed Biscuit Bombs
This recipe earns its spot at the top of my regular rotation without question. It’s fast, straightforward, and produces something that tastes genuinely special every single time. The combination of golden biscuit and warm strawberry cream filling hits a level of comfort that’s hard to beat.
Whether you serve them at brunch, pack them for a potluck, or just make them because it’s Saturday and you deserve something incredible, these never disappoint. The whole process takes just over 30 minutes, which means fresh, warm Strawberry Cream Stuffed Biscuit Bombs are never far away. Go make a batch this weekend. Double the recipe if you have a crowd coming. And if somehow you end up with leftovers, reheat them the next morning and thank yourself for the foresight. You’ve got this

Strawberry Cream Stuffed Biscuit Bombs
Ingredients
Method
- In a medium bowl, beat the softened cream cheese with a hand mixer on medium speed for about 2 minutes until completely smooth with no lumps.
- Add the powdered sugar and vanilla extract. Beat again for about 30 seconds until fully combined and fluffy.
- Fold in the finely diced fresh strawberries and optional jam, carefully mixing until combined.
- Cover the bowl and refrigerate the filling for at least 15 minutes.
- Preheat your oven to 400 degrees F (205 degrees C) and line a baking sheet with parchment paper.
- In a large bowl, whisk together flour, baking powder, sugar, and salt until combined.
- Add the cold cubed butter and work into the flour until it resembles coarse crumbs.
- Pour in the cold milk or buttermilk and stir gently until the dough just comes together.
- Turn the dough out onto a floured surface and gently fold it to bring it together. Pat or roll it to about half an inch thick.
- Cut circles from the dough using a 3-inch round cutter.
- Check that the edges of each circle are even in thickness.
- Remove the strawberry cream filling from the refrigerator and place about 1.5 tablespoons of filling in the center of each dough circle.
- Lift the edges of the dough to enclose the filling and pinch the seams together firmly.
- Roll the sealed bomb gently between your palms into a round ball and place seam-side down on the baking sheet.
- Brush the top of each biscuit bomb with melted butter.
- Sprinkle the mixture of granulated sugar and cinnamon over each bomb.
- Bake for 12 to 14 minutes until golden brown.
- Let them cool on the pan for 5 minutes before serving.