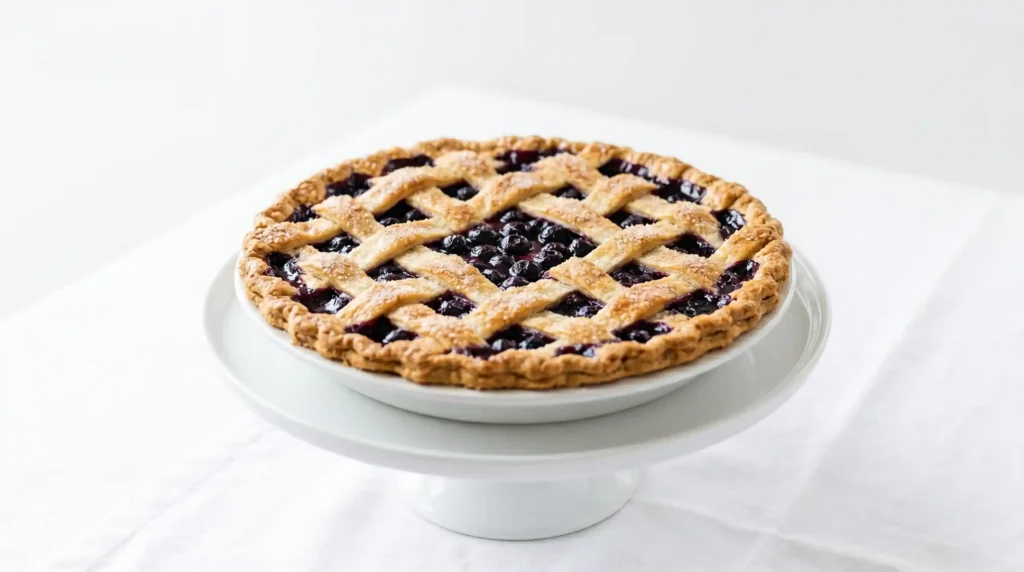
A blueberry pie done correctly is one of the finest things available in the category of baked dessert. Not the most elaborate, not the most technically demanding, but consistently, reliably excellent in a way that earns a specific reputation — the kind where someone asks which pie is coming to the gathering and the answer “blueberry” produces a visible reaction of genuine satisfaction. Blueberry Pie made with a proper flaky crust and a filling that sets without turning starchy deserves that reaction.
I have made a lot of blueberry pies over the years and the difference between a good one and a great one consistently comes down to two things: the crust and the filling thickener ratio. A flaky, buttery crust that shatters cleanly when cut rather than crumbling to dust elevates the filling significantly. And a filling that sets firm enough to slice but still looks glossy and jammy rather than gummy and translucent makes every piece look as good as it tastes.
Have you ever made a pie that looked exactly right when you cut the first slice? This recipe produces that result consistently. Let us build it from the bottom crust up.
What Makes This Blueberry Pie Recipe Particularly Good
Most blueberry pie recipes use standard all-butter pie crust or even shortening-based crust. This recipe uses buttermilk as the liquid in the crust instead of ice water — buttermilk adds a very slight tang and acidity that makes the finished crust taste noticeably more complex and interesting than plain butter-and-water crust. The acidity also helps develop tender gluten during mixing, producing a more cohesive dough that rolls without tearing.
The filling uses both brown sugar and white sugar rather than all of one type. White sugar provides clean sweetness. Brown sugar adds molasses depth and a subtle caramel note that makes the filling taste warmer and more developed than pure white sugar alone. Combined with the cinnamon and lemon juice, the two-sugar approach produces a filling flavour that tastes like it has been carefully built rather than simply sweetened.
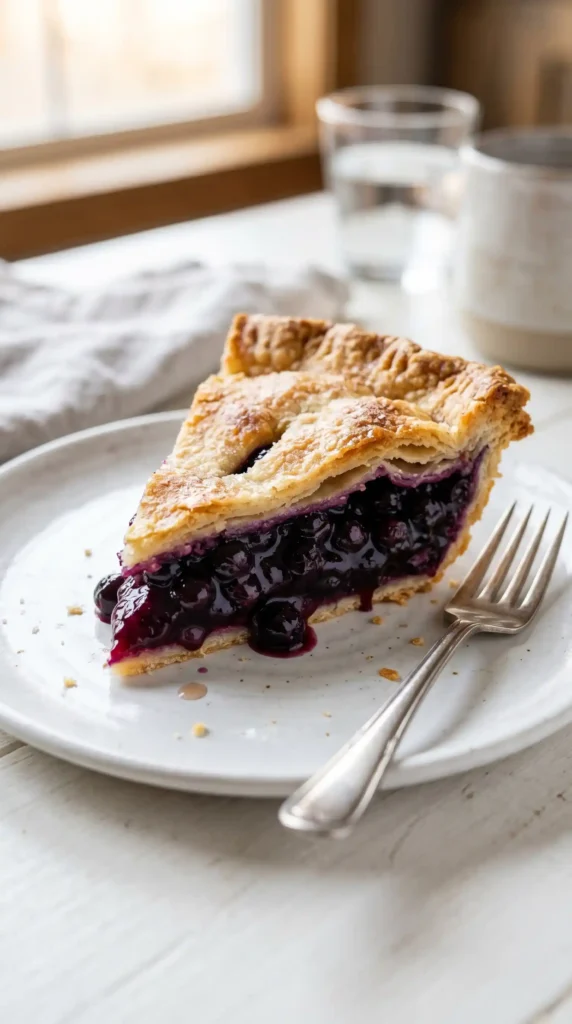
The cornstarch as a thickener produces a cleaner, clearer set than flour-thickened filling. Cornstarch-set blueberry pie filling looks glossy and jewel-like when sliced — a deep blue-purple with a translucent gloss that shows the individual berry shapes through the gel. Flour-thickened filling looks dull and opaque by comparison. IMO, the visual difference alone makes cornstarch the correct choice here and every blueberry pie enthusiast should know it.
What You Need
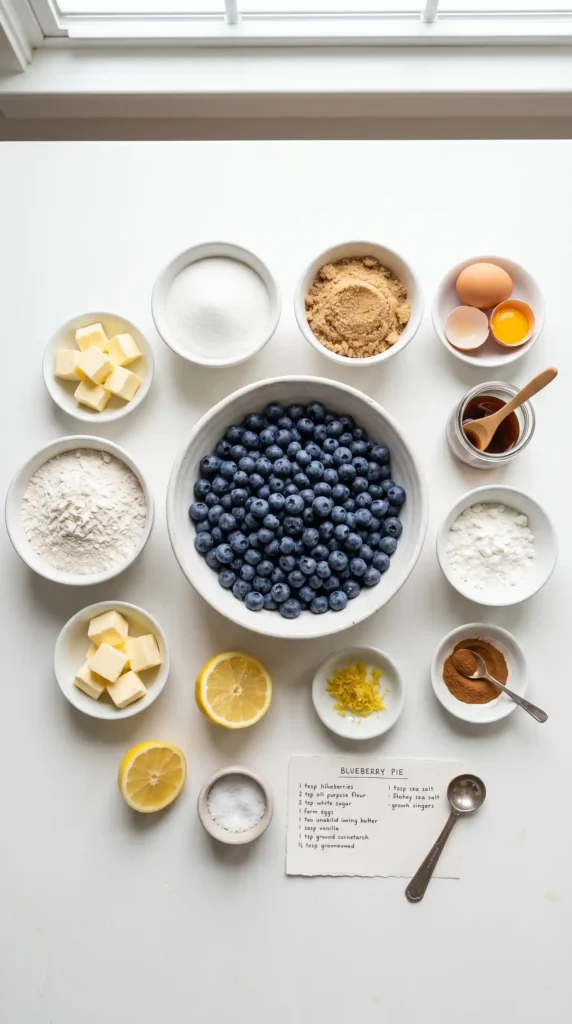
The ingredient list splits cleanly into crust and filling. The crust requires cold butter and cold buttermilk — cold everything, always, for flaky pastry. The filling is mostly fresh blueberries with straightforward baking pantry ingredients. Fresh blueberries produce the most beautiful, most intensely flavoured filling. Frozen blueberries work if fresh are unavailable, but require thawing and draining before use to prevent excess moisture from making the filling watery.
For the Buttermilk Pie Crust (Makes Double Crust for One 9-inch Pie)
- 2 and 1/2 cups (315g) all-purpose flour
- 2 tablespoons granulated white sugar
- 1/2 teaspoon salt
- 1 and 1/4 cups (284g) unsalted butter, cold and cut into 1cm cubes — keep it in the fridge until the moment you use it
- 1/2 cup (120ml) full-fat buttermilk, cold
For the Blueberry Filling
- 5 cups (about 750g) fresh blueberries, rinsed and dried
- 1/2 cup (100g) packed light brown sugar
- 1/4 cup (50g) granulated white sugar
- 4 tablespoons cornstarch
- 1 and 1/2 teaspoons ground cinnamon
- 1/2 teaspoon salt
- 1 teaspoon pure vanilla extract
- 1 tablespoon fresh lemon juice
- 1 tablespoon unsalted butter, cubed — dotted over the filling before the top crust goes on; it adds richness and prevents the filling from looking dry on top
Now For the Egg Wash
- 1 large egg, lightly beaten with 1 tablespoon whole milk — produces a deeper golden colour than egg alone
- Extra granulated sugar for scattering over the lattice before baking
Keep Everything Cold for Flaky Crust — This Is the Single Most Important InstructionPie crust becomes flaky because the fat in the butter remains in distinct pieces within the dough rather than incorporating completely. When these pieces of solid butter hit the heat of the oven, they release steam that pushes the surrounding dough apart and creates visible flaky layers. Warm butter melts into the dough before baking and produces a crumbly, mealy texture rather than flaky layers. Keep the butter cold until the moment it goes into the food processor. Keep the buttermilk refrigerated until you pour it. Work quickly and avoid over-handling the dough. If the dough feels warm at any point during mixing or rolling, stop and refrigerate for 15 minutes before continuing.
How to Make Blueberry Pie Step by Step
Three stages: make and rest the crust, make the filling, assemble and bake. The crust needs 30–60 minutes of refrigerator rest before rolling. This downtime is ideal for making the filling. The lattice top looks more complex than it is — the technique is straightforward once you understand the over-under weaving logic, which takes one minute to learn and produces results that look bakery-quality every time.
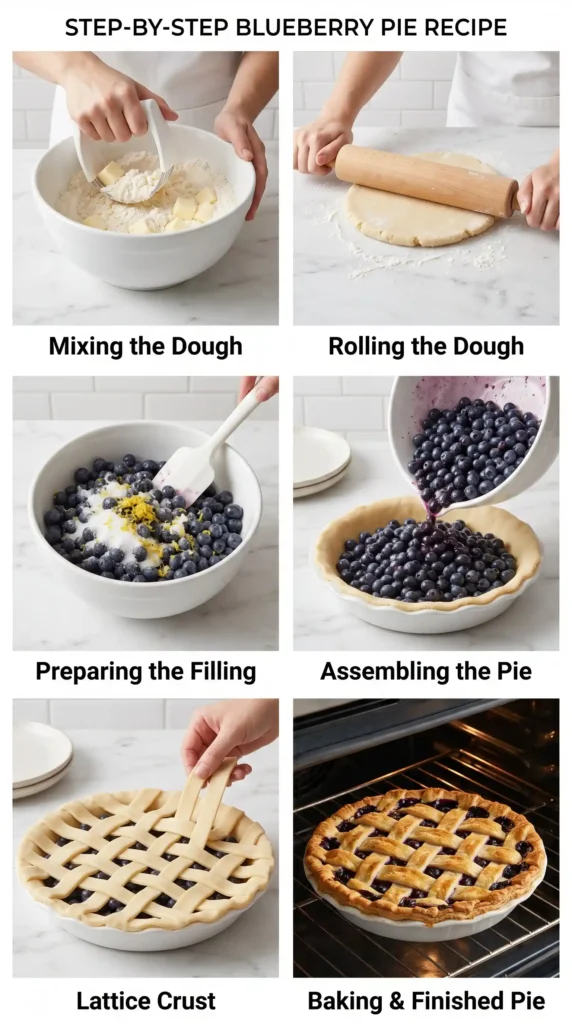
Step 1: Make the Buttermilk Pie Crust
Place the flour, 2 tablespoons of sugar, and salt in the bowl of a food processor and pulse briefly to combine. Add the cold cubed butter. Pulse in short bursts — 8–10 one-second pulses — until the butter reduces to roughly pea-sized pieces throughout the flour. You should still see distinct pieces of butter with some larger hazelnut-sized chunks remaining. This irregular butter size is intentional — it produces a more complex, multi-layered flakiness than uniformly small crumbs.
Transfer the butter-flour mixture to a large bowl. Pour the cold buttermilk over the mixture. Use a fork or your hands to mix just until the dough comes together into a rough, shaggy mass — do not knead or work it smooth. Overworked pie dough develops too much gluten and becomes tough rather than tender. The dough should look slightly rough and may have dry patches — this is correct.
Tip the dough onto a clean surface and press it into a cohesive mass using the heel of your hand with two or three firm sweeps. Divide the mass into two equal portions. Shape each portion into a flat disk about 2cm thick. Wrap each disk tightly in plastic wrap and refrigerate for 30 minutes to 1 hour. The refrigerator rest relaxes the gluten developed during mixing and firms the butter back to cold, producing a dough that rolls without shrinking or cracking.
Step 2: Make the Blueberry Filling
While the crust chills, prepare the filling. Place the 5 cups of rinsed, dried blueberries in a large mixing bowl. Add the brown sugar, white sugar, cornstarch, cinnamon, and salt to the berries. Stir the dry ingredients through the berries briefly before adding any liquid — mixing the dry ingredients into the berries first ensures the cornstarch distributes evenly through the filling before the berries begin releasing their juice. Uneven cornstarch distribution produces a filling with gummy pockets and liquid patches in the same pie.
Add the vanilla extract and lemon juice and stir gently to combine. The filling will look dry at first — the cornstarch coats each berry and the sugars are not yet dissolved. This is correct. The filling absorbs the berry juice during baking and the cornstarch activates with the heat to thicken the juice into a glossy gel. Do not allow the filling to sit for more than 30 minutes before using — extended sitting draws out the berry juices before baking, which dilutes the filling concentration.
Step 3: Roll the Bottom Crust and Fill the Pie
Remove one dough disk from the refrigerator. On a lightly floured surface, roll it out from the centre outward in even strokes, rotating the dough 90 degrees between strokes to maintain a round shape. Roll to approximately 13–14 inches in diameter — significantly larger than the pie dish to provide enough dough to line the sides and form an overhang. Lift the rolled dough by carefully folding it in quarters, place the folded corner in the centre of the 9-inch pie dish, and unfold it gently to drape over the dish.
Press the dough gently into the base and sides of the dish without stretching it — stretched dough shrinks during baking. Allow about 1 inch of dough to overhang the rim. Pour the blueberry filling into the lined dish, mounding it slightly in the centre since it will settle during baking. Scatter the cubed tablespoon of butter over the top of the filling.
Step 4: Make and Apply the Lattice Top
Remove the second dough disk and roll it to approximately 13 inches in diameter. Using a sharp knife, pizza cutter, or pastry wheel, cut the dough into 12 strips approximately 3/4 inch wide — use a ruler for even strips if presentation matters to you. Lay 6 strips evenly across the pie filling in one direction — vertical lines across the pie, spaced about 1 inch apart.
Now weave the remaining 6 strips perpendicular to the first set. Start at one edge and alternate: fold back every other strip from the first set, lay one perpendicular strip across the unfolded ones, then unfold the folded strips back over it. Move to the next perpendicular strip: fold back the opposite set of alternating strips, lay the strip across, unfold. Continue this over-under weave across the entire pie until all 12 strips are in place.
Trim the edges of both the bottom crust overhang and the lattice strip ends to about 1/2 inch beyond the rim of the dish. Press the lattice ends and overhang together, then fold the combined edge under itself to create a thicker border crust. Press or crimp the edge decoratively with a fork or your fingers. The sealed edge prevents the filling from bubbling out under the crust during baking.
Step 5: Egg Wash and Bake
Preheat the oven to 190°C (370°F). Brush the assembled Blueberry Pie — lattice strips and the crimped edge — with the egg wash. Apply a generous, complete coat that reaches all visible pastry surfaces. Scatter a tablespoon of granulated sugar evenly over the egg-washed lattice — this produces a sparkling, caramelised sugar crust on the top of the baked pie that looks genuinely beautiful.
Place the pie on a baking sheet lined with foil or parchment to catch any filling that bubbles over during baking. Bake on the centre rack for 50 minutes until the crust is deep golden-brown all over and the filling is bubbling visibly through the lattice gaps. The bubbling is essential — it confirms the filling has reached the temperature required to activate the cornstarch and set the filling properly. A pie removed before the filling bubbles will have a liquid, unset filling when sliced. Allow the finished pie to cool on a wire rack for at least 3–4 hours before slicing — this cooling period allows the cornstarch gel to fully set and produce clean slices.
Variations Worth Making
Blueberry Lemon Pie
Increase the lemon juice to 2 tablespoons and add 1 tablespoon of fresh lemon zest to the filling alongside the vanilla. The additional citrus makes the blueberry flavour taste brighter, more defined, and summery in a way that the standard recipe’s 1 tablespoon of lemon juice does not fully achieve. This version suits summer and spring gatherings particularly well and tastes exceptionally good with vanilla ice cream alongside it.
Blueberry and Peach Pie
Replace 2 cups of the blueberries with 2 cups of fresh peach slices, cut into roughly the same size as large blueberries. The peach adds a sweet, floral quality that complements the blueberry deeply without competing with it — the two fruits work together rather than against each other. Increase the cornstarch by 1 tablespoon since peaches release more liquid than blueberries during baking.
Storage Tips
Store baked Blueberry Pie loosely covered at room temperature for up to 2 days — the crust stays crispest at room temperature. Refrigerate for up to 5 days; the crust softens slightly in the fridge. Bring refrigerated pie to room temperature for 30 minutes before serving or warm briefly in a 175°C oven for 10 minutes to restore some of the crust’s original crispness.
Unbaked assembled pies freeze beautifully for up to 3 months. Assemble completely — bottom crust, filling, lattice top, and egg wash — then freeze uncovered until solid, then wrap tightly. Bake from frozen at 190°C, adding 15–20 minutes to the standard bake time and checking that the filling bubbles fully before removing. This make-ahead approach provides fresh-baked pie at any time with only 65–70 minutes of baking work.
Frequently Asked Questions
Why does my blueberry pie filling come out runny?
A runny filling results from one of three causes: insufficient cornstarch, not enough baking time for the filling to bubble and activate the cornstarch, or slicing the pie before it has cooled fully. Use the full 4 tablespoons of cornstarch for the proper filling consistency. Bake until the filling visibly bubbles through the lattice gaps for at least 5 minutes — not just until the crust looks golden. For clean slices and a fully set filling, allow the pie to cool for at least 3–4 hours before serving. The filling looks liquid when hot but gels as it cools to room temperature.
Can I use frozen blueberries instead of fresh?
Yes. Thaw the frozen blueberries completely and drain in a fine mesh sieve for at least 15 minutes, pressing gently to remove as much liquid as possible. Pat dry with paper towels before combining with the other filling ingredients. Frozen blueberries release significantly more liquid than fresh — if you skip the draining step, the filling becomes too watery and the cornstarch cannot thicken it adequately. Increase the cornstarch by 1 tablespoon when using frozen berries to compensate for the additional moisture.
Can I make this pie without a food processor?
Yes. Cut the cold butter into the flour mixture using a pastry blender, two knives, or your fingertips. Work quickly when using your fingertips — the warmth of your hands melts the butter faster than a pastry blender does. Rub the butter into the flour using your thumbs and fingertips in a quick, flicking motion until you have the pea-to-hazelnut sized butter pieces. Add the buttermilk and mix as directed. The dough takes approximately 5 minutes to make by hand compared to 2 minutes in a food processor.
How do I prevent the edges of the pie crust from burning?
The crimped pie edge bakes faster than the centre lattice because it is thicker and positioned at the outer edge of the oven’s heat. Cover the edge with a pie shield (a circular silicone ring designed for this purpose) or carefully fashion a ring from foil by shaping a piece of foil around the edge to shield it while leaving the top of the pie exposed. Apply the shield after the first 25–30 minutes of baking when the edge has taken on light golden colour but before it darkens further.
Can I substitute the buttermilk in the crust with regular milk?
Yes. To substitute, add 1 teaspoon of white vinegar or fresh lemon juice to 1/2 cup of whole milk and let it sit for 5 minutes until slightly curdled. Use this as a direct substitute for the buttermilk. The acidity in the buttermilk performs two functions in this crust: it slightly tenderises the gluten and adds a faint tang. The vinegar or lemon juice substitute replicates the acidity. Plain whole milk without added acid works but produces a very slightly less tender and flavourful crust.
Final Thoughts
This Blueberry Pie earns its classic status through consistent, genuine excellence — flaky buttermilk crust, a deeply flavoured blueberry filling that sets cleanly and glossily, and a lattice top that looks beautiful and bakes to deep, caramelised gold. It suits summer tables, autumn tables, holiday tables, and every casual gathering where pie is the right call, which is most gatherings.
Keep the butter cold. Use the full cornstarch quantity. Bake until it actively bubbles. Cool for the full three to four hours before cutting. These four non-negotiables produce a pie that looks and tastes exactly like a properly made blueberry pie should — and that earns the specific kind of enthusiasm that baked fruit desserts generate when they are genuinely well made.
Make this pie at the height of blueberry season for the most intense, most flavourful filling available. Make it in winter from frozen berries for the kind of reminder that some seasonal flavours are worth waiting for and some recipes are worth revisiting every year regardless of season. FYI — this is firmly in the second category.

Blueberry Pie
Ingredients
Method
- In a food processor, pulse together flour, sugar, and salt briefly. Add cold butter and pulse until pea-sized pieces remain.
- Transfer to a bowl and stir in cold buttermilk until just combined. Divide into two disks, wrap in plastic, and refrigerate for 30–60 minutes.
- In a mixing bowl, combine blueberries, brown sugar, white sugar, cornstarch, cinnamon, and salt, mixing dry ingredients into berries first.
- Add vanilla extract and lemon juice, stirring gently to combine. Use immediately after mixing.
- Preheat oven to 190°C (370°F). Roll out the bottom crust and place it in a 9-inch pie dish.
- Fill with blueberry mixture and dot with cubed butter.
- Roll out top crust and create a lattice pattern. Trim edges and crimp to seal.
- Brush with egg wash and sprinkle sugar on top. Bake for 50 minutes or until filling is bubbling.
- Allow pie to cool for 3-4 hours before slicing.


