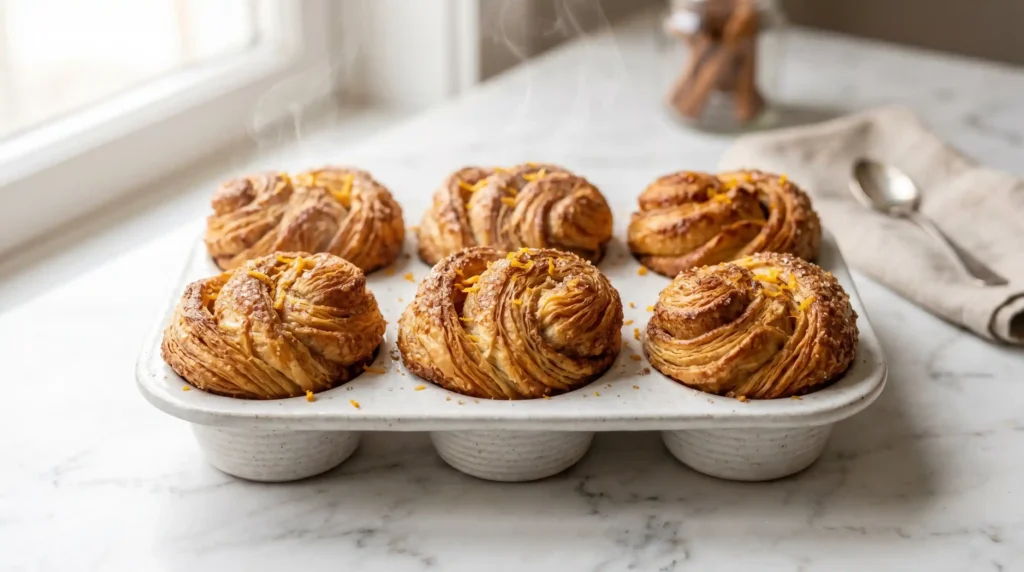
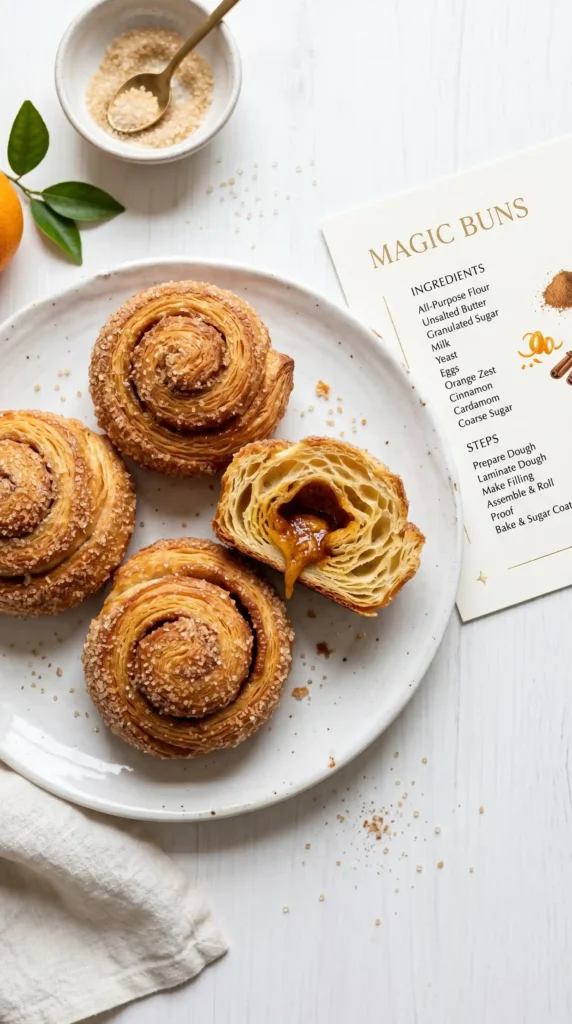
A standard cinnamon bun is a very good thing. A laminated cinnamon bun — one where butter is folded into the dough in layers like a croissant — is a different category of thing entirely. Magic Buns earn their name because the first bite produces genuine surprise: the exterior is crispy and caramelised from the sugar roll, the interior is soft and layered with visible flaky strata, and the orange-spiked cinnamon filling runs through every layer. Nothing about that combination is adequately described as merely good.
I made these for a weekend brunch when I wanted to attempt laminated dough without committing to full croissant technique. Magic Buns are genuinely accessible as a laminated dough project — the technique is the same but the format is more forgiving, the final result is more visually dramatic in a muffin tin format, and the orange-and-cinnamon filling produces a flavour complexity that no standard cinnamon bun achieves. They became the most impressive bake I do and the most requested thing from anyone who has tasted them.
Have you ever made something that made you understand why professional bakers spend years on technique? This is that bake. Let us walk through every step properly.
Why Magic Buns Are Genuinely Different From Standard Cinnamon Buns
Standard cinnamon buns use enriched dough — flour, yeast, milk, eggs, and butter mixed together to create a single, soft, relatively uniform crumb. Magic Buns use laminated enriched dough — a butter block folded into the dough through repeated rolling and folding, creating hundreds of distinct thin butter layers separated by thin dough layers. These layers produce a flaky, croissant-like internal structure that a standard cinnamon bun completely lacks.
The lamination process also affects how the buns behave in the oven. As the butter in each layer heats, it releases steam that pushes the dough layers apart slightly, creating the visible flaky strata in the finished bun. This steam leavening works alongside the yeast to produce a bun with extraordinary lift and an open, airy structure that feels significantly lighter to eat than a standard dense cinnamon bun despite containing more butter.
The filling has its own distinction from standard recipes. Brown sugar and cinnamon are common cinnamon bun filling elements, but the addition of fresh orange zest and Triple Sec (an orange liqueur) produces a filling that smells and tastes dramatically more complex — the citrus brightens the caramel depth of the brown sugar and the warming character of the cinnamon, making the flavour three-dimensional rather than one-directional. FYI — the Triple Sec alcohol cooks off during baking but leaves the orange flavour behind. 🙂
What You Need
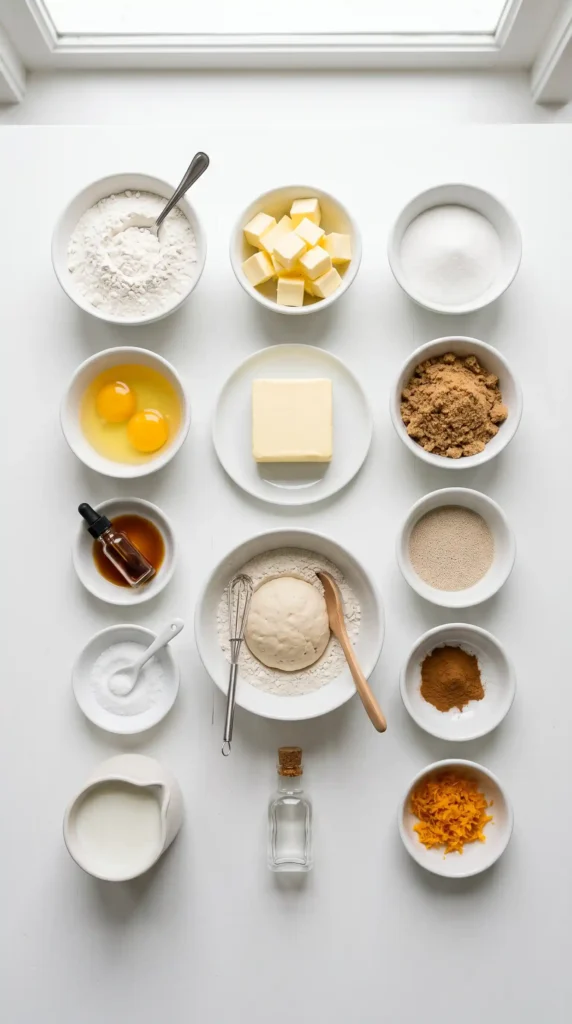
The ingredients split into three components: the enriched dough, the butter block, and the filling. The dough requires two mixing stages — an initial pre-ferment mix that rests before the remaining flour and flavourings are added. The butter block requires cold, firm butter combined with a small amount of flour to form a pliable but cold slab. Both need to reach the right consistency before lamination begins.
For the Enriched Dough
- 1 and 3/4 cups (420ml) whole milk, warmed to 40°C
- 2 and 1/4 teaspoons (7g) active dry yeast
- 6 cups (750g) all-purpose flour, divided — 3 cups in the initial mix, 2 and 1/2 cups added later, and 1/2 cup in the butter block
- 5 tablespoons granulated white sugar, divided — 2 tablespoons in the initial mix, 3 tablespoons added later — plus additional sugar for dusting and rolling
- 2 large eggs, lightly beaten
- 2 tablespoons melted unsalted butter (for the dough)
- 2 teaspoons pure vanilla extract
- 2 tablespoons plus 1 teaspoon kosher salt, divided
For the Butter Block
- 4 sticks (450g) unsalted butter, cold and cut into small cubes
- 1/2 cup (62g) all-purpose flour (helps stabilise the butter block during lamination)
- 1 teaspoon kosher salt
Now For the Filling
- 1 and 1/2 cups (300g) packed light brown sugar
- 1 and 1/2 tablespoons ground cinnamon
- Zest of 1 orange — zest only, no juice, scraped on a fine microplane
- 1 and 1/2 tablespoons Triple Sec (orange liqueur) — or substitute fresh orange juice for an alcohol-free version
- Pinch of kosher salt
The Butter Block and the Dough Must Be the Same Consistency to Laminate ProperlyThe most common failure point in laminated dough is a temperature mismatch between the butter block and the dough. The butter block should be cold but pliable — it should bend without cracking and dent without shattering when pressed with a finger. The dough should also be chilled but pliable. If the butter is too cold and hard, it shatters during rolling rather than forming layers and produces chunks of butter rather than sheets. If the butter is too warm, it melts into the dough and the layers disappear entirely. The multiple refrigerator rests throughout this recipe serve to keep both elements at the correct temperature for lamination.
How to Make Magic Buns Step by Step
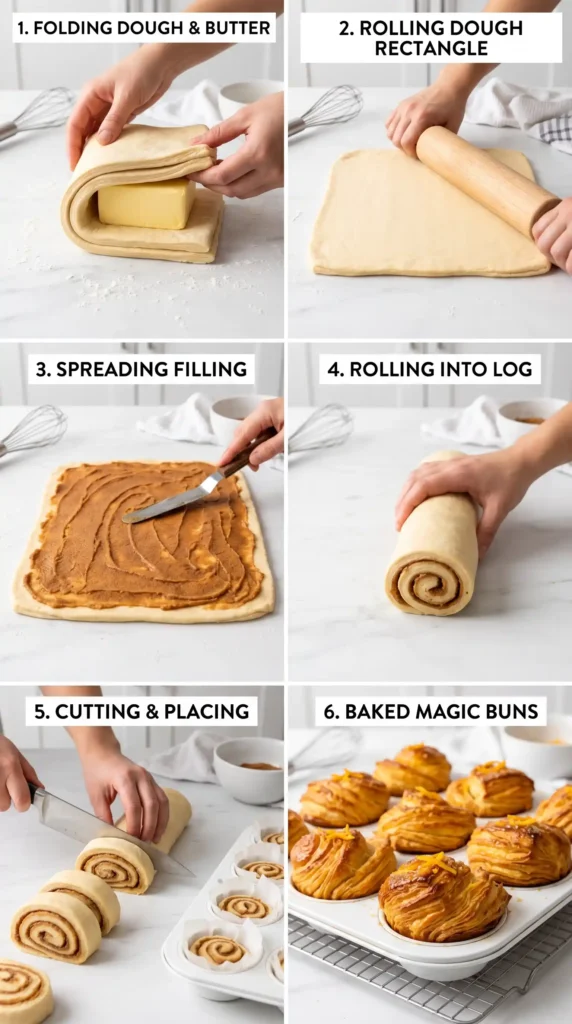
Five stages: initial dough mix, butter block preparation, lamination, filling and shaping, final rise and bake. The timeline includes approximately 2.5 hours of chilling divided across three rest periods — none of this time requires active work, which means the total hands-on time is about 45 minutes spread over a 5-hour project. Read through the complete process once before starting.
Stage 1: The Initial Dough Mix
Warm the whole milk to approximately 40°C — warm to the touch but not hot. Pour into a large bowl, add the active dry yeast, and stir briefly. Allow the yeast to sit for 5 minutes undisturbed. After 5 minutes, the surface should look slightly foamy — this confirms the yeast is alive and active. If no foam appears after 5 minutes, the yeast is dead and the milk may have been too hot; start again with fresh yeast and properly tempered milk.
Add the eggs, 2 tablespoons of sugar, and 3 cups of flour to the activated yeast mixture. Stir until just combined — a rough, somewhat sticky dough. Do not over-mix at this stage; this is a rough initial mix that allows the yeast to begin developing before the remaining flour and ingredients are added. Cover the bowl tightly with plastic wrap and set aside at room temperature while you prepare the butter block — about 20–30 minutes.
Stage 2: The Butter Block
Place the cold cubed butter, 1/2 cup of flour, and 1 teaspoon of salt in a large bowl or the bowl of a stand mixer fitted with the paddle attachment. Mix on low speed — or work by hand with a pastry cutter or the heels of your hands — until the butter and flour combine into a cohesive, slightly pliable block. The mixture should look like a rough, thick paste — no individual butter cubes visible, but not so smooth that it looks whipped.
Transfer the butter block onto a sheet of plastic wrap. Form it into an 8×8-inch square — use the plastic wrap to help shape it by folding the plastic over the butter and pressing to create flat, even sides and corners. An even 8×8 square ensures the butter block covers the folded dough evenly during lamination. Refrigerate the shaped butter block for 30 minutes until firm but not hard.
Stage 3: Complete the Dough and Begin Lamination
Return to the initial dough mixture. Add the remaining 3 tablespoons of sugar, 2 and 1/2 cups of flour, 2 tablespoons of salt, vanilla extract, and 2 tablespoons of melted butter. Stir until combined, then turn the rough dough onto a lightly floured surface. Knead for 5 minutes until smooth and elastic — the dough should feel soft and slightly tacky but not sticky. Form it into a rough square, wrap in plastic, and refrigerate for at least 30 minutes.
Remove both the dough and butter block from the refrigerator. Check that both have similar consistency — cold but pliable. Roll the dough out on a lightly floured surface into a 20×20-inch square. Place the butter block in the centre of the dough square, positioned like a diamond within the square with the corners of the butter block pointing toward the midpoints of the dough square’s edges. Fold the four dough corners over the butter block like an envelope, pressing the edges firmly to seal the butter completely inside the dough. Refrigerate the butter-enclosed dough for 30 minutes.
Stage 4: The Lamination Folds
Remove the enclosed dough from the refrigerator. On a lightly floured surface, roll it out into a 10×20-inch rectangle. Work with firm, even pressure from the centre outward — the goal is to elongate the dough without breaking through the sealed edges that would expose the butter. If the butter feels very firm and the dough begins to crack, return to the refrigerator for 10 minutes to allow the butter to soften slightly before continuing.
Fold the rectangle into thirds like folding a business letter — the top third folds down to the centre, then the bottom third folds up over it. This is the first fold, sometimes called a letter fold or single fold. Rotate the folded dough 90 degrees so the open edge faces you. Roll it out again into a 10×20-inch rectangle and fold into thirds again. This completes the first pair of folds. Wrap in plastic and refrigerate for 30 minutes.
Remove from the refrigerator and complete two more letter folds — roll out to 10×20, fold in thirds, rotate, roll out again, fold. Wrap and refrigerate for another 30 minutes. After this second pair of folds, you have completed four total folds. The dough should now look smooth and slightly yellow from the butter layers. This is the laminated dough — inside these layers are hundreds of alternating paper-thin sheets of dough and butter that will create the flaky interior of the finished Magic Buns.
Stage 5: Fill, Shape, Rise, and Bake
Preheat the oven to 175°C (350°F). Grease a 12-cup muffin tin generously with butter and dust each cup with sugar, tapping out any excess. In a bowl, mix the brown sugar, cinnamon, orange zest, Triple Sec, and pinch of salt until evenly combined and the filling looks like damp sand throughout.
Roll the laminated dough out on a lightly floured surface into a 15×20-inch rectangle. Spread the filling mixture evenly across the entire surface of the dough, pressing it gently into the surface. Starting from one of the 15-inch edges, roll the dough tightly into a 20-inch-long cylinder. Use a sharp knife or unflavoured dental floss to cut the cylinder into 12 equal rounds — each piece should be approximately 1 and 2/3 inches wide.
Place each round cut-side-up in the prepared muffin tin cups. Cover loosely with plastic wrap or a clean kitchen towel. Allow to rise for 30–40 minutes until the buns look noticeably puffed and slightly larger than their initial placement size. During the rise, the buns should expand to nearly fill each muffin cup.
Bake on the centre rack for 25–30 minutes until the buns look deeply golden on top and the visible layers at the edges show colour throughout. The sugar in the filling caramelises during baking and may bubble up around the edges — this is correct and produces the caramelised flavour that defines the Magic Buns eating experience. Remove from the oven and allow to cool in the tin for exactly 2 minutes — no longer. Immediately roll each warm bun in a plate of granulated sugar, coating all sides. Serve immediately while warm. :/
Variations Worth Making
Cardamom and Rose Version
Replace the cinnamon with ground cardamom and replace the orange zest with 1 teaspoon of rose water and 1 tablespoon of dried rose petals crushed into a fine powder. The cardamom-rose filling produces a deeply floral, Persian-inspired Magic Bun that pairs beautifully with black tea. The laminated dough base remains identical — only the filling changes.
Chocolate Hazelnut Magic Buns
Replace the cinnamon-brown sugar filling with a mixture of 1/2 cup of hazelnut spread (Nutella), 1/4 cup of finely chopped toasted hazelnuts, and 1 tablespoon of unsweetened cocoa powder. Spread the hazelnut filling thinly over the dough before rolling. The chocolate-hazelnut version produces a richer, more dessert-forward bun that works exceptionally well as an afternoon treat with coffee.
Storage and Reheating Tips
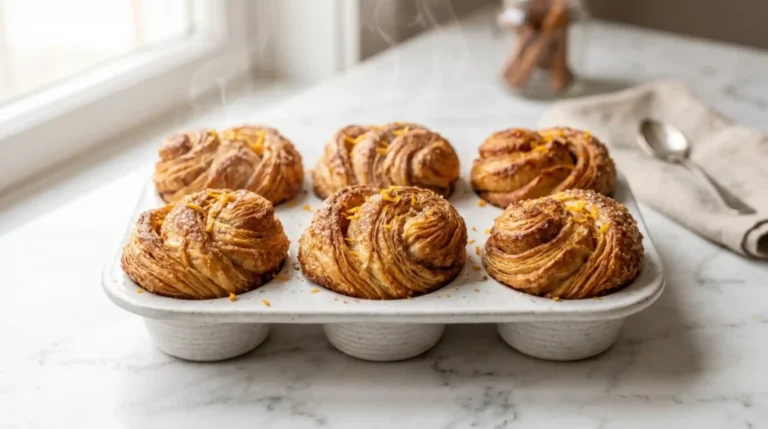
Magic Buns are at their absolute best within 30 minutes of coming out of the oven — warm from baking, sugar-rolled, and at maximum flaky, caramelised perfection. They lose some of their crispness as they cool and the sugar coating softens. Store cooled buns in an airtight container at room temperature for up to 2 days. Reheat in a 180°C oven for 5–7 minutes to restore much of the original texture.
The laminated dough can be prepared through the lamination stage, wrapped tightly, and frozen for up to 1 month. Thaw overnight in the refrigerator before rolling, filling, and shaping. This make-ahead approach makes a same-morning fresh bake practical even on a weekday — the active morning work reduces to rolling, filling, shaping, rising, and baking.
Frequently Asked Questions
What makes Magic Buns different from regular cinnamon rolls?
Magic Buns use laminated dough — the same butter-folding technique used in croissants and kouign-amann — which creates hundreds of distinct layers of dough and butter throughout the bun. Regular cinnamon rolls use a single enriched dough where the butter is mixed directly in, producing a soft, uniform crumb rather than the flaky, layered interior of a laminated bun. The orange-and-Triple Sec filling is also distinctly more complex than standard cinnamon roll fillings. The immediate sugar roll after baking creates a caramelised exterior crust that standard cinnamon rolls with glaze cannot replicate.
Can I substitute the Triple Sec with something non-alcoholic?
Yes. Replace the Triple Sec with an equal amount of fresh orange juice — the juice provides the liquid and the orange flavour without the alcohol. Alternatively, use 1/2 teaspoon of orange extract, which is more concentrated than juice and produces a more intensely orange-flavoured filling in a smaller quantity. The alcohol in Triple Sec cooks off entirely during baking leaving only the flavour behind, so the non-alcoholic substitutes produce an essentially identical flavour result in the finished bun.
Why do the layers not show in my buns?
Invisible layers in laminated buns almost always result from butter that was too warm during the lamination process — warm butter melts into the dough rather than forming distinct sheets. The refrigerator rests between each folding stage are specifically designed to prevent this. If your kitchen is very warm, increase the resting time between folds from 30 to 45 minutes and work quickly during each folding stage. Also check that your dough and butter block were the same pliable-but-cold consistency before you placed the butter on the dough — both being too warm produces the same merging effect.
Can I make Magic Buns without a stand mixer?
Yes. The dough requires only 5 minutes of hand kneading rather than extended machine mixing — this is a short, manageable knead that most people can do comfortably by hand. The butter block can be combined by hand using a pastry cutter, bench scraper, or the heel of your palm to work the flour into the cold butter until cohesive. The lamination folding stages are entirely done by hand regardless of equipment. The only machine that genuinely helps is a stand mixer for the butter block stage, but a pastry cutter or two forks work equally well with slightly more effort.
Why do Magic Buns need to be rolled in sugar immediately after baking?
The sugar coating requires the buns to be warm — hot from the oven — when rolled. The heat causes the sugar granules to melt very slightly against the surface of the bun, adhering firmly rather than falling off as they cool. If you wait too long after baking, the surface cools and the sugar no longer adheres — it falls off the bun rather than forming the characteristic crystalline crust. Two minutes of cooling in the tin is the ideal — long enough to handle the buns without burning your hands, short enough that the surface is still warm enough for the sugar to bond.
Final Thoughts
These Magic Buns genuinely earn the name in every way. The laminated dough produces a bun that feels categorically different from any standard cinnamon bun — flaky, layered, and rich in a way that reflects the technique rather than just the ingredients. The orange and cinnamon filling produces a flavour complexity that makes every bite interesting from the first to the last. And the hot sugar roll produces a caramelised crust that no glaze or icing can replicate.
The process is longer than a standard bun recipe but accessible to any home baker willing to read the instructions carefully and respect the refrigerator resting times. The lamination is not difficult — it requires patience and temperature management more than skill. Master it once and it becomes one of the most impressive things in your baking repertoire.
Start the day before if you want to bake the morning after. Respect every chill time without abbreviating. Roll them in sugar while they are still hot. And serve them immediately — because Magic Buns at peak temperature are something genuinely special, and IMO waiting even ten minutes is a waste of their best moment.
Magic Buns
Ingredients
Method
- Warm the whole milk to approximately 40°C. Pour into a large bowl, add the active dry yeast, and stir briefly. Allow the yeast to sit for 5 minutes undisturbed.
- After 5 minutes, add the eggs, 2 tablespoons of sugar, and 3 cups of flour to the activated yeast mixture. Stir until just combined. Cover the bowl tightly with plastic wrap and set aside at room temperature for 20–30 minutes.
- Mix the cold cubed butter, 1/2 cup of flour, and 1 teaspoon of salt in a large bowl until combined into a cohesive block.
- Form into an 8x8-inch square and refrigerate for 30 minutes.
- Add the remaining 3 tablespoons of sugar, 2 and 1/2 cups of flour, 2 tablespoons of salt, vanilla extract, and 2 tablespoons of melted butter to the initial dough mixture.
- Knead for 5 minutes until smooth and elastic. Wrap in plastic and refrigerate for at least 30 minutes.
- Roll the dough out into a 20x20-inch square and place the butter block in the center. Fold the corners of the dough over the butter block and seal.
- Refrigerate the butter-enclosed dough for 30 minutes.
- Roll out the dough into a 10x20-inch rectangle, fold into thirds, and wrap. Refrigerate for 30 minutes.
- Repeat two more times for a total of four folds. The dough should look smooth and slightly yellow from the butter layers.
- Preheat the oven to 175°C (350°F). Grease a muffin tin and dust with sugar.
- Roll out the laminated dough into a 15x20-inch rectangle and spread the filling mixture evenly across.
- Roll up the dough tightly and cut into 12 equal rounds. Place cut-side-up in the prepared muffin tin.
- Cover and let rise for 30–40 minutes until puffed. Bake for 25–30 minutes until golden.
- Roll warm buns in granulated sugar immediately after baking.