Making sushi at home often means working with a bamboo mat, perfectly cooked rice, and careful rolling techniques. Sushi Cups skip all of that. All you need is a muffin tin and a simple layer of rice pressed into shape. The result delivers the same great sushi flavors in a format that is easy to assemble and serve. Even better, these bite-sized cups look impressive while requiring far less effort than traditional sushi rolls.
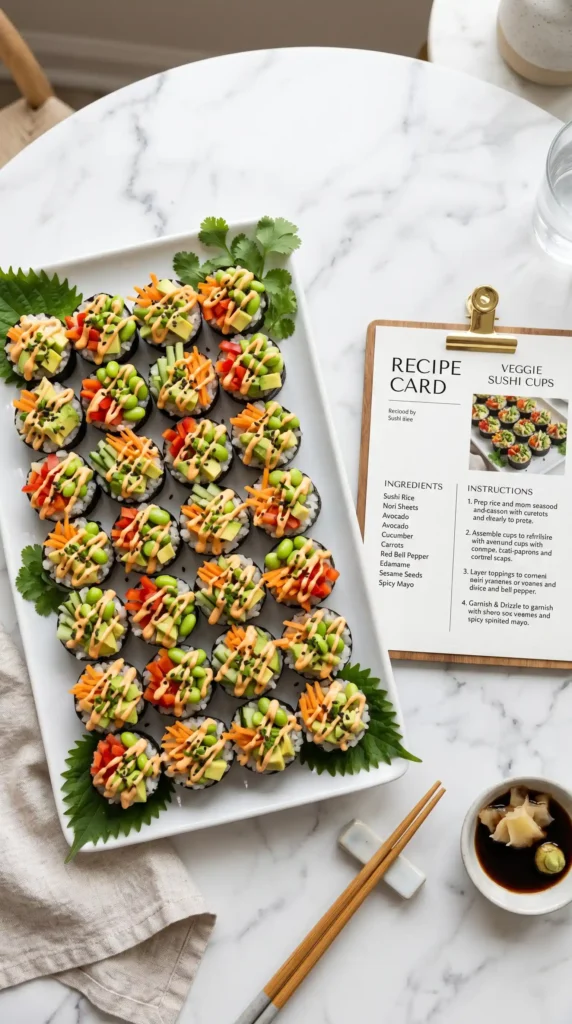
I first made these for a gathering when I wanted something elegant without the stress of mastering restaurant-level sushi techniques. A platter filled with neatly shaped rice cups, colorful vegetables, creamy avocado, and a drizzle of spicy mayo quickly became the center of attention. By the end of the evening, they were the most photographed item on the table—and one of the first to disappear. Several people asked if I had ordered them. I had not. I had used a muffin tin and two heaping tablespoons of rice per cup.
Have you ever served something that looked impressive enough to generate that slightly suspicious pause before people ate it? This is that recipe. Let us make them properly.
Why Sushi Cups Are the Smarter Party Sushi Format
Traditional sushi rolls are rolled and then sliced — which means each slice is essentially one portion, the presentation relies on clean knife work, and the whole thing requires eating before the nori softens and loses its texture. Sushi cups are structurally self-contained — each cup is already a single portion, shaped and ready to fill, requiring no slicing, no rolling, and no racing against softening nori. They also transport from kitchen to table without collapsing.
The muffin tin gives every sushi cup a consistent shape, even if your rice pressing technique is less than perfect. As a result, you can create neat, professional-looking cups without any sushi-making experience. Chilling the tin also helps the rice hold its shape when removed, reducing the risk of cracking or flattening on the serving platter.
Another advantage of the sushi cup format is the amount of filling each portion can hold. Instead of being limited by the size of a traditional roll, each cup can support a generous topping of vegetables, avocado, edamame, and other ingredients. This creates more texture and flavor in every bite. For parties and gatherings, sushi cups are often easier to serve, easier to eat, and more visually appealing than classic sushi rolls.
What You Need
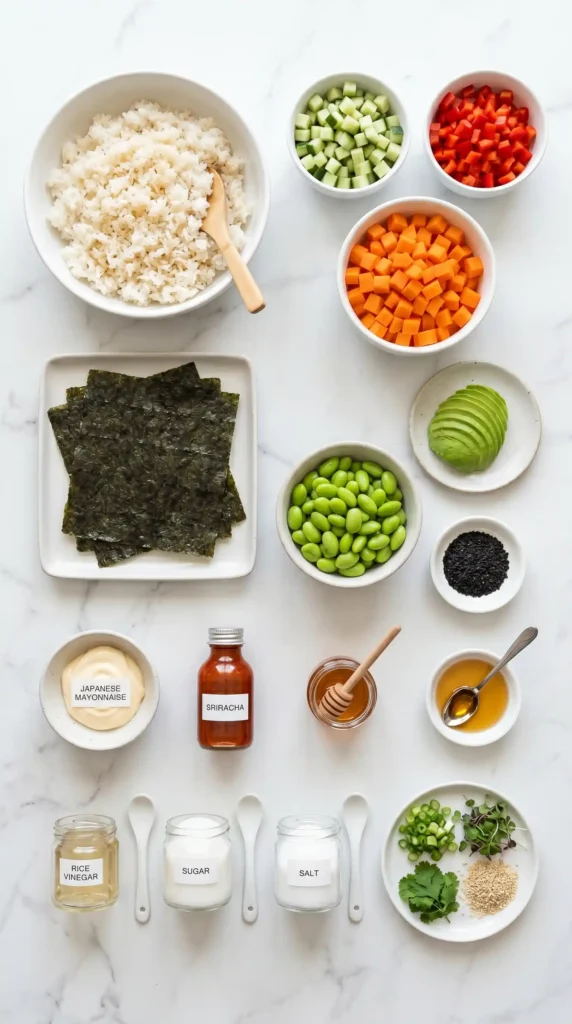
Four components: the sushi rice, the fillings, the spicy mayo, and the garnish. Everything assembles together in a muffin tin and requires no special equipment beyond that. The spicy mayo takes two minutes and four pantry ingredients. The filling combination below is the base recipe — the variations section covers protein additions and alternative filling combinations for repeat batches.
For the Sushi Rice (Makes 12 cups)
- 1 cup (190g) sushi rice, rinsed thoroughly under cold water until the water runs clear — rinsing removes excess surface starch that would make the rice gummy and difficult to press cleanly
- 1 and 1/2 cups (360ml) water
- 2 tablespoons rice wine vinegar (optional but traditional — adds the characteristic slight tang and sheen that makes sushi rice taste like sushi rice rather than plain cooked rice)
- 1 teaspoon sugar
- 1/2 teaspoon salt
For the Fillings
- 1/2 cup (about 75g) mixed vegetables, finely diced — cucumber, red bell pepper, and carrot all work well and provide colour contrast; cut everything to roughly the same 5mm dice for even visual presentation
- 1/2 cup (about 80g) steamed mukimame (shelled edamame), cooled to room temperature
- 1 medium ripe avocado, diced into 1cm cubes
Now For the Spicy Mayo
- 1/4 cup (60g) Japanese mayonnaise (Kewpie) or regular mayonnaise — Kewpie produces a richer, more intensely creamy result
- 1 teaspoon Sriracha sauce — adjust up or down based on heat preference
- 1 teaspoon honey — balances the heat and adds a slight sweetness that prevents the mayo from tasting purely spicy
- 1/2 teaspoon sesame oil — adds a nutty, aromatic depth that elevates the mayo significantly
Now For Garnishing
- Black sesame seeds — scattered across the filled cups before serving
- Optional: thin slices of cucumber, small pieces of nori, microgreens, or pickled ginger on the side
Cooked sushi rice on its own is delicious, but it does not have the distinctive flavor associated with restaurant-style sushi. That signature taste comes from a simple seasoning mixture made with rice vinegar, sugar, and salt.
Warm the vinegar mixture just until the sugar and salt dissolve, then gently fold it into the rice while the rice is still hot. This quick step adds the mild tang, subtle sweetness, and glossy finish that define authentic sushi rice.
After seasoning, fan the rice as it cools. This helps remove excess moisture and gives the grains their characteristic shine. The entire process takes only a few minutes, yet it makes a dramatic difference in both flavor and texture, transforming simple rice into true sushi rice.
How to Make Sushi Cups Step by Step
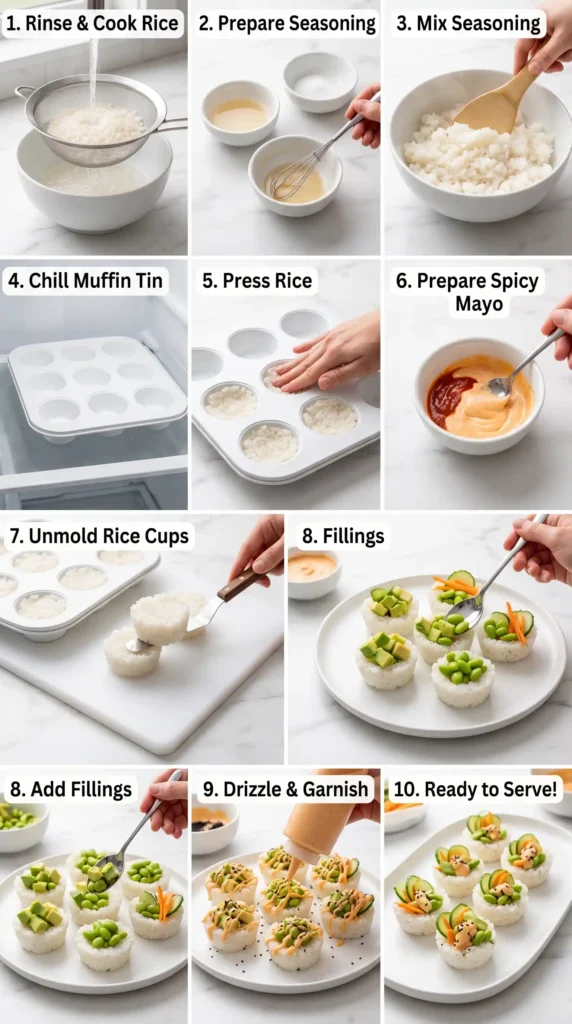
Four stages: cook and season the sushi rice, chill the muffin tin, press and fill the cups, and add the spicy mayo and garnish. The rice cooking and cooling takes the most time — about 30 minutes total between cooking and cooling to the right pressing temperature. While the rice cools, prepare the fillings and spicy mayo so everything is ready to assemble at once.
Step 1: Cook the Sushi Rice
Place the thoroughly rinsed sushi rice and water in a medium saucepan. Bring to a full boil over high heat. As soon as the water boils, reduce the heat to the lowest possible setting, place the lid on the saucepan, and cook undisturbed for 18–20 minutes. Do not lift the lid during this time — the steam trapped inside the saucepan is what cooks the top layer of rice. Lifting the lid releases this steam and produces unevenly cooked rice.
After 18–20 minutes, remove the saucepan from the heat and leave the lid on for a further 10 minutes — this allows the rice to steam-finish, ensuring the bottom layer has not dried out against the pan and the top layer is fully cooked through. After the 10-minute rest, remove the lid and check that all the water has been absorbed and the rice looks fully cooked, slightly glossy, and tender.
While the rice is still hot, combine the rice vinegar, sugar, and salt in a small saucepan over low heat and stir until the sugar and salt dissolve completely — about 60 seconds. Transfer the hot cooked rice to a wide, flat bowl or baking sheet. Pour the vinegar mixture over the hot rice and fold it through using a flat spatula or rice paddle with wide, scooping strokes — the technique is folding rather than stirring, which would crush the rice grains. Fan the rice while folding to cool it faster. The rice should look slightly glossy and taste mildly tangy when ready.
Allow the seasoned rice to cool to a temperature where you can handle it comfortably — warm but not hot. This is the ideal pressing temperature: warm enough to be pliable, cool enough that it will begin to set into its pressed shape without sticking to your fingers aggressively. If the rice is still very hot, it will be too sticky and soft to press cleanly. If it cools too much and becomes cold, it will be too firm and dry to press together cohesively.
Step 2: Chill the Muffin Tin
Place a standard 12-cup muffin tin in the refrigerator or freezer for 20 minutes before pressing the rice. The cold tin is the secret to sushi cups that release cleanly without sticking — warm rice pressed into a room-temperature tin bonds to the metal and tears when you try to remove it. Cold tin dramatically reduces this adhesion. Spray the cups with non-stick cooking spray after chilling, just before adding rice — this double insurance means every cup releases cleanly.
Step 3: Press the Rice Into the Cups
Working with the chilled, sprayed muffin tin on your work surface, scoop two heaping tablespoons of the warm seasoned rice into the first cup. Use the back of a lightly wet spoon or your dampened fingers to press the rice firmly down into the cup, creating a compact, even layer that fills the cup about three-quarters of the way up. The pressing needs to be genuinely firm — loose rice produces cups that fall apart when removed. The rice should be dense and compressed but not so crushed that the individual grains are damaged.
Use a flat-bottomed object — the base of a glass, a shot glass, or a small measuring cup — to press the rice layer flat and compact once roughly pressed with your fingers. This produces a cleaner, flatter base in each cup than fingertip pressing alone. Work through all 12 cups, keeping your fingers or the pressing tool lightly damp between each cup to prevent sticking. Once all cups are pressed, return the tin to the refrigerator for 15 minutes to let the rice set and firm in its shape.
Step 4: Make the Spicy Mayo
Combine the mayonnaise, Sriracha, honey, and sesame oil in a small bowl and whisk briefly until fully combined and smooth. Taste it — the mayo should taste spicy, creamy, slightly sweet, and nutty from the sesame oil. If the heat is too strong, add a small extra squeeze of honey. If it needs more heat, add more Sriracha in half-teaspoon increments. Transfer the spicy mayo to a small zip-lock bag or piping bag for easy, controlled drizzling — cutting the very corner tip off the bag produces a thin, elegant drizzle line rather than a thick uneven blob.
Step 5: Fill and Garnish the Cups
Remove the tin from the refrigerator. To remove each rice cup, run a thin butter knife or offset spatula around the edge of each cup and then press gently from underneath if possible, or use the knife to lift each cup cleanly. Arrange the cups on a serving platter. Divide the diced vegetables, edamame, and avocado among the 12 cups — pile each cup generously with filling, working from the most colourful vegetables to the avocado on top for visual impact.
Drizzle the spicy mayo over each filled Sushi Cup in a slow zigzag pattern from one side of the cup to the other. Scatter black sesame seeds across the entire platter. Serve the cups within 20 minutes of filling — the avocado begins to oxidise and the rice slowly absorbs moisture from the toppings after this point. For parties, assemble the rice cups ahead but fill and garnish at the last moment for the freshest result.
Filling Combinations Worth Exploring
Spicy Tuna
Mix 100g of canned tuna with 1 tablespoon of spicy mayo and a pinch of sesame oil. Top with thinly sliced cucumber and tobiko (flying fish roe) if available. A protein-rich version that suits the classic sushi flavour profile precisely.
Smoked Salmon
Fold small pieces of smoked salmon into cream cheese with a pinch of dill. Spoon onto the rice cups and top with capers, a thin cucumber slice, and a lemon zest garnish. An elegant, Scandinavian-inspired variation.
Crab and Mango
Mix imitation or real crab meat with diced mango, a squeeze of lime juice, and a teaspoon of spicy mayo. The sweet-spicy-savoury combination over sushi rice produces a tropical flavour that suits summer gatherings.
Vegan Teriyaki Mushroom
Sauté sliced shiitake mushrooms with soy sauce, mirin, and a pinch of sugar until glazed and sticky. Top with thin avocado slices, microgreens, and sesame seeds. A deeply savoury vegan option that suits every table.
Storage and Make-Ahead Tips
The pressed rice cups can be made up to 4 hours ahead and stored covered in the refrigerator. Bring to room temperature for 10 minutes before filling and serving — very cold rice loses the slight pliability that makes the cup eating experience pleasant. The spicy mayo keeps covered in the refrigerator for up to 5 days. Fill and garnish the cups no more than 20–30 minutes before serving for the freshest avocado and the best rice texture.
Leftover filled sushi cups keep in the refrigerator for up to 24 hours, though the avocado will oxidise and the rice will absorb moisture from the toppings and soften. For events where leftovers are likely, keep the fillings, rice cups, and spicy mayo in separate containers and assemble individual cups as needed rather than filling all 12 at once.
Frequently Asked Questions
Can I use regular long-grain rice instead of sushi rice?
Sushi rice is specifically short-grain Japanese rice with high starch content that makes it naturally sticky and cohesive when cooked — these properties are what allow it to be pressed into a cup shape that holds together. Regular long-grain rice does not have the same starch content and will not press into a stable cup shape regardless of technique. Medium-grain rice can work as a partial substitute but will not produce as clean or firm a cup as true sushi rice. For the best result, use the correct rice — it is widely available in most supermarkets.
How do I prevent the sushi cups from sticking to the muffin tin?
Three measures prevent sticking. First, chill the tin in the refrigerator or freezer for 20 minutes before pressing — cold metal bonds significantly less to warm rice than room-temperature metal. Second, spray the cups with non-stick cooking spray after chilling. Third, dampen your fingers or pressing tool lightly before working with each cup — this prevents the rice from bonding to your skin. Using a thin flexible knife or offset spatula to run around the edge of each cup before lifting also helps release any spots that have adhered despite these precautions.
Can I make sushi cups with brown rice?
Yes, you can use brown rice, but the texture will be slightly different. Brown rice contains less surface starch than white sushi rice, so the cups may not hold together as easily. Its firmer, drier texture can also make shaping a bit more challenging.
For better results, add an extra tablespoon of rice vinegar to the seasoning mixture. This helps improve cohesion and adds moisture. Press the rice firmly into the muffin tin and chill the cups for 25–30 minutes before adding the fillings. The extra chilling time helps them set properly.
If possible, choose short-grain brown sushi rice rather than regular brown rice. It has a stickier texture and produces sturdier sushi cups while still providing the benefits of a whole-grain option.
Can I add raw fish to sushi cups?
Yes, with the standard raw fish safety considerations. Use only sushi-grade fish — fish explicitly labelled as sushi-grade or sashimi-grade from a reputable fishmonger — which has been handled and sometimes frozen to standards that reduce parasitic risk. Never use supermarket-packaged raw fish not specifically labelled for raw consumption. Keep raw fish refrigerated until the moment of serving and serve the filled cups immediately. If you are cooking for immunocompromised guests, elderly people, or children, use cooked or canned protein alternatives rather than raw fish.
Can I make sushi cups without a muffin tin?
Yes. A silicone muffin tray works even better than a metal tin since the flexibility makes removing the cups completely effortless — press the rice in and simply push from underneath to pop each cup out cleanly. You can also press the rice into ring moulds, biscuit cutters, or even ramekins as alternative shaping vessels. For a completely equipment-free approach, press the seasoned rice into balls or patties by hand, lightly compress each one into a flat, thick disc, and pile the toppings directly on top of each pressed rice disc as an open-face sushi variation.
Final Thoughts
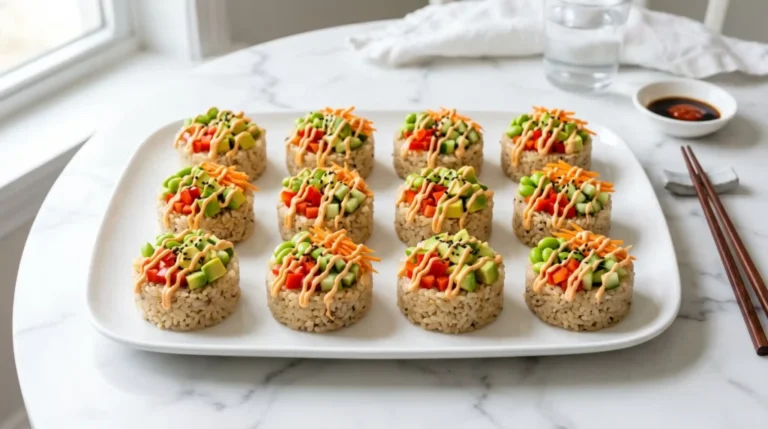
These Sushi Cups eliminate the most challenging part of homemade sushi: the rolling. They still deliver all the flavors that make sushi so enjoyable. The seasoned rice base, fresh vegetables, creamy avocado, and spicy mayo drizzle come together in a fun and satisfying bite. Best of all, they are ready in about 45 minutes, look impressive on a serving platter, and taste every bit as good as they look.
Season that rice with vinegar. Chill the muffin tin before pressing. Press the rice firmly and let the cups set cold before filling. Drizzle the spicy mayo in a thin, controlled zigzag. These four decisions produce the best possible version of a recipe that is already excellent without them.
Make these for your next gathering and resist the urge to explain how easy they were before people have tasted them. Let the impressed reaction happen first. The explanation can come after — if you decide to share at all. IMO, the mystique is half the presentation.
Sushi Cups
Ingredients
Method
- Place the rinsed sushi rice and water in a medium saucepan. Bring to boil over high heat.
- Reduce heat to the lowest setting, cover, and cook undisturbed for 18-20 minutes.
- Post cooking, let it sit covered for another 10 minutes.
- Mix rice vinegar, sugar, and salt in a saucepan over low heat until dissolved.
- Fold the vinegar mixture into the hot rice gently to avoid crushing the grains.
- Let the seasoned rice cool to a manageable temperature.
- Chill a standard 12-cup muffin tin in the refrigerator or freezer for 20 minutes.
- Spray the cups with non-stick cooking spray after chilling.
- Scoop two heaping tablespoons of warm seasoned rice into each cup.
- Press the rice firmly down, creating a compact base.
- Use a flat-bottomed object to compress the rice layer further.
- Chill the pressed cups in the fridge for 15 minutes.
- Whisk together mayonnaise, Sriracha, honey, and sesame oil until smooth.
- Transfer the spicy mayo to a piping bag for easy drizzling.
- Remove rice cups from the refrigerator and gently lift each out.
- Fill each cup with diced vegetables, edamame, and avocado.
- Drizzle spicy mayo over each cup and scatter black sesame seeds.
- Serve within 20 minutes for best quality.