I started making Tuna Salad Nori Wraps on a Tuesday when I had exactly zero bread left and zero appetite for another plain tuna bowl. Grabbing a packet of nori sheets from the back of the cupboard turned out to be one of my better kitchen instincts. I’ve made these at least twice a week ever since.
These wraps hit every note you want from a quick lunch: protein, crunch, creaminess, and that deep umami flavour the nori brings. And unlike most “healthy wraps,” they genuinely fill you up. Let’s talk about why — and exactly how to make them.
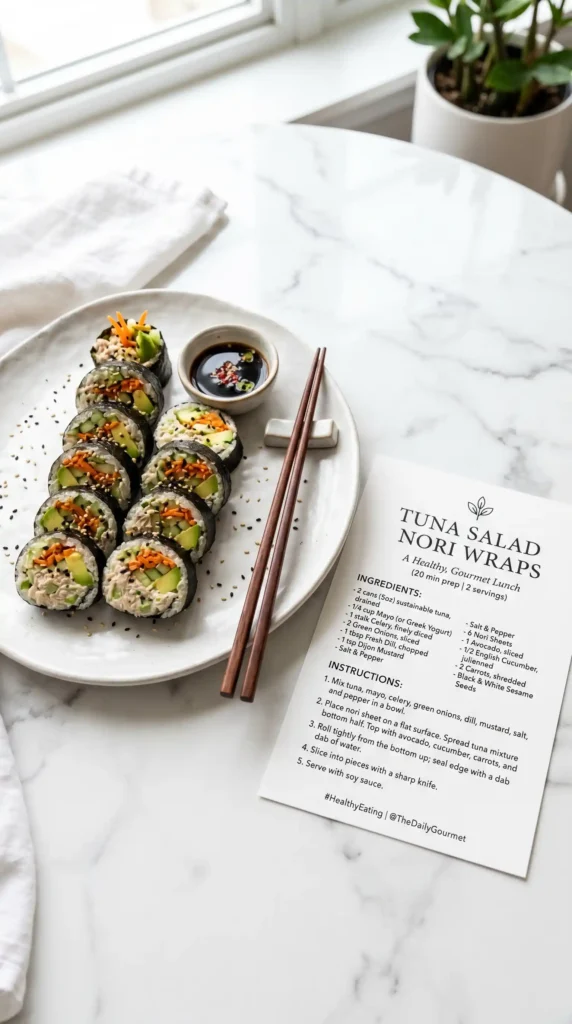
Quick snapshot: This recipe makes 2 large nori wraps, serving 1 to 2 people. Prep takes about 10 minutes and assembly takes another 5. Total: 15 minutes from pantry to plate, with zero cooking required. It doesn’t get more efficient than that for a proper lunch.
Why Nori Wraps Beat Regular Wraps
Have you ever thought about how much the wrapper matters in a wrap? More than most people realise. A standard flour tortilla adds calories, blandness, and the slightly gummy texture that starts falling apart the moment it hits a wet filling. Nori does none of that.
Nori sheets are thin, crisp, and deeply savoury. They add umami — that fifth taste, rich and oceanic — without adding heaviness. They’re naturally low in calories and carbs, which makes them a brilliant swap for anyone eating lighter without wanting to give up flavour or satisfaction.
Nori also holds wet fillings surprisingly well. The natural structure of the seaweed sheet stays firm long enough for you to roll, fold, and eat without the whole thing disintegrating in your hands. That’s more than I can say for certain thin tortillas.
What You’ll Need
The beauty of Tuna Salad Nori Wraps is that most of these ingredients live in your kitchen already. The tuna is a pantry staple, the vegetables are whatever’s fresh in your fridge, and the nori keeps for months in a dry cupboard. You can make this anytime with almost no planning.
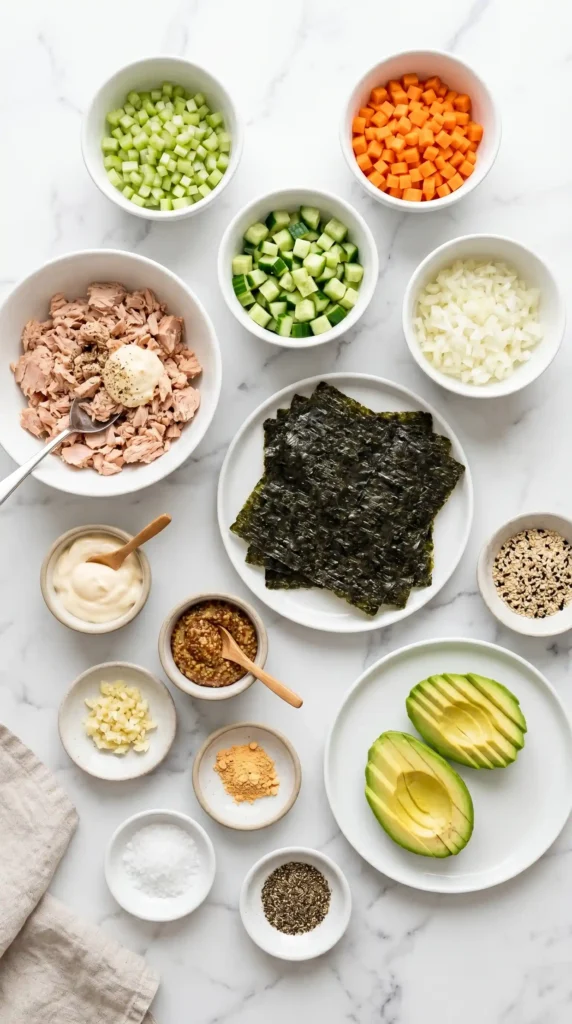
Full Ingredient ListMakes 2 Wraps / Serves 1–2
For the Tuna Salad
- Wild-caught tunaRich in flavour and protein2 cans
- Celery, finely choppedAdds crunch3 tbsp
- Carrots, finely choppedAdds natural sweetness3 tbsp
- Cucumber, finely choppedFor freshness2 tbsp
- White onion, finely chopped1 tbsp
- MayonnaiseFor creaminess4 tbsp
- Whole grain mustardAdds tanginess2 tbsp
- Ground gingerEnhances flavour1 pinch
- GarlicAdds depth — minced fresh or powder both work1 pinch
- Sea saltTo taste
- Black pepperTo taste
For Wrapping
- Large nori sheetsLow calorie, umami flavour2 sheets
- Sesame seedsFor garnishTo taste
- Small avocado, slicedFor creaminess1 small
IMO, the whole grain mustard is worth calling out specifically. It adds a punchy, slightly grainy texture to the dressing that cuts through the richness of the mayo beautifully. Don’t skip it in favour of regular yellow mustard — the flavour difference is significant and very much worth it.
Building the Tuna Salad First
The tuna salad filling is the core of this recipe, and it deserves a bit more attention than just “mix everything together.” Getting the texture and the dressing balance right makes the difference between a great wrap and a mediocre one. It takes maybe three extra minutes — worth every second.
Draining the tuna properly
This sounds boring, but properly draining canned tuna is genuinely important. Excess liquid in the tuna makes the whole salad watery, which then makes the nori go soft and start tearing before you even finish rolling. Open the can, press the lid down firmly against the tuna, and hold it over the sink for a full 30 seconds. Press hard. Get it really dry.
The dressing-first approach
Mix your dressing — the mayo, mustard, ground ginger, and garlic — in a separate small bowl before it touches the tuna. This lets you taste and adjust the dressing on its own, where it’s much easier to correct. Too sharp? A touch more mayo. Not punchy enough? Another half-teaspoon of mustard. Get it right before it goes in.
Consistency choices
Once you combine the tuna, vegetables, and dressing, you can decide on your preferred texture. A few folds with a fork keeps the tuna in larger, flakier pieces for a chunkier bite. A heavier mash with the back of the fork creates a smoother, more spreadable filling that distributes more evenly across the nori sheet. Both are delicious — it just depends on what you prefer.
How to Make Tuna Salad Nori Wraps — Step by Step
Once the tuna salad is ready, the whole assembly process takes under five minutes. Have your nori sheets out, your avocado sliced, and your sesame seeds within reach before you start rolling. The nori starts to soften quickly once it contacts the wet filling, so speed helps here.
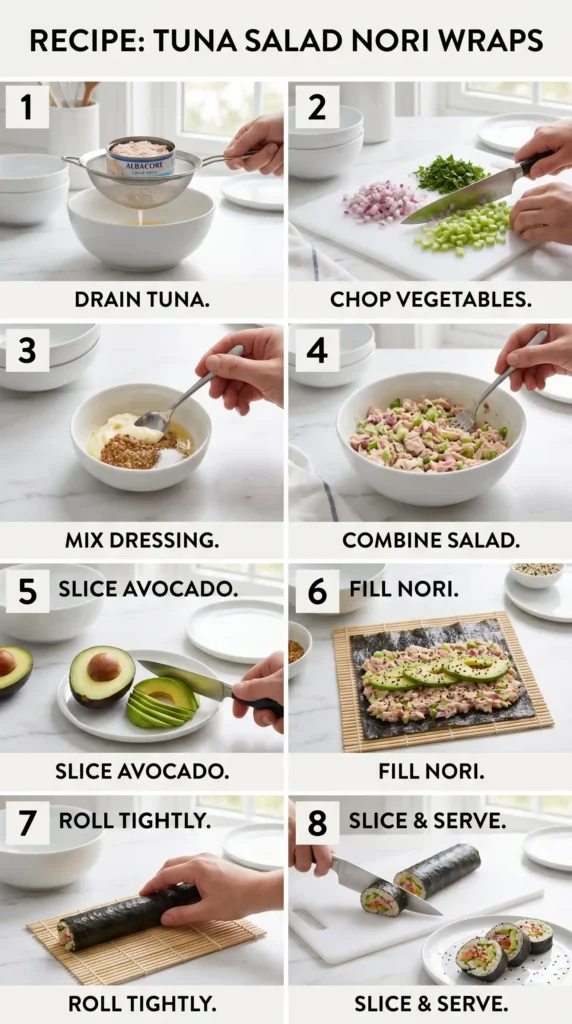
Step 1
Drain & prep the tunaOpen both cans of wild-caught tuna and drain them thoroughly. Press the lid firmly against the fish over the sink to squeeze out as much liquid as possible. Transfer the drained tuna to a medium mixing bowl. Use a fork to break the tuna into loose flakes but don’t mash it fully yet — that comes later once the dressing is in.
Step 2
Prep the vegetablesFinely chop the celery, carrot, cucumber, and white onion into small, uniform pieces. Smaller pieces distribute through the tuna more evenly and make the filling much easier to wrap. Rough, large chunks tend to tear through the nori when you fold it. Aim for pieces no larger than about half a centimetre — small enough to blend in but large enough to add texture with every bite.
Step 3
Mix the dressing separatelyIn a small bowl, combine 4 tablespoons of mayonnaise, 2 tablespoons of whole grain mustard, a pinch of ground ginger, and a pinch of garlic. Stir everything together until smooth and fully combined. Taste the dressing on its own at this point — it should taste tangy, creamy, and well-seasoned. Adjust anything that feels off before adding it to the tuna, since it’s much harder to fix once everything is combined.
Step 4
Combine tuna, veg & dressingAdd the chopped celery, carrots, cucumber, and white onion to the bowl with the tuna. Pour the dressing over everything. Use a fork to fold and mix the ingredients together, working from the bottom of the bowl up. Mix until everything looks evenly coated and combined. Then decide on your texture — fold gently a couple more times for chunky, or press the back of the fork across the mixture for something smoother and more spreadable.
Step 5
Season and tasteAdd sea salt and black pepper to the tuna mixture a little at a time, tasting after each addition. Remember that the nori already carries a natural saltiness from the sea, so the tuna salad doesn’t need heavy salting. A light hand with the salt here leads to a much better balanced wrap in the end. Once seasoned, set the bowl aside while you prepare the nori sheets.
Step 6
Slice the avocadoHalve the small avocado, remove the stone, and scoop the flesh out with a spoon. Slice it into thin, even strips — about half a centimetre thick works well. The avocado adds a layer of creaminess that complements the tangy tuna salad beautifully and helps everything hold together inside the wrap. If your avocado is very ripe, a squeeze of fresh lemon or lime juice over the slices will keep them from browning while you assemble.
Step 7
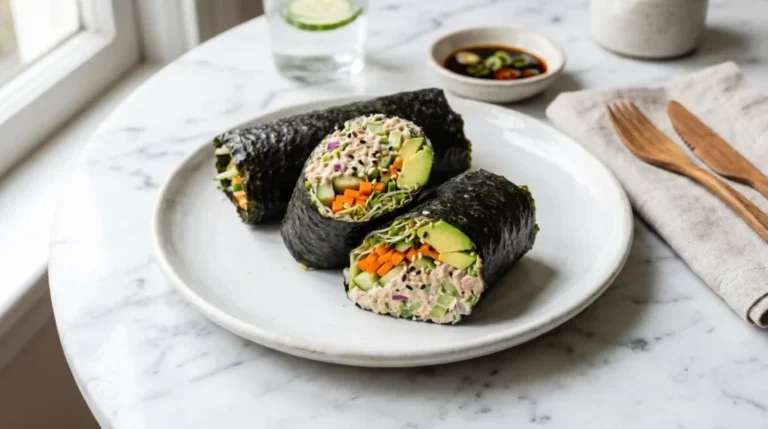
Lay out the nori and fillPlace one nori sheet flat on a clean, dry surface with the rough, matte side facing upward. The shiny side should face down — the matte side grips the filling slightly better. Spoon a generous heap of the tuna salad into the centre of the nori sheet, leaving about 2 to 3 centimetres of space clear around all the edges. Spread the filling in an even layer rather than piling it high, which makes rolling much easier and cleaner. Lay your avocado slices across the top of the tuna filling in a single layer.
Step 8
Add sesame seeds and rollScatter sesame seeds over the avocado to taste — a light sprinkle adds visual interest and a subtle nutty crunch. Now, roll the nori wrap firmly and with confidence. Start at the edge closest to you and fold it over the filling, tucking it tightly underneath the contents as you go. Keep the roll tight as you work toward the far edge. The moisture from the filling will help the far edge of the nori seal itself shut. If it resists, dab a tiny amount of water on the far edge with your fingertip to help it stick.
Step 9
Slice and serve immediatelyUse a sharp knife to cut the rolled wrap in half on a diagonal. A clean, confident slice in one motion is better than sawing back and forth — sawing drags filling out through the cut and compresses the nori. Serve immediately while the nori is still crisp. The longer it sits, the softer the seaweed gets from the moisture in the filling. Make these, eat these.
Tips for the Best Tuna Salad Nori Wraps
- Drain the tuna thoroughly and properly — wet tuna is the number one reason nori goes soggy fast.
- Mix the dressing separately before adding it to the tuna so you can taste and adjust it on its own.
- Roll and eat immediately for crisp nori. Even 10 minutes of sitting time softens the sheet noticeably.
- Wild-caught tuna has more flavour than regular canned tuna. The difference is worth it in a simple recipe like this.
- Keep the filling layer even and not too thick — overstuffed wraps tear at the seam when you roll them.
- A sharp knife in one clean motion slices the wrap far better than a blunt knife or a sawing motion.
Easy Ways to Customise Your Nori Wraps
Once you nail the base recipe, the customisation options are genuinely endless. Tuna Salad Nori Wraps work well as a template you can modify based on what’s in your fridge. The nori and the creamy tuna base hold up well with a lot of different additions.
Protein swaps
Canned salmon works brilliantly in place of tuna with no other changes needed. Shredded rotisserie chicken with the same dressing is another excellent option. For a pescatarian but tuna-free version, flaked smoked mackerel has an incredible depth of flavour that the nori wrapping suits perfectly.
Add heat
A small drizzle of sriracha or a pinch of chili flakes through the tuna salad adds a slow, pleasant heat that works very well against the cool cucumber and creamy avocado. Start with half a teaspoon of sriracha folded through the dressing — you can always add more.
Make it dairy-free
This recipe is already dairy-free as written, which is worth knowing if you’re cooking for dietary restrictions. The creaminess comes entirely from the avocado and mayonnaise, both of which contain no dairy. Just check your mayonnaise label to confirm — most standard mayo is dairy-free but worth a quick look.
Storage and Meal Prep Notes
Rolled nori wraps don’t store well once assembled — the moisture from the filling softens the nori quickly, and it loses its texture within an hour. The good news is that the tuna salad filling stores very well on its own in an airtight container in the fridge for up to 3 days.
FYI, if you want to meal prep these for the week, just make a big batch of the tuna salad and keep the nori sheets and avocado separate. Slice the avocado fresh each day to avoid browning and roll the wraps just before eating. Three-day tuna salad, three days of excellent lunches.
Frequently Asked Questions
Why does my nori go soft and soggy?
The main culprit is excess moisture — usually from undrained tuna or very watery vegetables like cucumber. Press the tuna thoroughly and pat the cucumber pieces dry on a piece of kitchen paper before adding them to the mix. Also, eat the wraps as soon as you assemble them. Nori starts absorbing moisture from the filling within minutes of rolling, so these aren’t really a make-ahead food in their wrapped form.
Can I make these wraps ahead and take them to work?
The tuna salad packs well separately and keeps in the fridge for up to 3 days in an airtight container. Pack your nori sheets dry and the avocado unsliced in a separate container. Assemble and roll at your desk or in a lunch room just before eating. The nori stays crisp right up until it touches the filling, so a 30-second rolling job at lunchtime is genuinely worth it for the texture difference.
What type of nori sheets work best?
Use full-size roasted nori sheets — the kind sold for making sushi rolls. They’re bigger, sturdier, and have a better flavour than the small snack-size nori packs. Look for sheets labelled “yaki nori” or “roasted nori” at Asian grocery stores or in the international aisle at larger supermarkets. Avoid flavoured or pre-seasoned nori for this recipe — the tuna salad provides plenty of flavour on its own.
Is this recipe suitable for keto or low-carb diets?
Yes — Tuna Salad Nori Wraps are naturally very low in carbohydrates. Nori sheets contain almost no carbs, tuna is pure protein, and the vegetables and avocado add minimal carb content. The dressing uses mayonnaise and mustard, both of which are low-carb. Just check the labels on your specific mayo and mustard brands, as some versions add sugar. Overall, this is one of the most naturally keto-friendly wrap options available.
Can I use Greek yoghurt instead of mayonnaise?
You can, and it works well for a lighter, tangier dressing. Use the same quantity of full-fat Greek yoghurt in place of mayo — the creamy texture is similar enough to work. The flavour shifts slightly toward a sharper, more acidic profile, which actually pairs nicely with the whole grain mustard. If the result tastes too sharp, add a tiny drizzle of honey or a pinch of sugar to round it out.
How do I stop the wrap from unrolling when I cut it?
Two things help here. First, roll the nori tightly and consistently all the way to the far edge, then hold it seam-side down for about 30 seconds while the moisture from the filling helps it seal. Second, use a very sharp knife and cut in one clean downward motion without sawing. If the far edge keeps popping open, dab the last centimetre of nori with a little water on your fingertip before completing the roll — it acts as a natural adhesive.
Make One Today and See for Yourself
Tuna Salad Nori Wraps deserve a regular spot in your lunch rotation. They take 15 minutes, use ingredients you already own, deliver real protein and flavour, and come in under a normal wrap in calories without ever feeling like you’re compromising on satisfaction.
The key points: drain that tuna well, mix your dressing separately, slice the avocado fresh, and roll it tight just before eating. Get those four things right and you’ll wonder how you ever settled for a plain sandwich again.
Tuna Salad Nori Wraps
Ingredients
Method
- Drain & prep the tuna. Open both cans of wild-caught tuna and drain them thoroughly. Press the lid firmly against the fish over the sink to squeeze out as much liquid as possible. Transfer the drained tuna to a medium mixing bowl. Use a fork to break the tuna into loose flakes.
- Prep the vegetables. Finely chop the celery, carrot, cucumber, and white onion into small, uniform pieces.
- Mix the dressing separately. In a small bowl, combine mayonnaise, whole grain mustard, ground ginger, and garlic. Stir until smooth and fully combined.
- Combine tuna, veg & dressing. Add the chopped vegetables and the dressing to the bowl with the tuna. Use a fork to fold and mix the ingredients together, adjusting texture as preferred.
- Season and taste. Add sea salt and black pepper to taste, remembering that the nori has a natural saltiness.
- Slice the avocado. Halve the avocado and scoop out the flesh, slicing it into thin strips.
- Lay out the nori and fill. Place one nori sheet flat with the matte side facing up. Spoon a generous heap of tuna salad into the center, leaving space around the edges. Lay the avocado slices on top.
- Add sesame seeds and roll. Scatter sesame seeds over the avocado. Roll the nori wrap tightly, tucking the filling as you go.
- Slice and serve immediately. Use a sharp knife to cut the rolled wrap in half on a diagonal. Serve right away for the best texture.