Two legendary treats combined into one ridiculously delicious dessert—that’s what Oreo brownies are all about. I made these for a bake sale once and they sold out in literally ten minutes. No exaggeration.
Prep Time: 15 minutes
Bake Time: 35 minutes
Total Time: 50 minutes
Servings: 16 brownies
These Oreo brownies recipe homemade creations deliver fudgy, chocolatey perfection with cookies baked right in. Ready to make something that’ll have everyone begging for the recipe?
Why Oreos and Brownies Are Perfect Together
Have you ever wondered why certain combinations just work? Oreos bring crunch and cream. Brownies add fudgy richness. Together they create textural and flavor perfection that’s basically unstoppable.
I’ve tried countless Oreo dessert recipes easy variations over the years. Some were okay. Others fell flat. But these brownies? They consistently blow people’s minds every single time I make them.
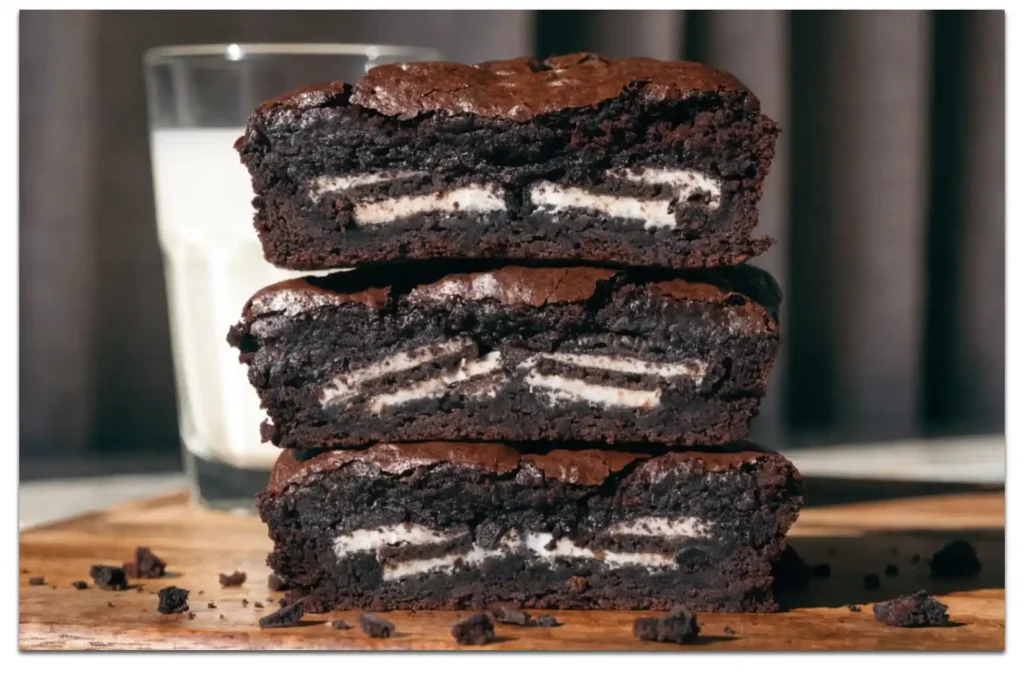
The Oreos stay somewhat intact during baking. You get pockets of cookie surprise throughout the brownie. That element of discovery makes each bite interesting. No two bites taste exactly the same.
Plus, they look incredibly impressive when sliced. Those visible Oreo layers make people think you spent hours on them. Little do they know the whole thing takes less than an hour, honestly.
Essential Ingredients
Let’s break down what you need for this easy Oreo brownies creation. Nothing complicated or impossible to source. Just quality ingredients that create spectacular results when combined correctly.
For the Brownie Base:
- 1 cup unsalted butter
- 2 cups granulated sugar
- 4 large eggs
- 1 teaspoon vanilla extract
- 3/4 cup unsweetened cocoa powder
- 1 cup all-purpose flour
- 1/2 teaspoon salt
- 1/2 teaspoon baking powder
For the Oreo Layer:
- 20-24 Oreo cookies (regular or double stuff)
- 4 ounces cream cheese, softened (optional for cheesecake layer)
- 1/4 cup granulated sugar (optional for cheesecake layer)
- 1 egg (optional for cheesecake layer)
Simple stuff, right? The beauty is in how these ingredients come together. The optional cream cheese layer transforms these into Oreo cheesecake brownies. Both versions are incredible.
Equipment You’ll Need
Before starting, gather your tools. Organization prevents chaos when you’re in the middle of mixing and baking. Trust me on this from experience.
Essential Tools:
- 9×13 inch baking pan
- Parchment paper
- Large mixing bowl
- Whisk and spatula
- Measuring cups and spoons
- Small saucepan
The parchment paper is crucial here. It makes removal and cutting infinitely easier. Don’t skip this step unless you enjoy wrestling brownies out of pans. Nobody enjoys that struggle.
Preparing Your Pan
Preheat your oven to 350°F while you prep everything else. Starting with a properly heated oven ensures even baking throughout. Cold ovens create weird texture issues.
Line your 9×13 inch pan with parchment paper. Leave overhang on two sides—this creates handles for lifting brownies out later. This simple trick saves so much frustration.
Spray the parchment lightly with cooking spray. This prevents any sticking issues. Even with parchment, a little insurance never hurts. Better safe than sorry here.
Set your prepared pan aside within easy reach. You’ll need it quickly once the batter is ready. Having everything positioned properly makes assembly smooth and stress-free.
Making the Brownie Batter
Melt butter in a saucepan over medium heat. Once completely melted, remove from heat immediately. Don’t let it brown—you want plain melted butter here.
Pour melted butter into your mixing bowl. Add sugar and whisk vigorously for about one minute. The mixture should look slightly lighter in color. This aeration helps create fudgy texture.
Add eggs one at a time, whisking well after each addition. The mixture should become smooth and glossy. Good incorporation here creates the perfect brownie structure later.
Stir in vanilla extract thoroughly. This adds depth to the chocolate flavor. Never skip vanilla in chocolate recipes—it enhances everything beautifully without being obvious.
Adding Dry Ingredients
Sift cocoa powder, flour, salt, and baking powder together. Sifting removes lumps and aerates the mixture. This creates smoother batter and better texture in finished brownies.
Add dry ingredients to wet ingredients all at once. Stir gently just until combined. Don’t overmix here—overmixing creates cakey brownies instead of fudgy ones. Stop when you see no dry streaks.
The batter should be thick, glossy, and smooth. It should coat your spatula heavily. Thin batter means something went wrong. Thick batter is exactly right.
This chocolate brownies recipe easy base works perfectly every time. It’s my go-to brownie recipe even without Oreos. That’s how good it is fundamentally.
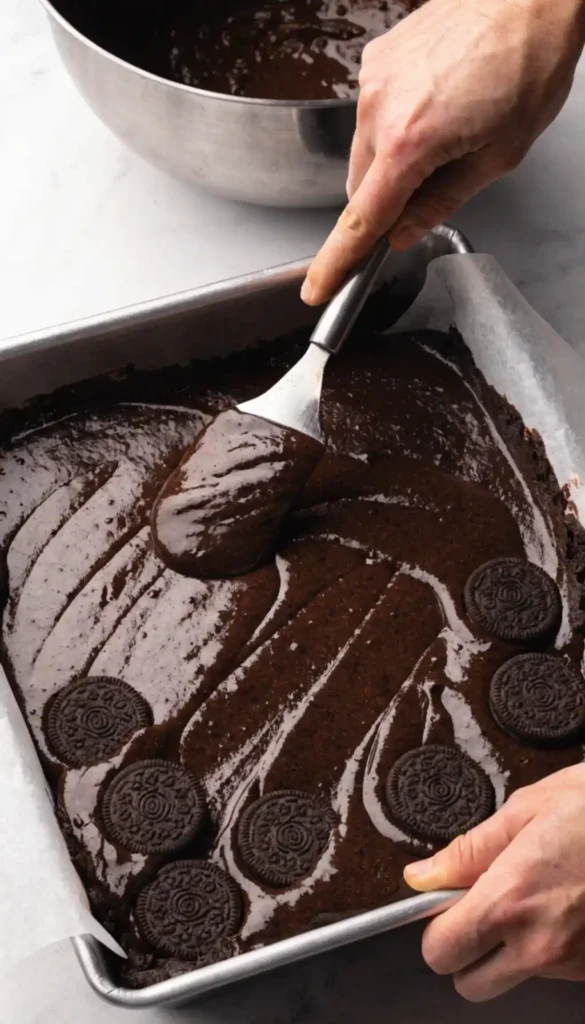
Layering the Brownies
Pour half the brownie batter into your prepared pan. Spread it evenly to all corners using a spatula. Don’t stress about perfect smoothness—close enough works fine.
Arrange Oreo cookies over the batter in a single layer. You can leave them whole or break them slightly. Whole cookies create more dramatic effect. Broken pieces distribute flavor more evenly.
Press cookies gently into the batter. They should sit mostly on top with bottoms slightly submerged. This positioning creates perfect distribution throughout the finished brownies with Oreos inside.
Cover cookies completely with remaining brownie batter. Spread carefully to avoid moving the cookies around too much. Some cookies peeking through is fine—actually adds to the aesthetic.
Optional Cream Cheese Layer
Want to make these into Oreo cheesecake brownies? Beat softened cream cheese with sugar until smooth. Add egg and mix just until incorporated completely.
Dollop cream cheese mixture randomly over the top brownie layer. Use a knife to swirl it decoratively through the batter. Create marble patterns for visual appeal.
This addition creates tangy contrast against rich chocolate. It’s not traditional but it’s incredibly delicious. The cream cheese balances the sweetness perfectly, IMO.
Skip this if you want pure brownie-cookie goodness. Both versions are fantastic. Choose based on your mood or what sounds appealing today.
Baking to Perfection
Place pan in the center of your preheated oven. Bake for 30-35 minutes total. Start checking at 30 minutes with a toothpick test carefully.
Insert a toothpick into the brownie portion, not through an Oreo. It should come out with a few moist crumbs attached. Completely clean means overbaked. Super wet means underbaked.
The edges should look set and slightly pull away from pan sides. The center should look mostly set but still slightly glossy. It continues cooking from residual heat after removal.
Don’t overbake these. Overbaked brownies turn dry and crumbly instead of fudgy. Slightly underbaked is better than slightly overbaked. Remember that always when making brownies.
Cooling Properly
Remove from oven and place pan on a wire rack. Let brownies cool completely in the pan before cutting. This takes about 2 hours at room temperature minimum.
Warm brownies fall apart when cut. Cool brownies slice cleanly and hold their shape beautifully. Patience here creates professional-looking results worth sharing on social media.
Once cooled, use the parchment overhang to lift the entire brownie slab out of the pan. Transfer to a cutting board for easier slicing and handling.
The cookies will have softened during baking but still provide textural contrast. That soft-but-present cookie texture throughout makes these special and unique.
Cutting Clean Slices
Use a sharp knife for cutting. Wipe the blade clean between each cut. This prevents dragging crumbs and creates clean edges. Professional appearance requires this extra step.
Cut into 16 squares for generous portions. Or cut into 24 smaller pieces for parties. Size depends on occasion and how much chocolate people can handle.
Each piece should show visible Oreo layers when viewed from the side. That visual appeal makes these cookies and cream brownies Instagram-worthy. The cross-section is half the appeal.
Store cut brownies in an airtight container separated by parchment paper. This prevents sticking while maintaining moisture. They keep for 5-6 days at room temperature easily.
Variations to Try
Master the basic recipe first, then experiment wildly. I’ve tried countless variations of these Oreo recipes easy adaptations. Some work brilliantly. Others taught me lessons about restraint.
Mint Oreo Brownies
Use mint Oreos instead of regular ones. Add a drop of peppermint extract to the batter. The chocolate-mint combination tastes refreshing and sophisticated together.
Top with chocolate ganache and crushed mint Oreos. This creates an ultra-decadent dessert perfect for special occasions. The presentation screams fancy without being complicated.
Peanut Butter Oreo Version
Swirl peanut butter into the brownie batter before adding cookies. Use peanut butter Oreos for double peanut impact. The combination rivals any candy bar out there.
Drizzle melted peanut butter over finished brownies for extra indulgence. Salt the top lightly to balance sweetness. Sweet-salty contrast creates addictive flavor profile.
Triple Chocolate
Use chocolate Oreos and add chocolate chips to the batter. This creates ultimate chocolate overload for serious chocolate lovers only. It’s intense in the best way.
Top with chocolate frosting and more crushed Oreos. This version borders on ridiculous but tastes absolutely incredible. Sometimes more is actually more, you know?
Making Them Look Professional
Want that brownies aesthetic perfection for photos? Dust the top lightly with powdered sugar before cutting. This creates beautiful contrast against dark chocolate.
Cut with a sharp knife and clean edges thoroughly. Arrange pieces on a white platter or wooden board. Simple presentation lets the brownies shine.
Stack a few pieces slightly offset for dimension in photos. Add a glass of milk nearby for context. These styling tricks make home baking look bakery-level professional.
Natural lighting works best for photography. Shoot near a window during daytime. These brownies photograph gorgeously—take advantage of that visual appeal completely.
Brookies Alternative
Want to try the brookies recipe cookie brownies trend? Make cookie dough separately. Layer it with brownie batter in the pan before baking together.
This Oreo brookies approach combines three elements: cookies, brownies, and Oreos. It’s excessive and wonderful. Perfect for people who can never decide on just one dessert.
Bake at 350°F for 40-45 minutes since you’re cooking more batter. The cookie layer needs adequate time to bake through completely underneath the brownies.
Serving Suggestions
Serve these Oreo cookie brownies warm with vanilla ice cream. The temperature contrast creates incredible eating experience. Cold ice cream melts slightly into warm brownie. Perfect combination.
Drizzle with hot fudge or caramel sauce for extra decadence. Sometimes you just need to go all out. Special occasions deserve maximum indulgence without apology.
Pair with cold milk for dunking. Yes, you can dunk brownies. It’s not weird—it’s genius. The milk softens edges and creates new texture dimension.
Cut smaller pieces for parties or potlucks. These are rich, so smaller servings actually work better. People can always take seconds if they want more.
Storage and Freezing
Store Oreo bars at room temperature in an airtight container. They stay fresh and fudgy for 5-6 days easily. Don’t refrigerate—cold temperatures make them firm and less enjoyable.
Layer brownies with parchment paper when stacking in containers. This prevents sticking and makes grabbing individual pieces easier later. Small organizational step, big convenience payoff.
Freeze unfrosted brownies for up to 3 months. Wrap individual pieces tightly in plastic wrap, then aluminum foil. Thaw at room temperature for 30 minutes before eating.
Frozen brownies actually taste amazing eaten slightly frozen. They become fudge-like and dense. Try it sometime—it’s a different but equally delicious experience entirely.

Common Mistakes to Avoid
Don’t use old, stale Oreos. Fresh cookies maintain better texture during baking. Stale ones turn weird and mealy. Check your pantry before starting the recipe.
Avoid cutting brownies while warm. I know they smell incredible and waiting feels impossible. But patience creates clean slices. Warm cutting creates crumbly messes.
Never overbake these. The line between perfect and overdone is thin. Check early and often during the last five minutes. Better slightly underbaked than overbaked.
Don’t skip lining the pan with parchment. This step makes removal effortless. Wrestling brownies from pans ruins them and frustrates you. Parchment solves everything, FYI.
Cost Analysis
Making these homemade Oreo brownies costs roughly $8-10 for 16 servings. That’s about 60 cents per brownie. Bakery brownies cost $3-5 each typically. Massive savings here.
Most ingredients are pantry staples you probably have already. The Oreos represent the only special purchase. Buy them on sale and you’re golden.
One batch feeds a crowd or gives you dessert for days. The value proposition is incredible compared to buying individual treats. Plus yours taste better and are fresher.
Making these how to make Oreo brownies yourself also impresses people more than store-bought. Homemade always wins in taste and sentiment. People appreciate the effort genuinely.
Why This Recipe Works
This Oreo chocolate brownies recipe succeeds through perfect ratios and proper technique. The brownie base is fudgy and rich. The Oreos add textural contrast. Everything balances beautifully.
The cookies soften during baking but don’t dissolve completely. They maintain presence while integrating with brownie. That balance creates the magic everyone loves about this dessert.
Simple ingredients and straightforward method ensure consistent results. No tricky techniques or professional skills needed. Just follow steps and you’ll get amazing brownies every time.
The recipe scales easily for different pan sizes. Adjust baking time accordingly. The ratios maintain properly regardless of quantity. Flexibility makes this invaluable for various occasions.
Final Thoughts
You now know how to make incredible Oreo brownies at home. It’s simpler than you imagined, right? No culinary degree required for these show-stopping results whatsoever.
These brownies have become my signature dessert. I make them constantly for everything from casual gatherings to special celebrations. They never disappoint or fail to impress.
Stop buying expensive bakery brownies and start making these. Your kitchen will smell like chocolate heaven. Everyone will think you’re a baking genius. Total win-win situation.
Remember, even slightly imperfect brownies taste amazing when they involve Oreos. Don’t stress about making them flawless. Just make them, share them, and enjoy all the compliments.
Frequently Asked Questions
Can I use a different cookie instead of Oreos?
Absolutely! Try any sandwich cookie you love. Nutter Butters, Chips Ahoy, or even homemade cookies work great. The technique stays the same regardless of cookie choice used.
Why are my brownies cakey instead of fudgy?
Overbaking or overmixing the batter causes this. Mix just until combined and remove from oven when slightly underdone. The center should still look slightly glossy when you remove them.
Can I make these in advance?
Yes! Bake them up to 3 days ahead and store covered at room temperature. Or freeze them for up to 3 months. They’re actually easier to cut when completely cooled.
Do I need to use parchment paper?
It’s not absolutely required but highly recommended. Without it, you’ll struggle to remove brownies cleanly. Greasing the pan works but parchment is easier and more reliable.
Can I add other mix-ins besides Oreos?
Sure! Try chocolate chips, nuts, or candy pieces along with the Oreos. Don’t add too much though—you’ll overwhelm the brownie structure. About 1 cup of add-ins maximum works best.

Oreo Brownies
Ingredients
Method
- Preheat your oven to 350°F (175°C) and line your 9x13 inch baking pan with parchment paper.
- Melt the butter in a saucepan over medium heat and pour into a mixing bowl.
- Add sugar and whisk for about one minute until slightly lighter in color.
- Add eggs one at a time, whisking well after each. Stir in vanilla extract.
- Sift cocoa powder, flour, salt, and baking powder together. Add dry ingredients to wet ingredients, stirring gently until just combined.
- Pour half the brownie batter into the prepared pan and spread evenly.
- Arrange Oreo cookies on top of the batter, pressing gently to submerge the bottoms.
- Cover with remaining brownie batter and spread to cover the Oreos.
- If making cream cheese layer, beat softened cream cheese with sugar and egg, then dollop over the top and swirl through the batter.
- Bake for 30-35 minutes or until a toothpick comes out with a few moist crumbs attached.
- Let cool completely before cutting, about 2 hours.


