Prep Time: 15 minutes | Bake Time: 9–12 minutes | Cool Time: 30 minutes | Total Time: ~1 hour | Servings: ~24 cookies
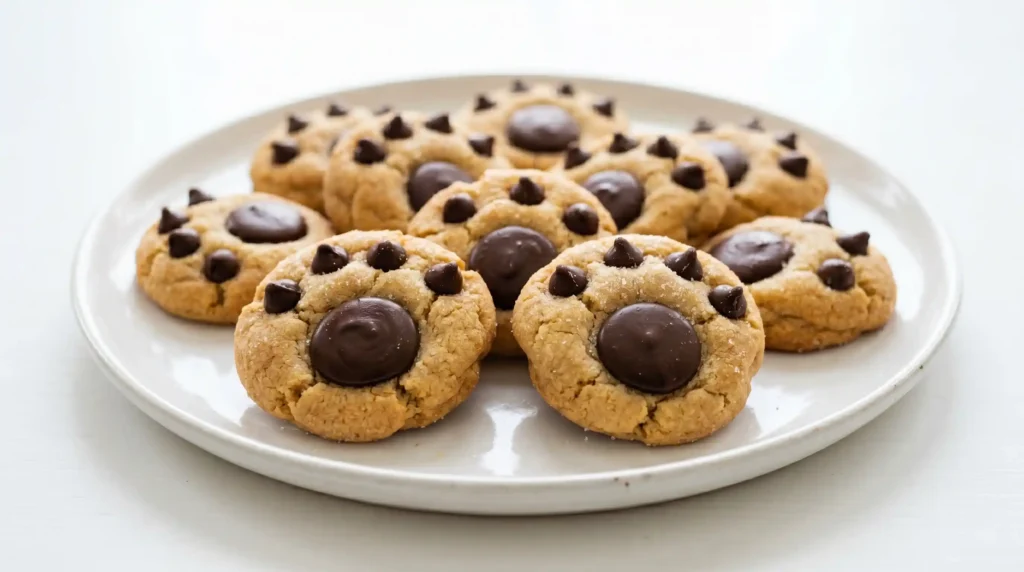
So, you want to make Bear Paw Cookies. Great choice. These little guys are the kind of treat that makes everyone in the room stop what they’re doing and go, “Wait — are those actual paw prints?” Yep, they are. And they taste just as good as they look.
I first made these for a birthday party and honestly, the cookies disappeared before the cake even got cut. That should tell you everything.
What Are Bear Paw Cookies?
Bear Paw Cookies are soft, buttery sugar cookies decorated to look like adorable bear paws. A dark chocolate melting wafer sits in the center as the main pad, and three chocolate chips sit above it as the “toes” — or claws, depending on how dramatic you want to be.
They’re simple, they’re fun, and they’re genuinely impressive-looking. Perfect for kids’ parties, Halloween, woodland-themed events, or just a Tuesday when you need something sweet. IMO, any day is a good day for Bear Paw Cookies.
Ingredients You’ll Need
Here’s everything to grab before you start. No fancy pantry stuff required.
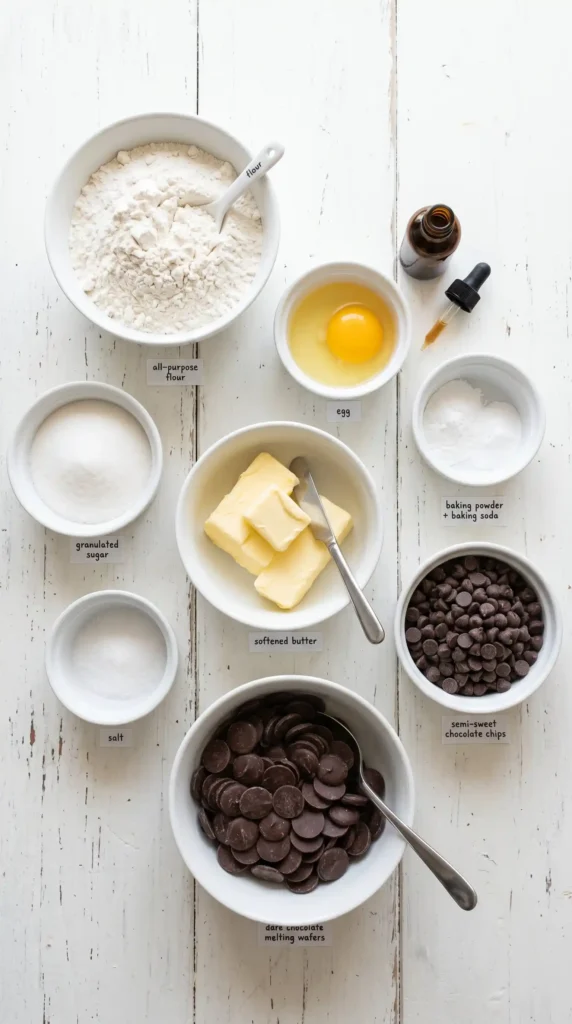
- 1 cup unsalted butter, softened
- 1 cup sugar (plus extra for rolling, optional)
- 1 egg
- 1 tsp vanilla extract
- 2 cups all-purpose flour
- 1 tsp baking powder
- 1/2 tsp baking soda
- 1/4 tsp salt
- 1 bag Ghirardelli dark chocolate melting wafers (you’ll only use 24 wafer chips)
- 1 bag semi-sweet chocolate chips (only 3 chips per cookie for the claws)
That’s it. Simple and straightforward — no obscure ingredients that make you question your life choices at the grocery store.
Equipment You’ll Need
Nothing crazy here either. Just the basics:
- Stand mixer or hand mixer
- Large mixing bowl
- Cookie sheet
- Parchment paper or silicone baking mat
- Small ice cream scoop
- Wire cooling rack
How to Make Bear Paw Cookies
Step 1: Get Your Oven Ready
Preheat your oven to 350 degrees Fahrenheit. While it heats up, line your cookie sheet with parchment paper or a silicone baking mat. Set it aside — you’ll need it soon.
This step sounds obvious, but trust me, forgetting to preheat is the #1 rookie mistake. Your cookies will spread weird and you’ll be sad. Don’t be sad.
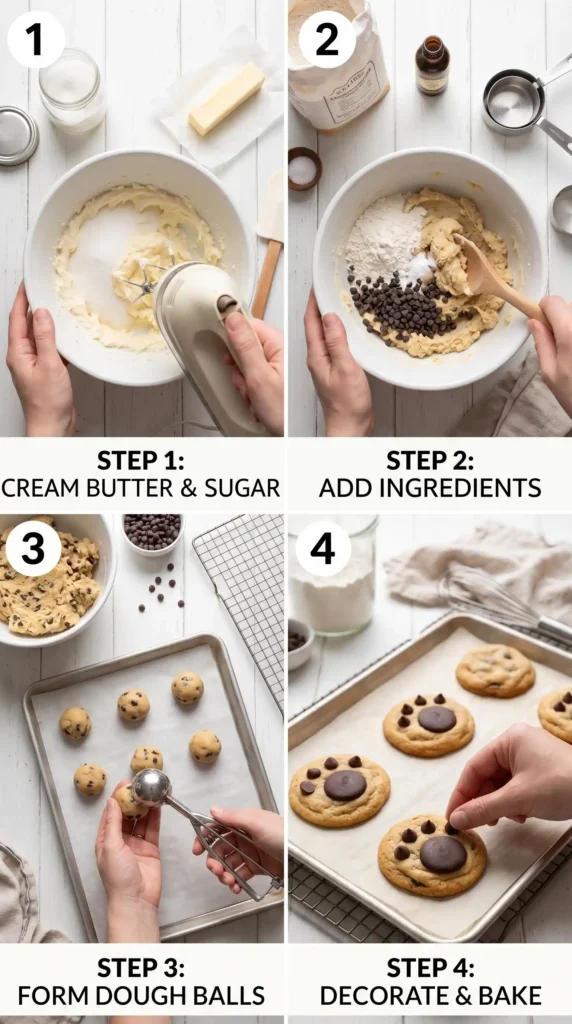
Step 2: Cream the Butter and Sugar
Using your stand mixer (or hand mixer), beat together the 1 cup of softened butter and 1 cup of sugar until the mixture looks light, fluffy, and pale — almost like whipped cream. This usually takes about 2–3 minutes on medium speed.
Why does this matter? Creaming incorporates air into the dough, which gives your cookies a soft, tender texture rather than a dense, flat disappointment. Don’t rush this step.
Step 3: Add the Egg and Vanilla
Once your butter and sugar are beautifully creamed, add in 1 egg and 1 teaspoon of vanilla extract. Beat the mixture again until everything combines smoothly. You want a uniform, slightly glossy batter at this stage.
Scrape down the sides of the bowl with a spatula if needed. Bits of unmixed butter hiding in the corners will mess with your final texture.
Step 4: Add the Dry Ingredients
Now comes the flour part. Add in the 2 cups of flour, 1 tsp of baking powder, 1/2 tsp of baking soda, and 1/4 tsp of salt all at once. Beat on low speed first so you don’t coat your kitchen in a flour cloud — ask me how I know this matters
Keep mixing until a soft, slightly sticky dough forms. It should hold its shape when you scoop it but still feel pillowy and soft. If it’s crumbling, your butter might not have been soft enough. If it’s too sticky, refrigerate for 10–15 minutes.
Step 5: Scoop and Roll the Dough
Using a small ice cream scoop, portion out the dough and roll each piece into a smooth ball between your palms. You’re aiming for balls roughly the size of a large grape — about 1 to 1.5 inches in diameter.
Want a little extra sweetness and a slight crunch on the outside? Roll the dough balls in granulated sugar before placing them on the sheet. It’s optional, but honestly, why wouldn’t you? It adds a gorgeous sparkle to the finished cookie too.
Step 6: Bake Them
Place the dough balls on your prepared cookie sheet, spacing them at least 2 inches apart. They’ll spread as they bake, and you don’t want them merging into one giant blob (though honestly, that sounds kind of amazing too).
Slide the tray into your preheated oven and bake for 9 to 12 minutes. Every oven runs a little differently, so start checking at 9 minutes. You’re looking for edges that are just barely set and a center that still looks slightly underdone. That’s the sweet spot. They’ll firm up as they cool.
Step 7: Add the Paw Details — This Is the Fun Part
Once you pull the cookies from the oven, work quickly but carefully. While the cookies are still warm and soft, press one Ghirardelli dark chocolate melting wafer directly into the center of each cookie. This becomes the large pad of the bear paw.
Then, place 3 semi-sweet chocolate chips in a row just above the melting wafer. These are your toe pads (or claws, if you’re into that vibe). Press them in gently so they stick without sinking too deep.
FYI — the heat from the fresh cookies will slightly melt the bottom of the chocolates, helping them bond to the surface. Don’t wait too long after pulling them from the oven or the cookies will cool and harden before the chocolate can adhere properly.
Step 8: Let Them Cool
Once every cookie has its paw print design, transfer them to a wire cooling rack. Let them rest for about 30 minutes before eating. I know. It’s torture. But rushing this step means the chocolate can smear and the cookies can crumble.
Use that time to clean up, make tea, or just stare longingly at the cooling rack. No judgment.
Tips for the Best Bear Paw Cookies
A few things I’ve learned from making these more times than I’d like to admit:
- Use softened butter, not melted. Melted butter makes flat, greasy cookies. Softened means it holds its shape but dents easily when you press a finger into it.
- Don’t overbake. Pull them when the centers still look slightly underdone. They finish cooking on the hot pan.
- Roll in sugar for extra crunch. It’s optional, but it elevates the texture noticeably.
- Work fast with the chocolate. Once the cookies start cooling, the wafers won’t stick as well.
- Ghirardelli wafers are worth it. Generic melting wafers can taste waxy. The Ghirardelli ones are noticeably better in flavor.
How to Store Bear Paw Cookies
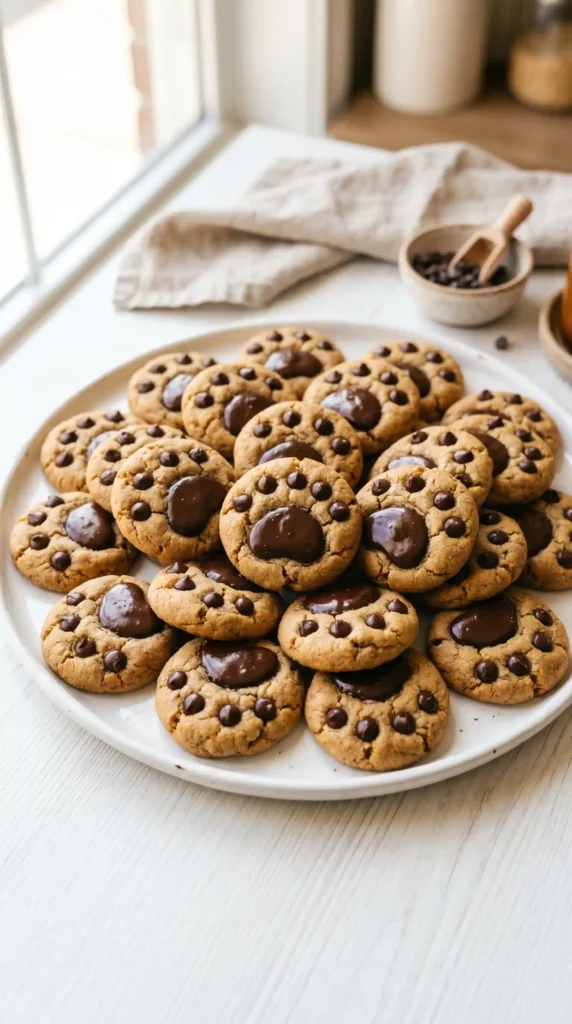
Once fully cooled, store your Bear Paw Cookies in an airtight container at room temperature for up to 5 days. They stay soft and chewy — sometimes even better on day two once the flavors have settled.
You can also freeze the baked cookies for up to 2 months. Lay them flat on a baking sheet first, freeze until solid, then transfer to a freezer bag. Thaw at room temperature for an hour before serving.
Can You Make the Dough Ahead?
Absolutely. Roll the dough into balls, place them on a parchment-lined tray, and freeze until solid. Then transfer to a freezer bag and store for up to 3 months. Bake straight from frozen — just add 2–3 extra minutes to the bake time.
This is a great strategy for holiday baking when you want fresh cookies without spending hours in the kitchen every single day.
Frequently Asked Questions
Can I use salted butter instead of unsalted? Yes, but reduce the added salt to a tiny pinch. Salted butter varies by brand, so unsalted gives you more control over the final flavor.
My chocolate wafers slid off the cookies — what went wrong? You likely waited too long to press them in. Add the chocolate while the cookies are still warm from the oven. The residual heat helps everything bond together properly.
Can I make these without a stand mixer? Totally. A hand mixer works perfectly. You can even mix by hand if your butter is genuinely soft, though it takes a bit more elbow grease.
Can I use milk chocolate instead of dark chocolate for the paw pad? Yes! Milk chocolate works great if you prefer a sweeter flavor. White chocolate is also fun and gives a striking visual contrast against the golden cookie.
Why did my cookies spread too much and go flat? A few possible reasons: your butter was too soft (almost melted), your dough was too warm, or your baking sheet was too hot from a previous batch. Try chilling the dough balls for 15–20 minutes before baking if you notice this happening.
Final Thoughts
Bear Paw Cookies are one of those rare recipes that check every box — they’re easy, they look impressive, and they taste genuinely delicious. Whether you’re baking for a crowd or just want something fun to make on a lazy afternoon, these deliver every time.
Now go make a batch. And maybe make two — because one is never enough.

Bear Paw Cookies
Ingredients
Method
- Preheat the oven to 350 degrees Fahrenheit. Line a cookie sheet with parchment paper or a silicone baking mat.
- Using a stand or hand mixer, cream together the softened butter and sugar until light and fluffy, about 2–3 minutes.
- Add the egg and vanilla extract, and mix until well combined and glossy.
- Gradually mix in the flour, baking powder, baking soda, and salt, initially on low speed to avoid a flour cloud. Mix until a soft dough forms.
- Scoop the dough into balls (1-1.5 inches) and roll in granulated sugar if desired.
- Place the dough balls on the prepared cookie sheet, spacing them at least 2 inches apart.
- Bake for 9-12 minutes, checking at 9 minutes. They should be barely set at the edges.
- While cookies are still warm, press one melting wafer into the center of each cookie.
- Place 3 semi-sweet chocolate chips above the wafer to represent the paw toes.
- Transfer cookies to a wire cooling rack and let cool for about 30 minutes.


