
Birria tacos have gone from a regional Mexican treasure to a global obsession in a remarkably short time. If you have tasted them, you understand why. If you have not — prepare yourself. We are talking about deeply spiced, slow-braised beef tucked into a tortilla that has been dipped in a rich chile consommé and fried until the edges are crispy, the cheese is melted, and the whole thing is so extraordinarily good that eating quietly becomes nearly impossible.
I spent an entire Saturday making Authentic Mexican Birria Tacos for the first time and questioned everything around the two-hour mark. Then I tasted the consommé at hour three and all questioning stopped permanently. Some recipes require time and every second of that time pays off in the final product. This is one of them.
Have you ever made something at home that genuinely rivalled anything you had paid good money for at a restaurant? That is the outcome this recipe consistently produces. Let us build it step by step, without shortcuts.
What Is Birria and Why Does Everyone Obsess Over It?
Birria originates from Jalisco, Mexico, where it was traditionally made with goat slow-cooked in a complex chile and spice adobo. Over generations, beef became the more common protein outside Mexico, and the taco format — dipping tortillas in the consommé before crisping them — emerged from border cities and Mexican-American communities in California before conquering every food scene globally.
The defining characteristic of birria is the consommé — the braising liquid that doubles as the dipping sauce. It starts as beef broth and transforms over hours into something deeply coloured, rich with rendered fat, and carrying every flavour note from the beef, dried chiles, spices, and charred aromatics. Nothing store-bought, nothing from a packet. Just time and technique producing something remarkable.
The consommé is genuinely the soul of the dish. The tacos are spectacular, but that bowl of hot, spiced, beef-fat-rich dipping broth on the side is what makes eating birria a full experience rather than just an excellent taco. IMO, any version that skips or abbreviates the consommé is missing the point entirely. 🙂
What You Need to Make Them
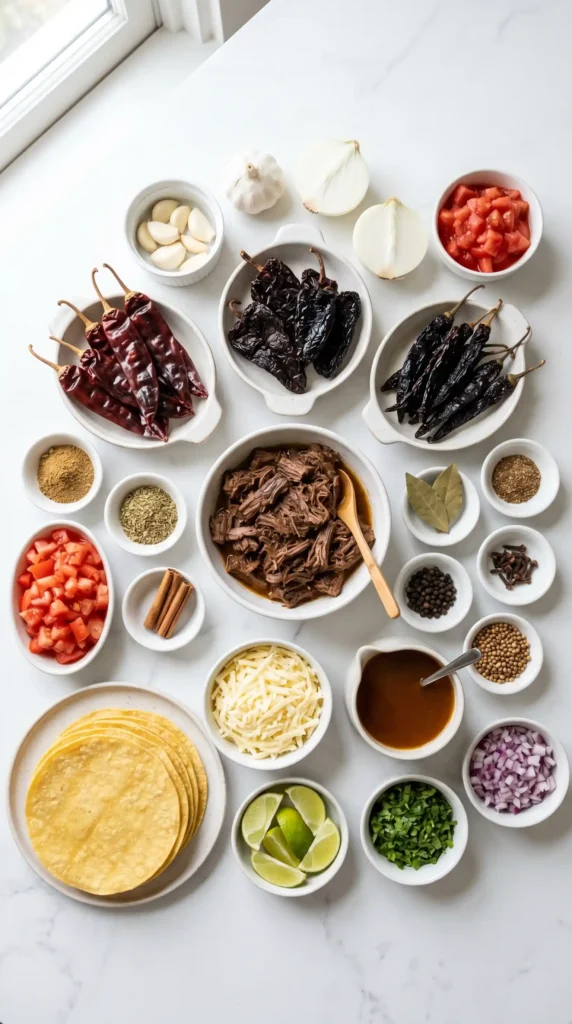
The dried chiles are the most critical ingredient in this recipe. They give birria its colour, its depth, and its complexity. Find them at any Latin grocery store, in the international aisle of most well-stocked supermarkets, or online. Do not substitute fresh chiles or chilli powder — dried whole chiles produce a depth that no substitute can replicate. Each variety contributes a specific note to the overall adobo.
For the Beef
- 1.5 kg (about 3.3 lbs) beef chuck roast, cut into large 8–10cm chunks
- 500g (about 1 lb) bone-in beef short ribs (optional but adds extraordinary depth to the consommé)
- 2 teaspoons salt + 1 teaspoon black pepper (for seasoning before searing)
- 2 tablespoons neutral oil (for searing)
For the Chile Adobo
- 5 dried guajillo chiles, stems and seeds removed
- 3 dried ancho chiles, stems and seeds removed
- 2 dried chiles de árbol (adjust for heat — add more for spicier birria)
- 1 dried pasilla chile, stem and seeds removed
- 4 cups (960ml) hot beef broth (for soaking the chiles)
Now For the Braising Liquid and Aromatics
- 1 medium white onion, quartered
- 8 garlic cloves, peeled
- 4 plum tomatoes, quartered (or one 400g can of whole tomatoes)
- 2 tablespoons apple cider vinegar
- 1 teaspoon ground cumin
- 1 teaspoon dried Mexican oregano
- 1/2 teaspoon ground cinnamon
- 1/4 teaspoon ground cloves
- 1/4 teaspoon black pepper
- 3 dried bay leaves
- 2 tablespoons tomato paste
- 4 cups (960ml) beef broth (for the braise)
- Salt to taste throughout
Now For the Tacos
- 20–24 small corn tortillas (15cm / 6-inch diameter)
- 2 cups (225g) Oaxaca cheese or low-moisture mozzarella, shredded
- Neutral oil or reserved beef fat from the consommé (for crisping the tortillas)
For Serving
- 1 medium white onion, finely diced
- 1 large bunch fresh cilantro, roughly chopped
- 4–6 limes, cut into wedges
- Salsa verde or salsa roja (homemade or store-bought)
- Sliced jalapeños or pickled chiles (optional)
Toast the Dried Chiles Before Soaking — Non-NegotiableBefore soaking the dried chiles, press each one flat against a dry hot skillet for 20–30 seconds per side until slightly pliable and deeply fragrant — you will smell a roasted, smoky aroma. Toasting activates volatile flavour compounds in the chile skin that contribute enormously to the depth of the finished consommé. FYI — do not toast until they blacken. That creates bitterness. Light, quick toasting only. This single step makes a noticeable difference that tasters always notice even if they cannot identify why.
How to Make Authentic Mexican Birria Tacos Step by Step
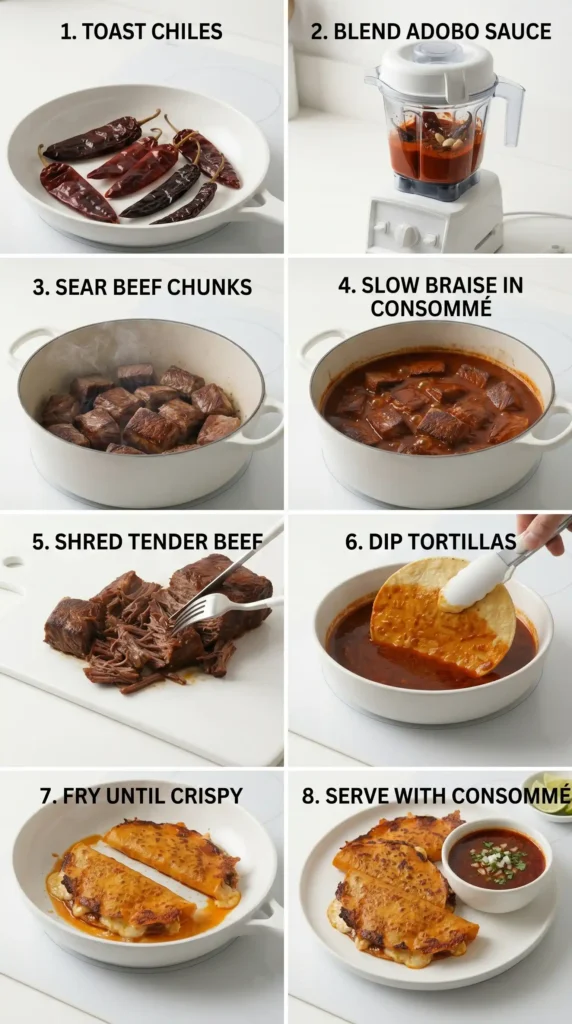
The process divides into four clear stages: prepare and blend the chile adobo, sear and braise the beef, shred and strain, then build and crisp the tacos. The braise runs mostly unattended, which means the active work bookends several hours of patience. The patience is not optional. Everything about the quality of the finished dish depends on the time you give the braise. Low and slow is non-negotiable.
Step 1: Birria Tacos and Soak the Dried Chiles
Heat a large dry skillet or comal over medium heat. Working in batches, press each dried chile flat against the hot surface using a spatula and toast for 20–30 seconds per side until the skin darkens slightly, the chile becomes pliable, and the kitchen smells deeply aromatic — earthy, smoky, and slightly sweet. Transfer each toasted chile to a large heatproof bowl.
Pour 4 cups of hot beef broth over all the toasted chiles. Press them down with a small plate so every chile stays fully submerged beneath the liquid. Allow them to soak for 20–25 minutes until completely soft and pliable throughout. Do not discard the soaking liquid. This dark, deeply flavoured broth forms the base of your adobo sauce and carries a significant amount of the finished consommé’s character.
Step 2: Char the Aromatics and Blend the Adobo
In the same dry skillet over medium-high heat, char the quartered white onion, garlic cloves, and quartered tomatoes until dark, blistered spots develop on their surfaces — about 3–4 minutes per side for the onion and 2 minutes for the garlic and tomatoes. The charring introduces a smoky, slightly bitter depth that is a defining characteristic of authentic birria adobo.
Transfer the charred aromatics to a blender. Add the softened soaked chiles and 2 cups of the soaking liquid. Add the apple cider vinegar, cumin, dried Mexican oregano, cinnamon, ground cloves, black pepper, and tomato paste. Blend on high speed for 60–90 seconds until completely smooth — no visible chunks of chile skin, onion, or tomato remaining.
Taste the adobo. It should be bold, earthy, deeply complex, and moderately spiced. This sauce carries the entire flavour identity of the dish, so it needs to taste assertive and well-rounded at this stage. Add salt as needed and blend briefly again. Set the adobo aside while you prepare the beef.
Step 3: Sear the Beef
Season all the beef chuck chunks and short ribs generously on all sides with salt and black pepper. Heat 2 tablespoons of neutral oil in a large Dutch oven or heavy-bottomed pot over medium-high heat until shimmering. Add the beef in batches — never all at once — and sear for 3–4 minutes per side until deeply browned and caramelised on the outer surface.
Work patiently through all the pieces. Crowding the pot drops the temperature and produces steamed, grey meat rather than a properly seared crust. The browned crust adds enormous flavour to the consommé as the braise progresses — unseared beef produces a noticeably thinner, less satisfying result. Do not wipe the pot between batches — all those browned bits release into the braising liquid and add depth.
Step 4: Braise Low and Slow
Return all the seared beef to the pot. Pour the blended chile adobo over the meat, followed by the 4 cups of beef broth. Add the bay leaves. Stir gently to ensure the beef is fully submerged in the braising liquid. Bring the pot to a gentle simmer over medium heat, then reduce to the lowest heat your stove allows. Cover tightly with a lid.
Braise for 3 to 4 hours, checking every 45–60 minutes to ensure the liquid maintains a gentle bubble rather than a vigorous boil. A rolling boil toughens the muscle fibres in the beef and turns the consommé cloudy and less clean-tasting. A barely-there simmer produces meltingly tender beef and a rich, clear, deeply flavoured consommé. Resist every urge to rush this.
If you prefer oven braising, transfer the pot to a 150°C (300°F) oven with the lid on for the same time period. The oven distributes heat more evenly and requires almost no monitoring. Instant Pot users can pressure cook on high for 60–70 minutes with a 20-minute natural release — the time saving is real but the consommé from a long stovetop or oven braise tastes noticeably more developed.
Step 5: Shred the Beef and Strain the Consommé
After 3–4 hours the beef should be completely tender and pull apart with the gentlest pressure from two forks. Remove all the beef pieces and the bay leaves from the pot. Shred the beef using two forks into rough, substantial pieces — not a fine paste. You want recognisable shreds of meat in each taco rather than a homogeneous filling. Season the shredded beef with a tablespoon of consommé and a pinch of salt while still warm.
Strain the remaining consommé through a fine-mesh sieve into a wide, shallow bowl or smaller pot. This removes chile skin fragments, bone pieces, and large spice remnants, leaving a glossy, clean, deeply red-brown liquid. Skim some of the fat that rises to the surface — but save it. That rendered beef fat is what you will use to coat the pan when crisping the tortillas. It gives the tacos their authentic colour and flavour. Keep the consommé warm over low heat throughout the assembly step.
Step 6: Build and Crisp the Tacos-Authentic Mexican Birria Tacos
Heat a comal, cast iron skillet, or large non-stick pan over medium-high heat. Add a thin coat of the skimmed beef fat from the consommé to the pan — this is the traditional approach that gives each taco its deep amber colour and characteristic flavour. Neutral oil works as an alternative if the fat is insufficient.
Dip one corn tortilla into the warm consommé for 2–3 seconds on each side, ensuring it absorbs the dark red-brown liquid and turns a deep rust colour throughout. Lift it out, let the excess drip off for a second, and lay it immediately into the hot fat-coated pan. Scatter a generous pinch of shredded Oaxaca cheese across one half of the tortilla. Spoon a generous portion of the shredded birria beef on top of the cheese on the same half.
Cook the taco for 2–3 minutes without moving it until the bottom looks golden and the edges feel crispy when tapped lightly. Using a spatula, fold the empty cheese-free half of the tortilla over the filled half to create a half-moon shape. Press down gently and cook for another 60 seconds per side until both faces are deeply golden and the cheese has melted completely. Work through all the tacos, keeping the finished ones in a low oven at 95°C (200°F) on a wire rack while you cook the remaining batches.
Consommé Temperature During Assembly Is CriticalThe consommé must stay genuinely hot during the dipping step — not warm, but actively hot. Cold or lukewarm consommé does not penetrate the tortilla properly and the colour transfer is minimal. Keep it at a low simmer in a wide, shallow bowl or small saucepan beside the stove throughout assembly. The dipped tortilla should sizzle the moment it hits the hot fat in the pan — that sizzle tells you both components are at the right temperature.
How to Serve Birria Tacos the Right Way
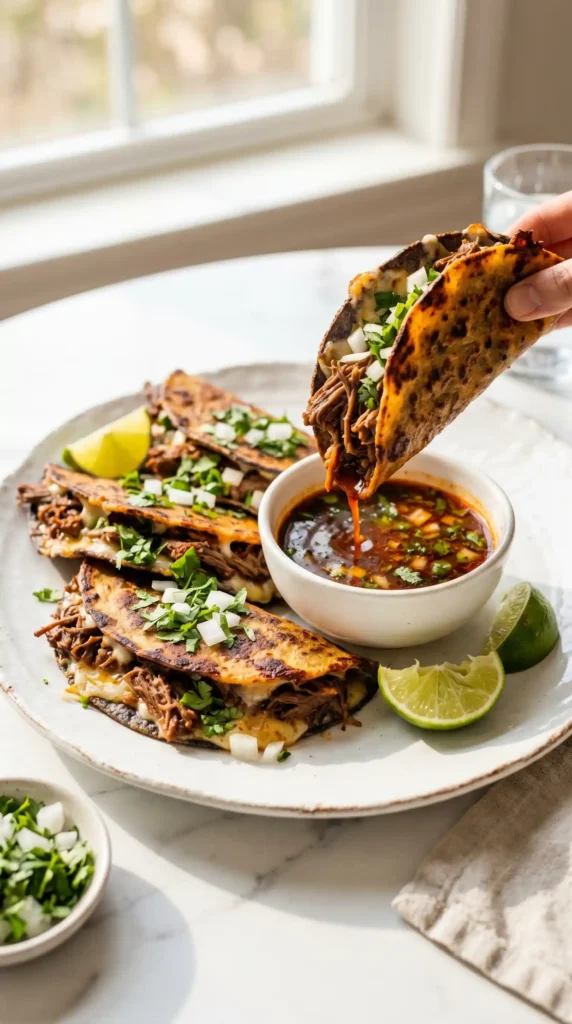
Authentic birria taco service is communal. Arrange the crispy filled tacos on a large plate or board. Fill a wide bowl or mug with hot consommé for every person at the table — this is non-negotiable. Set out the finely diced white onion, the fresh cilantro, lime wedges, salsa, and any additional chiles. Each person builds their own bite, dips the taco into the consommé between bites, and adds as much or as little of the toppings as they prefer.
The dipping is the experience. A birria taco eaten without the consommé is a good taco. A birria taco dipped into hot consommé between each bite is the full, original, intended experience — layers of flavour building with every mouthful. Do not skip the consommé serving step and do not let anyone at your table ignore it. It is genuinely the point.
Storage and Make-Ahead Tips
Birria is an exceptional make-ahead dish. The shredded beef and consommé both keep covered in the refrigerator for up to 4 days and actually taste better on day two as the flavours deepen and meld further. Reheat the consommé gently on the stovetop and warm the shredded beef in a skillet with a splash of consommé before building the tacos fresh. The assembled and crisped tacos do not store well — always build and crisp fresh.
Both the shredded birria beef and the consommé freeze well for up to 3 months. Store them in separate airtight containers or zip-lock bags. Thaw overnight in the fridge and reheat as described. Having frozen birria portions in your freezer means you are less than 30 minutes from extraordinary tacos at any point. That is a genuinely useful position to be in.
Frequently Asked Questions
What cut of beef works best for authentic birria tacos?
Beef chuck roast is the most widely used and accessible choice — its high collagen content breaks down during the long braise into gelatine, which gives the consommé its rich, slightly silky body. Bone-in beef short ribs added to the pot alongside the chuck produce an even more deeply flavoured consommé because the marrow and connective tissue contribute significantly during the long cook. Brisket works well as a substitute or addition. Avoid lean cuts like sirloin, which become dry and stringy rather than tender and juicy during prolonged braising.
Can I make birria tacos with chicken instead of beef?
Yes. Use bone-in chicken thighs for the best flavour and moisture — about 1.5 kg total. Reduce the braising time significantly to 1.5–2 hours, since chicken breaks down much faster than beef. The adobo sauce stays identical. The consommé will be lighter in body and colour than the beef version, but the flavour profile stays recognisably birria. Chicken birria tacos are a genuinely excellent option and crisp up equally well in the pan.
What can I substitute for Oaxaca cheese?
Low-moisture mozzarella is the most accessible and best-performing substitute — it melts similarly to Oaxaca, pulls in a comparable way, and does not release excessive moisture that would prevent the tortilla from crisping. Monterey Jack also melts well and has a mild flavour that does not compete with the spiced birria filling. Avoid aged or sharp cheeses that do not melt smoothly, and avoid fresh mozzarella, which contains too much water and makes the tortilla soggy rather than crispy.
Why are my tortillas falling apart when I dip them in the consommé?
This happens when the tortillas are cold and brittle before dipping. Warm your corn tortillas before dipping — either in a dry skillet for 20 seconds per side or wrapped in damp paper towels in the microwave for 45–60 seconds. Warm, pliable tortillas absorb the consommé and fold without cracking. Also ensure you dip briefly — 2–3 seconds per side is sufficient. Over-soaking makes the tortilla too saturated and structurally weak before it hits the pan.
Can I use a slow cooker or Instant Pot for birria?
Both work. For a slow cooker, complete the searing and adobo blending steps first, then transfer everything to the slow cooker and cook on low for 8–10 hours or high for 5–6 hours. For an Instant Pot, pressure cook on high for 60–70 minutes after completing the searing and adobo steps, then allow a natural pressure release of at least 20 minutes. The stovetop and oven methods produce the richest, most developed consommé, but both appliance methods deliver excellent birria with significantly less active monitoring.
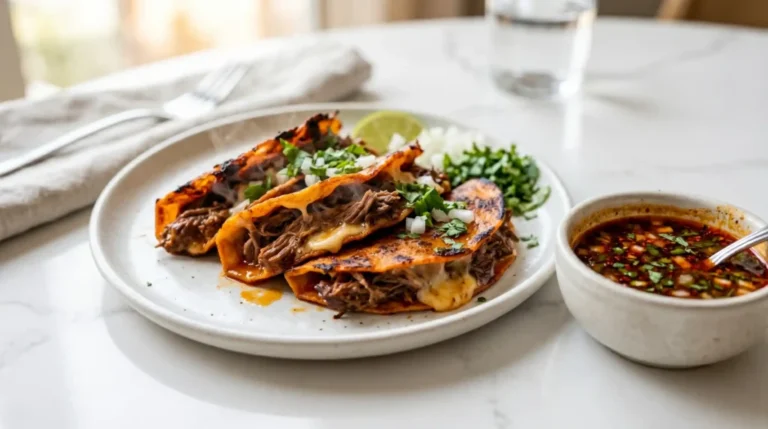
Final Thoughts
These Authentic Mexican Birria Tacos deserve every minute you give them. The deeply spiced braised beef, the extraordinary consommé, the crispy cheese-edged dipped tortilla — every element works in harmony to create something that genuinely earns the word legendary. This is not a Tuesday-night dinner. This is a weekend project that rewards patience with a result nobody at your table will stop talking about.
The consommé is the soul. The beef is the substance. The crispy dip-fried tortilla is the vehicle. Together they produce a taco experience that is worth every hour of the braise, every chile you sourced, and every moment of restraint it takes not to rush the low-and-slow cooking process.
Start the braise early in the morning. Let it do its work all day. Build the tacos in the evening. And serve that consommé hot in a bowl beside every plate — because that is how birria is meant to be eaten, and that is exactly how good it is.
Authentic Mexican Birria Tacos
Ingredients
Method
- Toast the dried chiles flat against a dry hot skillet for 20–30 seconds per side until fragrant.
- Soak the toasted chiles in 4 cups of hot beef broth for 20–25 minutes until soft.
- Char the onion, garlic, and tomatoes in the same skillet until blistered.
- Transfer charred aromatics to a blender, add softened chiles, soaking liquid, vinegar, spices, and blend until smooth.
- Season beef with salt and pepper, then sear in a Dutch oven until browned.
- Add blended adobo, beef broth, and bay leaves; bring to a simmer and braise for 3 to 4 hours.
- Shred the beef and strain the consommé, saving the fat for frying.
- Build tacos with tortillas, cheese, and shredded beef, then crisp in the hot pan.


