
Servings: 8 to 10 | Prep Time: 30 minutes | Cook Time: 30 minutes | Chill Time: 2 hours | Total Time: 3 hours
Pancake Crepe Cake Strawberry-You know that moment when you set something on the table and the whole room goes quiet? That is exactly what happens every single time I bring out a Pancake Crepe Cake Strawberry. It looks like you spent your entire day in the kitchen. You did not. And that little secret stays between us.
I first made this for a birthday when I wanted something that felt special without requiring actual pastry school skills. The result was a towering stack of paper-thin crepes layered with whipped cream and fresh strawberries — elegant on the outside, ridiculously simple on the inside.
Whether you are making this for a celebration, a weekend brunch, or just because strawberries are in season and you want to do something memorable with them — this recipe is the one. Let me walk you through every detail.
What Is a Pancake Crepe Cake With Strawberry?
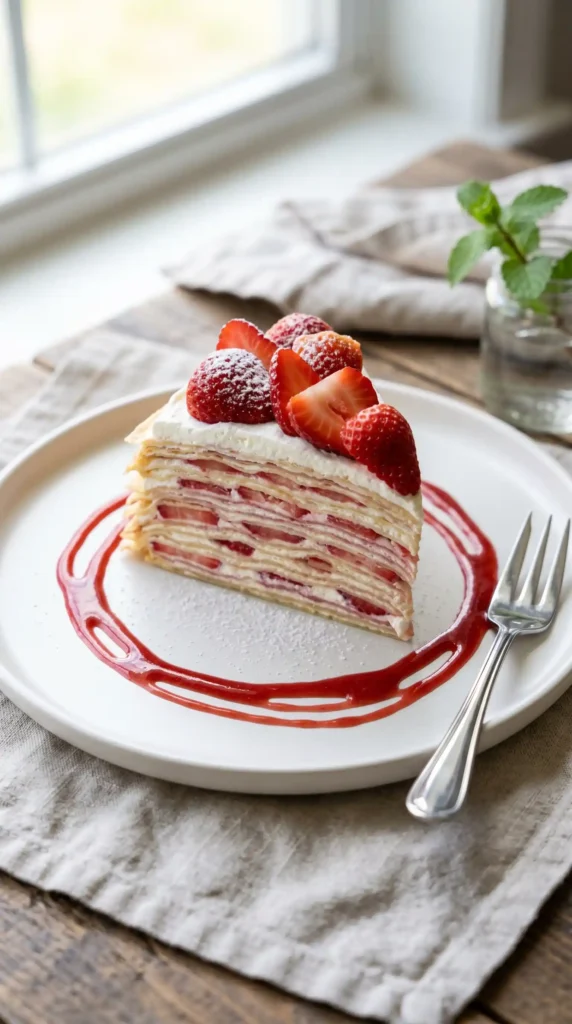
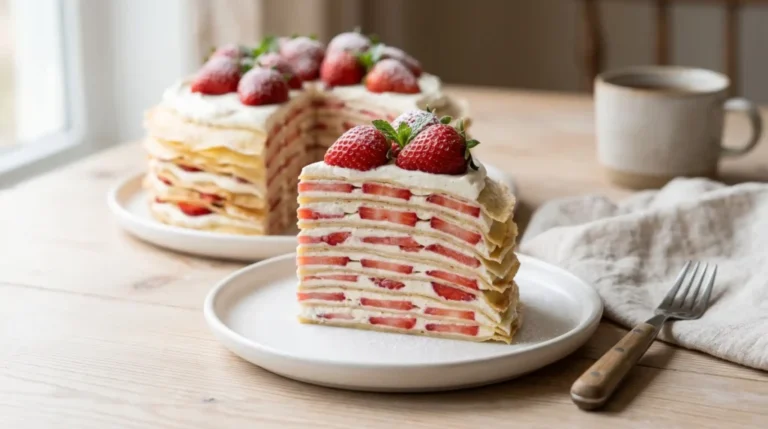
A crepe cake — sometimes called a mille crepe — is exactly what it sounds like: dozens of thin crepes stacked together with a creamy filling between each layer. Slice through it and you see all those gorgeous layers, each one separated by whipped cream and strawberries. It is a showstopper.
Unlike a traditional layer cake, this dessert requires no baking, no frosting skills, and no special equipment beyond a flat pan and a spatula. The magic is all in the assembly. Each layer is so thin that 15 to 20 crepes stack up into a cake that slices cleanly and looks genuinely impressive.
The strawberry filling adds freshness and a slight tartness that balances the sweet cream perfectly. FYI, this is one of those desserts that tastes even better on day two after the cream has had time to soften all the crepe layers into something almost mousse-like. Almost too good.
Ingredients You Will Need-Pancake Crepe Cake Strawberry
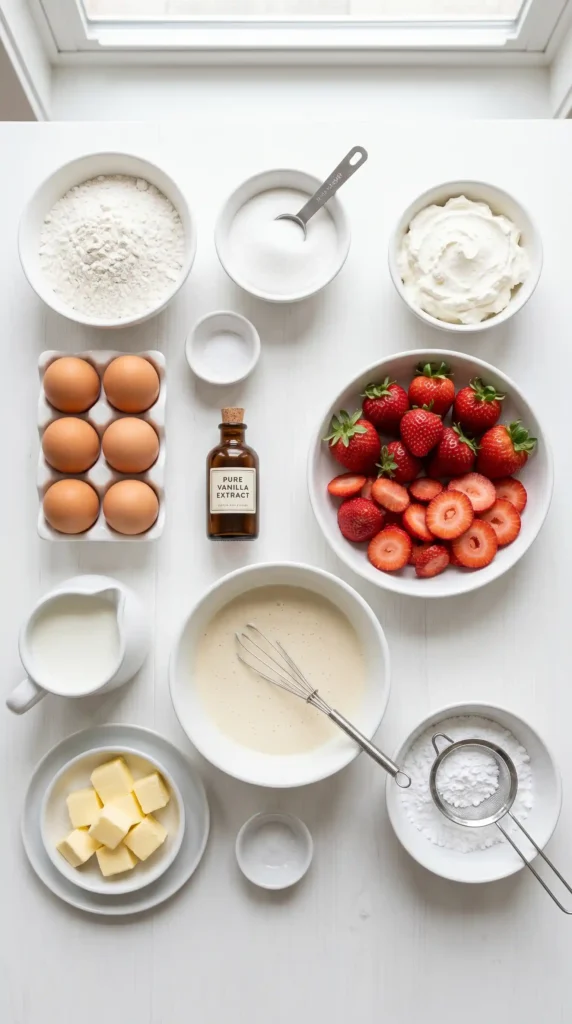
Here is everything you need to make a Pancake Crepe Cake Strawberry for 8 to 10 servings:
For the Crepe Batter
- 2 cups (240g) all-purpose flour
- 3 cups (720ml) whole milk, at room temperature
- 4 large eggs, at room temperature
- 3 tablespoons unsalted butter, melted and slightly cooled
- 2 tablespoons granulated sugar
- 1 teaspoon pure vanilla extract
- 1/4 teaspoon salt
- Extra butter or neutral oil for greasing the pan
For the Strawberry Whipped Cream Filling
- 2 cups (480ml) heavy whipping cream, very cold
- 1/3 cup (40g) powdered sugar, sifted
- 1 teaspoon pure vanilla extract
- 1 lb (450g) fresh strawberries, hulled and thinly sliced
- 2 tablespoons granulated sugar (for macerating the strawberries)
For Decoration
- 6 to 8 whole fresh strawberries, for the top
- 2 tablespoons powdered sugar, for dusting
- Fresh mint leaves (optional, for garnish)
Why This Strawberry Crepe Cake Works So Well
Have you ever wondered why crepe cakes look so much more impressive than they are to make? The thin layers do all the visual work for you. Each crepe is so delicate that stacking 15 to 20 of them creates a cake with real height and that iconic striped cross-section everyone wants to photograph.
The macerated strawberries are a key detail most people overlook. Tossing sliced strawberries with a little sugar and letting them sit for 20 minutes draws out their natural juices and intensifies the flavor. Those softened, slightly syrupy strawberries nestle into the whipped cream between each layer and add a burst of real fruit flavor in every bite.
The whipped cream filling is simple but important to get right. Heavy cream whipped to stiff peaks holds its shape between layers without collapsing or leaking. It also softens the crepes slightly over time, creating that melt-in-your-mouth texture that makes this cake genuinely addictive.
How to Make Pancake Crepe Cake Strawberry
This recipe has a few stages, but none of them are difficult. Take each step at your own pace and the whole thing comes together beautifully. Here is how to do it.
Step 1: Make the Crepe Batter
Add the flour, eggs, milk, melted butter, sugar, vanilla extract, and salt to a blender. Blend on medium speed for about 30 seconds until everything is fully combined and the batter looks completely smooth with no lumps. A blender is the easiest method because it incorporates the flour without overmixing, which can make crepes tough.
If you do not have a blender, whisk the eggs and milk together first in a large bowl, then gradually add the flour while whisking constantly to avoid lumps. Stir in the melted butter, sugar, vanilla, and salt at the end.
Once the batter is smooth, pour it into a bowl or jug, cover with plastic wrap, and refrigerate for at least 30 minutes. This resting period allows the flour to fully hydrate and the gluten to relax, which gives you crepes that are more tender, more flexible, and less likely to tear when you flip them. Do not skip this rest.
Step 2: Macerate the Strawberries
While your batter rests, prepare the strawberries. Hull all your strawberries and slice them as thinly and evenly as you can — aim for slices about 2 to 3 millimeters thick. Thin slices layer more neatly between the crepes and give a more uniform texture throughout the cake.
Place the sliced strawberries in a bowl and sprinkle 2 tablespoons of granulated sugar over them. Toss gently to coat every slice. Let the bowl sit at room temperature for 20 to 30 minutes. The sugar draws moisture out of the berries, creating a light syrup and intensifying the strawberry flavor significantly. Stir once or twice during this time.
After maceration, drain any excess liquid from the strawberries by tipping the bowl and spooning off the syrup, or using a slotted spoon to lift the berries out. Too much liquid between the cream layers will make the cake unstable. Save the syrup — you can drizzle it over the finished cake or stir it into a drink. Nothing goes to waste.
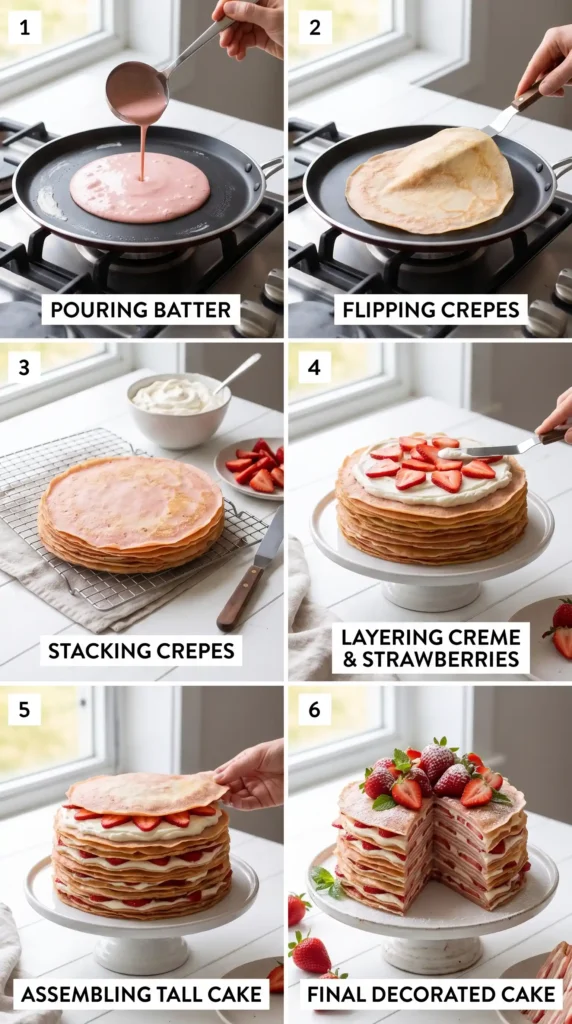
Step 3: Cook the Crepes
Pull your batter out of the refrigerator and give it a gentle stir. Heat a non-stick skillet or crepe pan (8 to 10 inches works best) over medium heat. Add a tiny amount of butter or neutral oil and swirl it to coat the entire surface. The pan needs to be hot enough that a drop of water sizzles immediately — but not so hot that the crepe browns before you can spread it.
Pour about 3 to 4 tablespoons of batter into the center of the pan. Immediately lift the pan off the heat and tilt it in a circular motion so the batter spreads into a thin, even circle that covers the entire base. Work quickly — the batter sets fast. If there are any gaps or thin spots, you can tilt a little more to fill them in.
Cook the crepe for about 60 to 90 seconds until the edges look set and slightly dry, and the surface of the crepe looks matte rather than shiny and wet. At that point, use a thin spatula to gently loosen the edges and flip the crepe in one confident motion. Cook the second side for just 30 seconds — it will not color as evenly as the first side, and that is completely normal.
Slide the finished crepe onto a plate and repeat with the remaining batter, greasing the pan lightly before each crepe. Stack the cooked crepes on the plate as you go — they will not stick together. Aim for 16 to 20 crepes total. Let them cool completely to room temperature before assembling the cake.
Step 4: Whip the Cream
Pour the cold heavy whipping cream into a large, clean bowl. Add the powdered sugar and vanilla extract. Using an electric hand mixer or a stand mixer fitted with the whisk attachment, beat the cream on medium-high speed. Start on low for the first 30 seconds to avoid splashing, then increase the speed.
Whip until the cream forms stiff peaks — meaning when you lift the beaters, the cream holds a firm point that does not droop or fall over. This takes about 3 to 4 minutes depending on your mixer and the temperature of the cream. Cold cream whips faster and holds better, so make sure it comes straight from the refrigerator.
Do not overwhip. If the cream starts to look grainy or curdled, you have gone too far and it will not spread smoothly between the layers. Stop as soon as you reach stiff peaks and use it right away or refrigerate until needed.
Step 5: Assemble the Cake
Choose a flat serving plate or a cake board for assembly. Place your first crepe flat in the center of the plate. Spread a thin, even layer of whipped cream over the entire surface of the crepe using a small offset spatula or the back of a spoon. Aim for about 2 to 3 tablespoons of cream per layer — enough to cover the crepe but not so thick that the layers become unstable.
Scatter a single layer of macerated strawberry slices evenly over the cream. Spread them right to the edges so every slice of cake gets strawberry flavor throughout. Then place the next crepe gently on top, pressing very lightly to level it. Repeat this process — crepe, cream, strawberries — until you have used all your crepes.
For the final top layer, place a crepe on top and spread a slightly more generous layer of cream across the surface. Arrange your whole fresh strawberries decoratively on top, dust lightly with powdered sugar, and add fresh mint leaves if you are using them. The top is what everyone sees first, so take a moment to make it look beautiful.
Step 6: Chill the Cake
This step is non-negotiable. Once assembled, cover the cake loosely with plastic wrap and refrigerate for at least 2 hours before serving. IMO, overnight chilling is even better. The cold sets the cream, firms up the layers, and allows the crepes to absorb just enough moisture from the cream and strawberries to become soft and cohesive.
A properly chilled crepe cake slices cleanly with a sharp knife, revealing those gorgeous even layers. A warm or under-chilled cake will slide and lean when you cut it — and nobody wants that after all this effort. Patience at this stage pays off completely.
Tips for a Perfect Strawberry Crepe Cake
- Rest your batter. Thirty minutes minimum in the fridge makes crepes tender and easy to flip.
- Keep the pan consistently hot. Temperature inconsistency causes uneven browning and tearing.
- Cool crepes completely. Assembling with warm crepes melts the cream and makes the cake unstable.
- Use cold cream. Warm cream will not whip to stiff peaks. Cold cream is essential.
- Drain the strawberries. Excess syrup between layers makes the cake watery and hard to slice.
- Chill before serving. Two hours minimum. Overnight is ideal for the cleanest slices.
- Use a sharp knife. Run your knife under hot water, wipe dry, and slice in one smooth motion for clean layers.
Fun Variations to Try
- Mixed Berry Version: Use a combination of sliced strawberries, raspberries, and blueberries between layers for a vibrant berry medley.
- Chocolate Crepe Cake: Add 2 tablespoons of cocoa powder to the crepe batter and fill with chocolate whipped cream and strawberries.
- Lemon Cream Version: Add 1 teaspoon of lemon zest and 1 tablespoon of lemon juice to the whipped cream for a bright, citrusy twist.
- Mascarpone Filling: Fold 1/2 cup of softened mascarpone into the whipped cream for a richer, more stable filling.
- Nutella Layer: Spread a thin layer of Nutella under the whipped cream on every other layer for a hazelnut-chocolate surprise.
How to Serve and Present the Cake
Always slice this cake with a sharp knife that you run under hot water and wipe dry before each cut. This technique melts through the cream cleanly and gives you beautiful slices that show off every layer. A dull or cold knife drags and compresses the layers.
Serve each slice on a chilled dessert plate. A small spoonful of the reserved strawberry syrup drizzled around the plate makes a gorgeous presentation with almost zero extra effort. Pair it with a cup of tea, a glass of champagne, or honestly just eat it as-is because it needs nothing else.
Storage Tips
Store the assembled cake covered in the refrigerator for up to 3 days. The crepes continue to soften over time, which many people actually prefer — the texture on day two is incredibly tender. Cover tightly with plastic wrap so the cream does not absorb any fridge odors.
This cake does not freeze well — the cream and strawberries lose their texture after thawing. Make it fresh within 3 days of serving for the best experience. You can, however, make the crepes up to 2 days in advance and store them stacked between sheets of parchment paper in the fridge, then assemble the day before serving.
Frequently Asked Questions
How many crepes do I need for a tall crepe cake?
Aim for 16 to 20 crepes for a well-stacked cake with good height. Fewer than 15 crepes will give you a flat result that does not have the dramatic layered effect. If your batter makes more than 20, you can always save extras to eat on the side — no one will complain.
Why do my crepes keep tearing when I flip them?
Usually two things cause this: the batter did not rest long enough, or the pan was too hot. Resting allows the gluten to relax, making crepes flexible instead of brittle. Also check that you are spreading the batter thin enough — a thick crepe is harder to flip cleanly than a thin one.
Can I make this cake a day ahead?
Yes, and it actually improves overnight. The cream softens the crepe layers into something wonderfully tender. Assemble the full cake, cover it loosely with plastic wrap, and refrigerate overnight. Decorate the top with fresh strawberries right before serving for the best presentation and the freshest look.
Can I use frozen strawberries?
Fresh strawberries work much better here. Frozen strawberries release a lot of water as they thaw, which makes the filling watery and the layers unstable. If you absolutely need to use frozen, thaw them fully, drain them extremely well, and pat them dry before using. Expect a softer texture and less visual appeal compared to fresh.
My whipped cream is not holding its shape between layers. What went wrong?
The most common reason is that the cream was not cold enough before whipping. Warm cream does not whip to stiff peaks reliably. Make sure the cream comes straight from the refrigerator and that your bowl and beaters are cold too. If the cream still collapses, fold in 1 tablespoon of sifted powdered sugar more and briefly re-whip.
Final Thoughts
A Pancake Crepe Cake Strawberry is one of those recipes that genuinely earns every bit of attention it gets. The layers, the cream, the fresh strawberries — everything works together to create something that feels special and celebratory without asking too much from you in the kitchen.
Once you make it the first time and see how straightforward the process actually is, you will wonder why you saved it only for special occasions. Spoiler: you should not. This cake works on a random Saturday just as much as it does for a birthday or anniversary.
So go ahead, buy those strawberries, rest that batter, and stack those crepes. Your future self holding a beautiful slice of this cake will have absolutely zero regrets.
Pancake Crepe Cake Strawberry
Ingredients
Method
- Add the flour, eggs, milk, melted butter, sugar, vanilla extract, and salt to a blender and blend on medium speed for about 30 seconds until smooth.
- Refrigerate the batter for at least 30 minutes.
- Hull and slice the strawberries thinly.
- Sprinkle 2 tablespoons of granulated sugar over the strawberries and let sit for 20 minutes.
- Drain excess syrup to avoid making the cake unstable.
- Heat a non-stick skillet over medium heat and grease lightly.
- Pour 3 to 4 tablespoons of batter into the center, tilt to spread into a thin layer and cook for 60 to 90 seconds.
- Flip and cook the second side for 30 seconds.
- Repeat until all batter is used, aiming for 16 to 20 crepes.
- Allow to cool completely before assembling.
- In a large bowl, beat the cold heavy cream with powdered sugar and vanilla until stiff peaks form.
- Be careful not to overwhip.
- Place the first crepe on a plate, spread a layer of whipped cream, and top with macerated strawberries.
- Repeat layering process until all crepes are used, finishing with a crepe on top.
- Decorate with whole strawberries and dust with powdered sugar.
- Cover loosely with plastic wrap and refrigerate for at least 2 hours before serving.


